Page Table of Contents
Reviews and Awards
Overview
Users can save essential items like pictures, contacts, calendars, movies, mail, and more with the help of iCloud, as it is a cloud storage service. Users of iCloud get remote access to their stored files anytime and from any location. It is an excellent alternative for keeping data backups and clearing off disk space on your local storage.

You may use iCloud for Windows to access your photos, movies, calendar, files, and other crucial data on your Windows PC after configuring iCloud on an iPhone, iPad, iPod touch, or Mac.
To make room on your iCloud account, you might choose to transfer iCloud files to your PC. Only important files should be stored there because iCloud only offers 5GB of free storage. Moving files from your iCloud account to your PC is another incentive to create data backups in case of data loss.
Easy Way to Move iCloud to Another Computer
Your iCloud account data can be transferred to another PC easily, that too without data loss. The powerful tool that can help you transfer iCloud to a new PC is EaseUS Todo PCTrans. To begin, you must install the program on both PCs.
EaseUS Todo PCTrans enables you to move additional personal data and PC settings to a new computer besides iCloud data. You can easily transfer large files or apps, without having to worry that the size may hinder the transfer process.
Features
- It saves time and energy by copying and pasting files onto a new PC.
- Transfers all sorts of files to a new PC, including programs, software, applications, or games.
- No data loss and no false operation would occur.
- Support for transferring files without the network.
- Compatible with Windows 11/10/8/7.
Functions
- It enables rapid migration of apps and settings to a new PC.
- The tool can easily recover data from a non-bootable or dead computer.
- Anyone without prior technical knowledge can easily use and transfer data.
There are some steps to show you how EaseUS Todo PCTrans move iCloud to another computer.
Step 1. Open EaseUS Todo PCTrans on both of your computers. Choose "PC to PC" to go to the next step.
Step 2. Make sure you have chosen the right transfer direction.
"New" - Move data from old computer to current new computer.
"Old" - Move data from current old n computer to remote new computer.
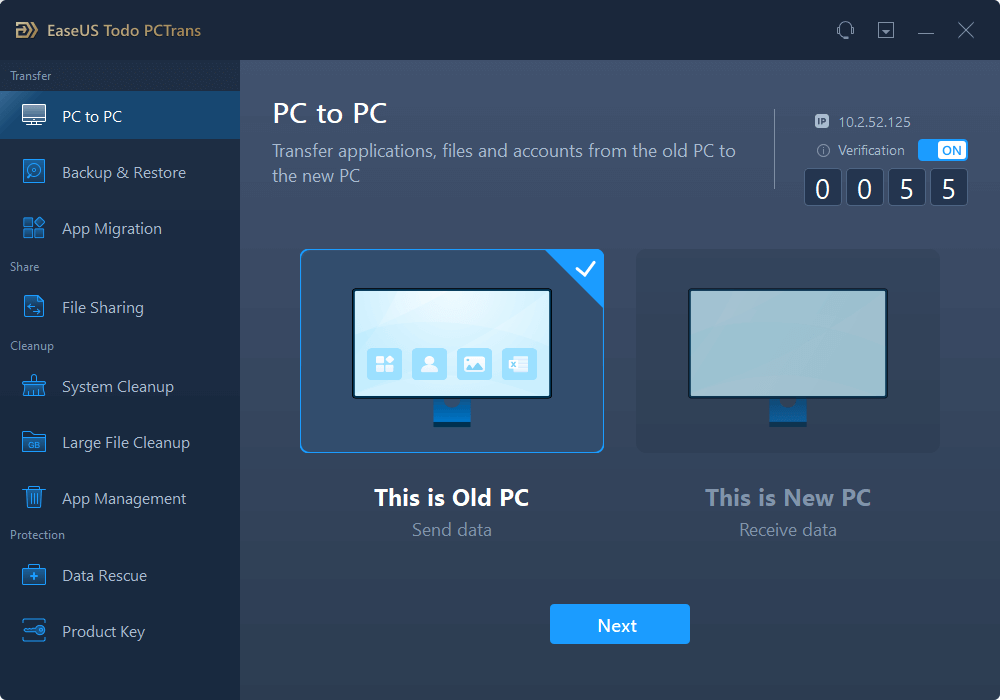
Step 3. Connect two PCs via the network by entering the password or verification code of the target PC. Besides, make sure you have chosen the right transfer direction and click "Connect" to continue.
The verification code is on the right top of the "PC to PC" main screen on the target computer.

Step 4. Then, choose "Files" to select files to transfer. Select the specific files as you want. What's more, you can click the Edit icon to customize the storage path for transferred data.
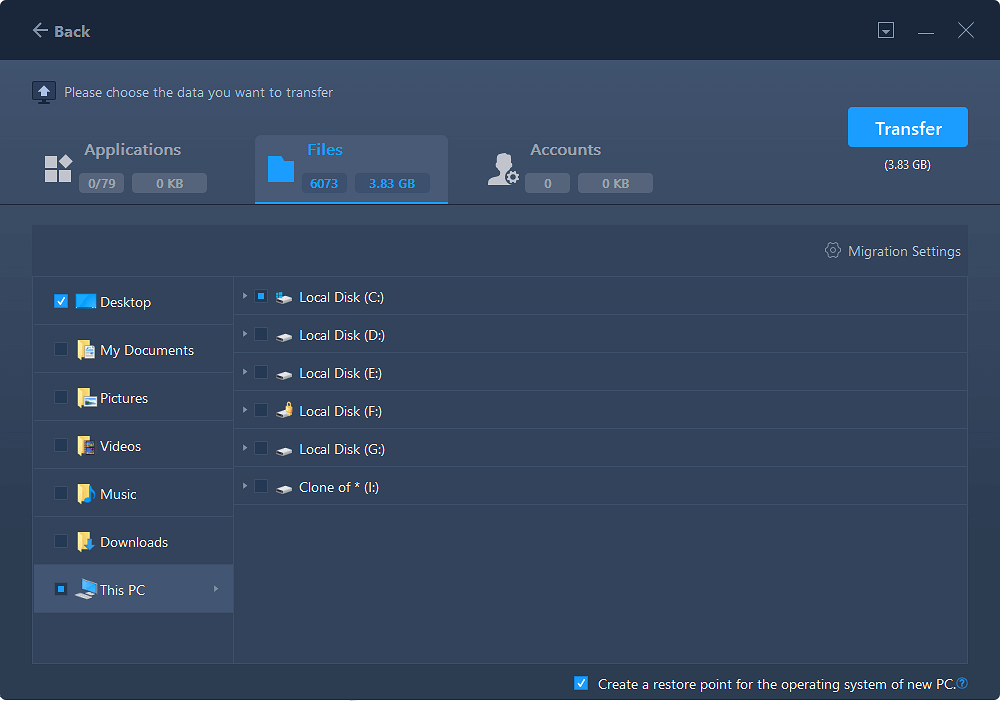
Step 5. Now, click "Transfer" to begin to transfer files from PC to PC. The size of the file determines the transfer time. Wait patiently.

If you are looking for ways to transfer files from iCloud to an external hard drive, the article below may help you:
Transfer Files from iCloud to External Hard Drive [Ultimate Guide]
Are you looking to Transfer Files from iCloud to External Hard Drive? It's a good idea to make a backup. Please read our article in detail to learn the easy methods with which you can do so.
Copy iCloud Files to Your New Computer
After downloading files from iCloud on your old PC, here are several methods to help transfer files to your new computer:
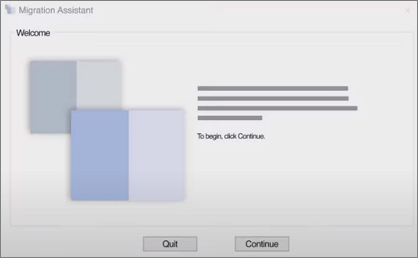
Method 1. Use Windows Migration Assistant
You can still use the Migration Assistant software on your Mac if you're moving from Windows, but you'll also need to download the Windows Migration Assistant for your Windows PC. Also, confirm that both computers are plugged into a power source and are linked with the same Wi-Fi network.
Here are the steps to follow if you're transferring files from a Windows computer to Mac:
Step 1. On your Windows, open the Windows Migration Assistant application. Click ''Continue''.
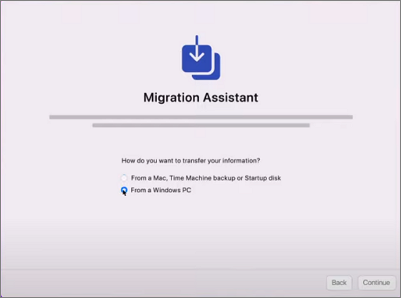
Step 2. Launch the Migration Assistant software by going to your Mac's Applications folder. Choose the "From a Windows PC" transfer option.
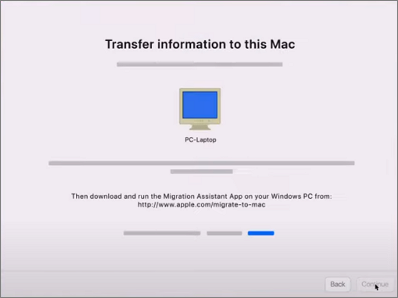
Step 3. From the list of available computers, pick your Windows computer.
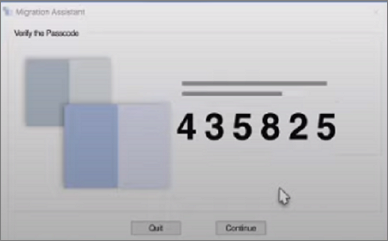
Step 4. Your Windows and Mac computers should now display a security code. Click "Continue" after ensuring the code is the same on both displays.
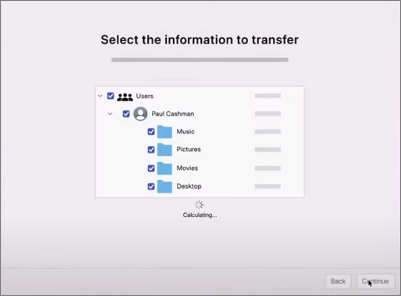
Step 5. Click ''Continue'' after selecting each item, piece of data, and setting you want to transfer to your Mac.
That's all, then! All your chosen files will begin to be copied to your new Mac via Windows Migration Assistant.
Method 2. Through File Sharing
Using file sharing, you can transfer files between computers linked to the same network. Here are the steps of file transfer between two Macs:
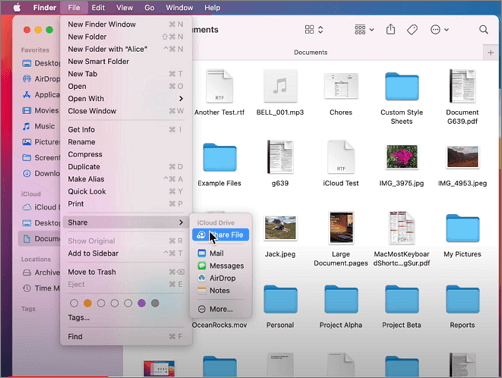
Step 1. Go to File in the Finder bar and choose "Share". From the drop-down menu, click "Share File". You'll need to remember your Mac's "Computer Name" later to find it.
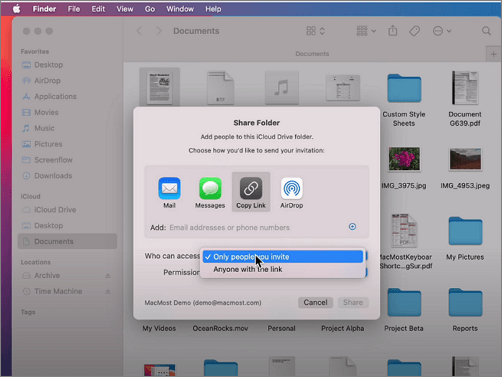
Step 2. In the next window, select how you want to share the file.
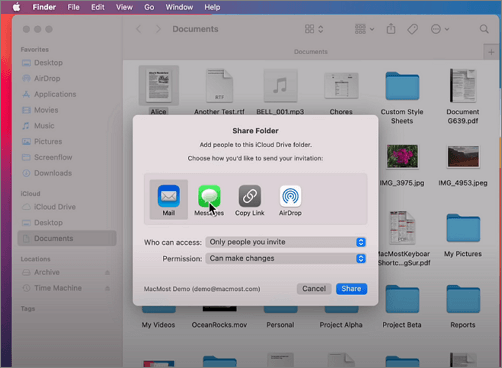
Step 3. Enter your username and password if prompted and set permission. Then click "Share".
You may now drag and drop files between your two Macs because they are connected.
Method 3. Take Advantage of Dropbox
If you've ever used the online file-sharing tool Dropbox, you know how quick and simple it is to share files with others. Here are some steps to move files from one computer to another one:
Step 1. Drag a file into your Dropbox account.
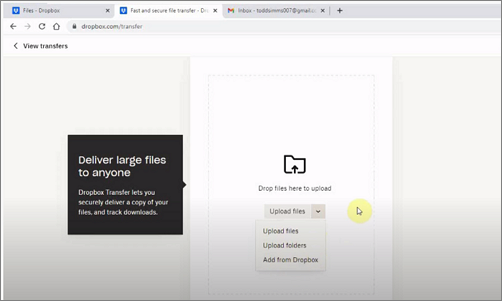
Step 2. Dropbox servers will receive it. The person you select to share this file with will be able to download it from the Dropbox servers and save it to their local computer.

This procedure works very well when exchanging files with others, especially over geographic distances. But what if you're transferring a file between two nearby PCs—possibly only a few inches apart? Using Dropbox servers seems excessive, especially given that each file you transfer will now require additional upload and download delays.
Method 4. With the help of External Drive
Every method we've explored has one thing in common: they all demand a live Internet connection. What happens, though, if you can't easily access the Internet? Perhaps the speed of your existing connection is slower than you'd like, making the transfer of considerable amounts of content impossible. Alternatively, perhaps your Internet usage is limited, and you don't want to risk exceeding your budget.
Whatever the cause, you can always move files the old-fashioned way, by utilizing an external hard drive, if you can't transfer them over the Internet. Here are some steps to follow:
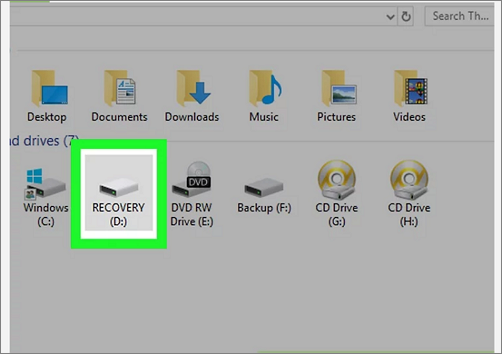
Step 1. Connect your external Drive to your old computer. It will show up in ''This PC''.
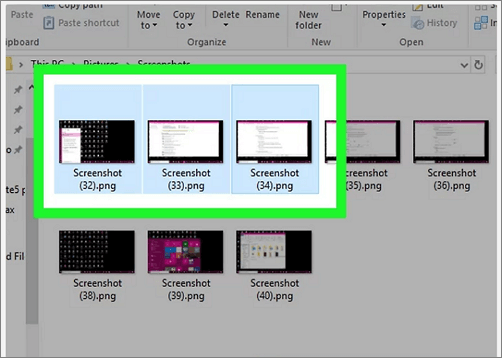
Step 2. Select the files and copy these files.
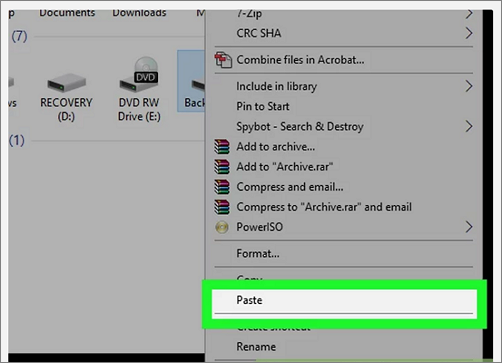
Step 3. Paste files to the Hard Drive.
Step 4. Now connect your hard drive to another computer, and copy-paste the files.
After analyzing every method in detail, we can make a comparison for you to short-list the easiest one. Users get frustrated with using many steps and using Windows Migration Assistant and File Sharing are lengthy. On the other hand, buying an external hard drive could be costly if you don't already have one.
So, EaseUS Todo PCTrans is comparatively simple and easy to use, and it works perfectly fine without any data loss. Also, if you have a weak internet connection, the good news is that it can work without the network as well.
Sync iCloud Files to Your New Mac
Once you have an Apple ID, setting up iCloud Drive on a Mac is simple. Follow the steps to sync iCloud files to your new Mac:
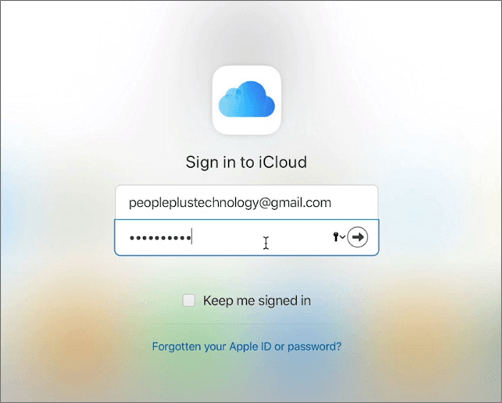
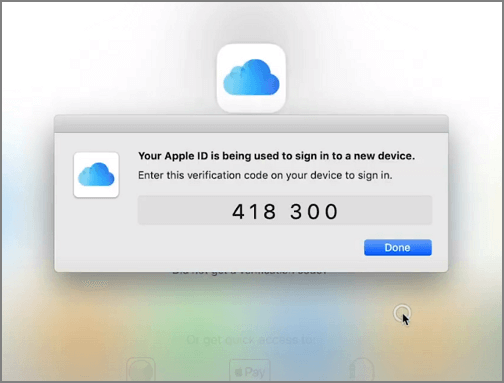
Step 1. Sign in to Apple ID.
Step 2. Verify the code.
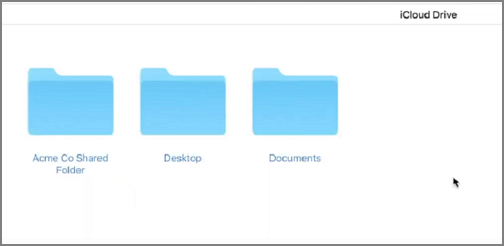
Step 3. Check the iCloud Drive box to enable iCloud Drive on the Mac after signing in with your Apple ID.

Step 4. You are synced and your files will start showing.
Conclusion
In this article, we have mentioned 4 different methods with their proper instructions to help you to move iCloud to a new computer. Of all these methods, EaseUS Todo PCTrans is the easiest and quickest method in which you lose no data, and it supports transferring files without the network. So, download and give it a try!
FAQs on Move iCloud to A New Computer
Here we also listed some top concerned questions that you may also be interested in, and we listed answers below every question. Check and find answers to those questions in your mind now:
1. Does iCloud transfer everything to a new Mac?
Any files, photos, and other images created or edited by an iPad, iPhone, or Windows system that are stored within iCloud become available to a new Mac, once mated to the iCloud account.
2. How do I import everything from iCloud?
Firstly, check your iCloud backup on your old iPhone. Then go to the iCloud settings, tap it, and you can see the "iCloud Backup" option, and you need to tap "Back Up Now" to back up all the data on the phone. Next, you need to set up your new iPhone and tap "Continue" popping up on your old iPhone automatically after swiping up your new iPhone. In the final step, you should choose "Download from iCloud" and it takes some time to restore your data. At last, you may continue to regular set up on the new iPhone.
3. Can I download all my iCloud photos at once?
Press and hold Shift + Ctrl + Alt Keys and press the Down Arrow Key to select All iCloud Photos. Note: You can also scroll down to the bottom of the page and click on the Last Photo. Once All Photos are selected, click on the "Download" to begin the process of downloading all iCloud Photos to your computer.
4. How do I download an iCloud backup?
To start, open your reset program and log into iCloud through its interface. The program should now present you with a list of your iCloud backups. From the list, select a file that you wish to recover. Download the backup file.
About the Author
Updated by Tracy King
Tracy became a member of the EaseUS content team in 2013. Being a technical writer for over 10 years, she is enthusiastic about sharing tips to assist readers in resolving complex issues in disk management, file transfer, PC & Mac performance optimization, etc., like an expert.
Reviews and Awards
-
EaseUS Todo PCTrans Free is a useful and and reliable software solution created to serve in computer migration operations, be it from one machine to another or from an earlier version of your OS to a newer one.
Read More -
EaseUS Todo PCTrans is by the folks at EaseUS who make incredible tools that let you manage your backups and recover your dead hard disks. While it is not an official tool, EaseUS has a reputation for being very good with their software and code.
![]() Read More
Read More
-
It offers the ability to move your entire user account from your old computer, meaning everything is quickly migrated. You still get to keep your Windows installation (and the relevant drivers for your new PC), but you also get all your apps, settings, preferences, images, documents and other important data.
Read More
Related Articles
-
Get Rid of Windows Server C Drive Full Issue | 5 Methods🎖️
![author icon]() Tracy King/2024/06/13
Tracy King/2024/06/13 -
6 Ways to Transfer Large Files from PC to PC (Guaranteed)
![author icon]() Brithny/2024/06/12
Brithny/2024/06/12 -
How Do I Transfer OneDrive to New Computer? Beginners' Guide 2024
![author icon]() Tracy King/2024/06/12
Tracy King/2024/06/12 -
How to Transfer Skype with Settings, Chat History to A New Computer
![author icon]() Tracy King/2024/06/13
Tracy King/2024/06/13