
Content
Page Table of Contents
About the Author
Hot Topics
Updated on Jun 29, 2026
A USB (Universal Serial Bus) is a perfect storage device to keep data safe in external storage. It allows for the transfer and storage of data in a much safer way. Sometimes, the need to erase data quickly or use the USB in another Operating System calls for a USB format. The following questions are worthy of note:
1. Does a flash drive need to be formatted for Mac?
Yes, if it previously worked for Windows, you must format it for Mac.
2. Can a flash drive be used on both Mac and PC?
Yes, you can use FAT32 and exFAT USB format for both Mac and Windows. This is a perfect solution if you want to use your USB drive on Mac and Windows operating systems simultaneously without formatting it every time.
Let's dive into the best USB format for both Mac and Windows.
FAT32 or exFAT - Which Is the USB Format for Mac and Windows?
So, for using a USB device for MAC and Windows simultaneously, there are two formatting options, i.e., FAT32 and exFAT. Both options are helpful and can format the flash drive for both Mac and Windows.
FAT32 is a traditional format option for many computer users. It is usually the default format for Mac and Windows 10 Operating Systems. However, the problem is that it is an outdated way of formatting. Also, this format option only stores up to 4GB of data.
Instead of using FAT32, exFAT is the latest formatting option for both Windows and Mac Operating Systems. It is an excellent alternative to FAT32 and can handle more than 32GB. Moreover, it is also well-matched with the latest versions of Windows and Mac Operating Systems.
Follow the guidelines below to format USB for both Mac and Windows Operating Systems.
How to Format USB for Mac and Windows
There are various ways to format a USB for both Mac and Windows. However, knowing the right tool and how to go about it matters. Here is the complete guideline of tools that can be used to format USB to FAT32 and exFAT. Some of the best ways to go about it are:
- #1. Use USB Formatter - EaseUS Partition Master
- #2. Use File Explorer
- #3. Use Disk Management
- #4. Use Disk Utility
- #5. Use Terminal
Also, remember to back up your USB files before starting the formatting process on the USB drive. Let's dive into greater detail.
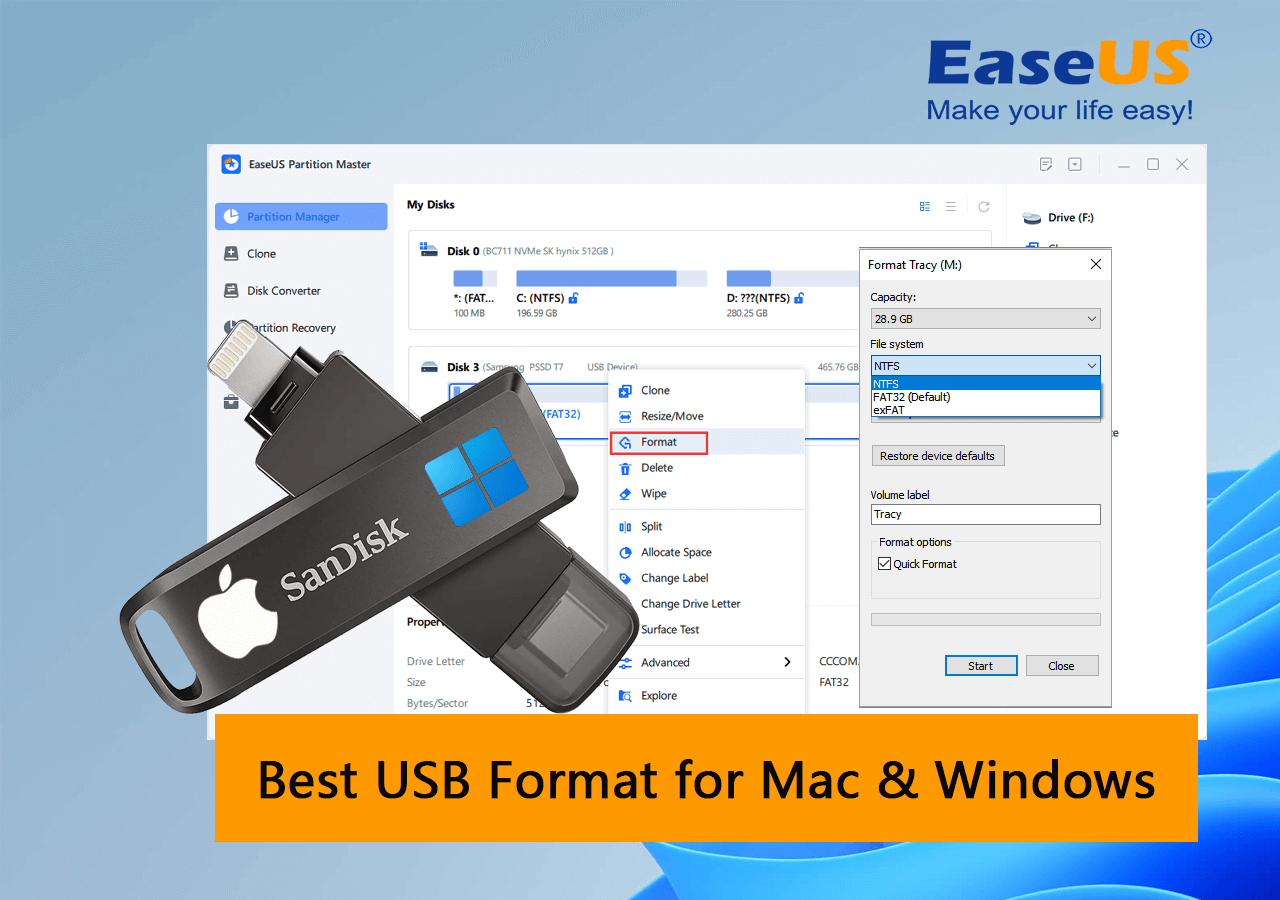
1. Use USB Formatter - EaseUS Partition Master
The EaseUS Partition Master is a software with many formatting options, such as NTFS, FAT32, and exFAT. It comes with free and paid versions, but the free version is good enough to use. The good thing is that it can also convert previously formatted devices into another format option without erasing any data.
EaseUS Partition Master Free allows for the format of a USB with FAT32 and exFAT and allows interconversion among these two options. It is a highly recommended tool because it provides an easy-to-understand interface and is free.
Follow the steps below to use this tool to format your USB:
Step 1. Select the USB drive to format.
Connect the USB drive or pen drive to your computer. Launch EaseUS partition software, right-click the USB drive you intend to format and choose "Format".
Step 2. Set the drive letter and file system on USB.
Assign a new partition label if you want to change the drive letter of your USB, set the desired file system -NTFS/FAT32/EXT2/EXT3/EXT4/exFAT to your USB, then click "OK".
Step 3. Check "Yes" to confirm formatting USB.
Click "Yes" if you see the Warning window. If you have important data on it, back up the data in advance.
Step 4. Apply the changes.
Click the "Execute 1 Task(s)" button first, and then click "Apply" to format the USB drive.
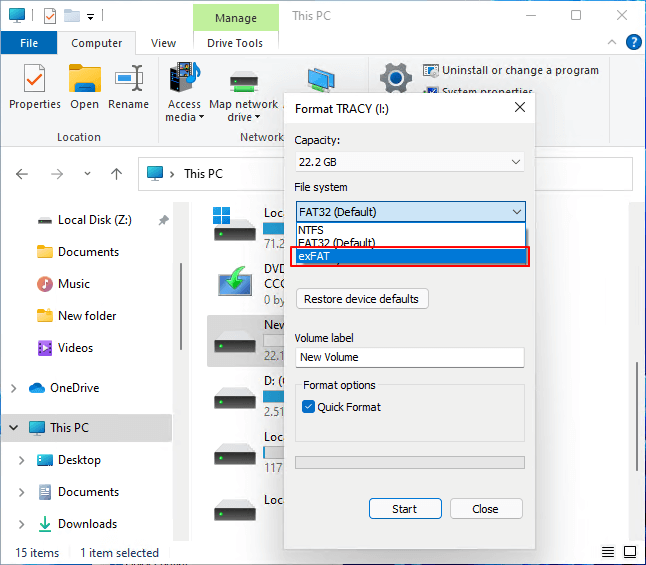
2. Use File Explorer
This is an in-built option on your system to format the USB derive for FAT32, exFAT, and NTFS. It can be used for USB flash of any brand, and its storage capacity is up to 128GB. Also, it is free-to-use software and can easily remove data from the device with the required format option. To use File Explorer to set your USB format, follow the steps below:
Step 1. Open the File Explorer and choose "This PC."
Step 2. Connect the USB.
Step 3. Now right-click on the USB device you want to format.
Step 4. On the dialogue box that comes up, select the required formatting style from the drop-down menu.
Step 5. Click on the Quick Format option, then formatting begins.
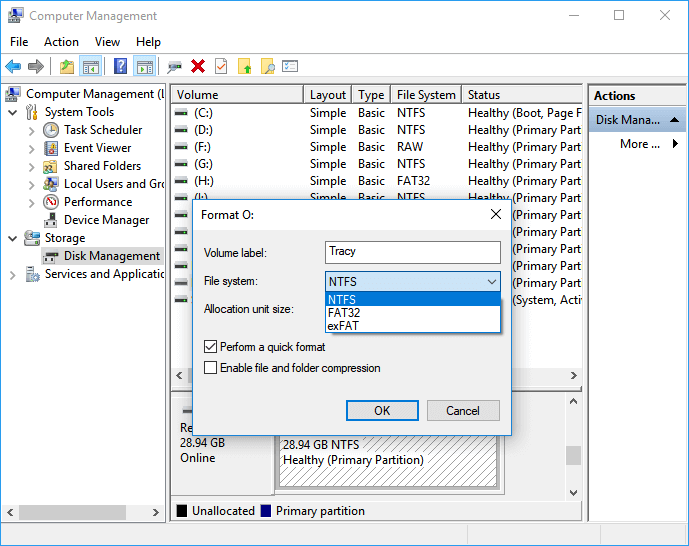
3. Use Disk Management
If you want to format the USB with FAT32 and exFAT but don't want to use File Explorer, you can use Disk Management to format the USB. This software is available on most Operating Systems. Follow the steps below to use the Disk Management option to set your USB format:
Step 1. Right-click on ‘This PC’ and select the Manage option.
Step 2. Select the Disk Management option.
Step 3. Select the USB drive that you want to format. Then, right-click on it and select Format.
Step 4. Select the formatting option FAT32 or exFAT.
Step 5. Click the quick format option and click OK to start formatting.
If you are familiar with the Windows command line, you can click on the video below to see more information about formatting USBs using commands:
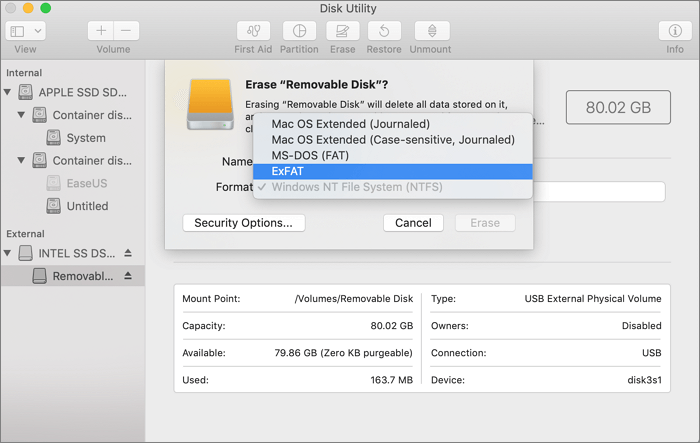
4. Use Disk Utility
Disk utility can also be used to format the USB. It can format drives, repair damaged discs, and validate disc integrity. Also, it is a free, in-built, and advanced tool in the macOS that helps format a USB. The steps below will help you set your USB format using the Disk Utility.
Step 1. Click the Finder and search for the Disk Utility.
Step 2. Open the Disk Utility on your Mac.
Step 3. Choose the USB drive that you want to format and erase all the data from the USB device.
Step 4. Now label it with a new name.
Step 5. Choose the formatting option.
Step 6. Now click "Erase" to start formatting.
5. Use Terminal
You can also use the Terminal to format your USB. It is the command line interface of macOS. You have to give different commands to format your USB device. The steps below can help you.
Step 1. Connect your Mac to your USB disc.
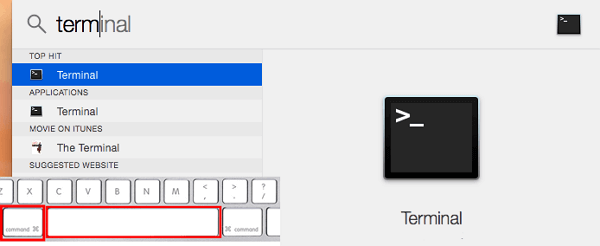
Step 2. Launch Terminal by pressing command + space keys.
Step 3. Enter the following command 'diskutil eraseDisk Your DRIVE NAME MS-DOS FAT32' as shown in the screenshot below.
Step 4. Then, press Enter.
Step 5. Enter 'sudo mkfs.MS-DOS -F32 /dev/disk2' on the command line.
You should now have a formatted USB disc!
- Point to Note
- Select the method that suits you according to your system and ease of usage, and remember to back up your data before commencing the process.
Conclusion
FAT32 and exFAT remain the best USB formats for both Mac and Windows. Also, the EaseUS Partition Master, Windows File Explorer, and Disk Utility are the three best options that can help you format your USB for both Mac and Windows without worry.
FAQs of the USB Format for Mac and Windows
If you still need clarification about the best format for Mac and Windows, our FAQ section can help.
1. exFAT vs. FAT32, which is better for USB?
exFAT is better for USB because it can handle more than 32GB of data and is also compatible with the latest versions of Windows and Mac Operating Systems.
2. What USB format works on Mac and Windows?
FAT32 and exFAT are excellent options for formatting a USB for both Mac and Windows.
3. Is exFAT compatible with Mac and Windows?
Yes, exFAT is compatible with both Mac and Windows.
How Can We Help You
About the Author
Updated by Tracy King
Tracy became a member of the EaseUS content team in 2013. Being a technical writer for over 10 years, she is enthusiastic about sharing tips to assist readers in resolving complex issues in disk management, file transfer, PC & Mac performance optimization, etc., like an expert.
Product Reviews
-
I love that the changes you make with EaseUS Partition Master Free aren't immediately applied to the disks. It makes it way easier to play out what will happen after you've made all the changes. I also think the overall look and feel of EaseUS Partition Master Free makes whatever you're doing with your computer's partitions easy.
Read More -
Partition Master Free can Resize, Move, Merge, Migrate, and Copy disks or partitions; convert to local, change label, defragment, check and explore partition; and much more. A premium upgrade adds free tech support and the ability to resize dynamic volumes.
Read More -
It won't hot image your drives or align them, but since it's coupled with a partition manager, it allows you do perform many tasks at once, instead of just cloning drives. You can move partitions around, resize them, defragment, and more, along with the other tools you'd expect from a cloning tool.
Read More
Related Articles
-
How to Resize EFI System Partition on Windows 11/10/8/7
![author icon]() Daisy/2026/06/29
Daisy/2026/06/29 -
Best Free OS Migration Software for Windows 10
![author icon]() Cici/2026/06/17
Cici/2026/06/17 -
Fortnite Insufficient Storage - How to Fix
![author icon]() Oliver/2026/06/17
Oliver/2026/06/17 -
SanDisk Format Tool & Repair Tool Free Download 🚩
![author icon]() Jean/2026/06/30
Jean/2026/06/30


