
Content
Page Table of Contents
About the Author
Hot Topics
Have you recently updated your system to Windows 11? Then, you must be all excited to use the new Windows. Unfortunately, your Windows 11 system keeps on crashing on you and making it hard for you to enjoy your new Windows. Then, you don't need to worry; it must be a simple bug or a one-time thing.
However, if you are facing the 'Critical Process Died' or 'Black Screen of Death' error, you might need to worry. But it is fixable. Using the right tools provided by EaseUS, you can easily fix the Critical Process Died error on Windows 11. For more information, walk through this guide.
One-Click to Fix Critical Process Died BSOD Error
Before we officially start fixing Blue Screen of Death errors in Windows 11, you can first use the Windows Boot Repair tool - EaseUS Partition Master, and try a quick solution.
This tool has been developed and tested to provide a "Boot Repair" feature for fixing all kinds of blue and black screen errors. Any problem related to master boot code issues can be solved easily and quickly:
If your computer is unbootable now, start with Step 1 here. If it's bootable, move to Step 3 and start the process.
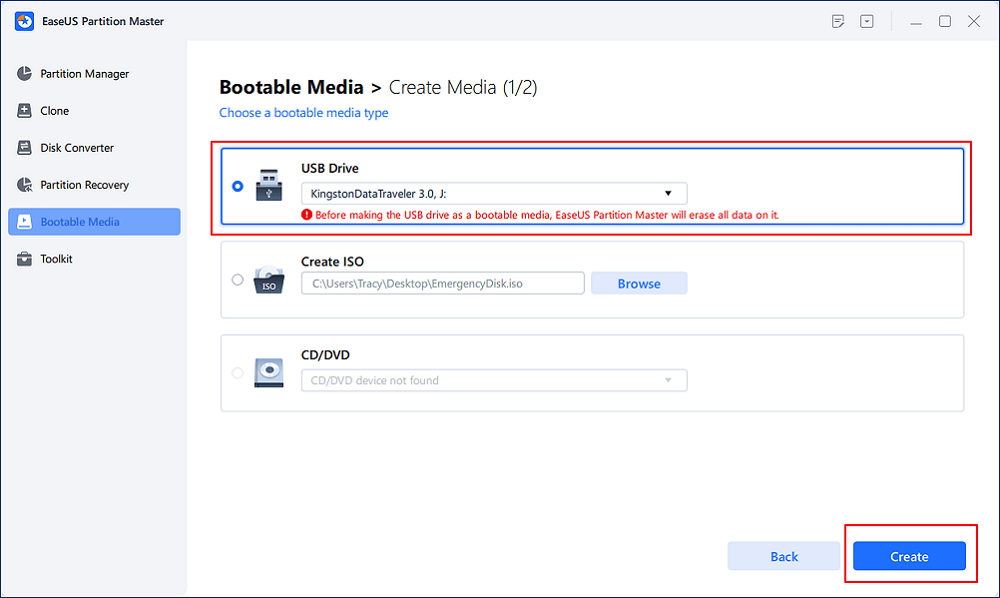
Step 1. Prepare a new PC and create a bootable media with EaseUS Partition Master
- On a new computer, connect an empty USB to your PC.
- Install and launch EaseUS Partition Master, go to the Bootable Media section, select "Create bootable media" and click "Next".
- Select the empty USB or external disk as target disk to create the bootable media for creating a Blue Screen error check tool.
Step 2. Boot PC from EaseUS bootable USB
Then, connect the bootable USB to your PC with Blue screen error, and reboot PC from the USB by configuring it as a boot drive. The process is: restart PC, press F2/F8/F11/Del key to enter BIOS, go to boot menu and configure the USB as boot drive, save changes and restart the PC.
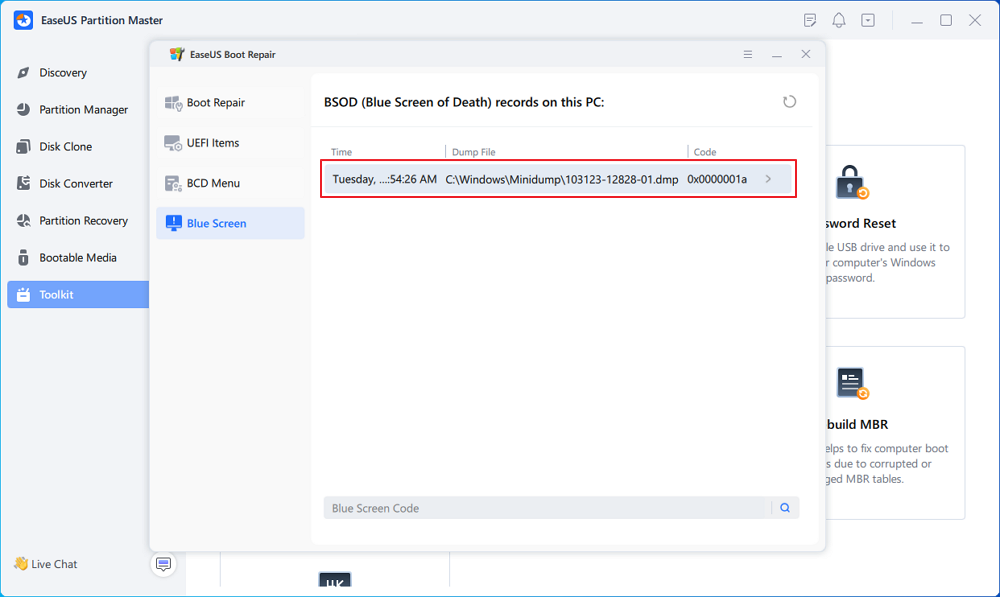
Step 3. Enable EaseUS Partition Master with its Boot Repair feature, and open "Blue Screen" tool.
When EaseUS Partition Master launches, go to the Toolkit section and click "Boot Repair".
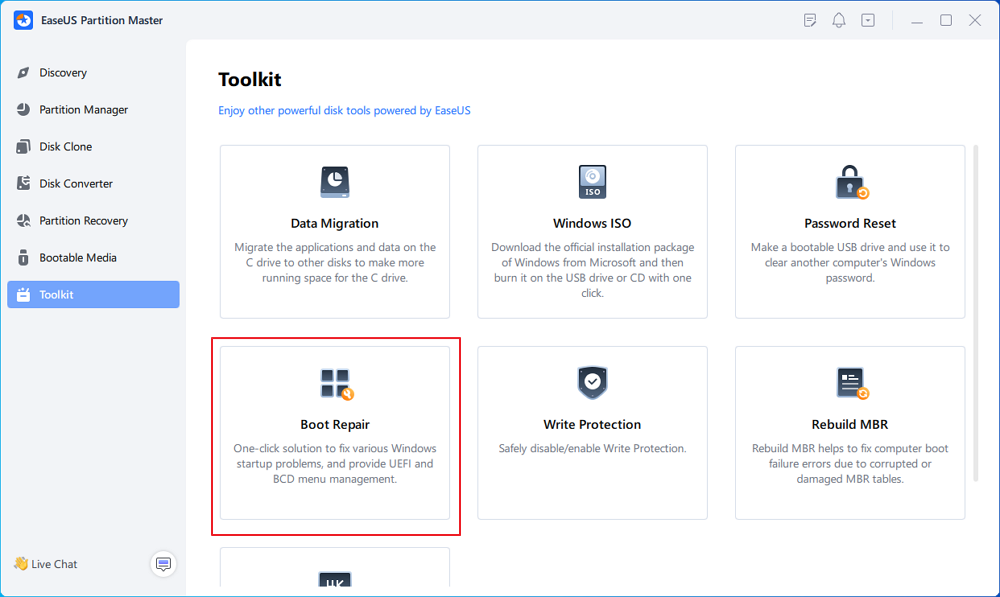
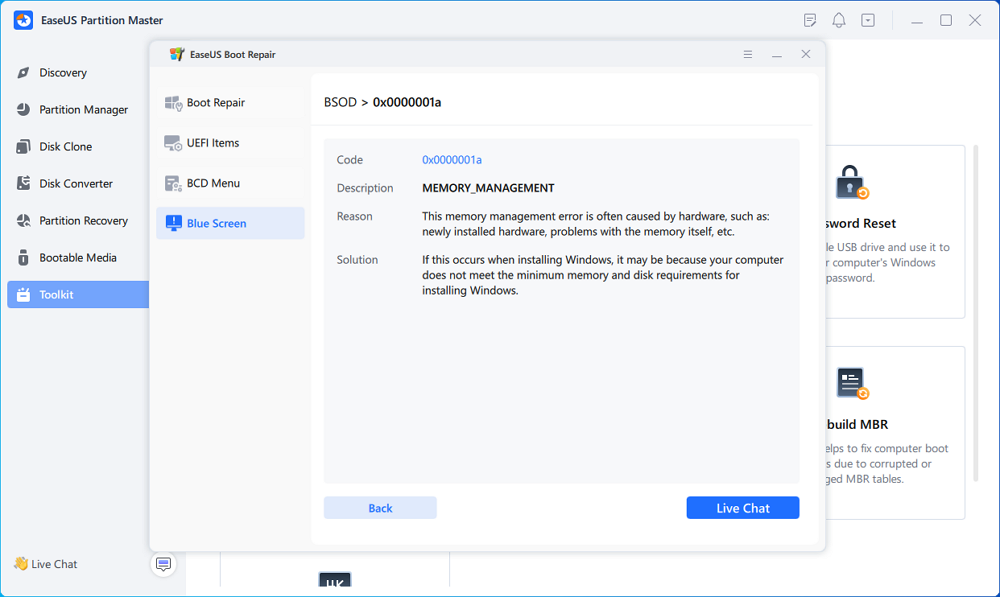
Then, click "Blue Screen" and click the listed Blue Screen error to check it's details. Or, you can type in a specific blue screen code or description to find the respective answer for fixing it.
Step 4. Fix blue screen error
- Now, you can follow the solution guide to get rid of the respective BSOD or blue screen issue from your PC.
- If it doesn't work, you can also click the "Live Chat" button to request a remote assistance for fixing this issue with the help of EaseUS tech support team.
♻️Additional Guidance
If you have more queries, our dedicated support team is here to assist you:

EaseUS experts are available to provide you with 1-on-1 manual services (24*7) and help fix Windows boot error, BSOD or computer boot loop issues. Our experts will offer you FREE evaluation services and efficiently diagnose and resolve system boot failure, Windows stop codes and OS lagging issues using their decades of experiences.
- 1. Fix BSOD - blue/black screen of death error due to Windows update or other reasons.
- 2. Get rid of Windows boot error such as no bootable device found, or BCD file corruption.
- 3. Serve to fix 0X000_error codes on Windows system or OS boot loop issues.
If you are familiar with computer operations and understand what is causing the problem, you can read on, and we will provide you with more guidance. Don't forget to share this tutorial if you think it's helpful.
How Do I Fix Critical Process Died Windows 11 Cannot Boot Error?
A number of factors, including software, hardware, or driver issues can cause the "CRITICAL_PROCESS_DIED" blue screen error in Windows 11. Reinstalling Windows can sometimes resolve software-related issues but not necessarily hardware issues or certain driver issues. Please follow the below solutions in order to troubleshoot the problem:
- Method 1. Reinstall or Update Drivers
- Method 2. Run Hardware and Device Troubleshooter
- Method 3. Run SFC
- Method 4. Extend C Drive and Leave Enough Space to Reinstall Windows 11
- Method 5. Run DISM
- Method 6. Uninstall the Problematic Program
- Method 7. Access Safe Mode
Note: Before applying any of the fixes, backup your system so you won't lose your data or settings. For backup purposes, EaseUS Todo Backup is the best and free software that can back up your Windows 11 settings, files, folders, and other programs with a click. The software can even help you to recover your system. These solutions are also suitable for critical process died on startup, after update or while gaming.
Method 1. Reinstall or Update Drivers
You can first update, or reinstall drivers to fix the Critical Process Died error as follows:
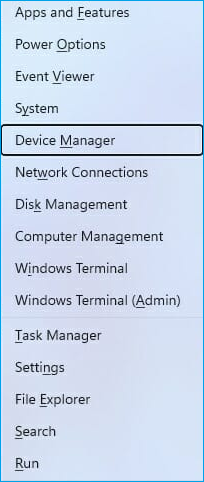
Step 1. Press the Windows + X keys together and select the Device Manager from the menu.
Step 2. Find the problematic driver and right-click on it. For that, check the crash logs or remove the drivers you have recently updated. Select the Uninstall device option from the menu.
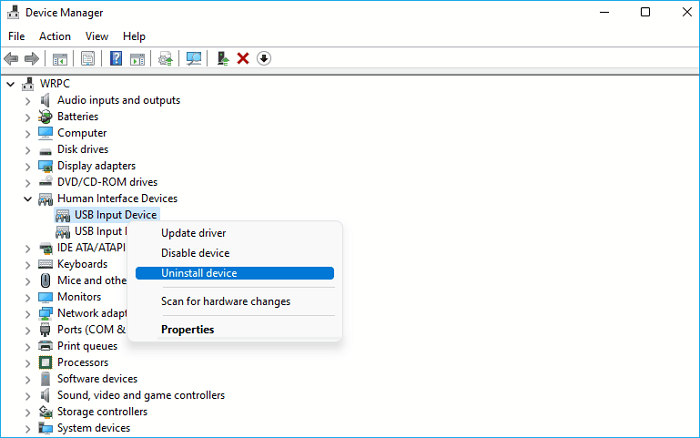
Step 3. Confirm again to uninstall the driver.
Step 4. Now, restart your PC and check if the problem is resolved. To reinstall the driver, head over to the vendor's site and install the latest driver version.
Updating drivers may help a lot to solve the "critical process died Windows 11" issue.
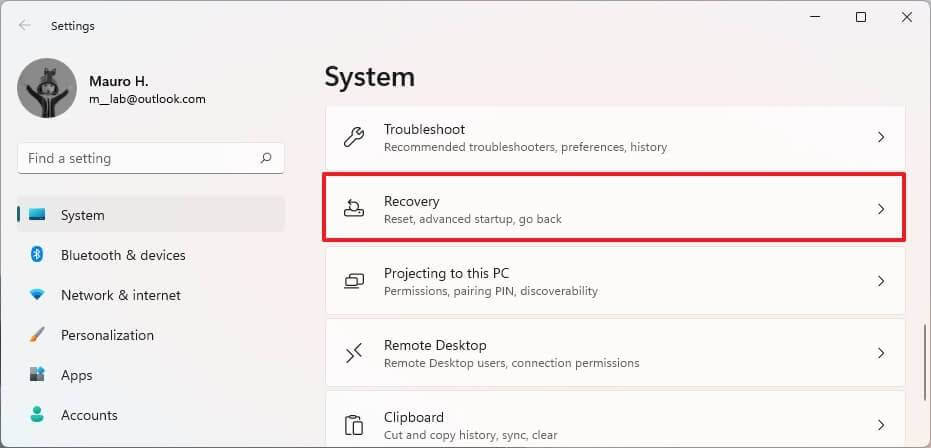
Method 2. Run Hardware and Device Troubleshooter
Windows 11 built-in troubleshooting feature is the simplest way to fix all system errors. You just have to follow these steps to run Troubleshooters on Windows 11:
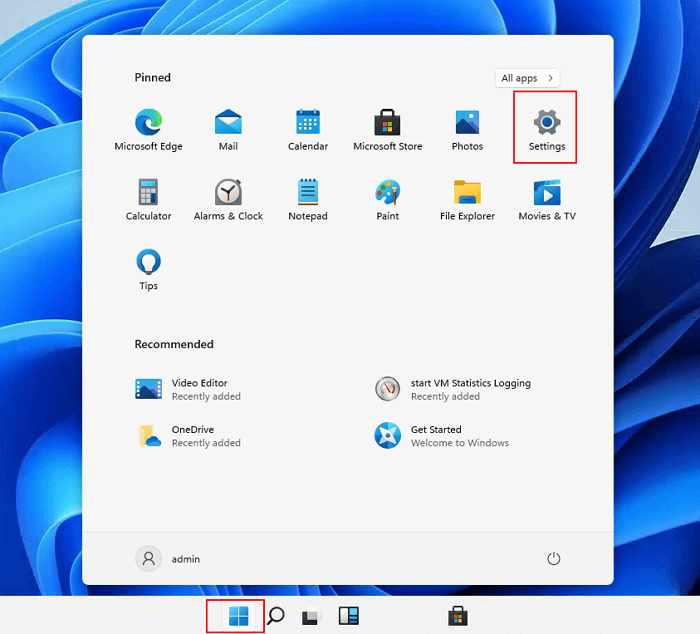
Step 1. Open the Start Menu and then choose the Settings.
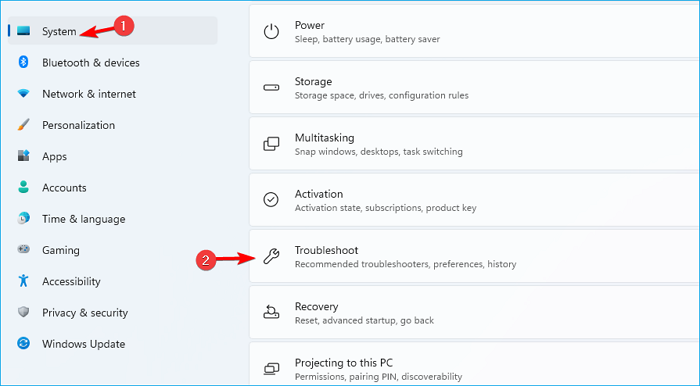
Step 2. Go to the Troubleshooter located on the right pane.
Step 3. Choose the Other troubleshooters.
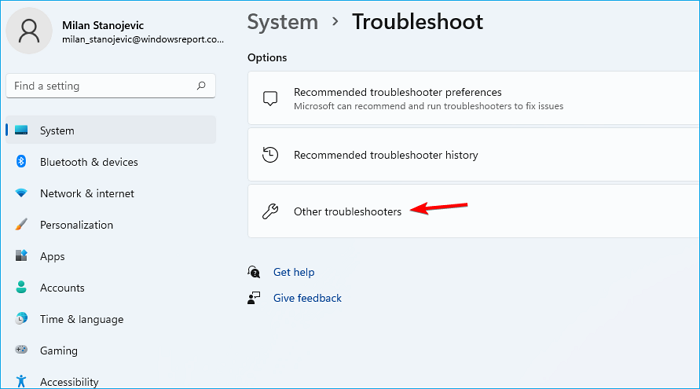
Step 4. Now, run a couple of troubleshooters on the hardware and device. Check if this has fixed the error for you or not.

📌Related Reading: Fix BSOD Kernel Security Check Failure in Windows 10/11
Method 3. Run SFC
You can also get the Critical Process Died error due to corrupted system files. In that case, you can run an SFC scan to locate the corrupted files and fix them, such as:
Step 1. Press the Windows + X keys together and select the Windows Terminal (Admin).
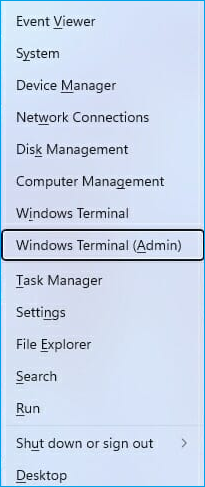
Step 2. Then, run this command:
sfc /scannow
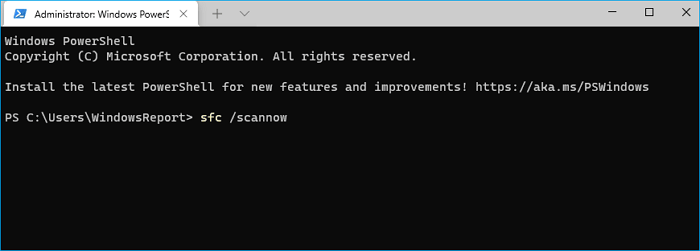
Step 3. Wait for a few minutes for the scan to finish, and restart your computer to check the problem.
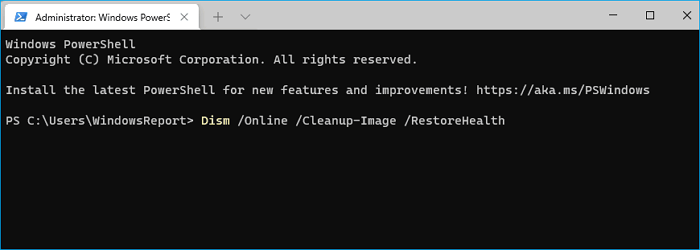
Step 4. If the problems are still there, open the Terminal again and run this command:
Dism /Online /Cleanup-Image /CheckHealth
Dism /Online /Cleanup-Image /ScanHealth
Dism /Online /Cleanup-Image /RestoreHealth
Method 4. Extend C Drive and Leave Enough Space to Reinstall Windows 11
If you encounter the Critical Process Died error after updating to Windows 11, this has something to do with the update. You might have bypassed some Windows 11 requirements to update your PC, which can create system errors.
One such problematic error is not having sufficient space on your disk. As per Microsoft's recommendation, at least 64 GB of free space is required to run the Windows 11 operations smoothly. However, having more free space is even better for reinstalling the Windows 11 process.
#1. Extend C Drive to Leave Enough Space
The best option to optimize your Windows 11 disk space is using the EaseUS Partition Master Professional. The software will manage, edit, and adjust the drivers/partitions for smooth Windows 11 functioning.
Here's how you can fix the Critical Process Died error by optimizing your Windows 11 disk with the Partition Master:
Extend System C drive with unallocated space
- 1. Right-click on the System C: drive and select "Resize/Move".
- 2. Drag the system partition end into the unallocated space so to add it to the C: drive. And click "OK".
- 3. Click "Execute Task" and "Apply" to execute the operations and extend the C drive.
#2. Reinstall Windows 11
Here is a step-by-step guide that you can follow to reinstall Windows 11 and thoroughly get rid of Critical Process Denied error:
How to Reinstall Windows 11 Without Losing Data
There are 4 steps mentioned to Reinstall Windows 11, and also follow the given methods before reinstallation so that you do not lose Data.
Method 5. Run DISM
Deployment Image Servicing and Management Tool aka DISM can also fix the Critical Process Died error on Windows 11, this way:
Step 1. Click on the Start Menu, search for the Command Prompt, right-click on it, and click on Run as administrator.
Step 2. Now, follow this command line and press the Enter button:
Dism /Online /Cleanup-Image /CheckHealth
Step 3. After this, enter the new command line:
Dism /Online /Cleanup-Image /ScanHealth
Step 4. Finally, enter this command, and your error will be fixed:
Dism /Online /Cleanup-Image /RestoreHealth
Method 6. Uninstall the Problematic Program
If your system starts crashing after installing a new application on your computer, that's your problem. By uninstalling the program, you can fix the Critical Process Died error. To uninstall the program on Windows 11, follow these steps:
Step 1. Click on the Start Menu and then open the Control Panel.
Step 2. In the Control Panel window, search for Uninstall a program and open it.
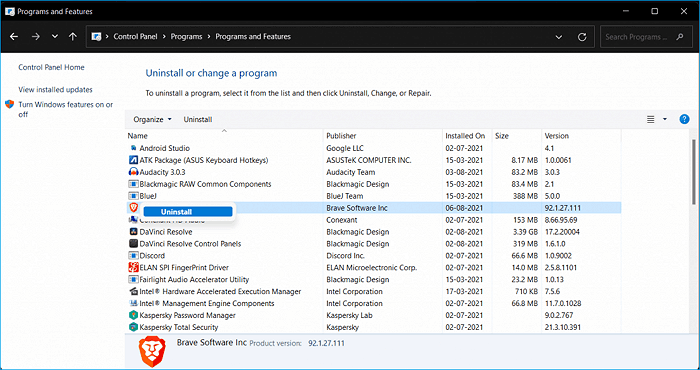
Step 3. Select the program causing the error and click on the Uninstall button next to it.
Step 4. Restart your computer after uninstalling the program and see if you get the error anymore.
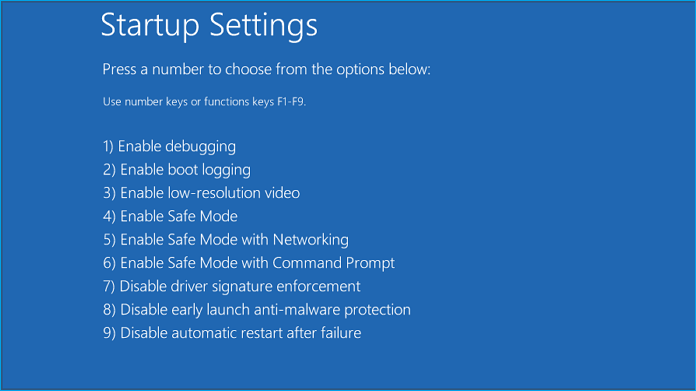
Method 7. Access Safe Mode
Accessing the Safe Mode will not fix the error, but if you are unable to boot your system, use these steps while being in the Safe Mode:
Step 1. Restart your PC a few times during the boot, or you can click on the Power icon on the login screen, hold Shift, and select Restart.
Step 2. Choose the Troubleshoot from the on-screen options.
Step 3. Go to the Advanced options > Startup settings > Restart button.
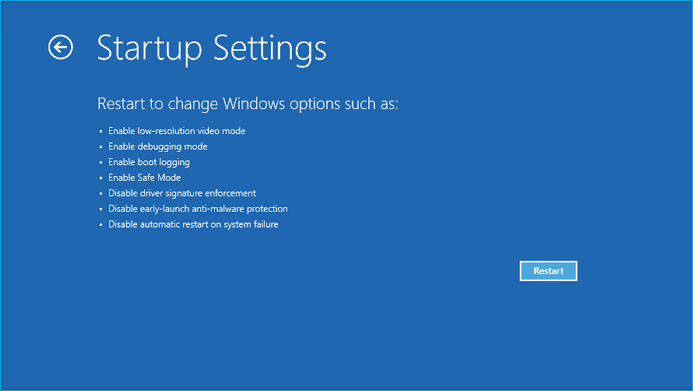
Step 4. Press the 5 key on the keyboard to start the Safe Mode with Networking.
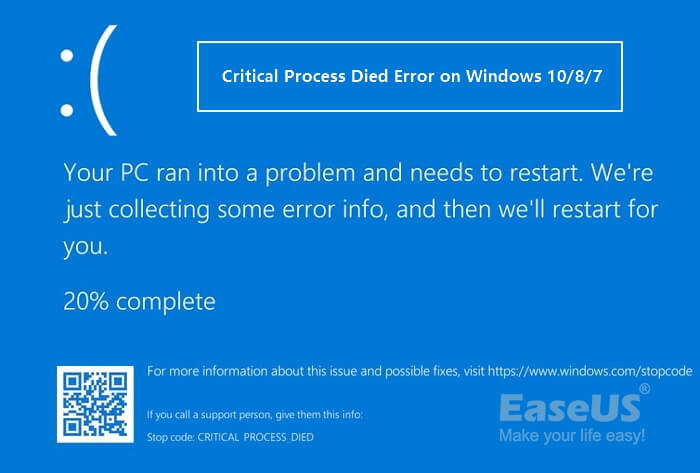
What is the Critical Process Died Error?
Critical Process Died or Blue Screen of Death in Windows 10 and Black Screen of Death as per Windows 11 theme is a system error. This error occurs when a fatal system error occurs and crashes your PC.
This error means that your Windows 11 can't function properly anymore. Once your system crashes, you will lose all your unsaved data, and your hours of hard work will be wasted.
Thus, you should look out for the common symptoms of the Critical Process Died error on your computer, like:
- Overclocking
- Slow speed
- A malware attack, etc.
Also, relax if you are experiencing a similar case as listed here on your PC on Windows 11, and follow the tutorials below to get rid of this issue instantly.
How to fix Stop code: critical process died loop: I'm using an external hard drive, and it does allow me to enter automatic repair mode...each time I start the laptop it boots up until it reaches desktop than a few seconds, it goes back to stop code critical process died, it's in this loop... from Microsoft
Main Causes Behind the Critical Process Died Error Occurrence on Windows 11
Be it a Windows 10 or Windows 11, the Critical Process Died error occurs due to several underlying system problems, such as:
- Unauthorized or Outdated Windows OS: If you have installed unauthorized Windows 11 on your computer, it can cause a BSOD error. Also, if you haven't updated your Windows in a long time, update it to fix the common system vulnerabilities.
- Outdated Drivers: If you have moved to Windows 11 but are still using Windows 10 drivers, that might be the main BSOD error trigger for you.
- Bad Hard Drives: Not only outdated but also damaged hard drives can lead to this error. The bad hard drives mean either your files are written badly on the hard drive, or your hard drive is visibly damaged. If you constantly face the Critical Process Died error, you might have to replace your hard drive.
- Improper Cable Management: When cable connections are poorly made, or several hardware components are attached to misfit slots, it can cause system issues, especially the RAM.
- Malware Attacks: The malicious codes can wreak havoc on your computer's registries and instantly ignite the Critical Process Died error. So, always keep your antimalware and antivirus programs updated to prevent malware attacks.
- Overclocking: This is a big blow to the gamers who have updated to Windows 11 for its gaming experience. However, Windows 11 is designed to play heavy games. But if you overwhelm it by running multiple heavy programs simultaneously, it can push your PC to errors, especially if you have an old computer.
Feel free to share this page to help more of your friends online who are experiencing a similar BSOD error on their computers:
Tips to Prevent Critical Process Died Error and Optimize Windows 11 Performance
If you don't ever want to go through the hassle of fixing the Critical Process Died error, do follow these precautionary tips:
- Always install the genuine Windows 11 environment from the Microsoft website or your local store.
- Ensure your C drive has sufficient space to run Windows 11 operations smoothly. Here, for better disk optimization, you can use EaseUS Partition Master, too.
- Often run antimalware and antivirus scans to keep your system clean.
- Also, keep your system backed up so you can easily recover your data despite errors.
Parting Remarks
If your computer shows the Critical Process Died error, don't panic. As you have seen, there are seven great ways to fix the Critical Process Died error on Windows 11.
However, if none of the above-mentioned methods work for you, unfortunately, that leaves you with one option - reinstall your Windows 11.
But before reinstalling your Windows 11, take your entire system's backup. This way, you won't lose important files, folders, account settings, or other apps.
To backup your Windows 11, you can use the EaseUS Todo Backup and smoothly fix your Critical Process Died error.
Also, optimize your Windows 11 hard disk so you won't face any system errors. To optimize the Windows 11 hard drive, you can quickly download the EaseUS Partition master.
FAQs About Critical Process Died Error in Windows 11
For further questions and answers related to the critical process died error in Windows 11, read this part:
1. What is critical process died in Windows 10?
When a crucial system process runs into an unforeseen issue or stops working properly, the Windows 10 system error known as "Critical Process Died" appears. System restarts, crashes, and possible data loss are frequently the results.
2. Why does critical process died when playing games Windows 11?
If you haven't updated your device's drivers in a long time, those old drivers may be causing problems with your system. Please update all existing device drivers to fix the problem.
3. Can critical process died be fixed?
Of course, critical processes can be fixed when they die. This article provides 8 options for fixing the error on Windows 11. In addition to using the Windows repair tool - EaseUS Partition Master, you can also run System File Checker. SFC scanning utility scans your system for corrupted files and tries to repair them automatically.
How Can We Help You
About the Author
Updated by Tracy King
Tracy became a member of the EaseUS content team in 2013. Being a technical writer for over 10 years, she is enthusiastic about sharing tips to assist readers in resolving complex issues in disk management, file transfer, PC & Mac performance optimization, etc., like an expert.
Daisy is the Senior editor of the writing team for EaseUS. She has been working at EaseUS for over ten years, starting as a technical writer and moving on to being a team leader of the content group. As a professional author for over ten years, she writes a lot to help people overcome their tech troubles.
Product Reviews
-
I love that the changes you make with EaseUS Partition Master Free aren't immediately applied to the disks. It makes it way easier to play out what will happen after you've made all the changes. I also think the overall look and feel of EaseUS Partition Master Free makes whatever you're doing with your computer's partitions easy.
Read More -
Partition Master Free can Resize, Move, Merge, Migrate, and Copy disks or partitions; convert to local, change label, defragment, check and explore partition; and much more. A premium upgrade adds free tech support and the ability to resize dynamic volumes.
Read More -
It won't hot image your drives or align them, but since it's coupled with a partition manager, it allows you do perform many tasks at once, instead of just cloning drives. You can move partitions around, resize them, defragment, and more, along with the other tools you'd expect from a cloning tool.
Read More
Related Articles
-
How to Check SSD Speed [Step-by-Step Guide]
![author icon]() Sherly/2026/06/30
Sherly/2026/06/30 -
(Solved) ASUS ROG Ally Not Recognizing SD Card
![author icon]() Oliver/2026/06/21
Oliver/2026/06/21 -
How to Fix 'No Audio Output Device is Installed' Windows 11
![author icon]() Daisy/2026/06/17
Daisy/2026/06/17 -
2026 Sony USB/Pen Drive Format Tool Is Online | Free Download
![author icon]() Jean/2026/06/17
Jean/2026/06/17


