Page Table of Contents
About the Author
Hot Topics
Updated on Oct 29, 2024
If you are looking for a way to extend a partition that is almost running out of storage space, well, you are in the right place. This article from EaseUS will present a detailed guide to teach you how to extend volume with Disk Management, which is a Windows built-in tool for managing disks and partitions. There will also be another preferable method. Now, continue reading and learn more.
How to Extend Volume with Disk Management
As we just mentioned above, Disk Management is provided by Microsoft, which is a built-in utility to help Windows users manage their disks and partitions. You can use this tool to create volumes, initialize disks, extend and shrink volumes, etc. By managing your partitions and disks, you can optimize storage space and enhance the performance of your system.
Below are the steps with pictures for you to extend volume with Disk Management in 2 different cases.
- Notice:
- Disk Management can only extend a volume with adjacent free or unallocated space behind that volume.
#Case 1. There is adjacent free or unallocated space behind the target volume.
Step 1. Press "Windows + R" to open the Run dialog box.
Step 2. Input diskmgmt.msc and hit "Enter".
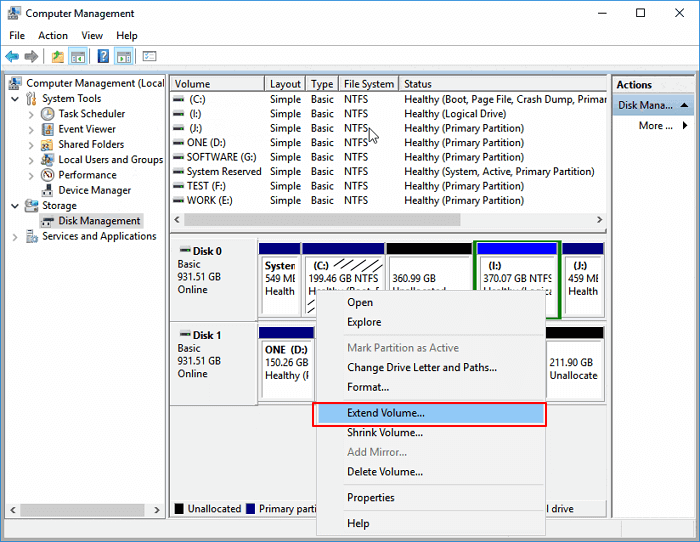
Step 3. Right-click on your target partition and select "Extend Volume".
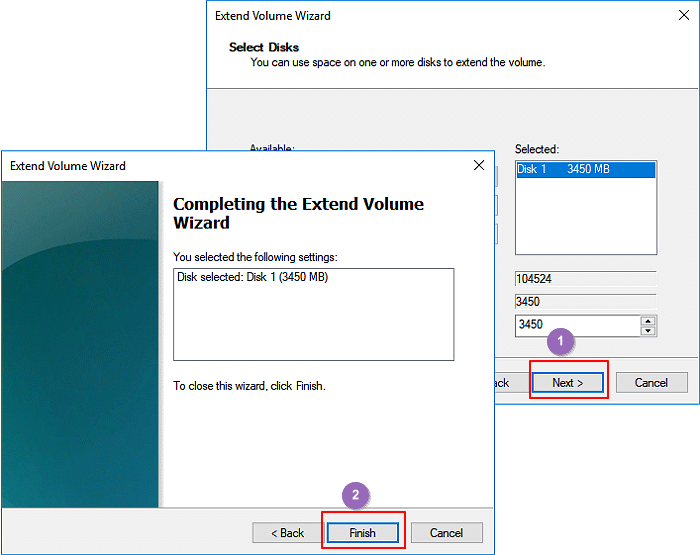
Step 4. Hit "Next" and then enter the size of the unallocated space to add to your target partition.
Step 5. Hit "Next" and "Finish" to complete.
#Case 2. There's no appropriate free or unallocated space on your drive, so you need to shrink a volume first.
Step 1. Press the "Windows + R" keys to open the Run dialog box.
Step 2. Input diskmgmt.msc and hit "Enter".
Step 3. Right-click your target partition and choose "Shrink Volume".
Step 4. Type in the amount of space you want to shrink for that partition and hit "Shrink".
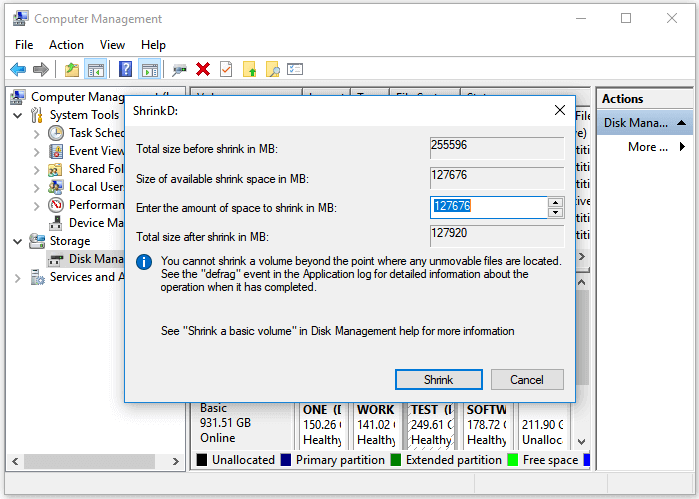
Then, you'll get an unallocated space on your drive. You can refer to case 1 to allocate the unallocated space for another partition now.
It is worth mentioning that some users might find the "Extend Volume" option greyed out. This is mainly because there is no adjacent free or unallocated space behind the volume you want to extend, or the partition is a FAT or other format partition. You can read the following article for more details.

Extend Volume Greyed Out? Fix Can't Extend Volume in Windows [New]
When you find "extend volume" greyed out in Disk Management, you are unable to extend the volume. Do not worry! We will show you an effective way here to tell you how to fix the issue and extend your target partition volume with easy steps. Read more >>
Easier Way: Extend Volume with EaseUS Partition Master
If you are confused with those limits of Disk Management, I recommend you use powerful third-party software - EaseUS Partition Master Professional.
Compared with Disk Management, it has a friendly interface and more practical features. The "Resize & Move" feature even allows users to extend partitions with nonadjacent unallocated space. Now, check the following steps to extend your volume.
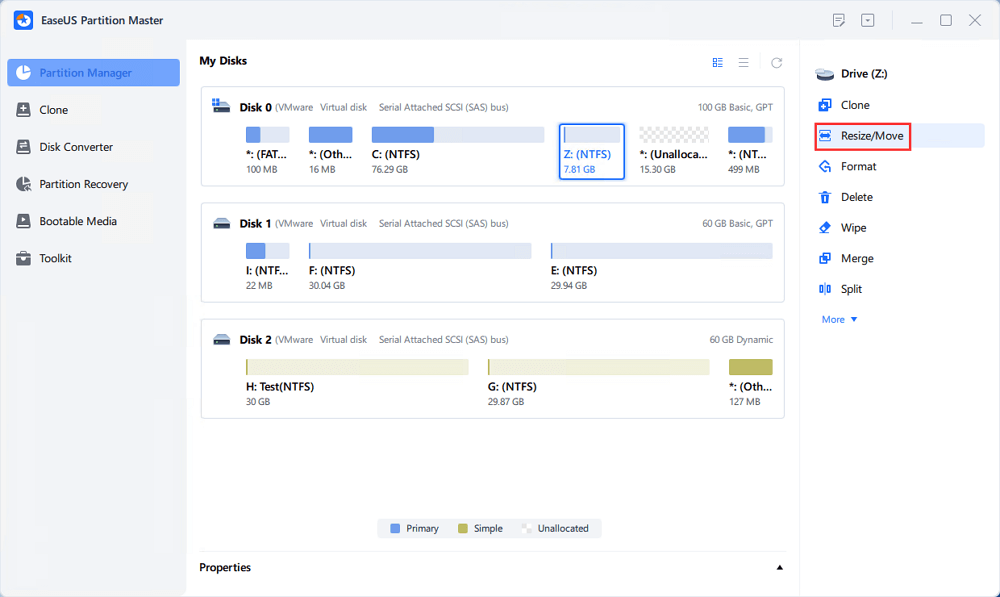
Step 1. Locate the Target Partition.
Go to Partition Manager, locate the target partition and select "Resize/Move".
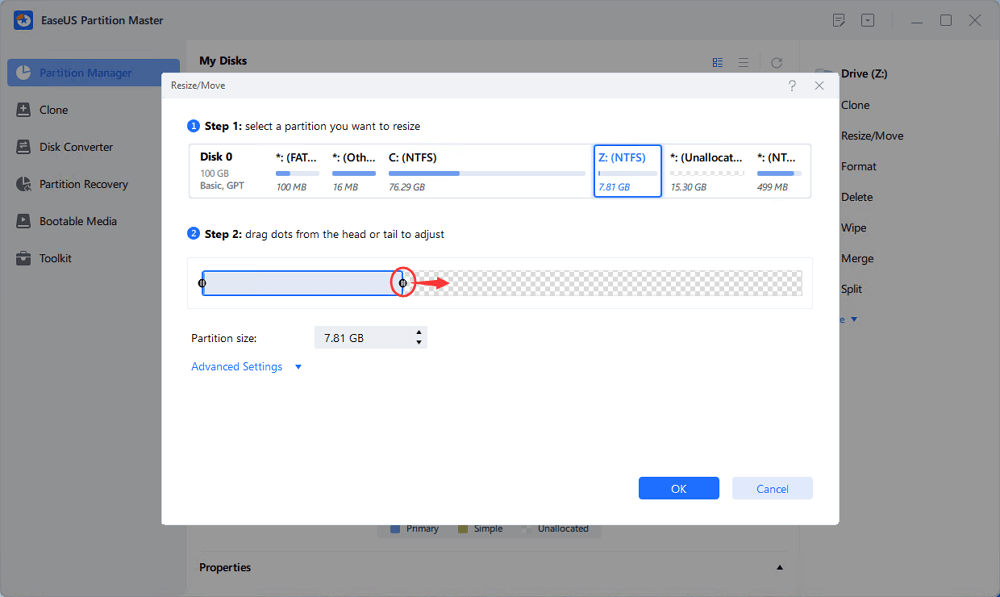
Step 2. Extend the Target Partition.
Drag the partition panel rightward or leftward to add the unallocated space into your current partition, or you can click click "fill in all unallocated" to allocate all space to the target partition. Then, click "OK" to confirm.
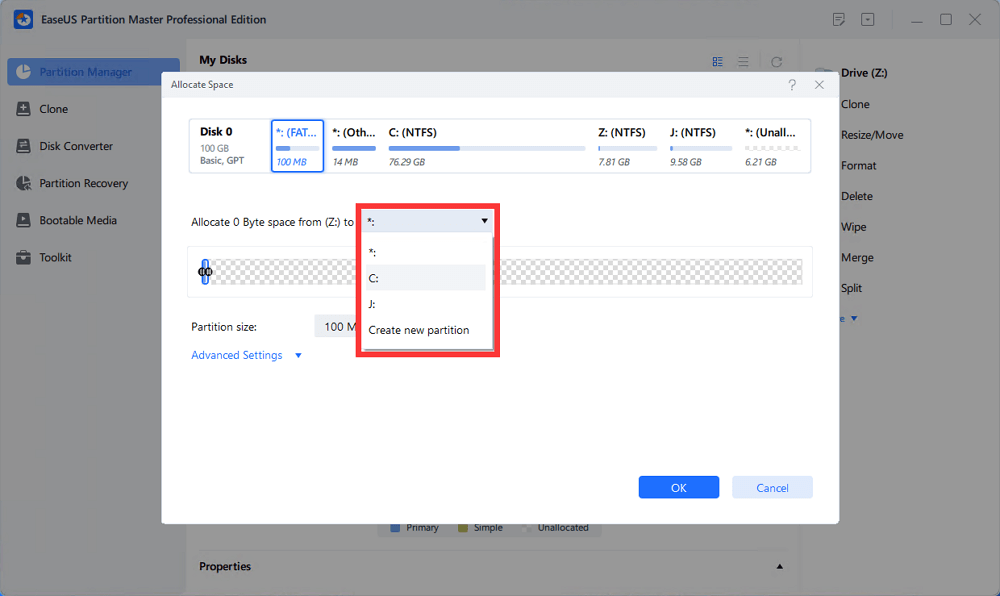
Extra Option: Get Space from Another Drive
If there is not enough unallocated space on your disk, right-click on a big partition with enough free space, select "Allocate space".
Then select the target partition that you want to extend at the allocate space to column.
Step 3. Execute Operations to Extend Partition.
Drag the dots of the target partition into the unallocated space and click "OK".
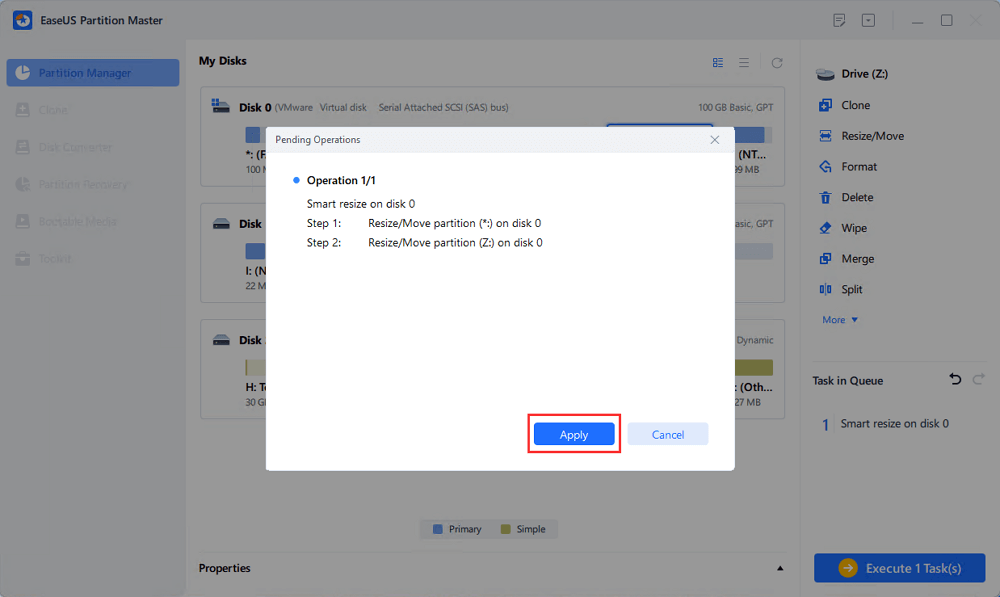
Then Click the "Execute Task" button and click "Apply" to keep all the changes.
Read also:
Why Do You Need to Extend Partitions
If you are wondering about the necessity of extending partitions, below are some typical reasons why you need to do so.
- Get more storage space for the target partition.
- Extending the system partition can enhance your PC's performance.
- Make full use of unallocated space.
- Better management of your personal files and data.
- Troubleshoot low disk space error.
If you find this article useful and practical, share it with your friends who might also need the tutorial on extending partitions.
Conclusion
If you want to extend a partition for more storage space, the first tool you can resort to is Disk Management. In this article, you can learn how to extend volume with Disk Management from the comprehensive tutorial. However, this tool is limited in several ways.
Lucky for you, there are powerful and professional tools like EaseUS Partition Master that can help you partition a hard drive easily and safely. Download this software and enjoy those useful functions now!
FAQs on Extend Volume with Disk Management
If you have more questions related to "Extend volume with Disk Management", check the following FAQs to find your answers.
1. How to extend C drive with Disk Management?
To extend the C drive with Disk Management, you can follow the below steps:
- Press "Windows + R" to open the Run dialog.
- Input diskmgmt.msc and hit "Enter" to run Disk Management.
- Right-click on your C drive and hit "Extend Volume".
- Enter the size you want to extend for the C drive and click "Next".
- Hit "Finish" to complete.
2. Why can't I extend volume in Disk Management?
The reason why you cannot extend volume in Disk Management is that there's no adjacent unallocated space or free space behind the partition you want to extend. Another reason is that Windows can't extend volumes formatted as FAT or other format partitions.
3. How to extend C drive by CMD?
To extend the C drive with CMD, you should launch Command Prompt first and then input several commands. The detailed steps are listed below:
- Hit the "Windows + X" keys and run Command Prompt as Administrator.
- Input the following commands and press "Enter" each time:
diskpart
list volume
select volume x (x is your C drive number)
extend size =number (the number is the MB size you want for extending the C drive)
How Can We Help You
About the Author
Sherly joined EaseUS in 2022 and she has always loved writing articles and enjoys the fun they bring. She receives professional training here, focusing on product performance and other relative knowledge. She has written over 200 articles to help people overcome computing issues.
Oliver is an EaseUS professional writer who dares explore new areas. With a passion for solving tech issues with straightforward guides for common users, Oliver keeps honing his writing craft by developing in-depth solutions for disk and partition management, computer boot-up issues, file transfer, etc.
Product Reviews
-
I love that the changes you make with EaseUS Partition Master Free aren't immediately applied to the disks. It makes it way easier to play out what will happen after you've made all the changes. I also think the overall look and feel of EaseUS Partition Master Free makes whatever you're doing with your computer's partitions easy.
Read More -
Partition Master Free can Resize, Move, Merge, Migrate, and Copy disks or partitions; convert to local, change label, defragment, check and explore partition; and much more. A premium upgrade adds free tech support and the ability to resize dynamic volumes.
Read More -
It won't hot image your drives or align them, but since it's coupled with a partition manager, it allows you do perform many tasks at once, instead of just cloning drives. You can move partitions around, resize them, defragment, and more, along with the other tools you'd expect from a cloning tool.
Read More
Related Articles
-
Partition recovery from unallocated space with EaseUS Partition Master
![author icon]() Tracy King/2024/09/19
Tracy King/2024/09/19 -
How to Downgrade and Rollback Windows 11 24H2 | Safe & Fast
![author icon]() Roxanne/2024/10/31
Roxanne/2024/10/31 -
How to Clone Windows 10 for Free - Beginner's Guide
![author icon]() Sherly/2024/11/18
Sherly/2024/11/18 -
How to Move Unallocated Space to C Drive in Windows 10/11
![author icon]() Sherly/2024/11/27
Sherly/2024/11/27
Hot Topics in 2024
EaseUS Partition Master

Manage partitions and optimize disks efficiently


