Page Table of Contents
About the Author
Hot Topics
Updated on Sep 11, 2024
Ever felt uneasy lending your USB drive to someone because it contains sensitive information? You're not alone! We've all been there - needing to share our drive with a colleague, friend, or family member but concerned about exposing our confidential files. Worry not! There's a simple solution: creating a hidden partition on your USB drive. This clever trick lets you store important files securely while sharing the rest of the drive without a care. By creating a hidden partition, you'll enjoy:
- Privacy protection: Keep sensitive files hidden from prying eyes.
- Data security: Minimize the risk of accidental exposure or deletion.
- Organized storage: Keep your personal files separate from shared ones.
Follow this step-by-step guide on EaseUS to learn how to create a hidden partition on the USB drive and ensure your data remains private and secure.
How to Create Hidden Partition on USB Drive?
Here's how to create a hidden partition on your USB drive, giving you a secure space to store confidential files. Follow the methods below that best suit your comfort level.
Method 1. Use EaseUS Partition Master
For the quick and effortless creation of a hidden partition on your USB drive, EaseUS Partition Master Professional is the ideal solution! This powerful and user-friendly partition management tool caters to beginners and experts alike. With its intuitive interface and robust features, EaseUS Partition Master simplifies partition-related tasks and offers a convenient "hide partition" feature that requires just a few clicks. Hiding a partition has never been easier! Moreover, its comprehensive range of features ensures your data remains safe, secure, and well-organized, making partitioning tasks effortless.
We recommend EaseUS Partition Master for creating hidden partitions because it is:
- Simple, Easy, and Safe: Its user-friendly interface makes partitioning straightforward and secure.
- Professional: It excels in solving issues related to disk partition.
- User-Friendly: Ideal for non-technical users who need to manage their partitions without hassle.
The "hide partition" feature allows you to hide drives in Windows 10 or other operating systems. You can hide any partitions on your USB drive with just a few clicks. Simply choose the partition you want to hide, right-click it, and select the hide option.
You can follow the steps below:
Option 1 - Hide Partition
- Right-click the partition, and choose "Advanced". Select "Hide" from the drop-down menu.
- Then you will see a window showing the notification. Read the instructions and click "Yes" to continue.
- Click the "Execute 1 Task(s)" button in the top-left corner. Then, click "Apply" to hide your partition.
Option 2 - Unhide Partition
- Right-click the partition you want to view and access. choose "Advanced" and select "Unhide" from the drop-down menu.
- Read the instructions and click "Yes" to continue.
- Click the "Execute 1 Task(s)" button in the top-left corner. Check the pending operations, then click "Apply" to unhide the partition on Windows 11/10/8/7.
EaseUS Partition Master offers a variety of other useful features to manage your partitions, including:
- Unhide Partition: Easily access your hidden partition whenever needed.
- Resize Partition: Adjust the size of your partitions for optimal storage allocation.
- Move Partition: Effortlessly relocate partitions on your drive without data loss.
- Copy Partition: Securely copy a hidden partition to another USB or drive.
We highly recommend downloading EaseUS Partition Master to manage your partitions efficiently and securely.
Method 2. Use Diskpart
You can use the built-in Diskpart tool to create a hidden partition but this method requires a high level of technical proficiency. Only proceed if you are confident in your command line skills. Trying this method without sufficient expertise may result in errors or data loss.
Follow the steps to create a hidden partition on your USB drive:
Step 1. Open Command Prompt as an administrator.
Step 2. Type diskpart and press Enter.
Step 3. Enter list volume to display all volumes.
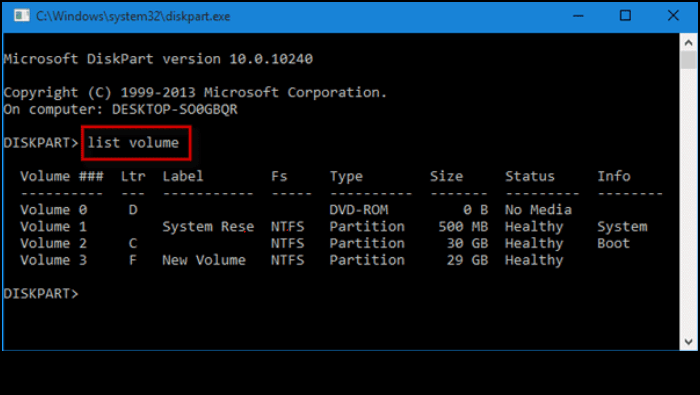
Step 4. Select the volume you want to hide by typing select volume X (replace X with the volume number).
Step 5. Hide the partition by typing remove letter X (replace X with the drive letter).
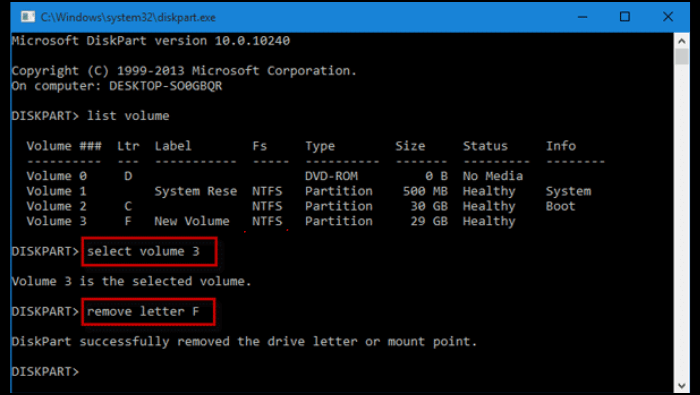
Step 6. Whenever you want to unhide the hard disk partition, type select volume x and press Enter to select the hidden partition you want to show. To show hidden partition via command prompt, type assign letter X (replace X with the drive letter) and press Enter.
Method 3. Use Disk Management
If you prefer using a graphical interface instead of command lines, Disk Management is a great alternative. This built-in Windows tool allows you to manage your partitions visually, making the process more intuitive and accessible.
Here's how you can use Disk Management to create a hidden partition on your USB drive:
Step 1. Right-click on the "Win + X" menu and click "Disk management" to open it.
Step 2. Right-click the partition you want to hide and choose "Change Drive Letter and Paths."
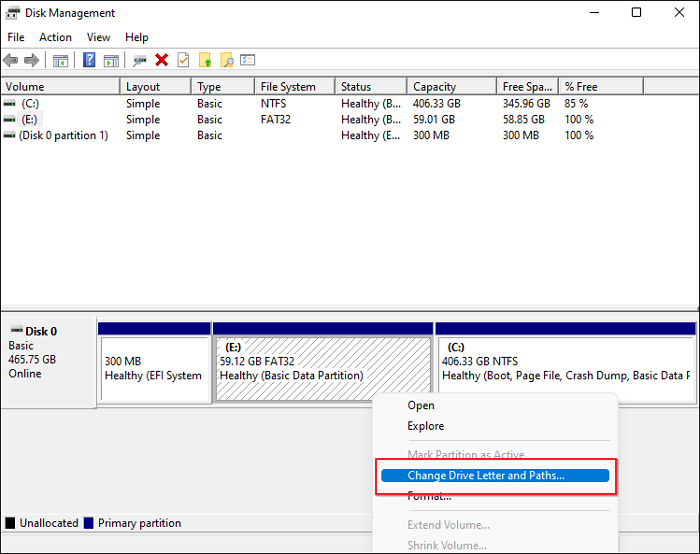
Step 3. In the "Change Drive Letter and Paths" dialog, click the "Remove" button.
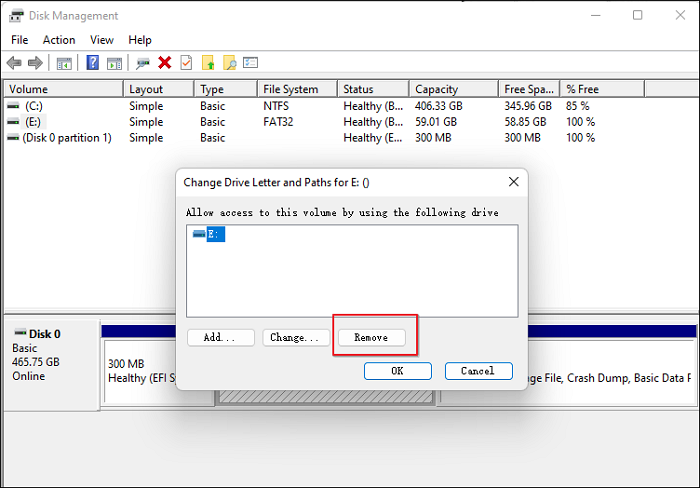
Step 4. Click "Yes" to confirm. This will remove the drive letter and hide the partition from view in File Explorer.
Step 5. If you want to make the hidden partition visible, simply follow the above steps and click the "Add" button.
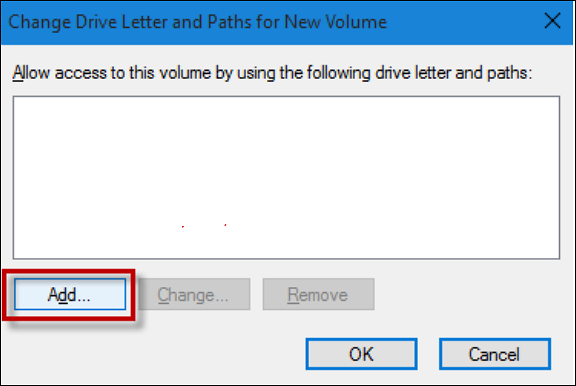
Step 6. Choose "Assign the following drive letter" and choose a letter from the drop-down menu. Click "OK" to confirm. Once you've assigned a drive letter, the partition will become visible in File Explorer.
Don't forget to share this article with others who need to create a hidden partition on USB.
Method 4. Use Local Group Policy Editor
You can also hide partitions through Local Group Policy Editor. This approach offers advanced configuration options, allowing you to hide partitions by yourself. If you're comfortable navigating through system settings, follow these steps to hide a partition using the Local Group Policy Editor:
Step 1. Type Edit group police in the Windows search box and click on it.
Step 2. Navigate through the policy folders in the left pane: User Configuration > Administrative Templates > Windows Components.
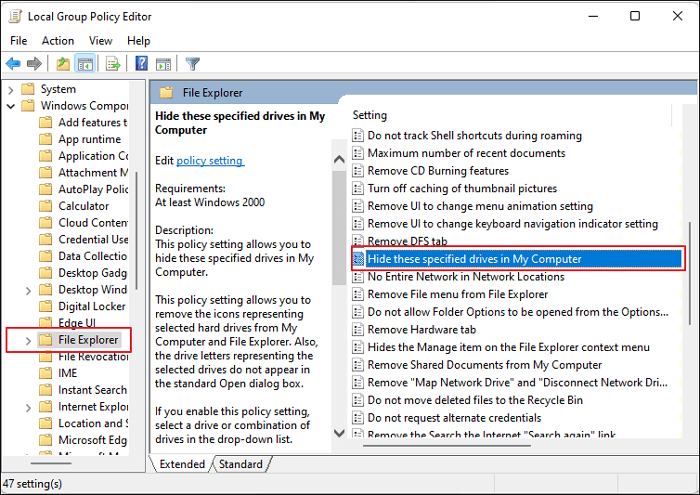
Step 3. Locate and click on "File Explorer" in the left pane.
Step 4. In the right pane, double-click the policy setting named "Hide these specified drives in My Computer."
Step 5. A new window will appear. Select the "Enabled" button. Under "Options", choose the drive letter corresponding to the USB partition you want to hide. Click "OK" to save the changes. This will prevent the chosen drive letter from appearing in File Explorer.
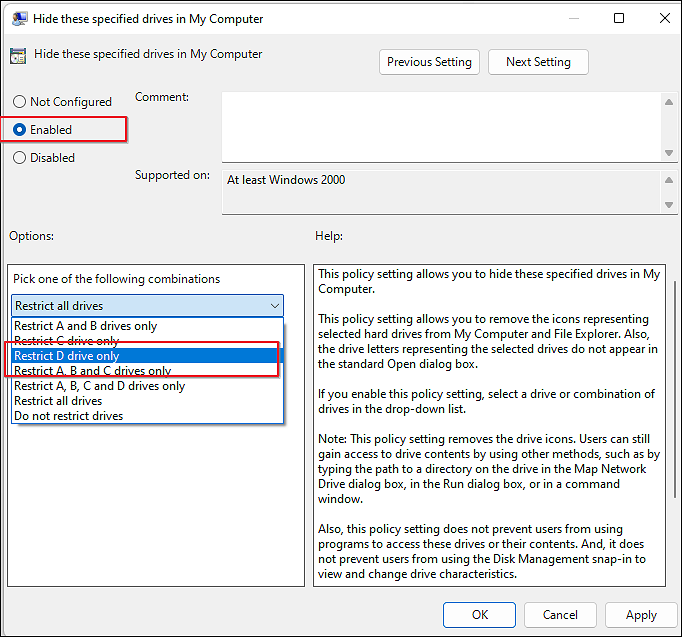
Step 6. To unhide the hard disk partition, choose either "Not Configured" or "Disabled" and then click "OK."
Conclusion
Creating a hidden partition on your USB drive is an effective way to protect your sensitive data and maintain organized storage. There are several ways to create hidden partitions on USB drives. Using EaseUS Partition Master is the easiest and safest way to create and manage hidden partitions, with its user-friendly interface and robust features. It also offers the convenience of easily unhiding partitions when needed. This tool is highly recommended for both beginners and experts, allowing for simple partition hiding, resizing, moving, and formatting.
Download EaseUS Partition Master to ensure your data remains private, secure, and well-organized.
FAQs About How to Create Hidden Partition on USB Drive
Do you have any queries about creating a hidden partition on your USB drive? Check out the FAQs below.
1. How to locate my hidden partition on HDD?
You can use partition management tools like EaseUS Partition Master or the built-in Disk Management tool in Windows. These tools allow you to view and manage all partitions, including hidden ones. In Disk Management, hidden partitions will appear without a drive letter.
2. How to copy hidden partition to another drive/USB?
The process of copying a hidden partition is similar to copying any other partition. However, you'll need to ensure the destination drive has sufficient space to accommodate the hidden partition's size.
3. How do I remove a hidden partition from a USB drive?
In Disk Management, locate the hidden partition, right-click it, and select "Delete Volume". Be sure to back up any important data before deleting the partition.
How Can We Help You
About the Author
Cici is the junior editor of the writing team of EaseUS. She accepted the systematic training on computers at EaseUS for over one year. Now, she wrote a lot of professional articles to help people resolve the issues of hard drive corruption, computer boot errors, and disk partition problems.
Product Reviews
-
I love that the changes you make with EaseUS Partition Master Free aren't immediately applied to the disks. It makes it way easier to play out what will happen after you've made all the changes. I also think the overall look and feel of EaseUS Partition Master Free makes whatever you're doing with your computer's partitions easy.
Read More -
Partition Master Free can Resize, Move, Merge, Migrate, and Copy disks or partitions; convert to local, change label, defragment, check and explore partition; and much more. A premium upgrade adds free tech support and the ability to resize dynamic volumes.
Read More -
It won't hot image your drives or align them, but since it's coupled with a partition manager, it allows you do perform many tasks at once, instead of just cloning drives. You can move partitions around, resize them, defragment, and more, along with the other tools you'd expect from a cloning tool.
Read More
Related Articles
-
NVMe Speed Test Tutorial on Windows [3 Efficient Ways]
![author icon]() Cici/2024/11/15
Cici/2024/11/15 -
How to Format An External Hard Drive That Is Not Visible [Efficient Ways]
![author icon]() Cici/2024/10/29
Cici/2024/10/29 -
File Too Large for Destination: How to Copy/Transfer Files Larger than 4GB to FAT32
![author icon]() Brithny/2024/10/29
Brithny/2024/10/29 -
How to Clone Hard Drive to Samsung SSD | 2024 Tutorial
![author icon]() Tracy King/2024/11/27
Tracy King/2024/11/27
Hot Topics in 2024
EaseUS Partition Master

Manage partitions and optimize disks efficiently


