Page Table of Contents
About the Author
Hot Topics
Updated on Jan 29, 2026
Usually, the problem of Windows booting with a black screen and cursor after cloning to SSD/HDD is caused by the wrong drive letter assignment.
If you want to completely avoid the Windows black screen error after cloning the disk, you can choose EaseUS Partition Master Professional to clone the disk. Professional cloning programs automatically identify and assign the correct drive letter to your hard drive. Besides, it can assign a new drive letter to fix the current error.
You can click the button below to download this professional disk cloning tool directly.
How to Fix Black Screen After Cloning Disk
As just mentioned, the wrong drive letter may be the cause of the Windows 10/11 Black Screen After Cloning Disk. This section gives you two fixes - change the drive letter or use the registry.
Fix 1. Change the Drive Letter
An incorrect drive letter assignment can cause Windows 10/11 to boot up with a black screen after cloning to SSD/HDD. You can try to fix it by correcting the drive letter. Please follow the steps below.
Step 1: Boot your Windows PC into safe mode when stuck on a black screen after cloning SSD.
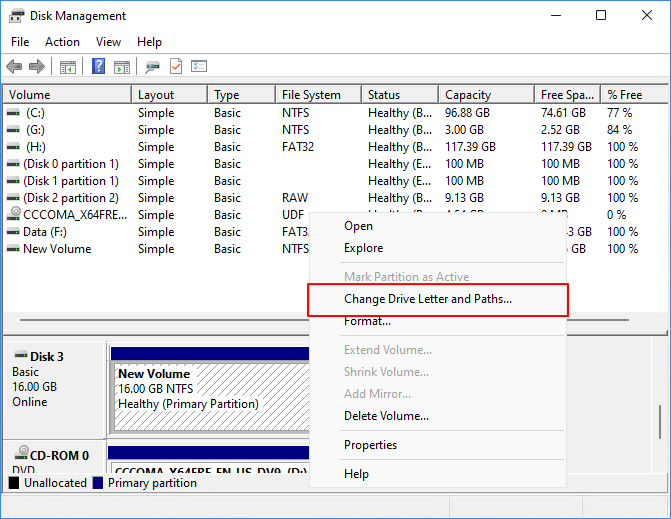
Step 2: Right-click the Start icon in Safe Mode and select Disk Management.
Step 3: Ensure the C drive is your system drive and there are no other drives assigned to the drive letter C. If not, right-click the problematic disk drive and select "Change Drive Letter and Paths" to reassign the drive letter.

Step 4: Once completed, restart your computer from the cloned disk and see if the "Black screen after cloning disk" issue still exists.
Don't forget to share this article to help remove the black screen after cloning.
Fix 2: Modify the Registry
You can also get rid of the black screen after cloning a disk by making some changes to the Windows Registry. If your cloned drive boots into a black screen, follow the given steps to fix it.
Step 1: Boot Windows into the recovery environment (WinRE).
Step 2: Go to Troubleshooting > Advanced Options > Command Prompt.
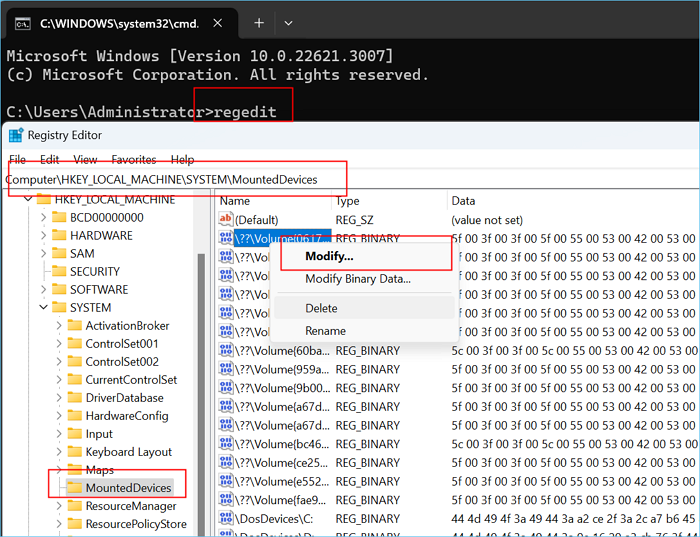
Step 3: In an elevated command prompt, type regedit and press Enter.
Step 4: After opening the Registry Editor, navigate to the following path:
HKEY_LOCAL_MACHINE\SYSTEM\MountedDevices
Step 5: After that, right-click on the value in the right panel and select Delete. Repeat this until all values except (Default) are removed.

Step 6: Then restart your computer, and Windows will automatically recognize and assign the correct drive letter to your hard drive. In this way, the problem of a black screen after cloning the disk may not happen again.
These two fixes work well when your PC OS boots into a black screen after cloning to an SSD or an HDD. However, if there is a way to avoid the black screen error, why not try it?
Turn to EaseUS Partition Master to Avoid Black Screen After Cloning
EaseUS Partition Master Professional is the best disk cloning software that can help you clone disks (HDD or SSD) without the problem of a black screen after cloning the disk. Because it will automatically change the boot order and assign the correct drive letter for you, it is suitable for all Windows users and is very easy to use for beginners.
Here are the detailed steps:
Step 1. Select the source disk.
- Click the "Clone" from the left menu. Select the "Clone OS Disk" or "Clone Data Disk" and click "Next".
- Choose the source disk and click "Next".
Step 2. Select the target disk.
- Choose the wanted HDD/SSD as your destination and click "Next" to continue.
- Read Warning message and confirm "Yes" button.
Step 3. View the disk layout and edit the target disk partition size.
Then click "Continue" when the program warns it will wipe out all data on the target disk. (If you have valuable data on the target disk, back up it in advance.)
You can select "Autofit the disk", "Clone as the source" or "Edit disk layout" to customize your disk layout. (Select the last one if you want to leave more space for C drive.)
Step 4. Click "Start" to start the disk cloning process.
It also comes with a boot repair feature and can remove the PC's black screen/blue screen while gaming or after cloning. Click the link to get more details about this tool.
Conclusion
This article provides effective methods to solve the Windows black screen after cloning the disk. You can have a try. Usually, the problem of Windows booting with a black screen and cursor after cloning to SSD/HDD is caused by the wrong drive letter assignment. Therefore, you can try to fix it by assigning a correct drive letter. For beginners, third-party tools may be a better choice. EaseUS Partition Master, a free SSD cloning software, can also directly help you avoid the problem of a black screen after cloning.
Windows Black Screen After Cloning FAQs
PC can meet a black screen after you clone Windows to an SSD/HDD. Continue to read and get more details about this error.
1. Why is my drive not bootable after cloning?
Make sure you have set the cloned drive as the boot drive. Then, Why is my drive not bootable after cloning?
If the cloned drive is a GPT disk, ensure the UEFI boot mode is enabled, and if it is an MBR disk, then set it to Legacy boot mode.
2. Why is there a black screen when booting up Windows after cloning?
Many reasons can cause this problem:
- Wrong drive letter
- Some settings are not enabled in Windows to accommodate SSDs
- Wrong boot sequence
- Wrong Legacy or UEFI settings
Many users solve the black screen after cloning by reinstalling Windows.
3. How do I boot from SSD after cloning?
You need to set the SSD as the first boot drive. Follow these steps to do so:
Step 1. Restart your PC, and press the BIOS key (F2/F8/F11 or Del key) to enter the BIOS environment.
Step 2. Go to the boot section and set the cloned SSD as the first boot drive in BIOS.
How Can We Help You
About the Author
Updated by Tracy King
Tracy became a member of the EaseUS content team in 2013. Being a technical writer for over 10 years, she is enthusiastic about sharing tips to assist readers in resolving complex issues in disk management, file transfer, PC & Mac performance optimization, etc., like an expert.
Sherly joined EaseUS in 2022 and she has always loved writing articles and enjoys the fun they bring. She receives professional training here, focusing on product performance and other relative knowledge. She has written over 200 articles to help people overcome computing issues.
Product Reviews
-
I love that the changes you make with EaseUS Partition Master Free aren't immediately applied to the disks. It makes it way easier to play out what will happen after you've made all the changes. I also think the overall look and feel of EaseUS Partition Master Free makes whatever you're doing with your computer's partitions easy.
Read More -
Partition Master Free can Resize, Move, Merge, Migrate, and Copy disks or partitions; convert to local, change label, defragment, check and explore partition; and much more. A premium upgrade adds free tech support and the ability to resize dynamic volumes.
Read More -
It won't hot image your drives or align them, but since it's coupled with a partition manager, it allows you do perform many tasks at once, instead of just cloning drives. You can move partitions around, resize them, defragment, and more, along with the other tools you'd expect from a cloning tool.
Read More
Related Articles
-
5 Blackmagic Disk Speed Test Alternatives for Mac
![author icon]() Oliver/2026/01/29
Oliver/2026/01/29 -
We Couldn't Create a New Partition or Locate an Existing One
![author icon]() Daisy/2026/01/29
Daisy/2026/01/29 -
How to Extend C Drive in Windows 10? [3 Efficient Ways]
![author icon]() Tracy King/2026/01/29
Tracy King/2026/01/29 -
NVMe Speed Test Tutorial on Windows [3 Efficient Ways]
![author icon]() Cici/2026/01/29
Cici/2026/01/29
Hot Topics
EaseUS Partition Master

Version 20.0 is here - full exFAT support, easier disk partitioning, and PC performance optimization.


