Page Table of Contents
About the Author
Hot Topics
Updated on Jan 29, 2026
The Resilient File System (ReFS) is a modern file system introduced by Microsoft with Windows Server 2012. It is designed to overcome the limitations of the older NTFS file system and provide enhanced data integrity, resilience, and scalability for today's large data volumes.
Therefore, this article from EaseUS will show you how to format ReFS for your drives so that it can meet your specific needs.
How to Format ReFS for Drives
Before formatting to ReFSE, you need to ensure you are running a compatible Windows version.
Currently, ReFS supports Windows Server 2022/ 2019/2016/2012, Windows 8.1, and later client versions like Windows 10 Pro, Enterprise, and Education editions. In addition, Windows 11 is getting ReFS support as well.
If your system meets the requirement, check below to continue.
- Notice:
- The format process will delete all data on the drive. Create a backup if needed.
- Warning
- Do not format the system drive (usually C:) because ReFS cannot be used as the system boot drive.
Way 1. Format ReFS via EaseUS Partition Master
In order to provide beginners with a convenient and user-friendly formatting solution, EaseUS Partition Master Server has designed an intuitive interface and versatile formatting functionality.
Whether it's a disk or an external device, this tool can help you format it as ReFS with just one click.
100% Secure
Free Inquiry
- Suitable for: All users (beginners and experts)
- Supported OS: All Windows Server
- File System Compatibility: ReFS/NTFS/FAT32/exFAT/Ext2/Ext3/Ext4
Follow the steps here to format the hard drive to ReFS with ease:
Step 1. Launch EaseUS Partition Master, right-click the partition you intend to format and choose "Format".
Step 2. In the new window, enter the Partition label if you prefer to rename it, choose the FAT32/EXT2/EXT3/EXT4 file system, and set the cluster size according to your needs, then click "OK".
Step 3. Then you will see a warning window, click "Yes" in it to continue.
Step 4. Click the "Execute 1 Task(s)" button in the top-left corner to review the changes, then click "Apply" to start formatting the partition to FAT32/EXT2/EXT3/EXT4.
This tool not only allows you to convert NTFS to ReFS, but other file systems are also supported.
100% Secure
Free Inquiry
Way 2. Format ReFS via Disk Management
You can also format the drive to ReFS through the Windows built-in utility - Disk Management.
Step 1. Right-click on the Start menu icon and select "Disk Management."
Step 2. In Disk Management, right-click on the target drive partition and select "Format."
Step 3. In the Format window, select "ReFS" from the File system dropdown menu.
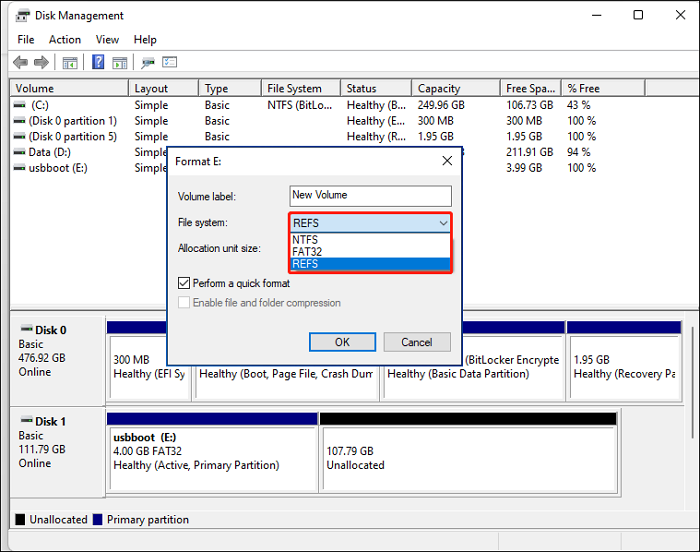
Step 4. Optionally, you can set the allocation unit size, volume label, and tick "Perform a quick format" if desired.
Step 5. Click "OK" and proceed.
However, if you are using a Windows 10/11 Home and trying to format an external hard drive, you won't find the ReFS option in Disk Management because it's not supported.
Way 3. Format ReFS via Command Line
Command Prompt also allows users to format a partition to ReFS with a few command lines.
Step 1. In the Taskbar search box, enter a Command Prompt and open it as an administrator.
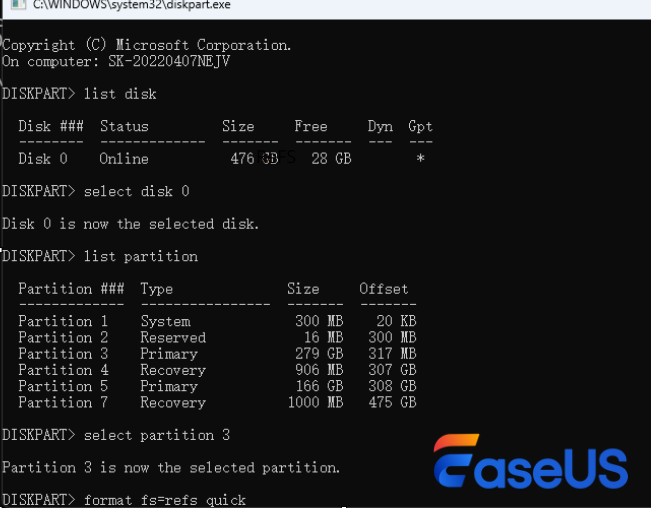
Step 2. Type in the following commands and hit "Enter" after each:
- diskpart
- list disk
- select disk X (Replace X with the number of the disk that contains the target partition)
- list partition
- select partition Y (Replace Y with the number of the partition you want to format to ReFS)
- format fs=refs quick
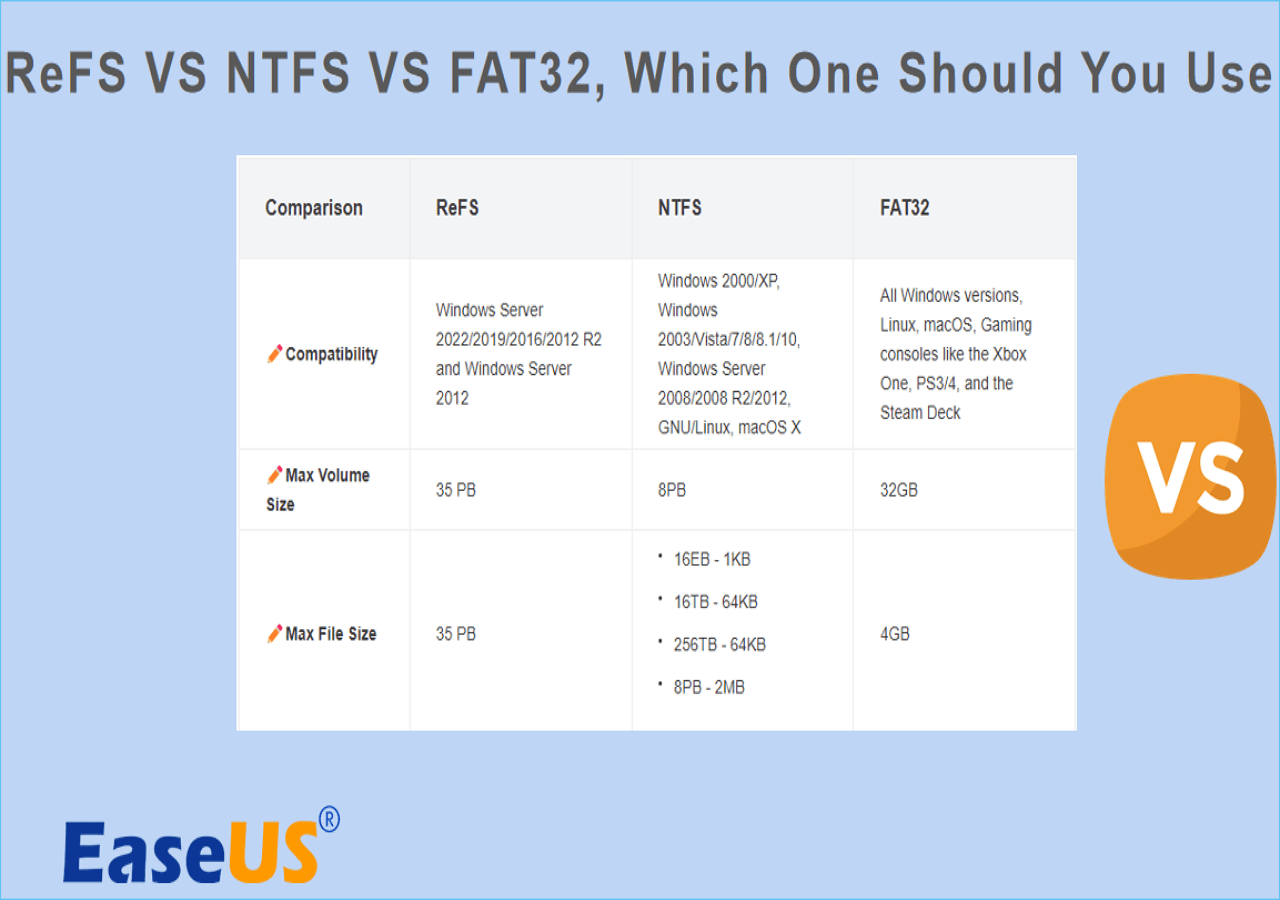
For more detailed information on the differences among these file systems, you can check the article below.
ReFS VS NTFS VS FAT32, Which One Should You Use?
Do you know the difference between ReFS, NTFS, and FAT32? If not, this page covers detailed information on their distinction. Click here and learn more.
Enable ReFS on Windows (Windows 8.1/10)
While ReFS is supported on Windows 8.1 and Windows 10, you may need to enable it manually to format a drive with ReFS. Here's how:
Step 1. Press the "Win" + "R" keys and enter regedit to open the registry editor.
Step 2. Go to HKEY_LOCAL_MACHINE\SYSTEM\CurrentControlSet\Control\FileSystem.
Step 3. Right-click on the blank area on the right and select "New">"DWORD (32-bit) Value."
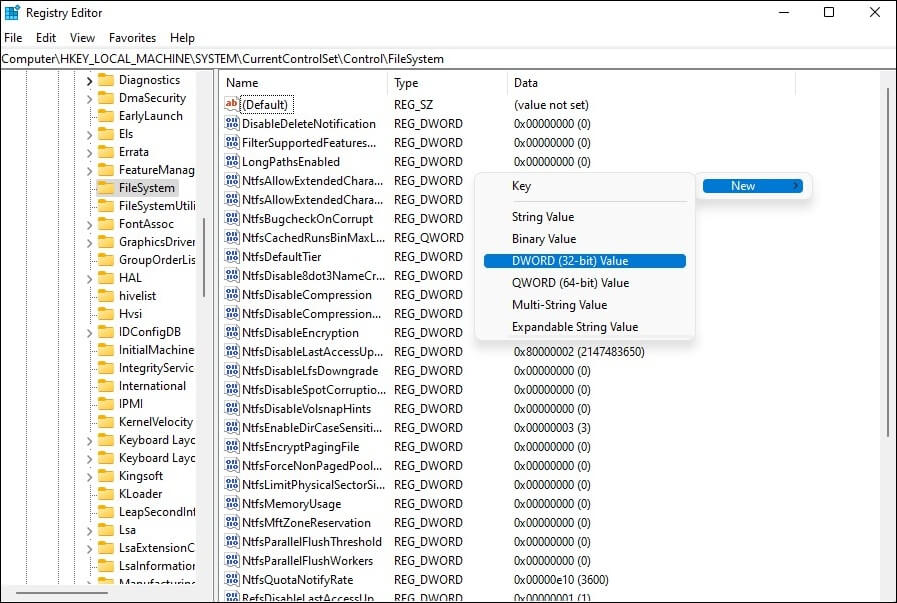
Step 4. Then, name the parameter with the name RefsDisableLastAccessUpdate and enter 1 as its value.
Step 4. Go to HKEY_LOCAL_MACHINE\SYSTEM\CurrentControlSet\Control\MiniNT.
If there's no MiniNT folder, select "Edit" > "New" > "Key" to create one.
Step 5. In MiniNT, create a 32-bit DWORD parameter and name it AllowRefsFormatOverNonmirrorVolume. Also, enter 1 as its value.
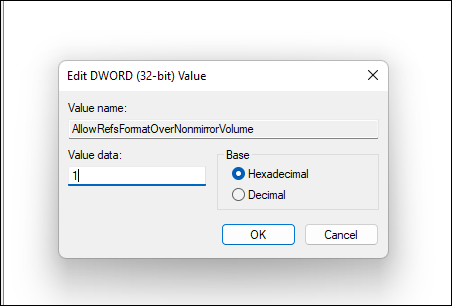
Step 6. Restart your PC and you should be able to format the drive to ReFS.
If you found this guide on how to format ReFS for drives helpful, please share it with others who may benefit from it.
Conclusion
This page covers a full guide for users to format a drive to ReFS. From the preparation to the additional tip on how to enable ReFS for Windows 8.1 and 10, you can follow these steps to complete the process with ease. Among the methods, EaseUS Partition Master offers the easiest and safest way for beginners who are not familiar with the operation. Download this ReFS format tool if you are looking for a quick and secure measure.
100% Secure
Free Inquiry
FAQs on How to Format ReFS
-
Q1. Is ReFS better than NTFS?
- ReFS vs. NTFS, which is better depends on your specific needs. ReFS provides better data resiliency, scalability for large data volumes, and performance benefits while NTFS remains more widely compatible, which is more suitable for most situations.
-
Q2. Will ReFS replace NTFS?
- No, ReFS is unlikely to completely replace NTFS as the default file system in Windows. Although ReFS offers some advantages, NTFS is still a better choice in many daily scenarios.
-
Q3. Does Windows 11 Home Support ReFS?
- No, Windows 11 Home does not support ReFS. ReFS support in Windows 11 is only on the Enterprise, Education, and Workstation editions
How Can We Help You
About the Author
Oliver is an EaseUS professional writer who dares explore new areas. With a passion for solving tech issues with straightforward guides for common users, Oliver keeps honing his writing craft by developing in-depth solutions for disk and partition management, computer boot-up issues, file transfer, etc.
Product Reviews
-
I love that the changes you make with EaseUS Partition Master Free aren't immediately applied to the disks. It makes it way easier to play out what will happen after you've made all the changes. I also think the overall look and feel of EaseUS Partition Master Free makes whatever you're doing with your computer's partitions easy.
Read More -
Partition Master Free can Resize, Move, Merge, Migrate, and Copy disks or partitions; convert to local, change label, defragment, check and explore partition; and much more. A premium upgrade adds free tech support and the ability to resize dynamic volumes.
Read More -
It won't hot image your drives or align them, but since it's coupled with a partition manager, it allows you do perform many tasks at once, instead of just cloning drives. You can move partitions around, resize them, defragment, and more, along with the other tools you'd expect from a cloning tool.
Read More
Related Articles
-
How to Format HDD/External Hard Drive to FAT32 [Your Step-by-Step Guide Is Here]
![author icon]() Daisy/2026/01/29
Daisy/2026/01/29 -
22H2/23H2 to 24H2 Windows 11 Update Guide✅
![author icon]() Cici/2026/01/29
Cici/2026/01/29 -
How to Convert NTFS to FAT32 | NTFS to FAT32 Converter [No Data Loss]
![author icon]() Brithny/2026/01/29
Brithny/2026/01/29 -
External SSD Slow Write Speed? Here are 4 Efficient Fixes
![author icon]() Sherly/2026/01/29
Sherly/2026/01/29
Hot Topics
EaseUS Partition Master

Version 20.0 is here - full exFAT support, easier disk partitioning, and PC performance optimization.


