Page Table of Contents
About the Author
Hot Topics
Updated on Jun 20, 2024
How do I Move Windows Server to HDD or SSD
There are many reasons why there is an increasing demand for Windows Server users to transfer Server 2022/2019/2016 to HDD/SSD. Windows Server may run start to lag due to long-term use, so transferring it to a new HDD or SSD enhances the computer OS booting and operating performance.
Also, suppose you just got a new PC, and you want it running with the same operating system server. In that case, you need to transfer Windows Server to the new PC with the aid of an external HDD/SSD device, and sometimes your computer might face different boot issues, migrating the Windows Server OS to HDD/SSD helps you prepare for this.
| Workable Solutions | Step-by-step Troubleshooting |
|---|---|
| Prerequisite: Purchase a New HDD/SSD | The first is to purchase a new HDD/SSD, and the next is to prepare it...Full steps |
| Tutorial: Migrate or Transfer Windows Server | Step 1. Select "Migrate OS" from the top menu. Select the SSD or HDD as the destination disk...Full steps |
| Follow-up: Make Windows Server OS Bootable | Restart your PC with the new HDD/SSD inserted in your computer and press DEL, F1, or F2...Full steps |
A typical Windows user may create the idea of utilizing the copy and paste option for transferring data to a new disk. However, these operations aren't performed by copying and pasting the Windows Server system and data to a new HDD/SSD. The Server system won't be bootable using this process.
To effectively migrate Windows Server 2022/2019/2016 to a new HDD/SSD, you need reliable software to perform the task efficiently. Following this tutorial guide to the letter will enable you successfully transfer Windows Server 2022/2019/2016 or older Server system versions to a new hard drive or SSD.
Prerequisite: Purchase a New HDD/SSD and Get It Ready
There are a few measures you need to take before beginning the whole process of transferring Windows Server. The first is to purchase a new HDD/SSD, and the next is to prepare it for the migrating process.
#1. Purchase a New HDD/SSD
The first factor to consider when purchasing a data storage drive is deciding if you need a solid-state drive (SSD) or a hard disk drive (HDD). SSDs perform the same function like any traditional HDD except that they use flash memory in contrast to the spinning metal disk of HDDs. SSDs read/write data faster, consume less power, are noiseless, have a longer lifespan, are more expensive, and have smaller data space than HDDs at any price. If you require as much storage space you can get, and money is a limiting factor, you can go with an HDD.
For most internal drives (HDD/SSD), SATA connectors are used for connectivity, and for external drives, irrespective of whether they are HDDs or SSDs, they connect to your system through a USB port. HDDs cap out 18TB per drive storage space due to physical limitations, while consumer-grade SSDs maxes around 5 – 8TB per drive. However, SSDs are very efficient data read/write and possess higher RPM for quick data transfer to and from the drive.
Depending on what suits you, you can make your choice, as both HDDs and SSDs are sufficient for transferring Windows Server 2022/2019/2016.
#2. Initialize New HDD/SSD to Get It Ready
After purchasing your HDD/SSD, the next action is to get it ready by connecting it with your computer and initializing it with disk management. Here's how to get started:
- Turn off your computer and insert the HDD/SSD through the SATA and power cable. Once done, restart the computer.
- Press the "Windows + R" key from your keyboard and type "diskmgmt.msc". Click OK or tap the Enter key to run Disk Management.
- Locate and right-click the HDD or SSD and click "Initialize Disk." Should the disk be listed as offline, right-click it and select online.
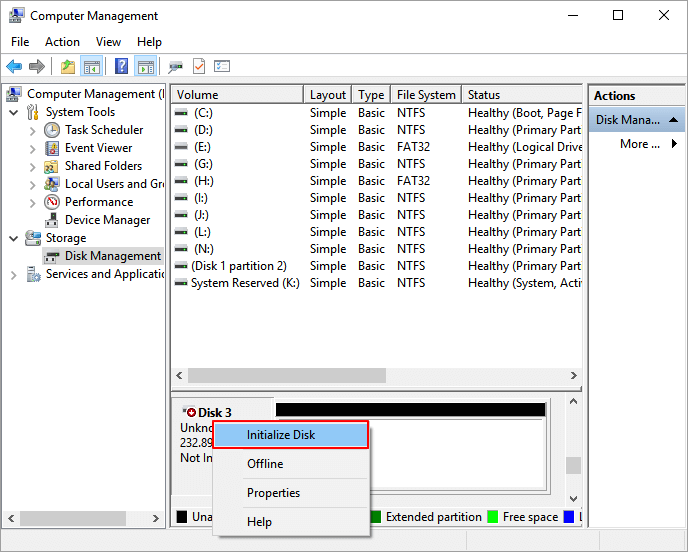
- From the Initialize Disk dialogue window, please choose the appropriate disk to initialize and click OK to use the source partition or adjust the partition style by converting it to MBR or GPT.
With the above process, the HDD/SSD is initialized with ready to use.
Tutorial: Migrate or Transfer Windows Server 2022/2019/2016 to HDD/SSD
To reiterate, you need a third-party tool to migrate or transfer Windows Server to HDD/SSD effectively. One such tool available for you is the EaseUS Partition Master Enterprise Edition. The EaseUS Partition Master Enterprise Edition is embedded with vital features that serve users' disk management demands.
EaseUS Partition Master Enterprise
Your trustworthy Windows Server disk manager.
- Extend System drive, combine/split partitions.
- Clone disk, migrate OS to HDD/SSD.
- Convert MBR to GPT, GPT to MBR, no data loss.
- 1-click adjust disk layout, create volumes at one time.
100% Secure
Free Inquiry
You can apply its Migrate OS feature to successfully transfer your Windows Server operating system to a new disk with a few easy clicks without reinstalling Windows Server.
Note: The operation of migrating OS to SSD or HDD will delete and remove existing partitions and data on your target disk when there is not enough unallocated space on the target disk. If you saved important data there, back up them to an external hard drive in advance.
Step 1. Select "Clone" from the left menu. Select the "Migrate OS" and click "Next" to continue..
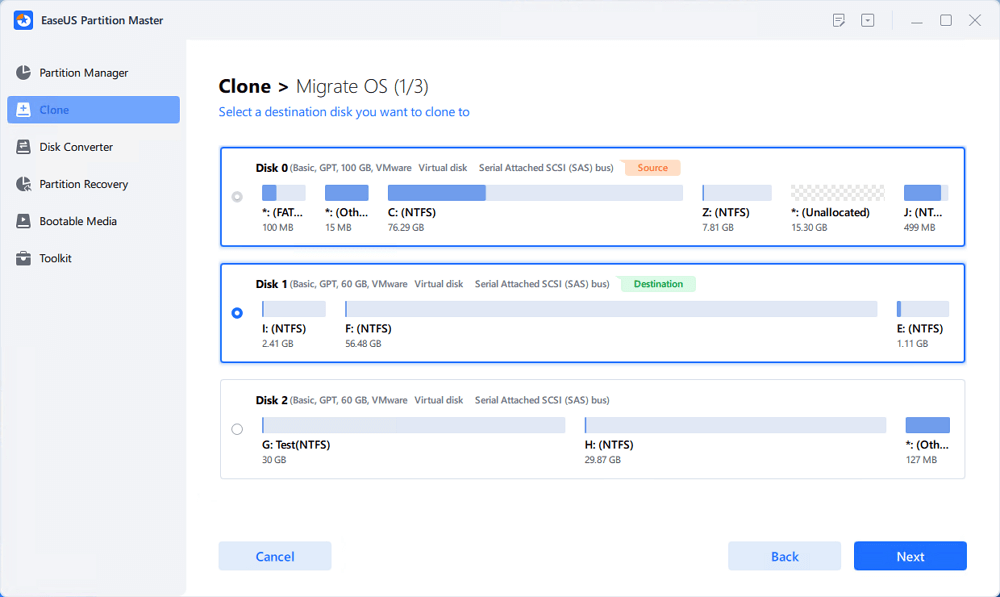
Step 2. Select the target disk you want to clone. Click "Next".
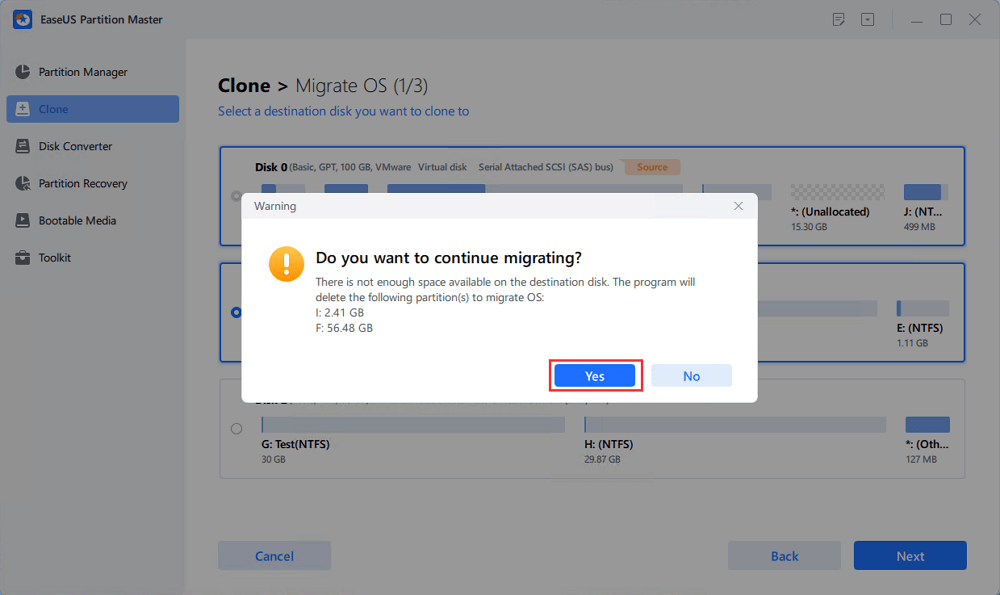
Step 3. Click "Yes" after checking the warning message. The data and partitions on the target disk will be deleted. Make sure that you've backed up important data in advance. If not, do it now.
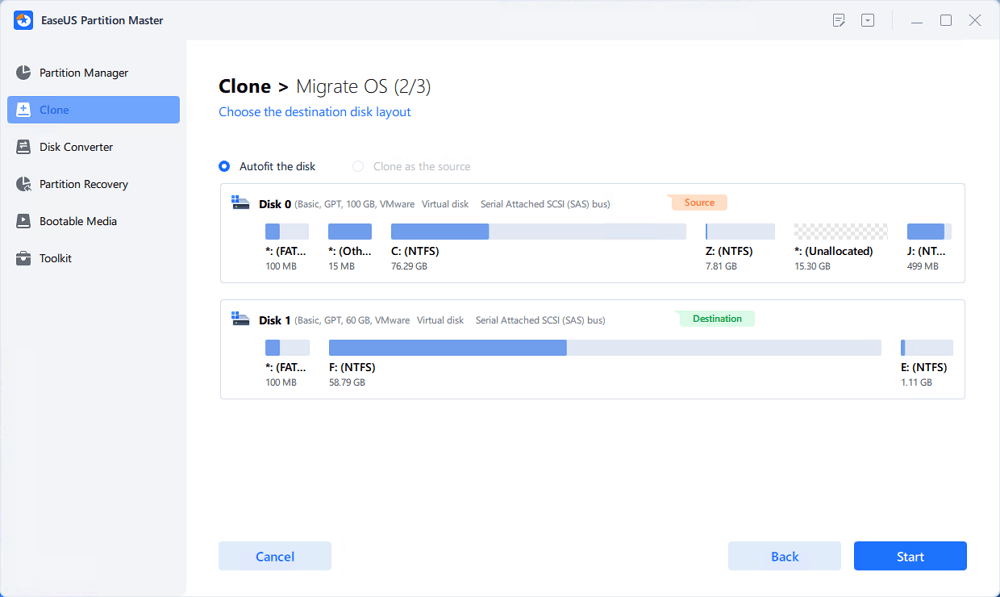
Step 4. Preview the layout of your target disk. You can also click the disk layout options to customize the layout of your target disk as you want. Then click "Start" to start migrating your OS to a new disk
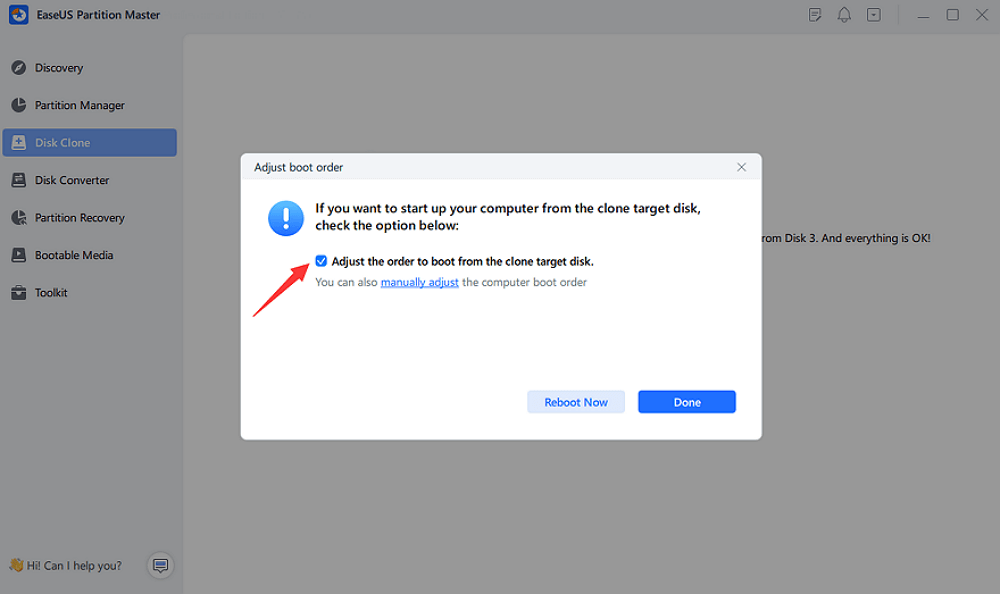
Step 5. When you see a confirming message, asking "If you want to start up computer from the clone target disk", tick "Adjust the order to boot from the clone target disk" and click the respective button through your demands.
- Reboot Now: it means to reboot the PC and boot OS from the new disk immediately.
- Done: it means to make the changes later.
Alongside OS migration, EaseUS Partition Master Enterprise can also wholly clone your disk and replace an outdated or damaged disk with a new one in a few simple clicks.
This software is fully compatible with Windows Server 2022, 2019, 2016, 2012 (R2), 2011, 2008 (R2), and 2003. Personal Windows Server users can directly download and install this software for easy and effective migration of Windows Server to a new HDD/SSD.
100% Secure
Free Inquiry
If you also want to duplicate this operation on your personal computer, upgrade the OS disk and switch the system from HDD to SSD, feel free to download the Pro edition of EaseUS Partition Master on your personal PC and follow this tutorial guide for help:
How to Transfer OS to SSD? Beginners' Guide 2023
EaseUS Partition Master is familiar to users as reputable OS Migration software with which users can move, migrate, and transfer OS to SSD without reinstalling Windows 11/10/8/7.
Follow-up: Make Windows Server OS Bootable in New Disk
To finalize the whole Windows Server migrating process, you must ensure that the new hard disk drive (HDD) or solid-state drive (SSD) with the transferred OS is the boot drive in BIOS settings. Performing this task will enable your computer to boot the Windows Server OS from the new HDD/SSD. Here's an easy guide to carrying out this task.
- Restart your PC with the new HDD/SSD inserted in your computer and press DEL, F1, or F2 (varies with different manufacturers) to enter the BIOS setup.
- Click on Boot located at the top bar of the setup menu to display the boot sequence.
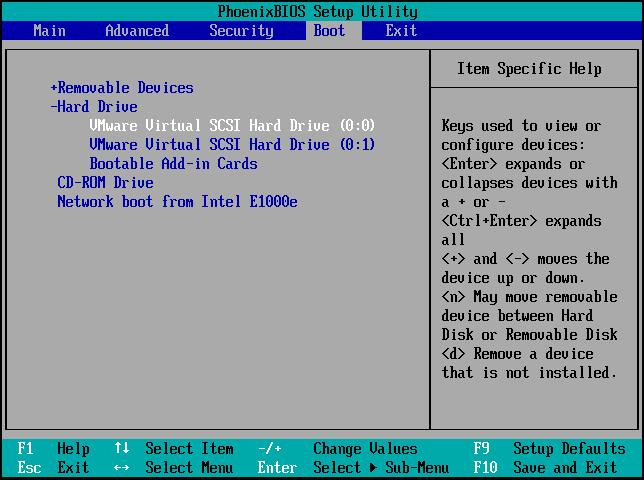
- Set the boot order by using the required key given on your system to set the sequence your device boots for an operating system.
- Set your order to boot from the new disk drive first.
- Press F10 to save the BIOS changes.
- Click Yes in the confirmation prompt to confirm your changes.
Start the computer with the new boot sequence. BIOS will boot from the new hard disk drive or SSD and to the next device on the boot order.
Conclusion
This guide explained the essential steps required in transferring Windows Server 2022/2019/2016 to HDD/SSD. We implored users to use the reliable Server Migrating software – EaseUS Partition Master Enterprise Edition to help perform the migration process. Also, users should make sure that their new drive is initialized and set to boot from BIOS after transferring the Windows OS. We hope you find the vista in this guide very useful as you embark on your Windows OS migrating task.
100% Secure
Free Inquiry
FAQs About Transfer Windows Server System to HDD/SSD
If you have more questions on transferring Windows Server system to a new HDD or SSD disk, refer to the questions and find answers here below:
1. What SSDs are used in Server?
There are three types of SSDs that are widely used in Windows Servers: SATA (Serial Advanced Technology Attachment) SSD, SAS (Serial Attached SCSI) SSD, and NVMe (Non-Volatile Memory Express) SSD.
2. Can you put SSDs in a Server?
Yes, sure. Here are the steps to install a new SSD to Windows Server computer:
- Shut down the Windows Server computer.
- Open the computer case, and collect the SSD to PC.
- For SATA or SAS SSD, connect it to PC via Power Cable and SATA cable. For NVMe, find the SSD slot, slide in NVMe SSD and lock it by fasten its srews.
- Restart Windows Server and initialize SSD on computer in Disk Management.
- Then, you can use it to clone disk, migrate OS, or create new partitions on it to store files.
3. Are SSD better for Servers?
Compare the performance between HDDs and SSDs for Windows Server systems, SSD is faster in reading and reading files, while HDD is slower.Also, SSD is more stable to run programs and systems on it. However, the biggest thing that may attract Server usres to use HDDs could be the price. HDDs with larger storage capacity is cheaper than SSDs.
So, if you tend to use SSDs for operating systems, yes, SSD is better for Servers. As for data storage, HDD is better for Servers.
How Can We Help You
About the Author
Updated by Tracy King
Tracy became a member of the EaseUS content team in 2013. Being a technical writer for over 10 years, she is enthusiastic about sharing tips to assist readers in resolving complex issues in disk management, file transfer, PC & Mac performance optimization, etc., like an expert.
Product Reviews
-
I love that the changes you make with EaseUS Partition Master Free aren't immediately applied to the disks. It makes it way easier to play out what will happen after you've made all the changes. I also think the overall look and feel of EaseUS Partition Master Free makes whatever you're doing with your computer's partitions easy.
Read More -
Partition Master Free can Resize, Move, Merge, Migrate, and Copy disks or partitions; convert to local, change label, defragment, check and explore partition; and much more. A premium upgrade adds free tech support and the ability to resize dynamic volumes.
Read More -
It won't hot image your drives or align them, but since it's coupled with a partition manager, it allows you do perform many tasks at once, instead of just cloning drives. You can move partitions around, resize them, defragment, and more, along with the other tools you'd expect from a cloning tool.
Read More
Related Articles
-
How to Find What Is Taking Up Space on My SSD [Effective Ways]
![author icon]() Roxanne/2024/11/27
Roxanne/2024/11/27 -
How to Fix Service Host Superfetch High Disk Usage
![author icon]() Brithny/2024/11/25
Brithny/2024/11/25 -
Full Guides: Initialize a Hard Drive on Windows 10/11
![author icon]() Sherly/2024/11/27
Sherly/2024/11/27 -
How to Use Clonezilla on Windows 10/11 [2024 Guide] 💡
![author icon]() Roxanne/2024/11/25
Roxanne/2024/11/25
Hot Topics in 2024
EaseUS Partition Master

Manage partitions and optimize disks efficiently


