
Content
Page Table of Contents
About the Author
Hot Topics
What is Superfetch? Can I disable the Superfetch service host? And how to disable it? Check the overview first and then see the details.
| Workable Solutions | Step-by-step Troubleshooting |
|---|---|
| What is Superfetch? | Superfetch is part of Windows Vista and onwards. This technology allows Windows OS to manage...Full steps |
| Fix 1. Disable Superfetch | Use three ways to disable Superfetch: Command Prompt, Registry Editor, and Services...Full steps |
| Fix 2. Fix with Troubleshooting | Go to Control Panel, choose View by Category, click System and Security. Click Security and...Full steps |
| Use a free partition manager | You can enhance your PC and system performance and using a free partition manager...Full steps |
Have you ever meet this situation: "Your PC runs into a problem that it couldn't handle, and the disk usage is nearly 100 percent, which is caused by Service Host: Local System."

This article tells you how to deal with this bad situation. Before we start to fix the high disk usage problem, we must know what the Service Host is and Service Host Superfetch to get a better understanding of your problem.
Read Also: 100% Disk Usage in Windows 10
What Is the Service Host and Service Host Superfetch
Service Host
Svchost.exe is a generic host process name for services that run from dynamic-link libraries. Microsoft started changing much of the Windows functionality from relying on internal Windows services (which ran from EXE files) to using DLL files instead. From a programming perspective, this makes the code more reusable and arguably easier to keep up to date. The problem is that you can't launch a DLL file directly from Windows the same way you can an executable file. Instead, a shell that is loaded from an executable file is used to host these DLL services. And so the Service Host process (svchost.exe) was born.
Windows requires a lot of services. If every single service ran under one Service Host process, a failure in one service could potentially bring down all of Windows. Instead, they are separated out. Services are organized into logical groups that are all somewhat related, and then a single Service Host instance is created to host each group.
Service Host Superfetch
Superfetch is part of Windows Vista and onwards. This technology allows Windows OS to manage random memory so that your apps can perform efficiently.
It helps third-party apps and critical Windows components to execute common tasks quickly. To achieve this, Superfetch stores and reads data for regularly used apps directly from RAM instead of resorting to the hard drive.
Superfetch is like drive caching. It copies all your commonly used files to RAM. This allows programs to boot faster. However, if your system doesn't have the latest hardware, Service Host Superfetch can easily cause high disk usage. High disk usage due to this service isn't always a problem. It's how this service works to optimize your system performance.
If you're using Windows 10 and you find that Service Host: Local System is taking much of your CPU, Disk or Memory usage, you're not alone. Many Windows users are reporting this problem as well. But no worries, it's possible to fix it. Read the tried and true solutions below to fix your high disk usage right now.
1. Fix Service Hosts Superfetch High Disk Usage via Disabling
SuperFetch decreases the boot time and make must-load programs more efficiently. However, it has been identified as a potential cause of disk performance issues in Windows 8 and later versions of Windows, including Windows 10. Here's how to stop this service.
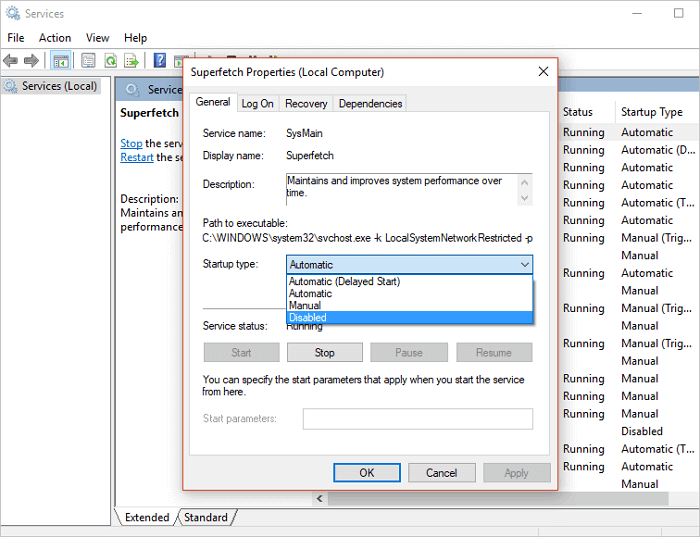
Method 1. Disable Superfetch in Windows Services
Step 1. Press Windows + R or alternatively, type Run in the Windows 10 search box. Type services.msc into the "Open" box and click the "OK" button.
Step 2. Now find "Superfetch". Right-click it > select "Properties" > click "Stop" on the pop-up windows > click "Disabled" from the 'startup type' drop-down menu.
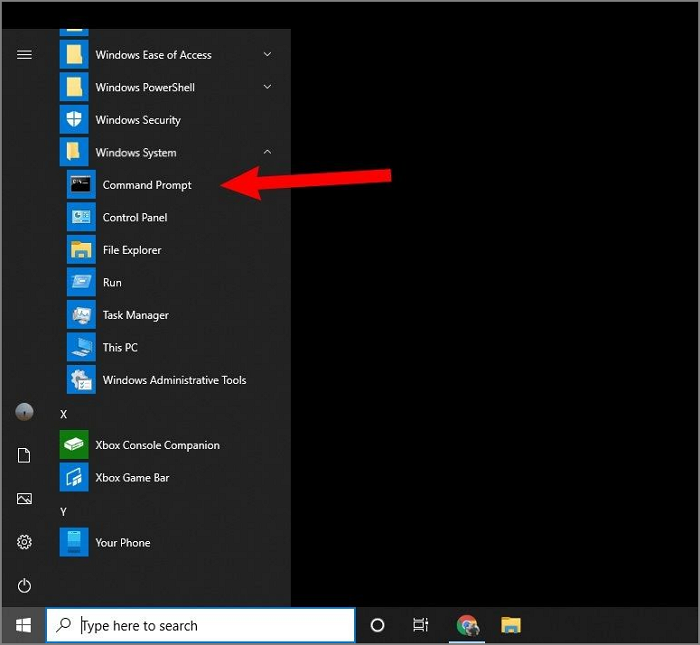
Method 2. Disable Superfetch with Command Prompt
Step 1. Click on Start and search for Command Prompt, right-click on it and click "Run as administrator" then click "Yes" to continue.
Step 2. Type net.exe stop Superfetch and press Enter.
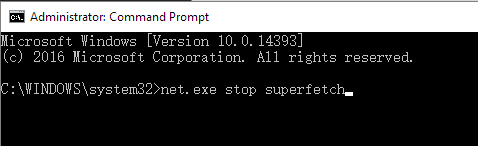
Step 3. If the command above isn't valid, try net.exe stop sysmain instead.
Wait for a few minutes and see if your computer starts performing better. Or check your computer's disk usage in Task Manager. In the Processes tab, look at the % at the top of the Disk column. If it's no longer 100%, you've fixed the problem!
Method 3. Disable Superfetch Using Windows Registry
You can also disable the service host from Windows Registry. Follow the steps below to disable service host Superfetch.
Step 1. Press the Windows + R or alternatively, type "Run" in the search box. Type Regedit into the Open box and hit enter.
Step 2. On the Registry Editor window, navigate to HKEY_LOCAL_MACHINE/SYSTEM/CurrentControlSet/Control/Session Manager/MemoryManagement/PrefetchParameters.
Step 3. Click the "Enabled Superfetch" and change its value to 0 to disable SuperFetch. Then click the "OK" button.

Close the Registry Editor and restart the system to see if the service host Superfetch 100% disk usage in Windows 10 is fixed.
2. Fix Service Host Superfetch High Disk Usage With Troubleshooting
Windows Update is said to be one of the causes of abnormally high CPU or Disk usage. You can run the troubleshooter to see if it's the culprit:
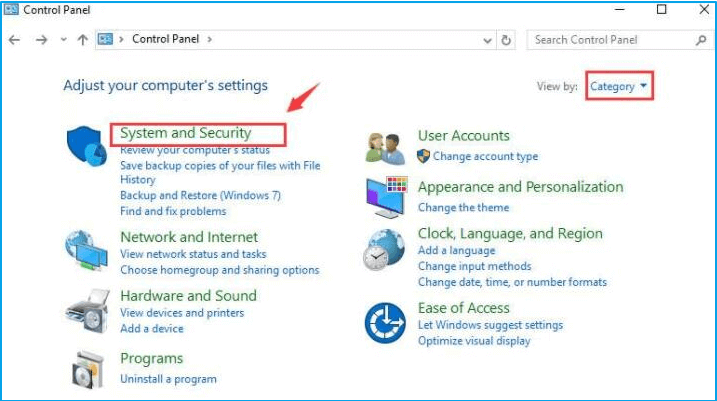
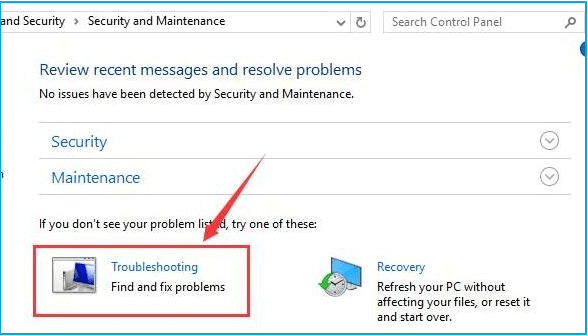
Step 1. On your keyboard, press the Windows logo key and click "Control Panel".
Step 2. View by "Category", click "System and Security".
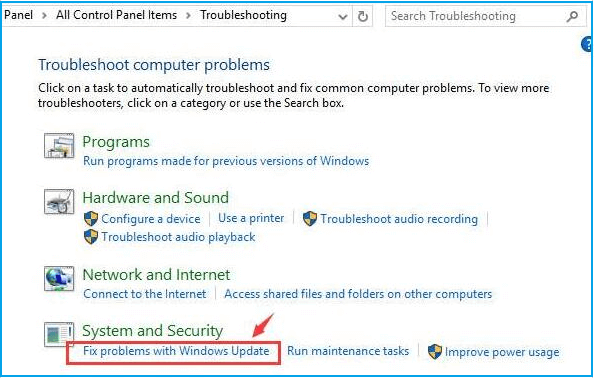
Step 3. Click "Security and Maintenance" > "Troubleshooting".
Step 4. Click "Fix problems with Windows Update". Click Next.
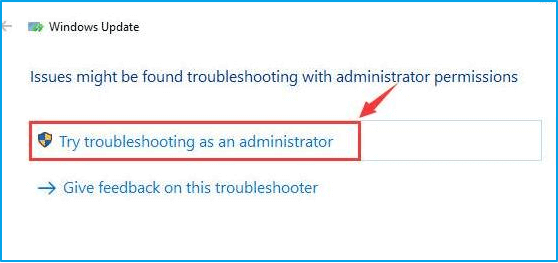
Step 5. Click "Try troubleshooting as an administrator".
Wrap Up
We hope this tutorial has provided you with enough information about service host Superfetch high disk usage and how to disable it. You can now optimize your computer's performance and bring your disk usage back to normal by using either the Services, Command Prompt, Registry Editor, or Windows Troubleshooting method. You can try any or all of them to solve the problem.
Bonus Tip. How to Optimize Your PC with a Free Partition Manager
In addition to disabling the Superfetch service to improve the performance of your computer, you can also manage your disk to improve the performance of your system. EaseUS free partition manager tool offers you comprehensive solutions to organize and manage your partitions in Windows 10/8/7 without effort.
- Resize/move partition, create/format/delete/clone/merge partition
- Convert FTA to NTFS, convert MBR to GPT, logical partition to primary or primary partition to logical
- Wipe all the data on the hard disk permanently with one click
- Supports 4K alignment on SSDs to maximize PC performance
- Check for errors on selected partitions and fix it
Now, download and try this free partition tool to help you manage your disk and partitions without data loss.
When you finish all the steps as shown in the video, reboot your Windows 10. Go to Task Manager to see if Service Host: Local System high disk usage is solved or not. If all the solutions above fail to help you, you can contact us and ask for help. We are very glad to help you.
People also ask
1. Is it safe to disable the service host Superfetch?
Service host Superfetch is merely a memory management process. When you notice that it's always causing high disk usage, you can disable it; and it won't cause system instability. However, you may experience some delays when accessing frequently used applications, as they load faster when they service host Superfetch enabled.
2. How do I disable the Superfetch service host?
As demonstrated in solution 1, there are three ways to disable the Superfetch service host, either through Services, Command Prompt, or Registry Editor in Windows 10. Jump to the corresponding parts to see details.
3. Can I disable Superfetch service Windows 10?
Yes, when you find there happens the service host local system high disk usage, you can try to disable the Superfetch service in Windows 10 to speed up your computer.
4. What is Superfetch, and do I need it?
Superfetch is like drive caching. It copies all your commonly used files to RAM. This allows programs to boot faster. However, if your system has the latest hardware, the Superfetch works properly. If not, Service Host Superfetch can easily cause high disk usage.
How Can We Help You
About the Author
Oliver is an EaseUS professional writer who dares explore new areas. With a passion for solving tech issues with straightforward guides for common users, Oliver keeps honing his writing craft by developing in-depth solutions for disk and partition management, computer boot-up issues, file transfer, etc.
Brithny is a technology enthusiast, aiming to make readers' tech lives easy and enjoyable. She loves exploring new technologies and writing technical how-to tips. In her spare time, she loves sharing things about her game experience on Facebook or Twitter.
Product Reviews
-
I love that the changes you make with EaseUS Partition Master Free aren't immediately applied to the disks. It makes it way easier to play out what will happen after you've made all the changes. I also think the overall look and feel of EaseUS Partition Master Free makes whatever you're doing with your computer's partitions easy.
Read More -
Partition Master Free can Resize, Move, Merge, Migrate, and Copy disks or partitions; convert to local, change label, defragment, check and explore partition; and much more. A premium upgrade adds free tech support and the ability to resize dynamic volumes.
Read More -
It won't hot image your drives or align them, but since it's coupled with a partition manager, it allows you do perform many tasks at once, instead of just cloning drives. You can move partitions around, resize them, defragment, and more, along with the other tools you'd expect from a cloning tool.
Read More
Related Articles
-
4 Ways to Fix PNY 128 GB Flash Drive Write Protected
![author icon]() Roxanne/2024/11/27
Roxanne/2024/11/27 -
Solved: SSD Not Showing Full Capacity After Clone
![author icon]() Sherly/2024/11/27
Sherly/2024/11/27 -
BitLocker Partition: How to Partition A BitLocker Drive on Windows 10
![author icon]() Tracy King/2024/09/19
Tracy King/2024/09/19 -
How Do I Run Fdisk on Windows 10/11: A Beginner's Guide
![author icon]() Tracy King/2024/10/29
Tracy King/2024/10/29
Hot Topics in 2024


EaseUS Partition Master

Manage partitions and optimize disks efficiently