Page Table of Contents
About the Author
Hot Topics
Updated on Jan 29, 2026
Since 2007, Clonezilla has served as an open-source disk cloning program and has gained recognition for its free features. It also provides several other popular features, such as system deployment, data backup, creating disk images, and disk partitions.
In addition, it provides universal compatibility with Windows, macOS, and Linux operating systems. Clonezilla offers 3 versions: Clonezilla live, Clonezilla lite server, and Clonezilla SE (server edition). Clonezilla Live is specially designed to help individuals clone small amounts of data, while lite server and SE editions are there for massive cloning.
If you are looking to employ Clonezilla as your cloning tool, this guide will walk you through how to use Clonezilla on Windows. EaseUS will provide step-by-step instructions and real-time images to ensure a seamless cloning experience.
How to Use Clonezilla
Clonezilla is a free cloning tool but might not recommended for beginners. It offers a complex interface, so you must have the relevant computer skills.
Additionally, the process might be time-consuming, so we will introduce you to a potential cloning alternative in advance, EaseUS Partition Master. This tool will help you clone the entire drive in three easy clicks.
Here are the detailed steps for cloning a hard drive using Clonezilla software. Please follow the process to ensure successful disk cloning. Let's begin:
#1 Create a Bootable USB
Step 1: Turn on your Windows computer and open the internet browser.
Step 2: Download Clonezilla Live software on its official website.
Note* Select CPU architecture: amd64, and file type: iso.

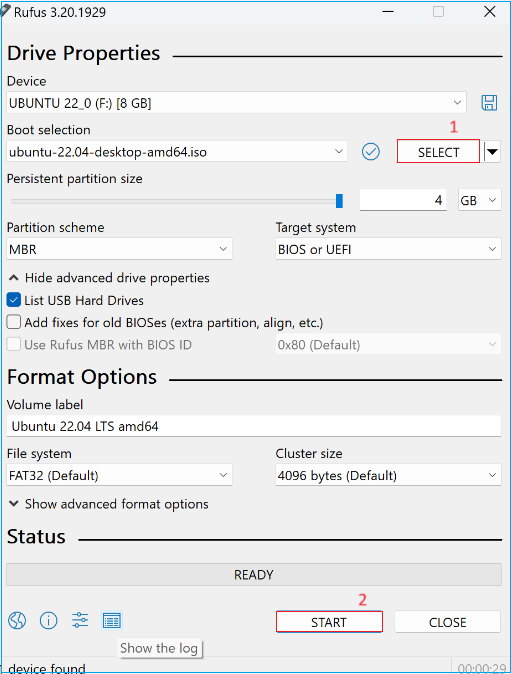
Step 3: Download any burning tool to create a bootable device. We are using Rufus 3.20. You can use other tools to download Rufus.
Step 4: Insert a USB drive into the Windows computer.
Step 5: Go to downloads and launch Rufus's ".exe" file.
Step 6: Click the "Select button" under the "boot selection."
Step 7: Choose the downloaded Clonezilla file and click "START" from the bottom. It will start creating the bootable Clonezilla for the connected USB drive.

Step 8: If the process is over, restart your computer.
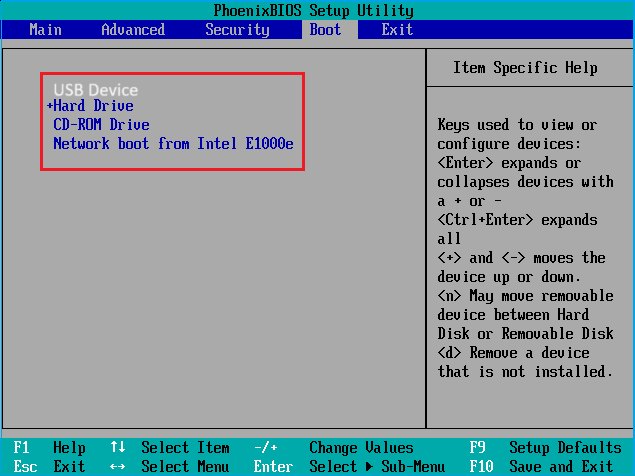
Step 9: Press the relevant function key to enter the BIOS configuration.
Note* If you are unsure about the correct "Fn" key, search the internet and mention the model number of your computer.
Step 10: Once you entered the BIOS settings, find the menu and move the USB drive to the top of the list. Use the + and - keys to move up/down.

Step 11: Select the "Save and exit" option.
#Clone Hard Drive with Clonezilla Live
After creating a bootable device, we must clone the data to another drive. Make sure the USB is connected.
Step 1: Boot the computer using the USB drive and connect a targeted SSD/HDD.
Step 2: Click the "Clonezilla Live" when you see the interface in the image below. Hit the "Enter" key to move forward.

Step 3: Choose the language as "English" and press "Enter.
Step 4: Select the keyboard layout as "default."
Step 5: Choose "Start Clonezilla" to continue.
Step 6: Choose the "device-device work directly from a disk or partition to a disk or partition" mode and hit "Enter."

Step 7: Select "Beginner Beginner mode: Accept the default options" and press "Enter" to run the wizard.

Step 8: Select the "disk_to_local_disk local_disk_to_local_disk_clone" option as a cloning method and hit "Enter.

Step 9: Then, it will ask you to select the source disk and target drive. Select the relevant drives as per your needs.
Step 10: Choose the "Skip checking/repairing source file system" and hit Enter."

Step 11: Press "Y" three times, then hit Enter.
Step 12: It will start the cloning process. Wait to end the process, and turn off your computer after the successful cloning.
Step 13: Remove the bootable flash drive and turn on your computer.
Note* If the computer does not boot normally, connect the bootable drive again and change the boot order from BIOS settings.
Found this tutorial helpful? You can click the buttons below to share the tutorial with other users.
- Notice:
- Still using Windows 10? After October 14, 2025, Microsoft will no longer provide free software updates through Windows Update. Check out this more detailed guide for upgrade and backup: Windows 10 End of Support.
Cloning with Clonezilla might be a complicated process for inexperienced users. You may want to try the following alternative for easy and automated cloning in a few clicks.
Best Alternative to Clonezilla - EaseUS Partition Master
EaseUS Partition Master Professional (EPM) is an effortless, time-saving utility that stands out as the best alternative to Clonezilla. This program can complete the task in just three clicks, eliminating the need for a time-consuming cloning procedure like Clonezilla. EPM not only clones the hard drive but also allows you to handle all disk management tasks, such as partition creation, resizing, and formatting.
Compared with Clonezilla, EaseUS Partition Master provides:
- Faster disk cloning speed.
- More user-friendly interface and simplified steps.
- Ability to clone a disk to a target disk that is equal to, larger, or even smaller than the source disk (as long as it has sufficient space to hold all data).
- Additional toolkit that contains features like Bad Sector Scan, Boot Repair, Password Reset, etc.
Download and try EaseUS Partition Master, and follow the simple steps to clone your hard drive.
Step-by-step Guide to Clone a Hard Drive Using EaseUS Partition Master
Step 1. Select the source disk.
- Click the "Clone" from the left menu. Select the "Clone OS Disk" or "Clone Data Disk" and click "Next".
- Choose the source disk and click "Next".
Step 2. Select the target disk.
- Choose the wanted HDD/SSD as your destination and click "Next" to continue.
- Read Warning message and confirm "Yes" button.
Step 3. View the disk layout and edit the target disk partition size.
Then click "Continue" when the program warns it will wipe out all data on the target disk. (If you have valuable data on the target disk, back up it in advance.)
You can select "Autofit the disk", "Clone as the source" or "Edit disk layout" to customize your disk layout. (Select the last one if you want to leave more space for C drive.)
Step 4. Click "Start" to start the disk cloning process.
Additional Features:
- Disk/Partition Clone: Easily clone entire drives or specific partitions.
- OS Migration: Transfer the operating system to another computer without reinstallation.
- Data Backup: Prevent data loss while cloning a hard drive to another.
Experience the power of EaseUS Partition Master for efficient cloning and disk management. Try it now and enjoy hassle-free disk management.
Conclusion
We hope this guide helped you understand how to use Clonezilla on Windows 10/11. Clonezilla is an excellent way to transfer data from one drive to another, but it requires advanced computer skills. Experienced users can create a bootable with the Rufus and follow the provided steps. If you are doubtful about handling the complex process, consider the recommended alternative - EaseUS Partition Master. It offers advanced features to satisfy all your cloning and disk partitioning needs.
Discover more useful details in the following articles:
FAQs About How to Use Clonezilla
Here are answers to some common queries if you want to know more about using Clonezilla on Windows 10/11.
1. How do I use the Clonezilla device image?
Start by booting into Clonezilla and then follow the on-screen instructions to use the Clonezilla device image. Disk clones, disk images, and disk restoration options are available. Select the disk image options and follow on-screen instructions to ensure flawless cloning.
2. How can I format a hard drive with Clonezilla?
Formatting a hard drive with Clonezilla is an easy task. Follow these steps:
Step 1: Boot your hard drive with Clonezilla live USB.
Step 2: Choose the disk formatting option from the screen.
Step 3: Locate the hard drive you want to format.
Step 4: Pick the preferred file system format and confirm your action.
Step 5: Reboot your computer.
3. Can Clonezilla save to the NTFS file system?
Yes, Clonezilla supports saving images to the NTFS file system. When prompted for the destination during the cloning or restoration process, choose the NTFS partition or disk as the target.
How Can We Help You
About the Author
Updated by Joey Albert
Joey is an enthusiast of science and technology. With a passion for uncovering the latest tech innovations, she creates clear, engaging how-to guides that make technology accessible and enjoyable for all.
Cici is the junior editor of the writing team of EaseUS. She accepted the systematic training on computers at EaseUS for over one year. Now, she wrote a lot of professional articles to help people resolve the issues of hard drive corruption, computer boot errors, and disk partition problems.
Product Reviews
-
I love that the changes you make with EaseUS Partition Master Free aren't immediately applied to the disks. It makes it way easier to play out what will happen after you've made all the changes. I also think the overall look and feel of EaseUS Partition Master Free makes whatever you're doing with your computer's partitions easy.
Read More -
Partition Master Free can Resize, Move, Merge, Migrate, and Copy disks or partitions; convert to local, change label, defragment, check and explore partition; and much more. A premium upgrade adds free tech support and the ability to resize dynamic volumes.
Read More -
It won't hot image your drives or align them, but since it's coupled with a partition manager, it allows you do perform many tasks at once, instead of just cloning drives. You can move partitions around, resize them, defragment, and more, along with the other tools you'd expect from a cloning tool.
Read More
Related Articles
-
Top 3 Ways to Factory Reset Windows 11 Without Password
![author icon]() Sherly/2026/01/29
Sherly/2026/01/29 -
How to Find and Recover Missing Space on Hard Drive in Windows
![author icon]() Brithny/2026/01/29
Brithny/2026/01/29 -
Free Partition Manager for Windows 7/Windows 10 64 Bit
![author icon]() Jean/2026/01/29
Jean/2026/01/29 -
How to Migrate OS from HDD to SSD? OS Migration 2026
![author icon]() Daisy/2026/01/29
Daisy/2026/01/29
Hot Topics
EaseUS Partition Master

Version 20.0 is here - full exFAT support, easier disk partitioning, and PC performance optimization.


