
Content
Page Table of Contents
About the Author
Hot Topics
| Workable Solutions | Step-by-step Troubleshooting |
|---|---|
| 1. Command Prompt | Step 1. Press Windows Key + R and type "cmd" then press "Enter". The command prompt will appear...Full steps |
| 2. EaseUS Partition Master | Step 1. Open EaseUS Partition Master on your computer. Then, locate the disk, right-click the partition...Full steps |
| 3. Defragment and Optimize Drives | Step 1. Press the Windows Key; Step 2. Search "defrag"; Step 3. Select Defragment and Optimize Drives...Full steps |
| 4. SeaTools | Step 1. Click on "Start > Select Programs > Select Seagate"; Step 2. Select "SeaTools for Windows"...Full steps |
Understanding SSD health check windows 11 is becoming more critical in PC and data protection.
SDDs are replacing hard disk drives because of their increased speed, and reliability, and the technology are evolving rapidly. But SSDs are not immune to corruption or damage.
This article discusses how to check SSD health on Windows 11. You'll also learn tips to improve your SSDs' health and performance.
You can also learn how to do a hard disk health check on Windows in this article.
What Is an SSD Health Check?
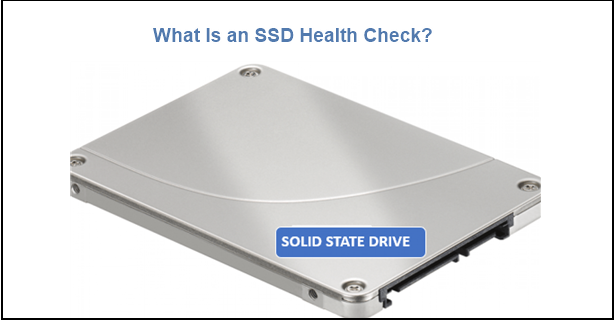
An SSD health check Windows 11 is meant to help monitor the status of a solid-state drive to identify any issues that need addressing.
SSDs are very fast and are at optimum performance when they're new. But, over time and as they fill up with data, their performance decreases. For example, when the SSDs stored data reaches around 70% of its capacity, you'll notice a decline in performance.
Since the PC's SSD is the primary storage and contains the operating system and vital data, performing a regular SSD Health Check is important.
Why Is It Important to Keep Your SSD Healthy?
Performing an SSD health check in Windows 11 will help you in different ways:
Check the SSDs Health status
The first thing an SSD health check will help you do is telling you your SSDs health status. Health status will show you how healthy the SSD is, detect bad sectors, and exhibit overall health, whether good or bad.
Prevent SSD failure
The problems that can cause an SSD failure are similar to those of an HDD failure. The common issues are physical damage (impact/water), data corruption, short circuits, faulty firmware update, and faulty construction.
When an SSD fails, you're likely to encounter some or all of the following symptoms:
- The drive cannot write but can be read-only.
- You can't write or read files on the drive at all.
- The PC experiences regular and inexplicable crashes.
- Frequent bad block errors.
- File system failure and the Blue screen of death errors.
Performing an SSD health check Windows 11 should tell you the source of your SSD's failure so that you can fix it.
Optimize SSD performance
During an SSD health check in Windows 11, you can carry out 'garbage collection' and other parameters to help improve the drive's performance. You can optimize or tune the SSD for different demands.
Test SSD speed (transfer speed)
The SSD health check Windows 11 process often reveals the SSD/Disk transfer speed. This way you'll know whether the manufacturer-given transfer speed (write/read data) is accurate. You can also learn how to do a hard drive speed test here.
You can also get a rough understanding of your SSDs performance.
How Can You Perform SSD Check in Windows 11?

There are different methods for SSD health check Windows 11:
- Windows 11 Built-in Tools
- Check SSD Health Software
Most of the methods that check SSD health check windows 11 also work on HDDs.
Let's discuss 4 methods showing how to check SSD health in Windows 11.
1. Windows Built-in Tool - Command Prompt
The Command prompt, abbreviated as CMD, is a Windows built-in tool that can help you perform an SSD health check on Windows 11 using the WMIC command line.
Windows Management Instrumentation Command (WMIC) helps in checking the SSD health and performs other S.M.A.R.T. functions.
The Self-Monitoring, Analysis and Reporting Technology (S.M.A.R.T.) feature in SSDs allows your PC to automatically monitor and provide conclusions about the SSDs state. Command Prompt lets you check your SSD for read-write errors, percent, temperature, wear leveling, and several other important details.
It will warn you before the SSD suffers significant data loss.
To use the WMIC tool, follow these steps:
Step 1. Press Windows Key + R and type "cmd" then press "Enter". The command prompt will appear.
Step 2. In the command prompt window, type "wmic" then press "Enter".
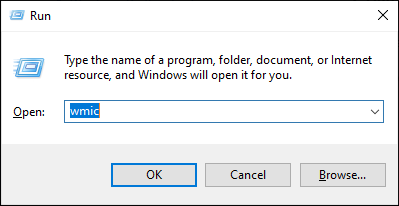
Step 3. When the wmic interface is ready type "diskdrive get status", then press "Enter".
Step 4. The command prompt will display each drive, along with one of two statuses:
- OK - which means that your SSD has a healthy performance.
- Pred Fail - which means your drive may crash anytime soon.
If the status is Pred Fail, you need to back up your data immediately, if you haven't, you risk losing your data when the disk fails.
2. Use EaseUS Partition Master to Fix Disk Error
EaseUS Partition Master is a comprehensive partition tool to manage and prepare HDD/SSD partitions for Windows 11 without data loss. It also has a "Check File System" function to automatically fix disk errors.
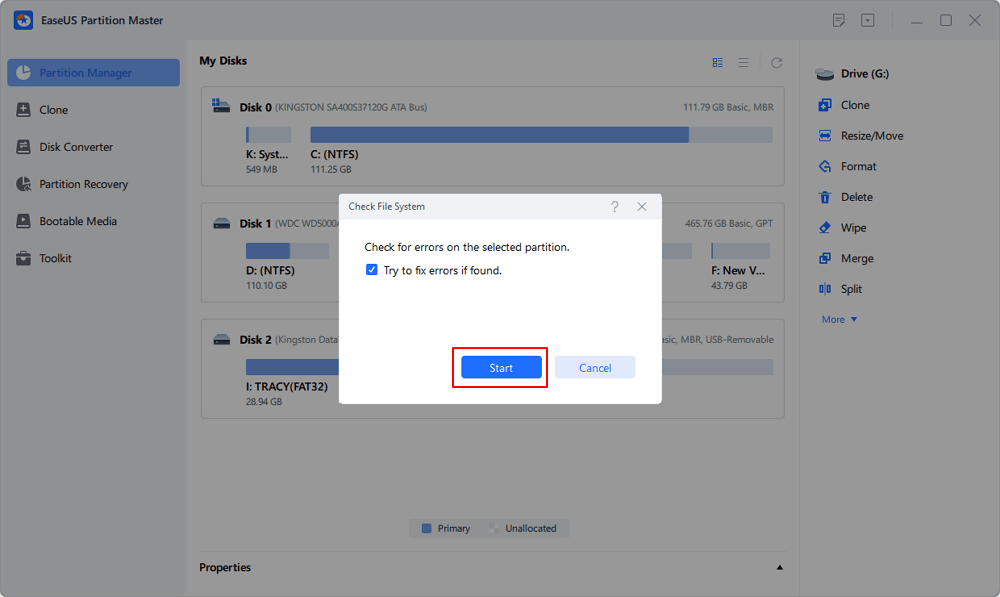
Step 1. Open EaseUS Partition Master on your computer. Then, locate the disk, right-click the partition you want to check, and choose "Advanced" > "Check File System".
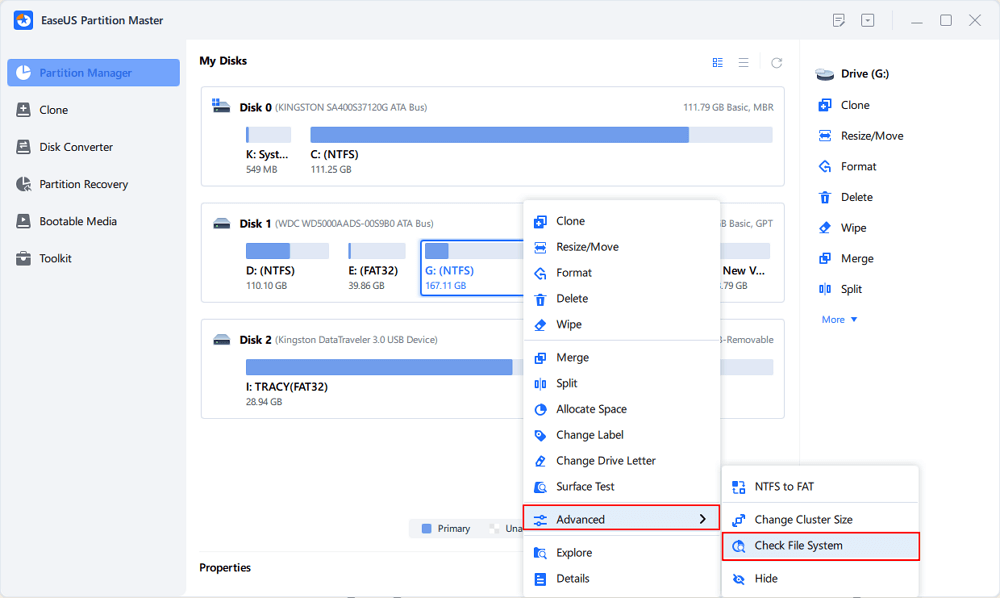
Step 2. In the Check File System window, keep the "Try to fix errors if found" option selected and click "Start".
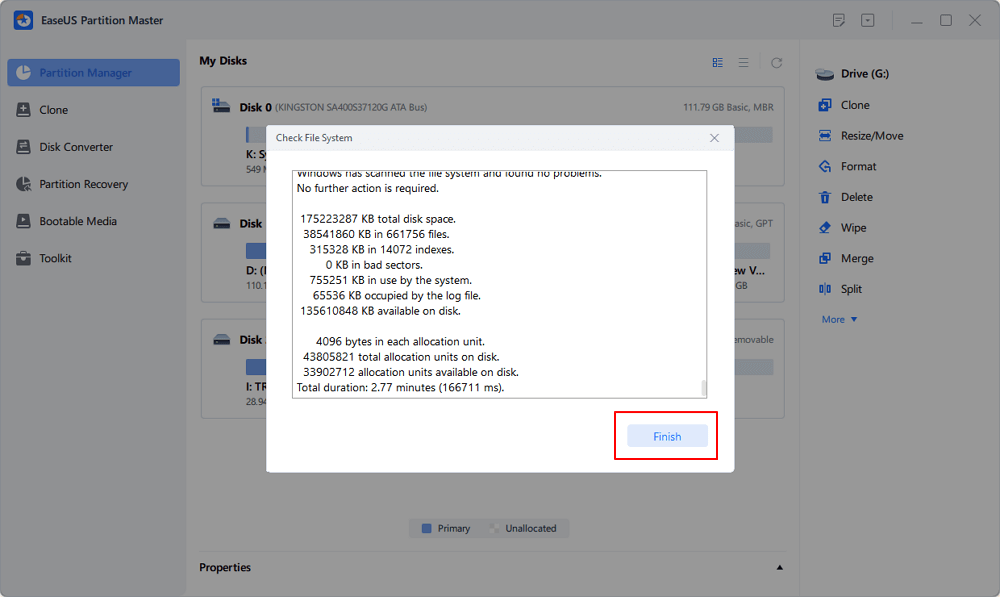
Step 3. The software will begin checking your partition file system on your disk. When it completes, click "Finish".
You can use this function to perform an SSD health check on Windows 11.
3. Run "Defragment and Optimize Drives" on Windows 11
Defragmenting and Optimizing your Windows 11 drives can help your PC's drive read and write files faster (PC speed), run smoother, and boot up faster. It does this by organizing the data in your SSD drive.
You can improve this performance by defragmenting and optimizing the Windows 11 SSD drive.
The Standard way to defrag/optimize SSD drives in Windows 11 is through the Defragment and Optimize Drives program:
To defrag/optimize the drive follow these steps:
Step 1. Press the Windows Key.
Step 2. Search "defragment".
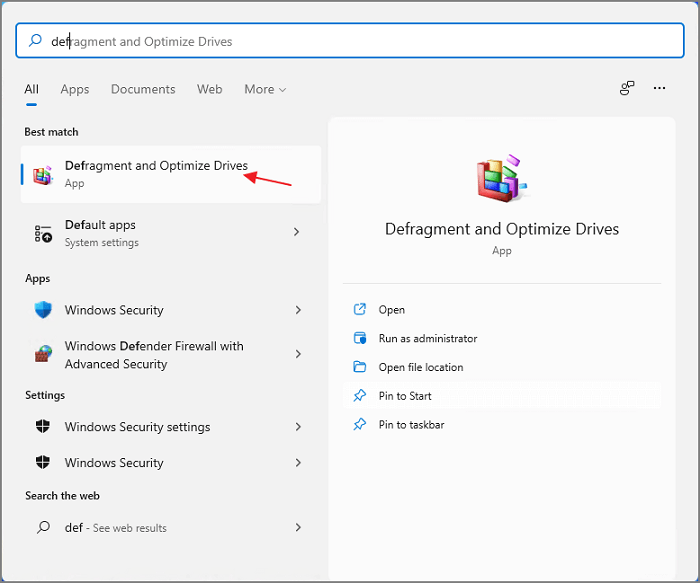
Step 3. Select Defragment and Optimize Drives.
Step 4. Select the disk drive you want to optimize.
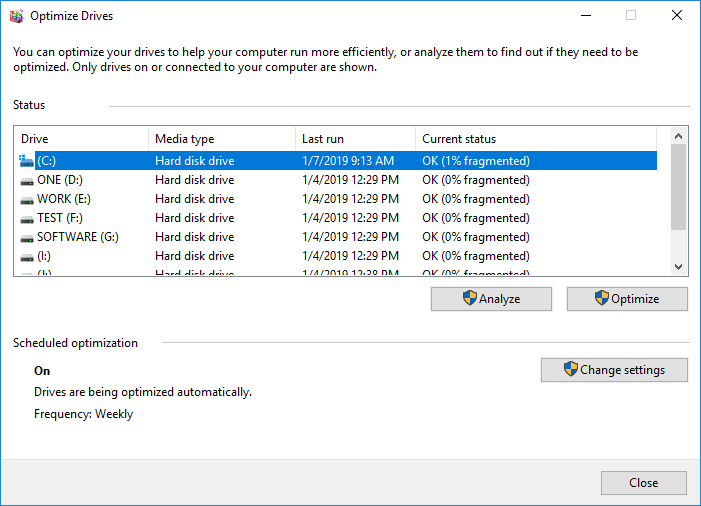
Step 5. Click the "Optimize" button.
4. Launch SeaTools to Monitor SSD (Seagate)
Before you use the SeaTools, download and install the application.
Once it's installed, launch SeaTools by following these steps:
If you have a SeaTools shortcut for Windows on the desktop, simply launch the program from there. If not, follow these steps.
Note: Make the PC ready for SeaTools diagnostics.
- Make sure you close all other applications before running a hard disk diagnostic.
- Keep the PC fully powered or connect it to power. The diagnostic takes a long time and the PC may go into Standby or Hibernate modes, make sure both are turned off.
- Click on the Start or Windows icon button.
- Type "Control Panel".
- In the control panel, select "Power Options".
- The setting "Turn off hard disks" should be set to "Never".
Once the PC is ready, follow the steps below to run the SeaTools diagnostics
Step 1. Click on "Start > Select Programs > Select Seagate".
Step 2. Select "SeaTools for Windows".
Step 3. Once SeaTools opens, select the Drives to test the different storage devices in your system. On the screen, you'll also see other information about the drives such as Model Number and Serial Number. You may select more than one drive to test them simultaneously.
Step 5. Now, select the test to run from the menu of possible diagnostic tests. All Basic Tests are data-safe, read-only tests. The tests are:
- Fix All
- Short Drive Self Test
- Drive Information
- Short Generic
- Long Generic
Step 6. Once you select the tests to perform, it will begin immediately.
The "Short Drive Self Test" (DST) runs a thorough diagnostic routine built into the SSD's firmware. It is adequate for most situations.
If you need a more comprehensive test you can consider running the "Long Generic", which reads each sector on the drive. But it will take a long time to complete.
Step 7. Upon completion of the diagnostic test, you will see a summary of the results. You can find the results in the log created for each drive and saved to the program installation folder.
Results summary
To read the rules summary log,
Step 1. Click "Help > View Log File".
Step 2. You can also view the test results log by clicking on:
- Either "Pass Info" or "Fail Info" depending on the results of the test next to the "Help" option.
- Here you'll see 3 tabs: "Pass Info", "Warranty Checker" and "View Log File".
Step 3. The following are the possible test results:
- Passed
- Failed
- Aborted
Usually, SeaTools tests with a PASS status. It helps eliminate the SSD as the source or physical cause of system problems.
Note that a drive can be healthy but has corrupted data. In such a case, you'll need to perform a chkdsk operation to repair corrupted data and bad sectors.
How Can I Improve My SSD Health?
Now that you know how to perform an SSD health check in Windows 11, there's one thing left: protecting the SSD and improving its health.
A few issues and situations could damage your PC's SSD or shorten its lifespan. If you avoid these issues or situations, you can keep the SSD healthy or extend its lifespan
Here are a few ways to keep your SSD healthy:
- Avoid extreme temperatures. Although SSDs are more resistant to extreme hot or cold temperatures than HDDs, it's essential to avoid the extremes, especially over extended periods.
- Avoid power shocks/outages. Power outages/shocks damage any piece of computer equipment, including SSDs.
- Don't store data to full SSD capacity. Keep the drive as open as possible to avoid filling it to completion. If your drive is almost full, you can delete unused files on your PC or move them out to external storage.
- Avoid physical damage caused by shocks such as dropping your laptop, which can destroy the SSD.
- Update SSD firmware regularly to maintain its performance across the board.
- Enable AHCI (Advanced Host Controller Interface). This gives the PC a high-speed platform for data transfer between the SSD and motherboard.
- Disable hibernation. Although hibernation fires your PC real fast back to what you were working on, it shortens the SSDs life because it uses more power than shutting down your computer. And when it starts, it must load everything in from the SSD to the PC.
Conclusion
In this article, you've learned about SSD health check windows 11. You've also learned how to keep your SSD healthy and improve its performance, speed, and lifespan. Keeping a check on your SSD health helps prevent failure and loss of irreplaceable data.
How Can We Help You
About the Author
Sherly joined EaseUS in 2022 and she has always loved writing articles and enjoys the fun they bring. She receives professional training here, focusing on product performance and other relative knowledge. She has written over 200 articles to help people overcome computing issues.
Written by Tracy King
Tracy became a member of the EaseUS content team in 2013. Being a technical writer for over 10 years, she is enthusiastic about sharing tips to assist readers in resolving complex issues in disk management, file transfer, PC & Mac performance optimization, etc., like an expert.
Product Reviews
-
I love that the changes you make with EaseUS Partition Master Free aren't immediately applied to the disks. It makes it way easier to play out what will happen after you've made all the changes. I also think the overall look and feel of EaseUS Partition Master Free makes whatever you're doing with your computer's partitions easy.
Read More -
Partition Master Free can Resize, Move, Merge, Migrate, and Copy disks or partitions; convert to local, change label, defragment, check and explore partition; and much more. A premium upgrade adds free tech support and the ability to resize dynamic volumes.
Read More -
It won't hot image your drives or align them, but since it's coupled with a partition manager, it allows you do perform many tasks at once, instead of just cloning drives. You can move partitions around, resize them, defragment, and more, along with the other tools you'd expect from a cloning tool.
Read More
Related Articles
-
How to Repair MBR on Windows Server (Two Quick Ways)
![author icon]() Tracy King/2024/04/19
Tracy King/2024/04/19 -
How to Fix Windows 10 Won't Boot After Update 2016 [Effective]
![author icon]() Roxanne/2024/04/19
Roxanne/2024/04/19 -
Internal Drive vs External Hard Drive. Which is better?
![author icon]() Tracy King/2024/04/19
Tracy King/2024/04/19 -
How to Merge Adjacent and Non-Adjacent Partitions in Windows Server
![author icon]() Tracy King/2024/04/19
Tracy King/2024/04/19
Hot Topics in 2024


EaseUS Partition Master

Manage partitions and optimize disks efficiently