Quick Navigation:
- 1. When Should You Delete Files on Mac
- 2. Why No Space Is Freed After Files Are Deleted on Mac
- 3. Solutions to Files Deleted But No Space Are Freed (4 Effective Methods With Detailed Steps!)
- 4. Remedial Aid: Recover Accidentally/Mistakenly/Permanently Deleted Files
Your Mac may have huge storage space, but it is limited. So, deleting Mac files is a good idea to create space for new files. The problem occurs when you delete several files and empty the trash, but still, there is no space increase. It is very frustrating when people have no idea what to do next.
Generally, most Mac users face this problem at some point. Thankfully, there are several methods available to get rid of this situation. If you are encountering the same problem, keep reading to get the best possible solutions.

When Should You Delete Files on Mac
You need to delete files when you want to replace or update them. You have to regularly clean useless contents when you're running low on disk space. Too many files that are not essential not only occupy a massive storage space but also become one of the reasons why your Mac is slow.
If you keep storing new files without deleting existing ones, it takes a bit of looking for the file you want. But when significant data is stored close together makes the files easier to find. However, deleting unneeded files keeps the system organized and helps locate necessary files without any hassle. It saves time and effort to navigate any file over and over in different folders.
So, always remember that you should keep checking that your Mac does not have unnecessary data. If yes, then do a quick check and remove it.
Why No Space Is Freed After Files Are Deleted on Mac
It is undoubtedly frustrating when you are actively deleting files from your Mac and notice that there is no free storage space. Sometimes, when you delete files from your Mac and empty the Trash, it looks like you are deleting them permanently. It may not happen every time. Deleting files from the Trash may not mean that the files delete forever.
Deleted files Mac but still no space can be caused by any error in macOS, like macOS can't repair the disk. It will not be possible to reclaim the drive space used by a deleted file until we truly delete it from the Mac. Some processes can remain the file unclosed which stops it to delete from the disk. In this case, the system will determine that the file is still running. As a result, your Mac does not reclaim the storage space employed by the file.
To free up the disk space from such unseen files, you need to perform a few essential steps with a little extra effort.
What Is the Other in My Mac Storage and How to Clear It
Computer disk space is precious, especially when you use a Mac computer. The storage capacity of MacBook Pro ranges from 128GB to 2TB.

Solutions to Files Deleted But No Space Are Freed
Several Mac users experience this problem of Deleted files Mac but still no space. If you are also experiencing the same, then you can follow the given solutions. These methods are helpful for completely deleting the files and freeing up the space, and anyone can use these methods, even if they do not have a technical background. It not only helps you to get rid of the problem but can also save your Mac from such problems in the future. Let's start:
- Method 1. Open Storage Tab to Free Space
- Method 2. Restart Mac in Safe Mode
- Method 3. Run First Aid in macOS Recovery Mode
- Method 4. Manually Free Up Space By Startup Disk
Method 1. Open Storage Tab to Free Space
When you delete files from your Mac but don't see any free storage space, the first thing you can do in such a situation is to optimize the storage space using the pre-installed and easy-to-use management system. Here are the steps you need to follow:
Step 1. In the left corner of your Mac, Tap on the Apple logo > Choose the About This Mac option
Step 2. Now click on Storage. When you click on the storage option, it will start calculating the space and display you the used and available disk space.
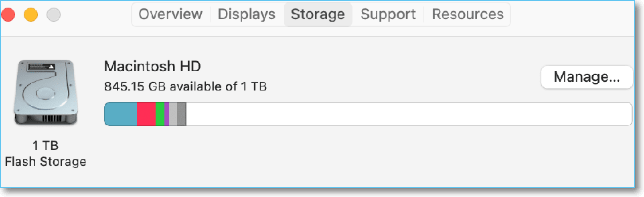
When the calculating process ends, you will see the categorization of different files. You can find scrapable files inside this category. It enables you to select and delete a large number of files.

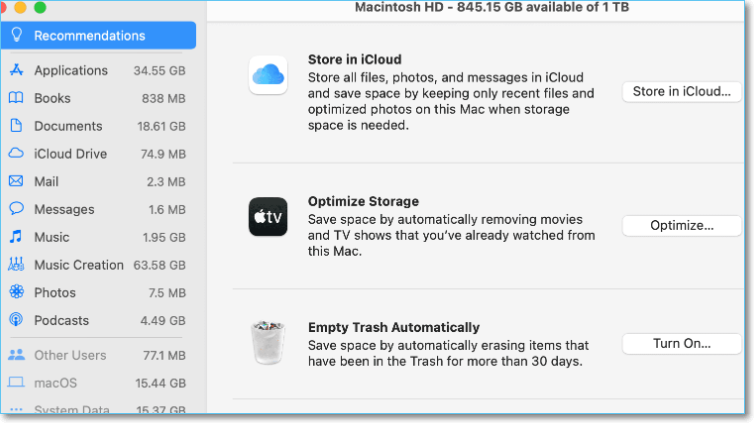
Step 3. Click the Manage button to explore the storage management menu.
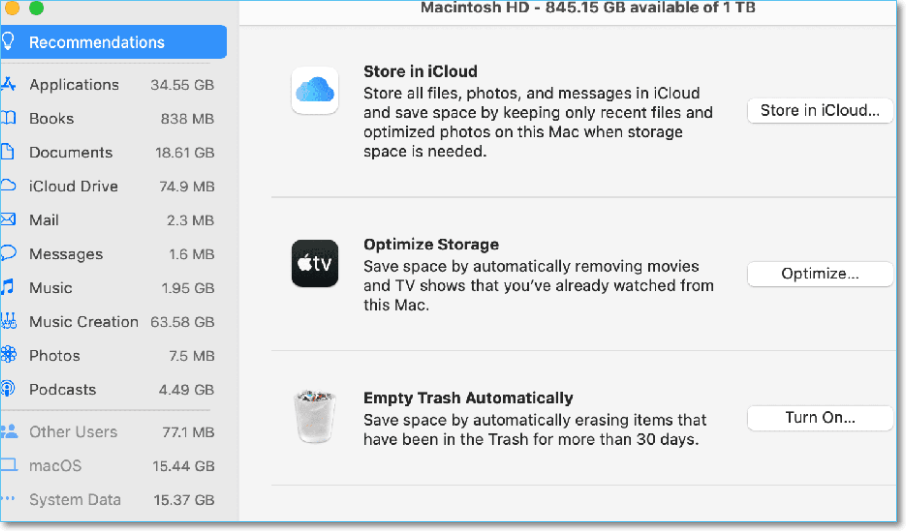
Step 4. To start the storage optimization process system will ask you to choose from the given options. To free up the space by deleting unrecognized files, you need to select Optimize Storage option. You will be able to free up massive amounts of space by removing unnecessary attachments. To automatically reduce the clutter or empty the trash you can choose other options.
Note: You can choose Store in iCloud option and use Apple cloud storage to save files. You will have to pay additional storage fees if the data exceeds 5 GB.
Method 2. Restart Mac in Safe Mode
Restarting Mac in Safe Mode can be a good option if you delete files in your Mac but fails to recognize and free the storage space. This method may be time-consuming. However, it thoroughly diagnoses and fixes any random errors. It automatically removes cached data and helps to delete files or applications from the Mac. Follow the given steps to restart your Mac in Safe Mode:
Step 1. Open Menu and Click on Shut Down. Once you click on Shut down, instantly press and hold the Shift key.
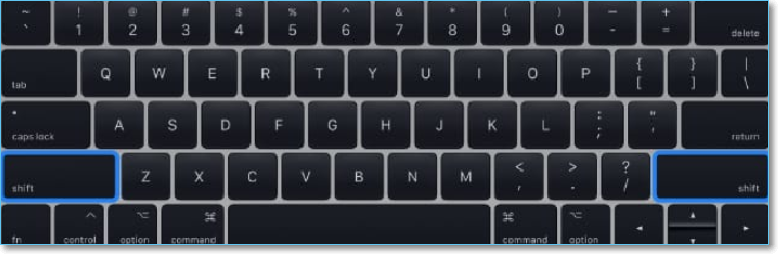
Step 2. Hold the Shift key until you see the Apple logo on the screen > Release the key and wait for a few seconds.
Note: The boot process may take some time.
Step 3. When you see the login screen, check if Safe Boot is written in red on the top-right side of your Mac.
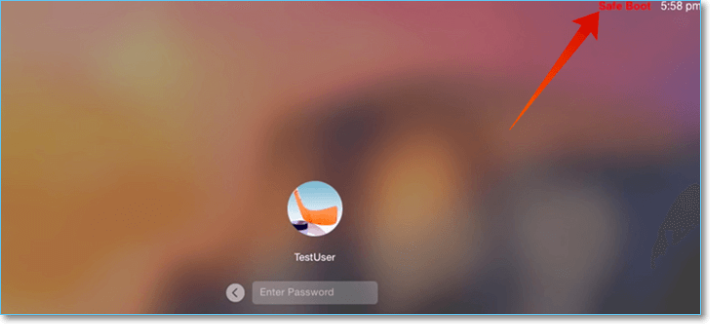
Turning on the Safe Mode will fix all the errors during booting.
Step 4. Log in to your Mac and check the disc space. More storage space will be available than before.
Using Safe mode, you can also clear other unneeded stuff from your Mac.
Step 5. Now, Restart your system and boot normally.
Method 3. Run First Aid in macOS Recovery Mode
If the previous method doesn't solve the problem, you should run First Aid in macOS Recovery Mode from Disk Utility to smooth out your disk performance.
Using the First Aid function, you can quickly diagnose any problems with your Mac disk, volumes, or external drives. It has numerous in-built features that can find and fix several random errors. Please follow the steps:
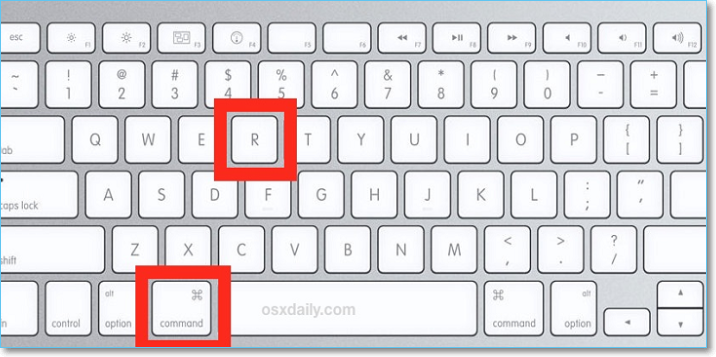
Step 1. Restart your Mac, and quickly press and hold the Command + R keys to enter macOS Recovery Mode.
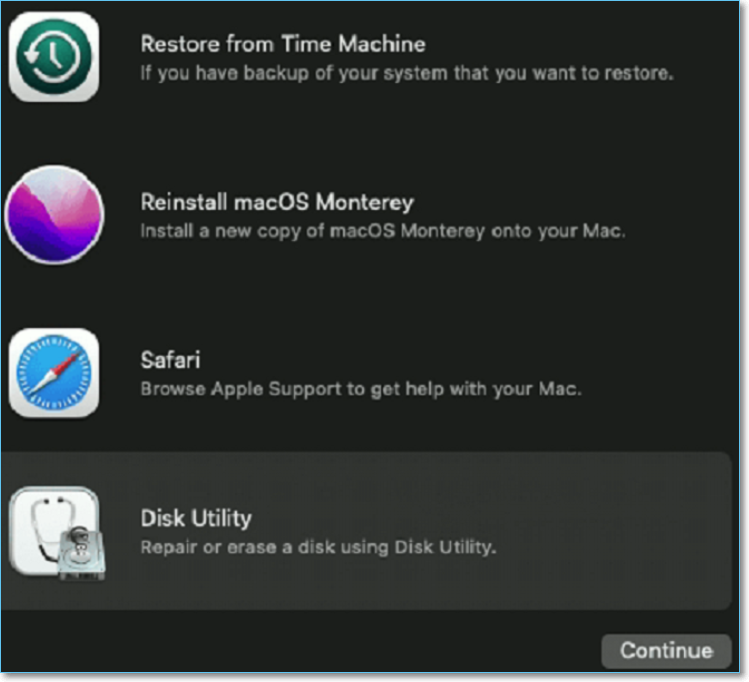
Step 2. Once the Apple logo appears, release the keys > Open the macOS Utilities, select Disk Utility, and click Continue.
Step 3. In the sidebar, select Macintosh HD and select First Aid.
Step 4. Start the storage drive repair procedure by clicking Run.
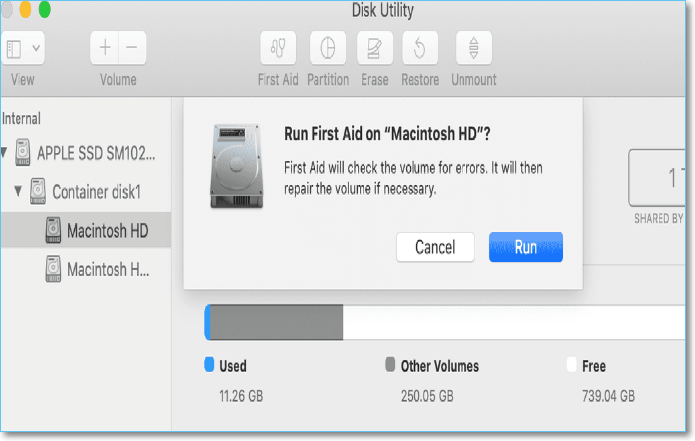
We are sure that this process will check and fix all the errors on the hard drive. Running Disk Utility will clean up the space and enhance the system's performance.
Method 4. Manually Free Up Space By Startup Disk
Manually freeing up the dick space is indeed an effective way. You will not only be able to increase your free space but also manage your data. Follow the given steps:
Step 1. Click on the Apple logo and choose the About This Mac option > Now, Select Storage, then click on Manage.
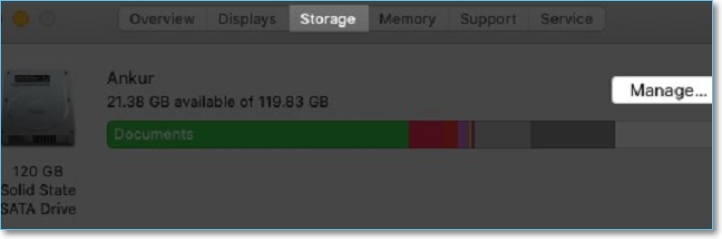
Under Recommendations, you will see different options to manage the disk space.
Step 2. You can choose Store In iCloud option to store some files in the cloud.
Note: iCloud offers you up to 5 GB of free storage space.
Step 3. Now, choose the Optimize option to delete watched iTunes movies and TV programs.
Step 4. Select the Turn On option beside Empty Trash Automatically. It will delete all the files from the Trash that have been there for 30+ days.
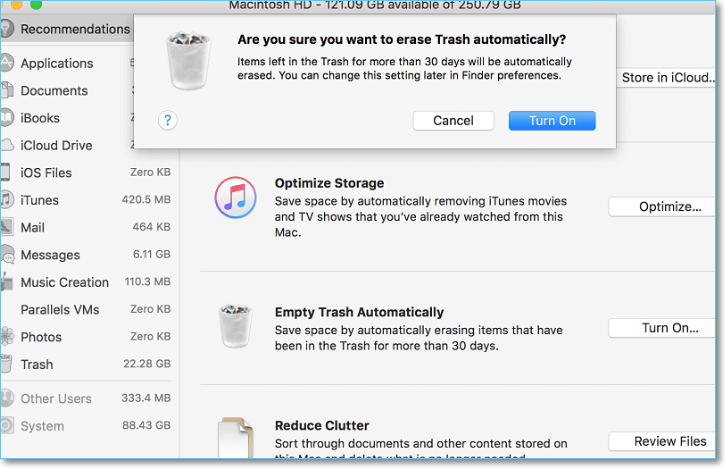
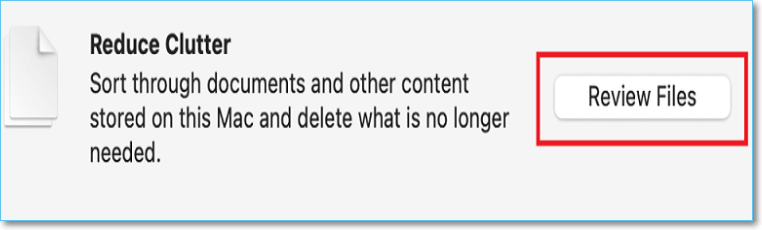
Step 5. Under Reduce Clutter, choose the Review Files option to sort files on your Mac. Check all items and delete unnecessary files.
Step 6. Select Applications, then move useless apps to the trash folder. Check all the documents and photos manually, then move them to the Trash.
Step 7. Now, go through all options like iOS Files, iTunes, and Mail, then find and delete unwanted files to free up Macintosh HD storage.
Step 8. After deleting all the selected files carefully, click the Empty Trash button.
Finally, you will see an extensive free section on the disk of your Mac.
Remedial Aid: Recover Accidentally/Mistakenly/Permanently Deleted Files
The above methods will help you to get rid of the problem of Deleted files Mac but still no space. However, deleting unnecessary data may accidentally delete important files. It happens to many users at the same point. You may not be able to replace all your essential files until you use the best method.
If you have lost your crucial files or deleted them by mistake, don't worry. You will be able to recover deleted files on Mac using an efficient data recovery tool. AMong all the software, EaseUS Data Recovery Wizard for Mac is the most recommended one. Since its creation, the software has been enhancing its data recovery algorithms to ensure that all deleted files are recovered reliably and quickly.
This data recovery software has a simple user interface, and every Mac user can use it without any hassle. You can operate it by following a few easy steps to recover all the disappeared files. EaseUS Data Recovery Wizard needs a stable Internet connection that enhances its functionality to deliver the best results. It is the most advanced tool to recover commonly used file formats like photos, audio, video, and document files. When the process ends, you will get well-categorized and organized results.
You can follow the steps below to use this powerful tool:
Step 1. Select the drive to be scanned
In the main EaseUS Data Recovery Wizard window, there will be a list of the drives connected to your Mac. Select the drive you need to recover lost/deleted files from, and click the "Search for lost files" button.
Step 2. Select your lost data/files
EaseUS Data Recovery Wizard for Mac will immediately scan your selected disk volume and display the scanning results on the left pane. You can sort the results to find the wanted files if you are looking for certain files.

Step 3. Recover lost/deleted data
Once you have found the desired files, preview the files and then click "Recover" to begin the recovery of your deleted/lost Mac files.

Was This Page Helpful?
Brithny is a technology enthusiast, aiming to make readers' tech lives easy and enjoyable. She loves exploring new technologies and writing technical how-to tips. In her spare time, she loves sharing things about her game experience on Facebook or Twitter.
Jean is recognized as one of the most professional writers in EaseUS. She has kept improving her writing skills over the past 10 years and helped millions of her readers solve their tech problems on PC, Mac, and iOS devices.
-
EaseUS Data Recovery Wizard is a powerful system recovery software, designed to enable you to recover files you’ve deleted accidentally, potentially lost to malware or an entire hard drive partition.
Read More -
EaseUS Data Recovery Wizard is the best we have seen. It's far from perfect, partly because today's advanced disk technology makes data-recovery more difficult than it was with the simpler technology of the past.
Read More -
EaseUS Data Recovery Wizard Pro has a reputation as one of the best data recovery software programs on the market. It comes with a selection of advanced features, including partition recovery, formatted drive restoration, and corrupted file repair.
Read More
Related Articles
-
Fix Mac Won't Shut Down Problem in 3 Minutes
![author icon]() Jean/Jun 17, 2026
Jean/Jun 17, 2026 -
APFS External Drive Not Mounting? Fixes on Mac
![author icon]() Jaden/Jun 21, 2026
Jaden/Jun 21, 2026 -
Screen Recording Didn't Save? Methods to Fix!
![author icon]() Jaden/May 19, 2026
Jaden/May 19, 2026 -
How to Recover Deleted Files from Mac Guest Account [macOS Ventura/Monterey/Big Sur]
![author icon]() Jaden/Jun 30, 2026
Jaden/Jun 30, 2026