Featured Articles
- 01 The Disk Is Write Protected
- 02 How to Remove Write Protection from SD Card
- 03 How to Format Write Protected Pen Drive
- 04 Remove Write Protection and Format Write Protected SSD
- 05 Write Protection Removal Tool/Software
- 06 Troubleshooting 1: SD Card Read Only Fix
- 07 Troubleshooting 2: USB Current Read-only State Yes
- 08 Troubleshooting 3: The Media Is Write-Protected
- 09 How to Remove Write Protection from Pen Drive
- 10 Toshiba USB Flash Drive Write Protected Removal/Format Solutions
You get to the point if you want to know how to remove write protection on a USB, micro SD card, and disk drives. This guide provides you with several options to solve this issue on Windows and Mac.
Main Content:
Understanding the Write-Protection
How to Remove Write Protection on USB Drive?
How to Remove Write Protection from SD Card?
How to Remove Write Protection from SSD?
Can I Format Write Protected USB, SD Card and Disk Drive?
Troubleshooting: Specific Write Protection Error
1. Understanding the Write-Protection
Write protection is a feature that can be used to protect data from being written or edited. It is often used on removable media, such as flash drives and memory cards, to prevent accidental deletion or modification of the data. Write protection can also be applied to hard drives and other storage devices, though this is less common. There are a few different ways that write protection can be implemented, such as through physical switches or software settings.
Pros of Write Protection:
- Can prevent accidentally deleting or modifying data.
- Can help to protect sensitive data from being tampered with.
- Can be a useful security measure
Cons of Write Protection:
- Can make it difficult or impossible to edit or delete data, even when you want to
- Can cause problems if the write protection is accidentally enabled
- Can prevent you from using some features, such as format...you want to write protect an entire drive)
It's important to note that write protection does not provide security against malicious software infections or physical theft. If you're concerned about the safety of your data, you should use a drive with built-in encryption or password protection instead of relying on write protection alone.
LEARN MORE
Click here to figure out the disk is write protected.
How to Remove Write Protection
While write protection is an excellent option to protect sensitive data from being peered at or modified, however, due to unexpected errors, the unlocked devices sometimes show encrypted or locked by default. For these reasons, write protection can also be a hassle that you will not be able to make any changes to it.
Here are some write protection removal tool to disable write protection both on USB, SD card and SSD drive, inclusing physical switch, diskpart, Registry, and Disk Utility. No matter what operating system you are using, click to see fixes:
| Workable Solutions | Step-by-step Troubleshooting |
|---|---|
| Remove Write Protection on Windows |
Option 1. Using Lock Switch...Full steps Option 3. Turn BitLocker Off...Full steps
|
| Remove Write Protection on Mac |
Method 1. Use Disk Utility to format...Full steps |
How to Remove Write Protection on USB Drive
You are trying to save data to it, but there is a problem that an error message shows the flash storage is write-protected. How can it be? Here are three options to remove write protection on a flash drive. For Windows PC, it is free to change lock switch, run Diskpart and Registry to disable write protection. For Mac computer, you can go to Disk Utility to fix USB write protected error.
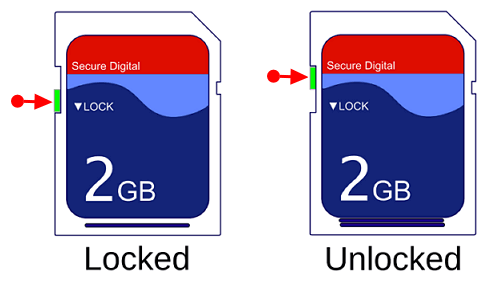
Option 1. Using Lock Switch to Remove Write Protection
There is a toggle switch you can check first for changing the USB write protected status. These days, some specific USB storage drives are equipped with a lock switch for turning write protection on or off.
The physical switch is too small to be ignored for users who are not tech-savvy. You can take the USB off and find this switch on the side, usually decorated as one or two lock icons. (If not, go into method 2.) Like this:
![]()
Step 1. Find the physical switch and toggle the switch to the other side.
Step 2. Re-connect USB stick to PC and try to drop data on it again.
If you can write data on it usually, lucky, the USB error is solved! One thing you need to look for is not to move the switch to the wrong side by accident. You can apply other options for a standard USB with a smooth surface.
Option 2. Remove Write Protection with Diskpart
Launch command lines, Diskpart, is one of the valuable options to fix "how to remove write protection from USB drive in Windows 10/11", letting you manage hard disks detected by the Windows PC. Please ensure you've typed the correct command lines to prevent unexpected data loss.
Step 1. Type Command Prompt on the Windows search box and click to launch it.
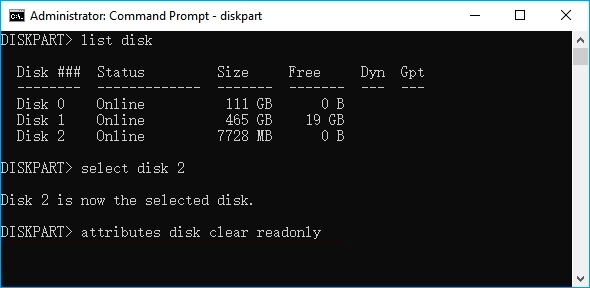
Step 2. Type command lines and press Enter each time.
- diskpart
- list disk (This step works to identify your devices. You can see a list of disk named as Disk 0, Disk 1, Disk 2, etc.)
- select disk 0 (You can replace disk 0 with the write-protected USB number.)
- attributes disk clear readonly (Ensure to type "s" and don't separate "readonly".)
Step 3. Wait until progress is complete and type "exit".
Step 4. Restart your PC and check if the write-protected USB has been changed.
Option 3. Turn BitLocker Off to Disable Write Protection on USB
To remove BitLocker encryption from USB drive:
Step 1. Press "Windows + E" to open File Explorer.
Step 2. Go to the "This PC" on the left side, and locate your locked USB drive under Devices and drives. Right-click the drive icon and click "Manage BitLocker".
Step 3. The BitLocker Drive Encryption window shows all drive and their status. Locate your write-protected USB and select "Turn off BitLocker".
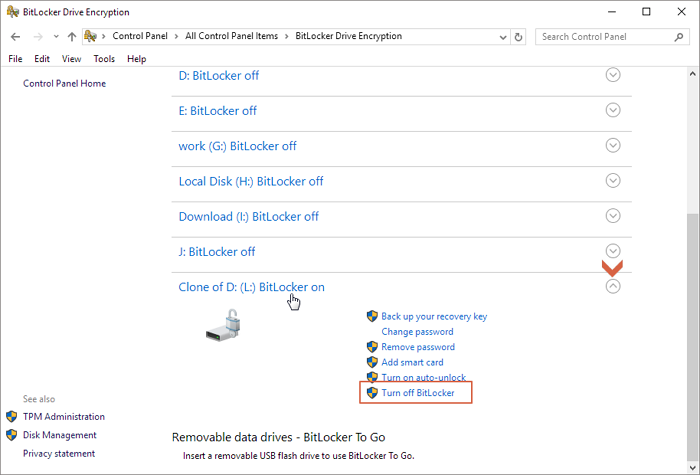
Then enter the password or recovery key and wait for decrypting time. After turning off BitLocker, you can try to add files on the flash drive to test whether "write protection" is fixed or not.
Tips: Check five methods to recover the lost BitLocker recovery key if you forgot it.
Option 4. Use Windows Registry to Disable USB Write Protection
To disable write protection, here recommends Windows Registry for experienced users familiar with Registry.
Note: Editor Registry will disable the write protection set on all devices.
Step 1. Insert USB drive to PC. Press "Windows + R" and type "Regedit" on the box. Click Enter or OK to go into Registry Editor.
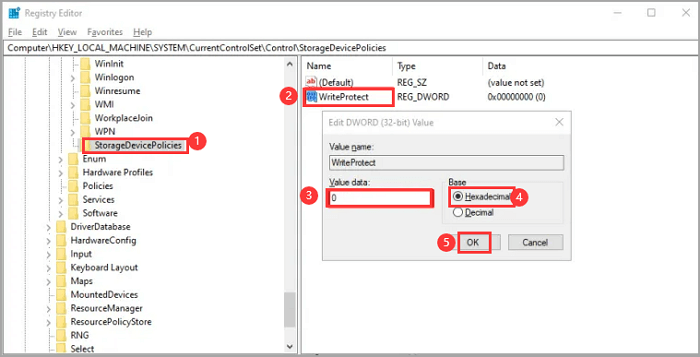
Step 2. Follow the path: Computer\HKEY_LOCAL_MACHINE\SYSTEM\CurrentControlSet\Control\StorageDevicePolicies
Note: Due to the high risk, if your "StorageDevicePolices" is missing, we recommend using other methods instead of creating them yourself. - Your computer could mess up.
Step 3. Double-click the "WriteProtect". Modify "Value data" as 0 and check "Hexadecimal". Click OK.
Step 4. Restart your PC and check if the drive is writable.
LEARN MORE
Here also provides a one-click third-party write protection removal software - EaseUS Partition Master. It is Free. Easy to take write protection off by a toggle button. Click to remove write protection from USB. 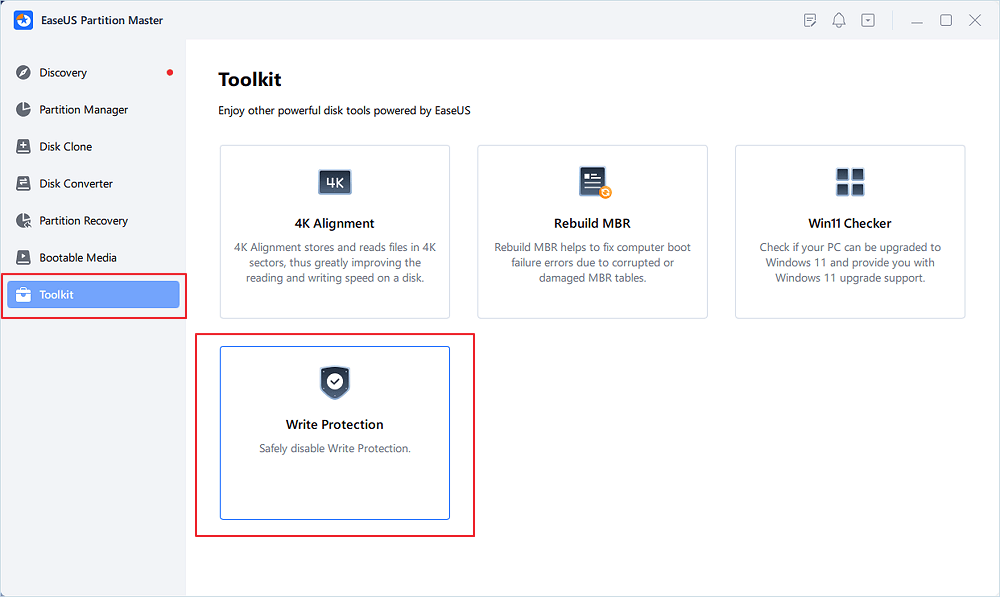
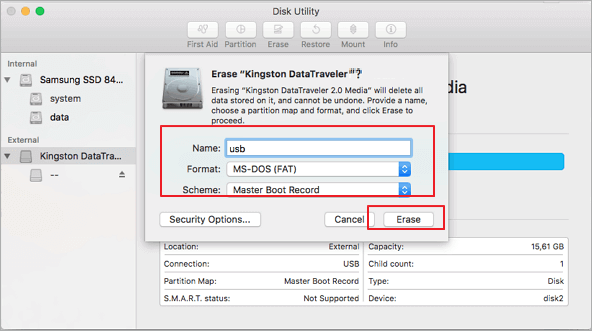
Method 5. Format write-protected USB via Disk Utility
The format is a good option to remove the write protection. Connect a USB drive to Mac and go to wake up Disk Utility.
Step 1. Go to Finder > Go > Utilities > Double-click Disk Utility.
Step 2. Select the read-only flash drive from the left panel.
Step 3. Click the Erase button.
Step 4. Enter the USB name. Select the format and scheme. Then click the Erase option.
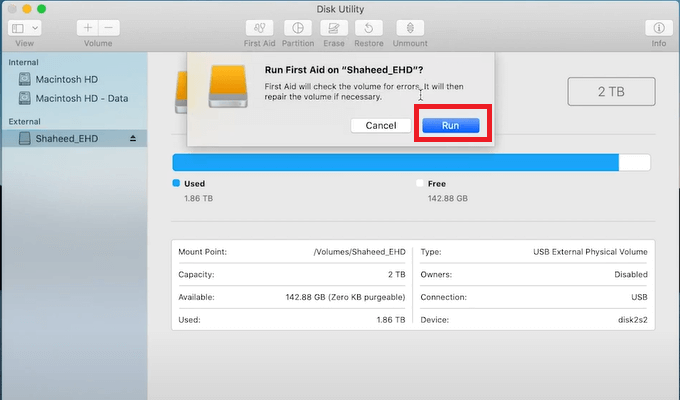
Method 6. Run First Aid to Repair Read-Only Device
Open Disk Utility > Find the read-only drive > Select First Aid and click the Run option.
How to Remove Write Protection from SD Card
If you've ever tried to copy files to an SD card and got an error message saying the card is write-protected, you know how frustrating it can be. Write protection is designed to prevent accidental deletion of important files, but it can also lock you out of your own SD card if you're not careful. Thankfully, there are a few ways to remove write protection from an SD card so that you can access your files again. In most cases, all you need to do is change a physical switch. If those methods don't work, there's always the nuclear option: set up command lines on Windows 10/11 and change "Get Info" settings on Mac.
Option 1. Change the Physical Switch
Like USB drive, some SD card also has a physical lock that you can enable or disable write protection.
- Remove the SD card from the computer and find the physical lock.
- If it is "On", toggle it to the off side.
Option 2. Use Diskpart to Take Write Protection Off on Windows
- Insert SD card into SD card reader and place SD card to computer.
- Run CMD and enter the command lines. (The steps in this section are the same as the command line mentioned above. Go back. )
Option 3. Modify Read-Write Status on Mac
How to change a write-protected SD card on mac? Take a look at the Sharing & Permissions settings. It enables to decide who can add or modify files in the Finder app. You can remove SD card write protection by it.
Step 1. Connect SD card to Mac with SD card reader.
Step 2. Go to SD card and right-click the file. Choose "Get Into" from the list.
Step 3. Go to the Sharing & Permissions, click on the "Read & Write" under Privilege.

LEARN MORE
Not enough? If the toggle is missing and the diskpart seems too complex for you, don't worry. Methods vary, go and learn other three ways about how to remove write protection on Micro SD card.
How to Remove Write Protection from SSD
When you try to transfer files from your computer to an SSD, you may receive an error message stating that the disk is write-protected. This can be frustrating, but fortunately there are a few steps you can take to remove the write protection and transfer your files. First, check the properties of the SSD to see if there is a hardware switch that is preventing writing. If so, simply flip the switch and try again. If there is no hardware switch, the write protection may be enabled in the firmware. To disable it, you'll need to connect the SSD to a computer and run some commands in the Command Prompt. Once you've done that, you should be able to transfer files to your SSD without any problem.
Remove SSD Write Protection
Want to see more solutions? Click here to learn about how to fix SSD is write protected.
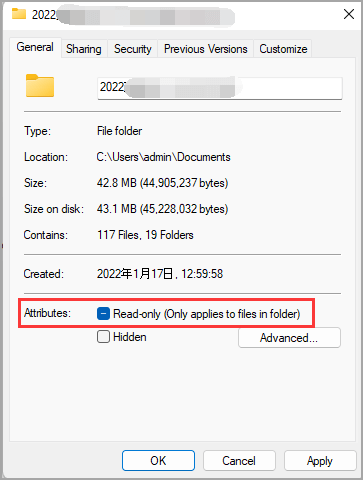
How to Remove Write Protection from A File
When a single file is write-protected on the Windows computer, you can start to remove file write protection by following steps:
Step 1. Press the "Windows+E" shortcut key on the keyboard to open Windows File Explorer.
Step 2. Located the write-protected file. You can search file names and find them faster than scrolling one by one.
Step 3. Right-click the file and select the "Properties" button.
Step 4. Go to the Attributes tab and uncheck the Read-only option. Click OK to save changes.
Can I Format Write Protected USB, SD Card and Disk Drive?
If you've ever tried to format a write protected USB drive, memory card, or hard drive, you know it can be a frustrating experience. You may see a message saying that the device is write protected, or that formatting is not supported. In most cases, this means that the write protection switch on the device is turned on. You can't format write protected USB until lock it first.
Formatting can not remove write protection. Of course, your locked USB won't allow you to format it. You can use EaseUS Partition Master Free to format the device.
Step 1. Select the USB drive to format.
Connect the USB drive or pen drive to your computer. Launch EaseUS partition software, right-click the USB drive you intend to format and choose "Format".
Step 2. Set the drive letter and file system on USB.
Assign a new partition label if you want to change the drive letter of your USB, set the desired file system -NTFS/FAT32/EXT2/EXT3/EXT4/exFAT to your USB, then click "OK".
Step 3. Check "Yes" to confirm formatting USB.
Click "Yes" if you see the Warning window. If you have important data on it, back up the data in advance.
Step 4. Apply the changes.
Click the "Execute 1 Task(s)" button first, and then click "Apply" to format the USB drive.
Troubleshooting: Specific Write Protection Error
1. Windows Cannot Run Disk Checking on This Volume Because It Is Write Protected
Windows cannot run disk checking write-protected. This means that the Windows operating system cannot change the files on your computer's hard drive. You will need to remove the write protection from the hard drive using CMD, Diskpart, and Registry Editor to fix this.
2. SD Card Read Only
Can't write to SD card? One of the most frustrating things when using a camera is getting an "SD card read-only" error. This typically happens when you try to save a file to your SD card but find that you can't because the card is set to read-only mode. There are a few different reasons why this might happen, but the most common is that the SD card has become corrupted. You can fix the problem by formatting the SD card with a third-party read-only removal software.
Related fixes - SD Card Read Only
3. USB Current Read-only State Yes
Current Read-Only State Yes on a USB or SD card means that the disk is in a read-only state. This usually happens when the disk is corrupted or infected by a virus. If you're getting this error, you won't be able to write to the disk. To fix this, you'll need to clear the read-only state yes on diskpart.

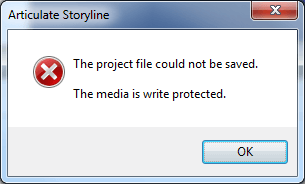
4. The Media Is Write-Protected
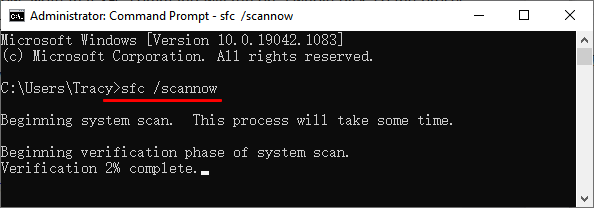
The Media is write protected error in Windows can be caused by various factors. One common cause is a corrupt or damaged file system. When the file system is corrupted, the computer cannot read the files on the disk correctly. You can fix it by checking system file corruption.
You can fix it by checking system file corruption - Open CMD and type the SFC /scannow to check disk. Then wait for the scan to finish.
Wrap Things Up
When you find an SD card or USB disk is write-protected, there is nothing to panic about with the great options we wrote in the article. There are a few different ways that you can remove disk write protection. One helpful method is to use a physical switch on the drive itself. Another way is to use software to remove the write protection. This can be done by changing the drive's permissions or using a tool like Diskpart and Registry Editor. After unlocking the disk, your drive is free of reformatting with disk formatter.
Was This Page Helpful?
Updated by Tracy King
Tracy became a member of the EaseUS content team in 2013. Being a technical writer for over 10 years, she is enthusiastic about sharing tips to assist readers in resolving complex issues in disk management, file transfer, PC & Mac performance optimization, etc., like an expert.
Related Articles
-
File System Comparison: NTFS, FAT32, exFAT, and EXT, Which File System Should I Use
![author icon]() Tracy King/Dec 23, 2025
Tracy King/Dec 23, 2025 -
An Ultimate Guide to the Master Boot Record (MBR)
![author icon]() Tracy King/Dec 23, 2025
Tracy King/Dec 23, 2025 -
What Is UEFI and How Do I Use It on Windows? [Full Guide]
![author icon]() Tracy King/Dec 23, 2025
Tracy King/Dec 23, 2025 -
Partition Magic Software Free Download with How-To Tutorial [Full Guide]
![author icon]() Tracy King/Dec 23, 2025
Tracy King/Dec 23, 2025