What Causes Mac Won't Boot After macOS 14 Update
Have you recently encountered a Mac that won't turn on after the macOS Sonoma update error? This error may drive you crazy as it hinders you from using your MacBook efficiently. The most worrisome factor is that you can't access every type of data on your Mac.
But you must not worry! This article will assist you in recovering data from the unbootable Mac and let you know what to do when your MacBook fails to launch after upgrading to macOS Sonoma. You must be wondering why your MacBook isn't booting after a macOS 14 update! These are the top 4 reasons that cause Mac won't turn on after the macOS Sonoma update:
🖥️Malfunctioning display. The display may get so gloomy that you can't see anything when your MacBook turns on after the macOS Sonoma update. In this case, modifying the screen brightness may solve the error. On the other hand, there might be corrupted hardware that causes the display to malfunction. Therefore, the display needs to be replaced or repaired.
❌Software glitches. Software errors on some third-party MacBook applications cause this black screen error. Others might cause your MacBook to be perfunctory. In that scenario, you must force quit the troublesome app.
🔋Drained battery. It might be days since you last charged your MacBook, which causes its battery to be drained. You need to plug in your MacBook when the Mac won't turn on after the macOS Sonoma update.
💻Startup processes. Whenever your MacBook turns on after an update, some apps and processes are calibrated to commence by default. An error among such startup items might cause your MacBook not to turn on.
Recover Data from Unbootable Mac [First Thing] 🏅
Recovering data from an unbootable Mac is crucial if the Mac won't turn on after the macOS Sonoma update. This method is worth trying when your MacBook can't boot. With the help of professional data recovery software, you can quickly retrieve crucial files.
EaseUS Data Recovery Wizard for Mac Pro fulfills all your needs in this regard. Moreover, this software is excellent and useful enough to retrieve data from an unbootable MacBook.
The main highlights of this software are given below:
- Assist you in recovering files from a Mac that won't boot. You may create EaseUS data recovery wizard bootable media to recuperate off-track files.
- Recover all your personal files from an unbootable Mac. It supports video recovery on Mac, photo recovery, document recovery, etc.
- Recover data when you encounter update issues, such as recovering missing photos after the macOS Sonoma update.
This powerful data retrieval software can restore data after the macOS Sonoma upgrade fails. Mac unbootable errors might ensue when the upgrade stops suddenly, and EaseUS can aid you in retrieving data:
Step 1. Launch EaseUS Software in Recovery Mode
Select "Utilities > Terminal" from the top menu, and enter the command sh <(curl https://d3.easeus.com/mac/boot.sh). Hit "Return". Wait for the application to open, and it will take several minutes.

Note: If the Terminal displays either "No such file or directory" or "Could not resolve host," you should verify that the command line you entered is correctly spelled, ensure your Mac has a stable internet connection, and confirm that your macOS version is not lower than macOS 10.15.
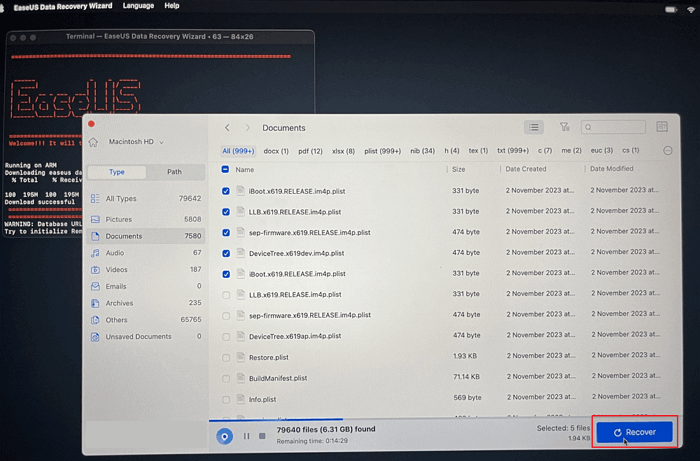
Step 2. Select the Volume on Your Mac Hard Drive
Select the volume where your lost data is stored, and click "Search for lost files". The EaseUS software will quickly locate all the recoverable data on the selected volume.

Step 3. Choose the Lost Data You Want
EaseUS software categorizes the scanned recoverable data by file type and storage path. Find the data you want by clicking "Type" or "Path" in the left panel. Then, check the boxes in front of the data you want to recover.

Step 4. Recover and Save Data on an External Disk
Click the "Recover" button, and a pop-up window will show up saying, "Please select a target location to save". Choose the external disk as the new storage location of your recovered data.
Don't hesitate to share this page with your social media friends if you think this macOS Sonoma data recovery software is helpful.
How to Fix Mac Won't Turn on After macOS Sonoma Update
This is a serious hassle when you can't install the macOS Sonoma. But if that happens, fortunately, then you might face Mac won't turn on after the macOS Sonoma update. Although it's a real-time issue, you must stay calm and try these nifty solutions for fixing the Mac won't turn on after the macOS Sonoma update.
- Fix 1. Check Mac Power Connection
- Fix 2. Force Restart Mac
- Fix 3. Reset NVRAM/PRAM on Mac
- Fix 4. Boot Mac into Safe Mode
- Fix 5. Repair Startup Disk in Recovery Mode
- Fix 6. Contact Apple Support
Fix 1. Check Mac Power Connection
Your MacBook Pro may sometimes encounter this issue after an update due to a power outage. All you have to do is turn your MacBook on and verify if you can hear a startup chime or fan noises. But in case you can't hear any noise, you must understand that the device has power connection problems. Go through these fixes below:
- ⭐All you need to ensure that the charger cable, wall outlet, and adapter work seamlessly.
- ⭐In case you utilize a MacBook, charge the battery for a while to steer clear of a dead or low battery.
- ⭐Hit the power button again to restart your Mac.
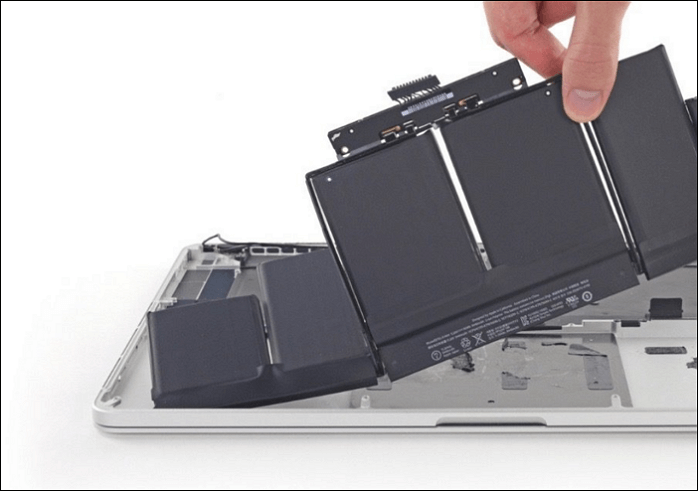
In case you notice the startup chime but your MacBook doesn't boot, you must try to perform a power cycle. This process involves fully cutting every trace of power from the Mac and then rebooting it from the beginning.
For your MacBook without a removable battery, conduct a power cycle to solve the MacBook won't turn on after the macOS 14 update error:
Step 1. Hit the "power" button, and press down for 10 seconds.
Step 2. Restart your Mac.
Fix 2. Force Restart Mac
Force restarting your MacBook is the best strategy to fix this error. Follow the steps below to force restart MacBook Pro:
Step 1. Press down the Mac's power button until it turns off entirely.
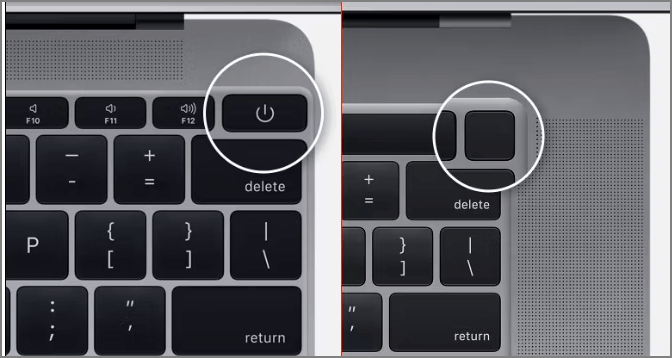
Step 2. Wait for some time, and let the Mac reboot.
If you like these fixes, don't forget to share them with your mates on social media.
Fix 3. Reset NVRAM/PRAM on Mac
NVRAM/PRAM is a special memory that stays active after turning your MacBook off. It consists of every type of information, including brightness settings, volume settings, screen resolution, and many more. Therefore, resetting these settings won't be a hassle for you. This strategy has always been the most effective regarding the update and boot errors of the Mac. Follow the steps below to reset NVRAM/PRAM on Mac:
Step 1. Turn your Mac off.
Step 2. Hit the following keys: "Command + Option + P + R" to turn on your Mac.
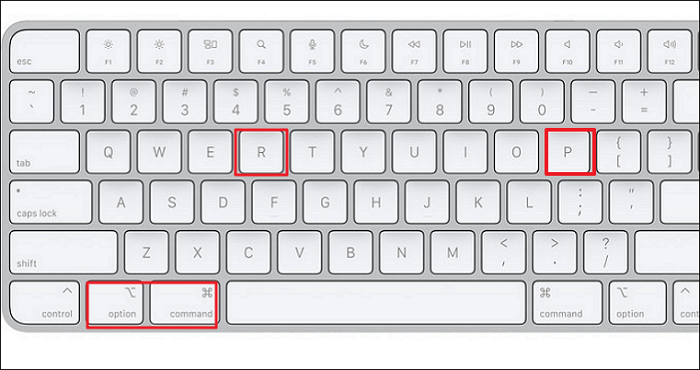
Step 3. Liberate those keys when you listen to the restart chime, and press down the keys for at least 20 seconds.
Step 4. Now, your MacBook must start swiftly.
If the NVRAM reset not working, find solutions in the following passage:

Fix NVRAM Reset Not Working on Mac
There are several ways to fix the "NVRAM reset not working" error. You can find detailed tutorials in this passage. Read more >>
Fix 4. Boot Mac into Safe Mode
In case your Mac fails to start after a macOS 14 update, you may boot in Mac Safe Mode. It will only begin some elementary programs during startup, and then you may eliminate the incompatible software, which makes your Mac unbootable. Follow the steps below to boot your Apple M1 MacBook Pro or Air into safe mode:
Step 1. Turn your Mac off.
Step 2. Press down the "Power" key until the startup options and disks appear on the screen.
Step 3. Opt for your "startup disk"> press & hold the "Shift" button > Hit "continue" in safe mode.
If you want to learn more information about how to boot a Mac into Safe Mode, click the link below:
Fix 5. Repair Startup Disk in Recovery Mode
You can attempt to boot your Mac into recovery mode in order to restore the Mac startup disk if it boots to a dead or black screen. Go through the steps below:
Step 1. Hit the power button for 10 seconds for Apple silicon Macs until you notice a startup options window.
Step 2. Opt for "Options" and hit the "Continue" button.
Once you're in the recovery window of macOS, you may opt for Disk Utility and hit the continue button. In order to repair your startup disk, you may choose your Mac startup disk in "Disk Utility" and select "First Aid".
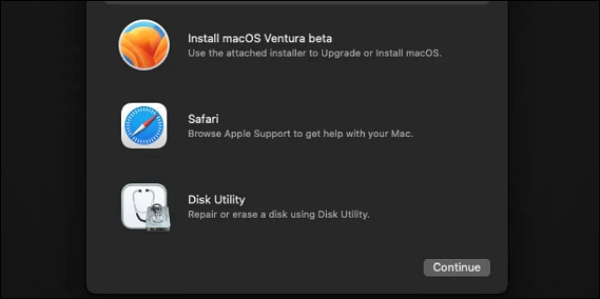
Are you willing to reinstall your macOS? If so, you may opt to reinstall macOS in the macOS retrieval window. The following passage will offer more information about repairing the Mac disk:

How to Repair a Mac Disk with Disk Utility
This article discusses 5 free and simple ways to recover deleted files on Mac computers before or after the Trash can has been emptied. Read more >>
Fix 6. Contact Apple Support
If you have made this so far but cannot resolve this error, your MacBook might possess some lurking hardware errors. Therefore, it's important to contact Apple support for additional help.

🔖Bonus Tip: How to Avoid macOS Sonoma Update Issues
You will be prompted to upgrade your Mac each time the latest macOS Sonoma update becomes accessible via an alert from the Software Update tab in System Preferences. The question is, "Do you want to reboot the process of installing these updates right away or attempt tomorrow?"
Directly updating from the Apple menu is risky, though, since you could suffer a blocked macOS update, obtain an error notice during installation, or even lose crucial information. You may implement some precautions ahead of time to avoid macOS Sonoma issues.
- Go through numerous reviews from techies. You must read countless reviews from techies to know potential errors when a new version of macOS is released.
- Safe working of the Apple servers. In order to avoid macOS Sonoma update errors, you need to ensure that Apple's servers are correctly working by going to Apple's system status page.
- Ensure sufficient free disk space. While updating your Mac to Sonoma, you must have adequate disk space. An SSD or an HDD must have some free space on it.
Share this information with your friends on social media if these tips are helpful.
To Wrap Up
Perform these 6 troubleshooting methods in this article if your Mac won't turn on after the macOS Sonoma update. Don't forget to periodically back up your data with EaseUS Data Recovery Wizard to avoid losing it in the event of any software or hardware problems.
Back Up Your Mac and Never Lose Data
Back up and restore your MacBook/iMac without Time Machine, iCloud, or external hard drives.
Mac Won't Boot After Sonoma Update FAQs
Go through the FAQs below to understand the error more effectively:
1. What happens if my Mac dies during a macOS Sonoma update?
Making an appointment to take your Mac to the Apple store is recommended. The issue may arise because key operation system files are corrupted, as your Mac died while those were being upgraded.
2. How to recover lost files after macOS Sonoma update?
If you have lost data while updating your MacBook to macOS Sonoma, you can retrieve the lost files with the help of EaseUS Data Recovery Wizard for Mac.
3. What should I do if my MacBook is stuck on the loading screen after the macOS 14 update?
You need to press down the Command + Option + P + R keys to reset NVRAM/PRAM, and once it's done, the Mac stuck on the loading screen error will be ruled out.
4. How to update macOS Sonoma correctly?
The best way to update macOS Sonoma correctly is by hitting the Apple logo at the top of the screen > select system settings > General > software update. You can also download macOS Sonoma in the App Store.
Was This Page Helpful?
Finley is interested in reading and writing articles about technical knowledge. Her articles mainly focus on file repair and data recovery.
Dany is an editor of EaseUS who lives and works in Chengdu, China. She focuses on writing articles about data recovery on Mac devices and PCs. She is devoted to improving her writing skills and enriching her professional knowledge. Dany also enjoys reading detective novels in her spare time.
Related Articles
-
Fix Windows (11/10/8/7) Won't Boot From USB Error
![author icon]() Tracy King/2024-08-23
Tracy King/2024-08-23 -
Desktop Keeps Refreshing on Windows 10/11 (Why & How to Fix)
![author icon]() Larissa/2024-11-25
Larissa/2024-11-25 -
How to Delete a User Profile From Windows 10 [Fixed]
![author icon]() Daisy/2024-01-11
Daisy/2024-01-11 -
How to Factory Reset Toshiba Laptop [Detailed Info]
![author icon]() Jerry/2024-11-25
Jerry/2024-11-25

EaseUS Data Recovery Services
EaseUS data recovery experts have uneaqualed expertise to repair disks/systems and salvage data from all devices like RAID, HDD, SSD, USB, etc.