Have you seen the text "the operation can't be finished due to an unforeseen error" while trying to transfer data to your external storage devices, including SD card, HDD, SSD, or send files to the trash? It happened due to Mac error code 1407.
Deleting file on Mac from an HDD might occasionally result in this error code, which can be fixed by a wide array of solutions mentioned in this article.
Here are effective solutions for Mac error code 1407:
| Workable Solutions | Step-by-step Troubleshooting |
|---|---|
| Fix 1. Check File Permission | Right-click the file, select Get Info, and scroll down to find the Sharing and Permissions...Full steps |
| Fix 2. Unlock the File | Choose the file you would like to move or delete. Go to File > Get Info. Untick the lock checkbox...Full steps |
| Fix 3. Force Quit Applications | Hit the Option + Command + Esc keys to open the Force Quit window, and opt for Finder...Full steps |
| Fix 4. Restart Your Mac | Hit the Apple menu, select Restart, and hit the Yes button to confirm the restart if prompted...Full steps |
| Other Proven Methods | Use First Aid in Disk Utility and reinstall macOS to fix Mac error code 1407...Full steps |
Mac Error Code 1407: Possible Causes
What is Mac error code 1407? When you copy-paste files to the external drives or drag-drop files to the Mac Trash, your Mac is unable to do it and exhibits "error code -1407".

Below are some of the common reasons for Mac error code 1407:
🚫No read/write permissions to the file: You won't have permission to read/write the file. Not being an administrator, you can't have read/write access to specific files.
🔒The file is locked: The file is locked by your macOS system. If a file has been encrypted, you won't be able to transfer, copy, or delete it from the computer. If you do, Mac error code 1407 will emerge.
📂The file is being used by another program: It means you can't delete a Word file in case it's still operating behind. On the other hand, Finder might be using the file which you intend to transfer or delete.
😨The file is damaged: It might result in Mac error code 1407, and abrupt termination is the leading cause for the creation of a damaged file. When you shut down your Mac while working on the file, it may get damaged, which is why it can't be transferred or deleted.
⚠️The file format is not supported: The attached device lacks compatibility with the file format. Verify the file system compatibility before transferring files from your Mac to another storage medium.
How to Fix Error Code 1407 on MacBook Pro/Air
You must resolve the error to fulfill the file transfer or file deletion process. This section elaborates on fixing the error code 1407 on your MacBook Air/Pro.
Fix 1. Check File Permission to Fix Error Code 1407
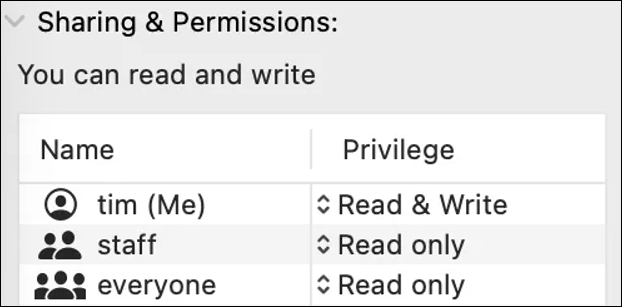
The file permission on your MacBook ascertains who can read and write files on your Mac. You may change permission settings for a folder, file, or disk in Finder. This Mac error code 1407 will vanish when you have the proper permissions. Follow the steps below:
Step 1. Right-click the file and select "Get Info".
Step 2. Scroll down to find the "Sharing & Permissions" part.

Step 3. Opt for a user or group in the Name column; after that, pick "Read & Write" to get permission to open the file and change it.

5 Best Ways to Fix Permission Denied on Mac
This article discusses 5 ways to fix Mac Permission Denied issues. Keep reading and learn more about how to fix permission denied on Mac. Read more >>
Fix 2. Unlock the File to Fix Error Code 1407
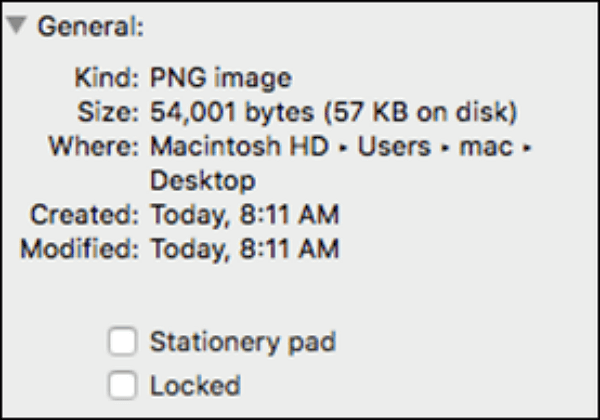
If the first fix isn't helpful, you may unlock the file that can't be moved or deleted to an external storage medium because of this 1407 error code. The steps are the following:
Step 1. Choose the file you would like to move or delete. Once done, go to "File > Get Info".
Step 2. Untick the lock checkbox so that you can unlock the file.

Otherwise, you may employ Terminal to untick a folder or file. The steps are the following:
Step 1. Visit "Applications > Utilities > Terminal" to open Terminal.
Step 2. Type sudo chflags - R nouchg P# in the Terminal window. Once done, hit the "Return" button.
Here, P# should be replaced with the address corresponding to the document you want to unlock. Drag and drop the file or folder to the command prompt to add the location instantly.
Step 3. Provide the password, and the file with the locked icon is unticked.

How to Recover Deleted Files from Mac Terminal
This article shows you how to recover deleted files using Terminal and restore permanently deleted files due to emptying Trash. Read more >>
Share this article on social media to help others learn how to fix Mac error code 1407.
Fix 3. Force Quit Applications that Keep the File Up
To discard error code 1407, consider abandoning the Finder application forcefully. The steps are given below:
Step 1. Hit the "Option + Command + Esc" keys simultaneously to open the "Force Quit" window.
Step 2. Opt for "Finder" from the detailed list of options, and hit "Force Quit". Once done, select "Relaunch".

It's time to move or delete your file. You should know that forcing quit an app might cause data loss. For example, forcing quit the Word application may cause losing changes on the working documents. In this case, it's hard to recover unsaved Word documents.
Here a professional data recovery software, EaseUS Data Recovery Wizard for Mac, comes in handy to recover almost all file types. With this software, you can retrieve lost/deleted data with a few clicks.
The EaseUS Mac data recovery software supports the numerous data loss scenarios, including:
- Formatting during macOS update
- Deletion of data without a backup
- System crash and hardware failure
- Unforeseen shutdown
- Unmounted drive and partition loss
Download this professional data recovery software today! And recover your lost/deleted data by the following steps:
Step 1. Select the location to scan
Launch EaseUS Data Recovery Wizard for Mac and choose the hard drive, SSD, SD card, USB flash drive, or TF card where you lost data. Click "Search for lost files" to start scanning.

Step 2. Filter lost Mac data
The software will automatically scan for lost data on MacBook/iMac. When the scan completes, filter wanted data through the "Type" and "Path" buttons.

Step 3. Recover lost data or files
Double-click a file to preview it. Then, click the "Recover" button to restore the lost data to another place.

Fix 4. Restart Your Mac to Fix Mac Error Code 1407
You may restart MacBook Pro/Air to fix this Mac error code 1407. Follow the steps below to restart your Mac:
Step 1. Hit the Apple menu, and select "Restart".
Step 2. Hit the "Yes" button to confirm the restart if prompted.

Try relocating or removing the files and restarting the Mac. Follow the next troubleshooting step if the error reappears.
Fix 5. Fix Error Code 1407 Using Disk Utility
You may try using Mac First Aid or repairing Mac disk with Disk Utility to get rid of this error code 1407. The full steps to resolve this error code using Disk Utility are the following:
Step 1. Start your MacBook that exhibits the error code 1407. After that, quickly press & hold the "Command + R" keys until you see the Apple icon. This is the process of booting into Mac Recovery Mode.
Step 2. Opt for "Disk Utility" in the macOS Utility window. After that, hit the "Continue" button to kickstart the Disk Utility.
Step 3. Hit the Mac startup disk from the sidebar of the Disk Utility. Once done, hit "First Aid" from the top.
Step 4. Hit "Run" to commence the Mac startup disk mending procedure. Wait until the repair is done!

First Aid Found Corruption That Needs to Be Repaired, What Should I Do
This article will examine the error First Aid found corruption that needs to be repaired, and provide you with a complete guide. Read more >>
Fix 6. Reinstall macOS to Fix Mac Error Code 1407
You may try reinstalling macOS in case the Disk Utility repair method doesn't work. Steps are the following to reinstall macOS:
Step 1. You need to start or restart your MacBook; after that, press & hold the "Command + R" keys immediately.
Step 2. When you notice the Apple symbol, release those keys. This is how your MacBook will boot into the macOS Recovery mode.
Step 3. Follow the instructions displayed on the screen after wiping the Mac storage disk when requested.
Step 4. Recover the backup copies of files to your Mac's hard drive following a fresh macOS installation.
Conclusion
You now understand how to fix the Apple Mac problem code 1407 effectively. Force closing Finder, releasing locked files, rebooting the system, launching First Aid or Disk Utility, or reinstalling macOS in Recovery mode are good places to begin troubleshooting.
Consider utilizing EaseUS Data Recovery Wizard for Mac to retrieve your lost, erased, or unreadable data in the unfortunate circumstance of any unforeseen data loss scenario.
Mac Error Code 1407 FAQs
Let's consider these below-mentioned FAQs to understand Mac Error Code 1407 better:
1. How to delete a file on Mac that won't delete?
To delete files on Mac that won't delete: If an object is locked, you must either affirm that you wish to throw it away in the trash or enable it first. Click the item that needs to be unlocked, then click "File > Get Info" (or Command + I), and then uncheck the Locked checkbox.
2. What is error code -50 on Mac?
Users are unable to copy or move files from external storage devices, such as USB drives, when the USB drive encounters error code 50. This issue can be caused by various things, including system data, faulty NVRAM/PRAM, etc.
3. How do I fix error 1407 on Mac?
Follow the solutions, including fixing error codes using disk utility, reinstalling macOS, checking file permission, etc. Or you may force quit the Finder to fix this error 1407 on Mac.
To access the Force Quit window, hit "Option + Command + Esc" simultaneously. Choose "Finder" from the list of actions, then press "Force Quit" and hit the "Relaunch" button.
4. What is system Mac error code 1407?
When attempting to drag and drop a file to the Trash or transfer it to an external SD card, USB flash drive, HDD, or SSD, your Mac will display the Apple Mac error code 1407.
Was This Page Helpful?
Brithny is a technology enthusiast, aiming to make readers' tech lives easy and enjoyable. She loves exploring new technologies and writing technical how-to tips. In her spare time, she loves sharing things about her game experience on Facebook or Twitter.
Related Articles
-
Windows 11 Blue Screen Fix in 2024 [100% Working]
![author icon]() Cici/2024-07-04
Cici/2024-07-04 -
How to Scroll Down on a MacBook Air [Step-by-Step Tutorial in 2024]
![author icon]() Brithny/2024-10-25
Brithny/2024-10-25 -
Fix Blue Screen of Death Error While Playing Helldivers 2
![author icon]() Roxanne/2024-10-23
Roxanne/2024-10-23 -
How to Boot from USB Ubuntu? [Full Guide in 2024]
![author icon]() Tracy King/2024-01-11
Tracy King/2024-01-11
EaseUS Data Recovery Services
EaseUS data recovery experts have uneaqualed expertise to repair disks/systems and salvage data from all devices like RAID, HDD, SSD, USB, etc.
