The easiest way to experience Ubuntu is to run it directly from your USB stick or DVD. If you are looking forward to booting from USB Ubuntu, this guide will help you achieve it.
Running boot from USB Ubuntu is a seamless process that can be quickly done without hassle. The best thing here is that one doesn't necessarily need technical skills to initiate booting. The Ubuntu USB includes all the essential files, including system booting information.
If you are going to boot from USB Ubuntu for the first time but don't know how to initiate it, here we are with the definitive guide that will make things much more convenient.
How to Boot from USB Ubuntu?
USB Ubuntu offers users an easier way to boot up their devices effortlessly. The best thing here is that one doesn't need to install Ubuntu on any device. Connect the USB Ubuntu to your device and start the booting process within a few clicks. The things you have to do here are:
Create Bootable USB
Step 1: You will need a 4GB USB drive, Ubuntu Desktop 14.04, and an Ubuntu ISO file. Make sure to copy it into the Downloads folder.
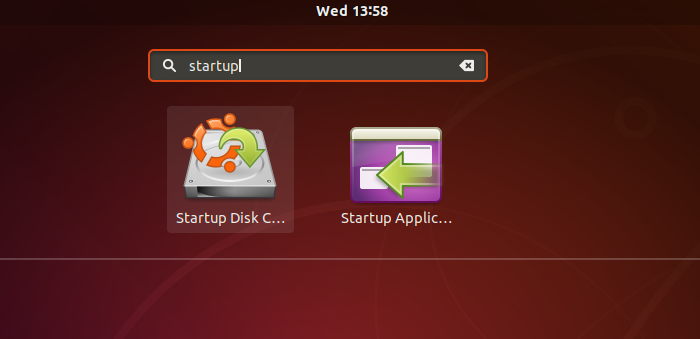
Step 2: In Ubuntu Desktop, go to Show Applications at the bottom left icon, and then look for Startup Disk Creator.
Step 3: Launch the application, automatically detecting the ISO file once you find it. It will also automatically detect the USB drive. Select the one you want to make a bootable disk if you have multiple disks.

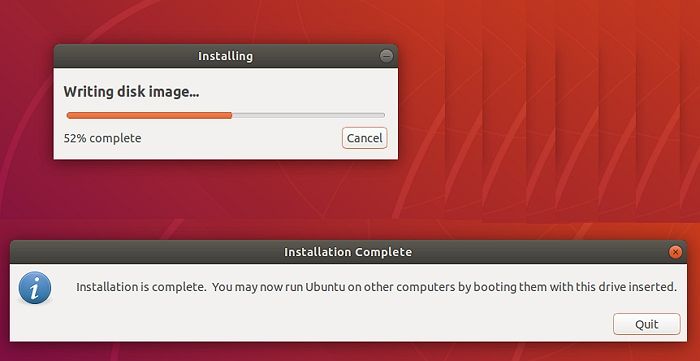
Step 4: Click on the Make Startup Disk, and then it will ask for confirmation. Once you do that, the writing process will start, and you should see the progress bar. Once complete, you will have Ubuntu on a USB stick, bootable and ready to go.
Bootable USB is not only valuable for installation but also helps test, repair, or fix a broken configuration
Boot from USB
Step 1: Please turn off your computer system and remove all unnecessary USB and external devices connected to it.
Step 2: Once done with it, you now have to insert the Ubuntu USB drive into your computer system and then have to turn it on.
Step 3: On completing the above process, if your computer system will boot up the USB drive automatically, you will be perfectly done with it.
Step 4: If not, go to the Boot Menu or BIOS/UEFI option and launch it. Keep the device connected, and press the F2, Del, or ESC key to boot into the BIOS or UEFI. The information should be available when the PC boots up.
- For Acer booting key is F9, F12, or Esc.
- For Asus booting key is F8 or Esc.
- For Compaq booting key is F9 or Esc.
- For eMachines booting key is F2.
- For Fujitsu, the booting key is F12.
- For HP booting key is F9 or Esc.
- For Lenovo booting key is F8, F10, or F12.
- For Samsung booting key is F2, F12, or Esc.
- For Toshiba booting key is F12.
Step 5: Once you enter the BIOS or UEFI, locate the Boot menu section, allowing you to change the order for the boot drive.
Step 6: Set the Ubuntu USB drive as the first boot drive and save the changes.
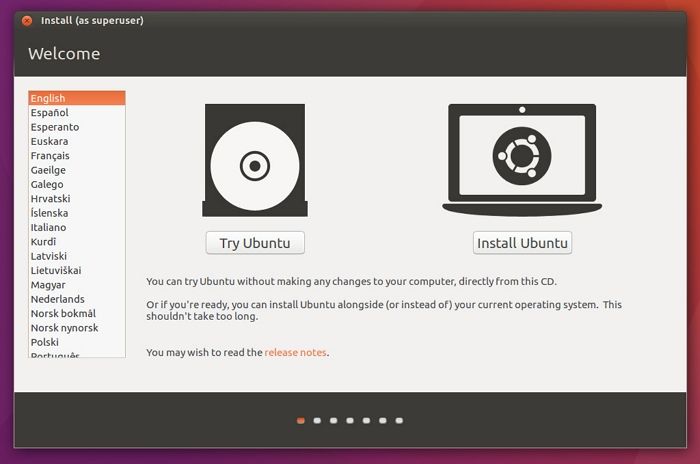
Step 7: Restart the PC, and this time PC will boot into the Ubuntu from the USB drive. If you are doing it for the first time, you will need to set up Ubuntu, and then it's ready.
Why Do You Boot from USB Ubuntu?
Booting from USB Ubuntu is one of the easiest and quickest ways to boot up a computer system. The process brings up a lot of benefits along with it; if you are eager to know, check the few we are providing you below:
- Install or upgrade Ubuntu: Using a bootable Ubuntu USB stick makes it easier for users to install or upgrade their Ubuntu without hassle. One doesn't need to install any third-party sources to get access over the same.
- Easy testing: USB Ubuntu helps super test out their Ubuntu desktop experience without making many efforts. The best thing here is that one doesn't need to touch their PC configuration to enable successful testing.
- Conveniently booting: USB Ubuntu is the best way to boot into Ubuntu on a borrowed machine or from an internet cafe. The process is secure and only requires a few clicks to make it.
Conclusion
Hopefully, you have gotten to know how to boot from USB Ubuntu conveniently. It is an easy and quick process that hardly requires a few clicks to make it. One can now quickly test the USB user experience and even boot Ubuntu on a borrowed machine or internet cafe without any issues. We have provided you with a detailed step-by-step process for booting from USB Ubuntu. Follow up on the given process carefully to enjoy seamless access.
FAQs
Although we have enlisted all the required details above for booting from USB Ubuntu still, there are some mostly asked queries that we would like to solve here. It will not only add up more to your knowledge hub but also will ease things up more for you.
1. How do I download Ubuntu from USB?
First, you must create a bootable USB using the Ubuntu ISO or setup file. Second, you must boot from the USB and install Ubuntu on that computer. This way, you will be able to download Ubuntu from USB.
2. Is an 8GB USB enough for Ubuntu?
Yes, 8GB is plenty enough for Ubuntu. Most of the distributions can run efficiently from an 8GB USB disk.
Was This Page Helpful?
Updated by Tracy King
Tracy became a member of the EaseUS content team in 2013. Being a technical writer for over 10 years, she is enthusiastic about sharing tips to assist readers in resolving complex issues in disk management, file transfer, PC & Mac performance optimization, etc., like an expert.
Related Articles
-
How to Fix Windows 10 Search Bar Not Working
![author icon]() Jaden/2025-07-04
Jaden/2025-07-04 -
The Operating System Did Not Shutdown Cleanly - How to Fix?
![author icon]() Jerry/2025-07-04
Jerry/2025-07-04 -
How to Factory Reset Windows 7 [Follow Detailed Guides]
![author icon]() Brithny/2025-07-04
Brithny/2025-07-04 -
(Solved!) Windows Update Stuck on Restarting🔥
![author icon]() Jerry/2025-07-04
Jerry/2025-07-04
EaseUS Data Recovery Services
EaseUS data recovery experts have uneaqualed expertise to repair disks/systems and salvage data from all devices like RAID, HDD, SSD, USB, etc.