
You may want to create Windows 10 live USB for various purposes. This type of drive helps to make your operating system portable and run it on different computers. What is a Windows 10 live USB? How can you create a live Windows USB 10? This article has come to your rescue to help answer these questions. EaseUS will give a detailed description of Windows 10 live USB and discuss 3 free ways to create Win 10 live USB drives.
| Methods | Description | Effectiveness | Difficulty |
| 1️⃣Using Bootable USB Creator | Create Windows bootable live USB with/without the ISO file and offer the one-stop solution for the Windows ISO image download and installation process. | High. Do it with several simple clicks. | ⭐ |
| 2️⃣Using Media Creation Tool | Download and install the tool and create a bootable USB with many steps. | Medium. You might meet the Tool not working error. | ⭐⭐ |
| 3️⃣Using Rufus | Takes several simple clicks to create a live bootable USB, but you must download the Windows 10 ISO file first. | Medium. You might encounter the Rufus can't create bootable USB error. | ⭐⭐ |
3 Ways to Create Live Windows 10 USB on Laptop/PC
If you want to create live Windows 10 USB for your laptop or PC, this section will discuss 3 reliable methods. Read on as we discuss the steps for each method in detail.
Way 1. Using Professional Bootable USB Creator
The easiest and quickest way to create a Windows 10 live USB is to use a professional USB creator tool like EaseUS OS2Go. It allows you to create a portable Windows installation USB drive and use it on any device. The tool lets you run a fully functional Windows 11/10/8.1/8/7 setup on a media USB flash drive or external hard drive.
EaseUS OS2Go allows you to create an emergency bootable disk and install Windows 10 from USB from BIOS. You can bypass all the "minimum requirements" restrictions and successfully install Windows 11. For example, it lets you install Windows 11 without a secure boot and TPM. Moreover, the tool allows you to run Mac apps on your Windows PC without limitations.
The main features of EaseUS OS2Go include the following:
- Create a Windows bootable USB drive without an ISO file
- Run Windows 10 from USB without installing it on any PC
- Directly create a Windows installation from an ISO file
- Install Windows 10 without a Microsoft account
- Clone Windows 11/10/8/7 to a USB as a portable Windows
- Install 2 operating systems on one computer simultaneously
Download a free version of EaseUS OS2Go on your computer today if you want a professional Windows USB creator. It's easy to start with this software since the user steps are quite straightforward. Try it out now.
Step 1. Install EaseUS OS2Go on your Windows computer, it will display your system drive's used space. Plug in a USB drive that is larger than the system drive used space. Choose the target USB drive and click Next to continue.

Step 2. EaseUS OS2Go will notify you that the following operation would delete all data on your drive. Make sure that you have backed up all the important data. Click the Continue button to proceed.

Step 3. Adjust disk layout. The default disk layout on the target drive will be exactly the same as the resource drive. You could also edit the layout according to your needs. Tick the option there if you're using a Solid State Drive as the Windows bootable drive. Next, click Proceed.

Step 4. Then EaseUS OS2Go will start to create the portable USB drive. It usually takes a while depending on your OS and Network condition. When the progress reaches 100%, the USB drive should be bootable now.

Step 5. Insert the portable Windows USB and start your computer. Press the required key (F2, DEL, F10...) to access BIOS. Choose to boot from the USB disk.
Note: Please make sure that the boot mode (UEFI or Legacy) of the portable USB and your target computer are the same, otherwise you may not be able to boot.
Is this article helpful? Post it on your social media to help others if it can solve your problems.
Way 2. Using Windows 10 Media Creation Tool
You'll first need to download the Media Creation Tool to a computer with an internet connection to use this method. Once done, you can create a live USB because it already has a Windows 10 live USB ISO download. Follow the steps below:
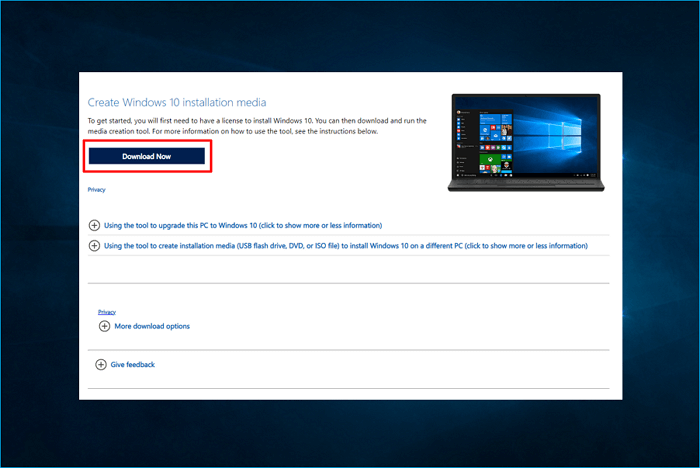
Step 1. Visit the Microsoft Windows 10 download page and click the "Download now" button. This allows you to download the "MediaCreationTool.exe" file to your computer. Install the Tool on your PC and launch it.
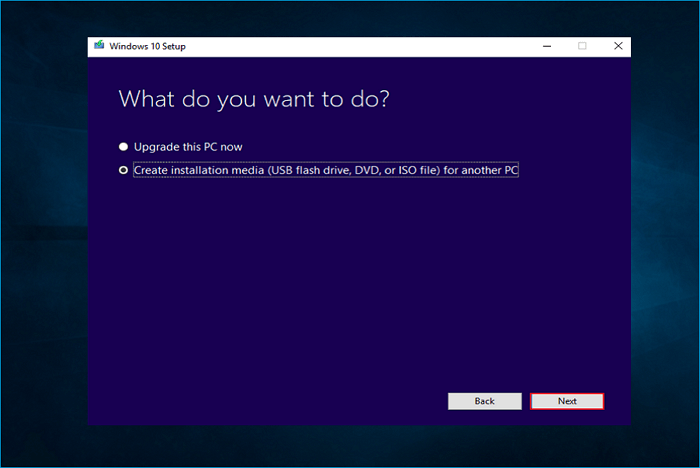
Step 2. Tap Create installation media (USB...) for another PC and press Next.
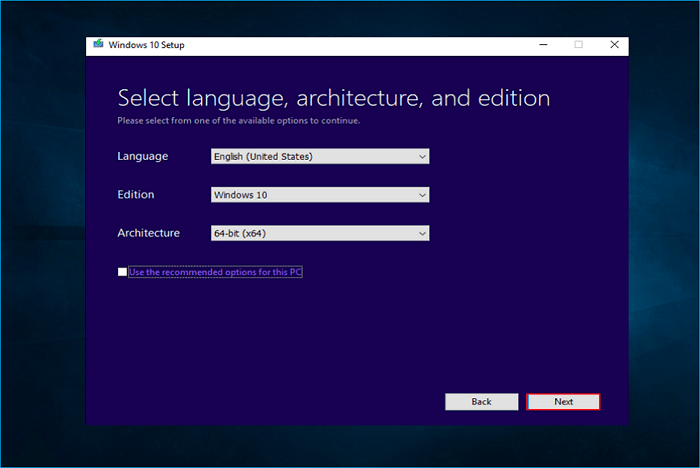
Step 3. Set the Windows 10 Edition, Language, and Architecture. After that, press Next.
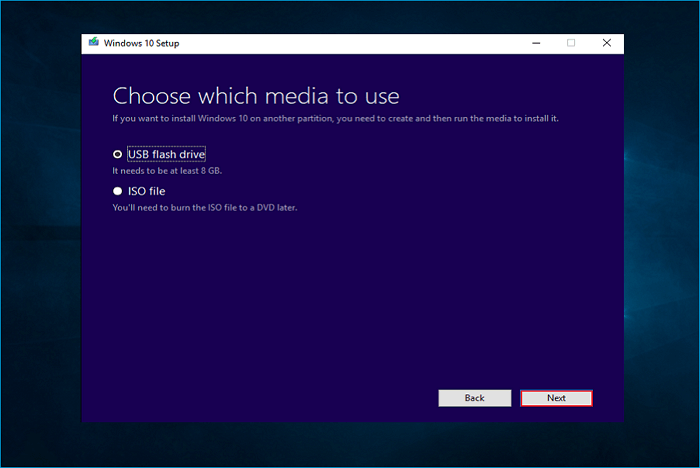
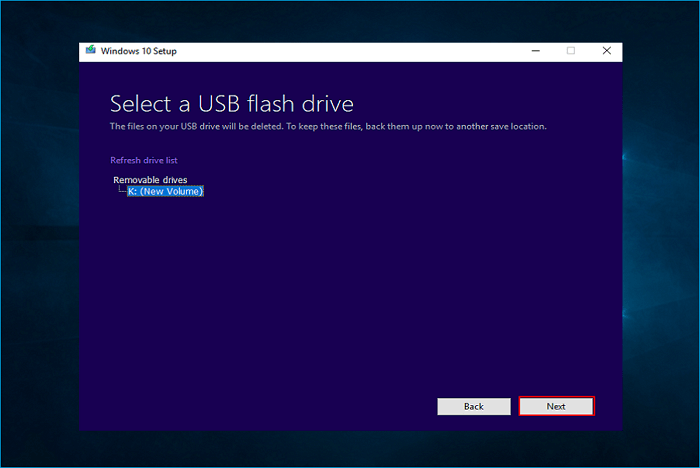
Step 4. Select the USB flash drive and press Next. (Ensure the USB has a capacity of at least 8GB.)
Step 5. Select the USB drive connected to your computer and press Next.
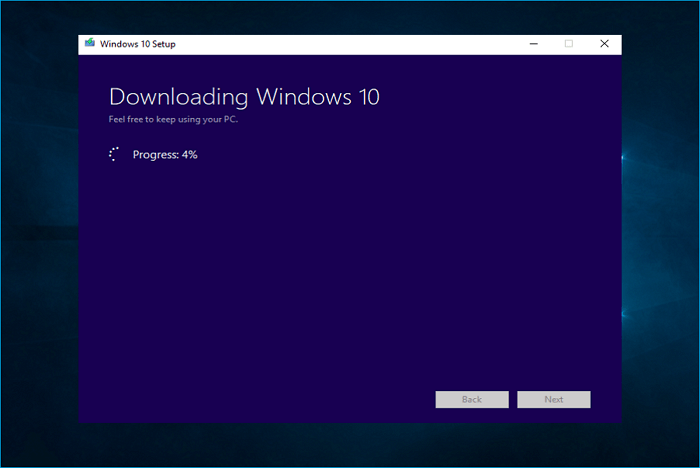
Step 6. The Windows Tool will download Windows 10 to your chosen USB.
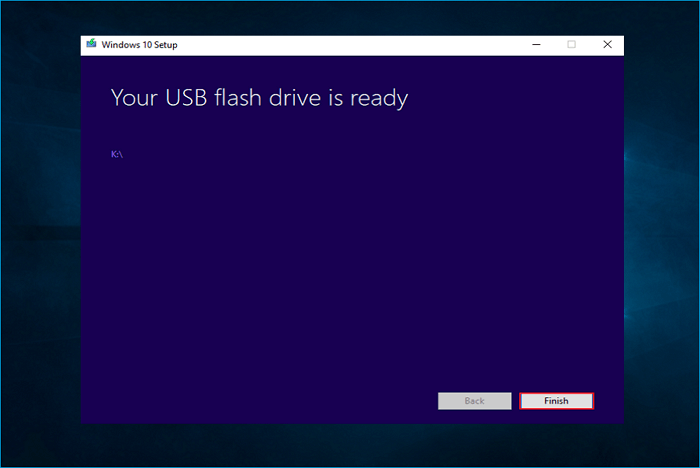
Step 7. After downloading, the Tool will create a bootable Windows 10 USB drive. When the message reads "Your USB flash drive is ready", you can tap Finish to exit the Tool.
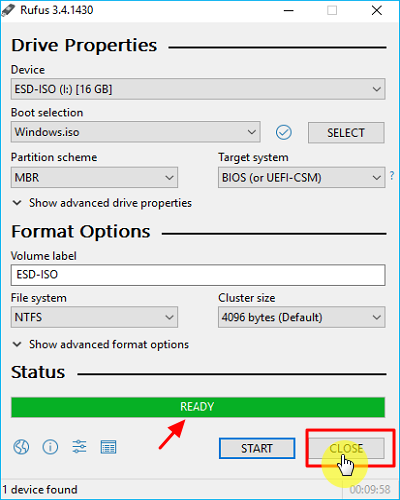
Way 3. Using Rufus
Rufus is a free & open-source tool for Microsoft Windows to format and create a bootable USB flash drive or Live USB. If you want to create a live USB with Rufus, you need first go to the Windows 10 download page to get the Windows 10 ISO file. After that, you can follow the steps below to use it.
Step 1. Download, install, and launch Rufus on your computer.
Step 2. Click "Select" and pick the Windows 10 ISO file you want to make bootable.
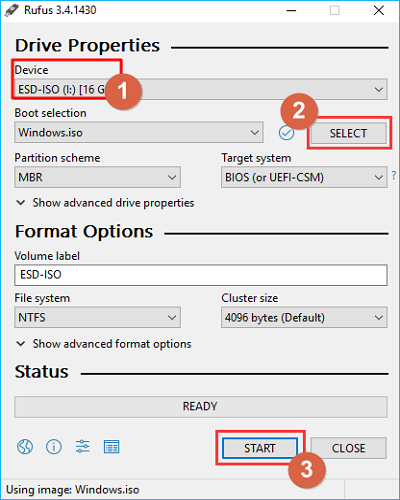
Step 3. Next, click the drop-down menu next to "Image option," "Partition scheme," and "Target system" to make your preferred selections.
Step 4. Click the start button to initiate the Windows 10 live USB creation process. Stay patient until the process finishes. It will display "Ready" under the status bar once done. That's how to create a Windows 10 bootable USB from ISO using Rufus.
You can read the following article to know the difference between Rufus and Windows Media Creation Tool.
Bonus Tip: How to Run Windows 10 from USB Drive
Once you've created a bootable live USB drive, the next step is to try running Windows using it. Below are the steps to run Windows 10 installation from a USB drive:
Step 1. Shut down and reboot your PC, then press ESC, DEL, F2, or F10, depending on your computer model, to enter the BIOS setup.
Step 2. Once on BIOS, click the "Advanced" tab to open the "Boot menu."
Step 3. Select the preferred "Boot mode" for your computer and pick "USB drive" under "UEFI boot order." Save your changes and exit BIOS.
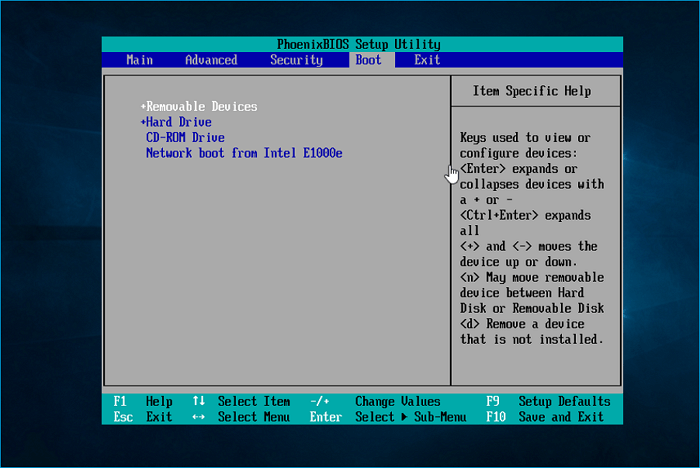
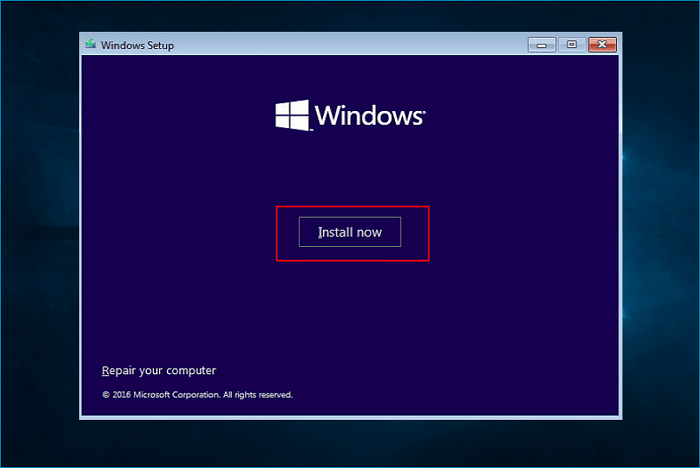
Step 4. Reboot your PC, insert the bootable live USB, and repeatedly press F9 to enter the boot menu. Select your bootable drive from the list. This allows you to proceed to Windows setup and installation.
Step 5. Select your language, then click "Next." Select "Install Now" when the next screen displays. Follow the onscreen instructions to install a new Windows version on your computer. Stay patient until the process finishes.
Read the following article to learn detailed information about how to run/install Windows 10 from a USB drive.

How to Install Windows 10 on New Hard Drive from USB
This article tells you how to install Windows 10 on a new hard drive from a USB flash drive. Read more >>
What Is Windows 10 Live USB & Why Do You Need One
Windows 10 live USB is a bootable flash drive containing a copy of your entire operating system. A Windows 10 live ISO USB lets you alter the booted OS anytime and supports writable storage. With a Windows 10 live USB, you can perform data recovery, system administration, save settings or install new software packages on your system.
A live USB is portable and allows you to run your operating system anytime without carrying your computer. This type of drive is also important in saving internal disc space since it allows you to install large programs.
Is this article helpful? Post it on your social media to help others if it can solve your problems.
To Sum Up
This article has outlined 3 ways to create Windows 10 live USB. They include using a professional USB creator, Media Creation Tool, and Rufus. The most recommended method is using a professional USB creator like EaseUS OS2Go. This software allows you to conveniently create a portable Windows USB drive for your Windows 11/10/8.1/8/7 PC.
OS2Go allows you to run your operating system via USB on any PC. Also, it allows you to bypass Windows 11 installation system requirements and use it on your PC without any restrictions. Do you want to start using a professional USB creator today? Ensure you download and install EaseUS OS2Go on your PC.
FAQs How to Create Live USB Windows 10
Below are common questions about how to create a live USB Windows 10.
1. Is live USB same as bootable USB?
There's a difference between the two. A bootable USB only allows you to boot and install Windows but destroys all existing files. On the other hand, a live USB allows you to boot and install Windows but also store the changes made. This means the live USB is portable and allows you to run your OS on multiple computers.
2. How to make bootable USB Windows 10 without ISO file?
It’s possible to create a bootable USB without an ISO file via Command Prompt on Windows 10. You'll just need to launch CMD as an administrator on your PC and then input a string of commands to make your drive bootable.
3. How to make bootable usb windows 10 using command prompt?
Follow the steps below to make a bootable USB Windows 10 via Command Prompt:
Step 1. Place the USB drive on your computer and launch Command Prompt as an admin.
Step 2. Type diskpart and hit Enter. Next, type list disk, then Enter to display all connected disks.
Step 3. To select your USB drive, type select disk followed by its drive number or letter, then press Enter.
Step 4. Next, type the following commands one after the other and press enter after each:
- clean
- create partition primary
- select partition 1
- format fs=ntfs quick
- active
Step 5. Type exit, then press Enter to quit Diskpart. Close the CMD window.
Step 6. Copy all files from your operating system's installation disk and paste them to the bootable USB drive.
4. How to create Windows 10 bootable USB without Media Creation Tool?
If you don't want to create a Windows 10 bootable USB using a Media Creation tool, you can use a professional USB creator Tool like EaseUS OS2Go or WinToUSB. This software allows you to create a portable Windows installation USB drive and run it on any computer. It allows you to use your system anywhere alongside your applications, preferences, and passwords. Ensure you download EaseUS OS2Go and try it out today.
Was This Page Helpful?
Related Articles
-
How to Play Windows Games on Chromebook [Latest Guide]
![]() Jean/2026-06-17
Jean/2026-06-17 -
How to Play League of Legends (LOL) on Mac with 3 Solutions
![]() Jean/2026-06-17
Jean/2026-06-17 -
How to Create Bootable Partition on Hard Disk/USB from ISO
![]() Jerry/2026-06-17
Jerry/2026-06-17 -
Windows To Go for Mac: How to Install and Use
![]() Jean/2026-06-17
Jean/2026-06-17