
If you are experiencing trouble while booting your Windows OS, there might be multiple reasons for the booting failure. It is suggested that you must create a bootable USB drive if you want to keep your computer system running. In most situations, bootup failures lead to panic situations. However, various ways are there through which you can create a bootable USB drive with Windows OS. Two of the popular tools that are used for creating Windows bootable USB drives are Windows Media Creation Tool and Rufus. Both tools are widely used because of their interface, simple process and technical assistance. If you are not able to select a suitable tool for creating a bootable USB drive, follow the article to the end for a detailed guide on both utilities.
What is Windows Media Creation Tool?
In simple terms, Windows Media Creation Tool allows the users to download a Windows OS version into a USB drive. The USB can be used in case of bootup failures to reinstall Windows on the system. It is always advised that Windows users must have a hard copy of your operating system for emergencies. To use the Windows Media Creation Tool, you would need the following things:
- Blank USB Flash Drive: You must have a formatted USB drive in which you want to create Windows bootable USB drive
- Computer With Internet Access: Without the internet, the utility tool will be difficult to operate. To create a bootable USB drive, you must have a working computer system and internet connection.
- Windows Product Key: You must hold the product key that you received while purchasing the Windows. The product key will allow you to create a copy of your Windows OS on the USB flash drive
Once you have all the essentials required to create Windows installation media on the USB drive, follow the steps mentioned below:
Step 1. Visit the Microsoft website and download the file for the Windows Media Creation tool
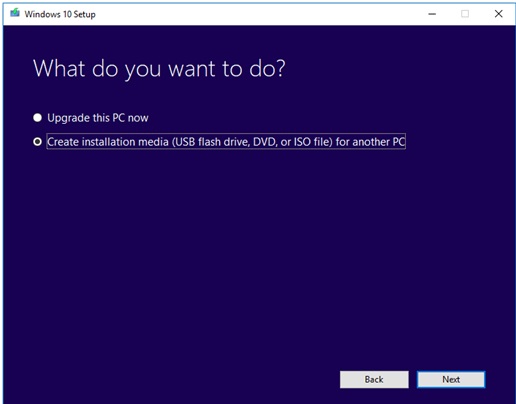
Step 2. Once the utility tool is downloaded, you will see two options. Click on the second option, which will state Create Installation Media (USB flash drive, DVD or ISO file) for another PC and click Next.
Step 3. Select the language, Windows edition and architecture that you want to use for creating the installation media. You can also select the recommended options that would match your computer settings.

Step 4. Choose the USB flash drive storage option in the next part and press next.
Step 5. Select the desired USB drive that you want to use for the installation process.
Step 6. Once you select the USB drive, the Microsoft Media Creation Tool will start downloading the latest Windows OS files on the computer system.
Step 7. As the download will complete, the Windows OS media creation will start.
Step 8. Click on the Finish and you will be able to use the USB drive to boot up the computer system and install Windows OS.
What is Rufus?
Rufus is an open-source application that is widely used for creating USB installation media from bootable files of Windows. The Rufus bootable USB feature helps users create USB installation media for various operating systems like Linux, UEFI and more. If you wish to create a Windows USB drive from Rufus, you would require a USB flash drive with a minimum of 8GB space and a downloaded ISO file of Windows. You must note that if your USB flash drive has data, it will be completely removed during the process. To create a bootable USB using Rufus, follow the steps mentioned below:
Step 1. Download the Rufus utility on your computer system.
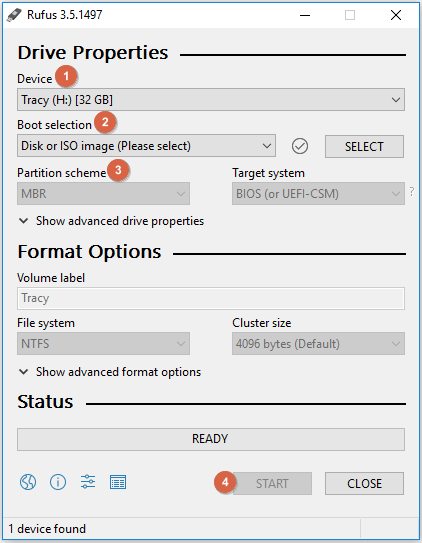
Step 2. Once the software is downloaded, select your USB flash drive under the Device option and then click the Select button to select the respective Windows 11/10/8.1/8/7 installation media.
Step 3. If you wish to format the drive, you have to select the volume label and leave the file system to default.
Step 4. Click on the start and wait for the process to get finished.
Rufus Vs Windows Media Creation Tool: What's The Difference
If we closely look at both the utilities, there are no major differences in the process of Rufus and Windows Media Creation Tool. However, there are minimal differences between both the utilities that you should know. The major differences between Rufus and Windows Media Creation Tool are:
| Basic | Rufus | Windows Media Creation Tool |
| Partition Format | Rufus gives you the option to choose the partition format that is MBR or GPT | Windows Media Creation Tool does not allow to choose the partition format |
| Disk Space | Rufus takes 100% Disk Utilization | Windows Media Creation Tool leave acceptable space in disk utilization |
| Operating System | Rufus can be used for any operating system | Windows Media Creation Tool is used for Windows |
What Else You Can Use to Make a Bootable USB Drive?
Sometimes the entire purpose of creating a bootable USB drive is just a portable version of the operating system rather than Windows installation. The EaseUS OS2Go allows users to create a bootable Windows 11/10/8.1/8/ 7 USB drive. The software can easily clone the OS to an external USB so that it can be used in any system. The EaseUS OS2Go is easy to download and use. Once you have downloaded the software, you can easily follow the steps and create a portable Windows USB drive. For the entire process, you would need a USB drive and a computer system. The flexible interface of the EaseUS OS2Go will aid users in following the procedure with ease.
Step 1. Install EaseUS OS2Go on your Windows computer, it will display your system drive's used space. Plug in a USB drive that is larger than the system drive used space. Choose the target USB drive and click Next to continue.

Step 2. EaseUS OS2Go will notify you that the following operation would delete all data on your drive. Make sure that you have backed up all the important data. Click the Continue button to proceed.

Step 3. Adjust disk layout. The default disk layout on the target drive will be exactly the same as the resource drive. You could also edit the layout according to your needs. Tick the option there if you're using a Solid State Drive as the Windows bootable drive. Next, click Proceed.

Step 4. Then EaseUS OS2Go will start to create the portable USB drive. It usually takes a while depending on your OS and Network condition. When the progress reaches 100%, the USB drive should be bootable now.

Step 5. Insert the portable Windows USB and start your computer. Press the required key (F2, DEL, F10...) to access BIOS. Choose to boot from the USB disk.
Note: Please make sure that the boot mode (UEFI or Legacy) of the portable USB and your target computer are the same, otherwise you may not be able to boot.
Conclusion
The standard procedure of creating a Windows USB drive is almost identical in Rufus, Windows Media Creation Tool and EaseUS OS2Go software. Depending upon the flexibility, you can pick one of the methods to create a portable version of your Windows operating system on the flash drive. You would just require an empty flash drive, computer system and internet connection for the entire process.
Was This Page Helpful?
Related Articles
-
Windows To Go vs. Standard Installation: Which Option Is Better For You
![]() Jean/2026-06-17
Jean/2026-06-17 -
How to Play Windows Games on Chromebook [Latest Guide]
![]() Jean/2026-06-17
Jean/2026-06-17 -
How to Download and Install Windows 11 Version 25H2
![]() Jerry/2026-06-17
Jerry/2026-06-17 -
How to Install Windows 11 Without Secure Boot and TPM | 3 Ways🔥
![]() Jerry/2026-06-17
Jerry/2026-06-17