-
![]()
-
![]() How to Repair Not Working SanDisk Memory Card without Losing Data | NEW
How to Repair Not Working SanDisk Memory Card without Losing Data | NEW July 24,2024
 6 min read
 -
![]()
-
![]() Recover Deleted Files in Network Shared Folder | 3 MethodsJuly 24,20246 min read
Recover Deleted Files in Network Shared Folder | 3 MethodsJuly 24,20246 min read -
![]()
-
![]()
-
![]() [SOLVED] Hard Drive/External Hard Drive Only Shows Half CapacityJuly 24,20246 min read
[SOLVED] Hard Drive/External Hard Drive Only Shows Half CapacityJuly 24,20246 min read -
![]() How to Fix Corrupted SD Card Without Losing Data | 2024July 24,20246 min read
How to Fix Corrupted SD Card Without Losing Data | 2024July 24,20246 min read -
![]()
-
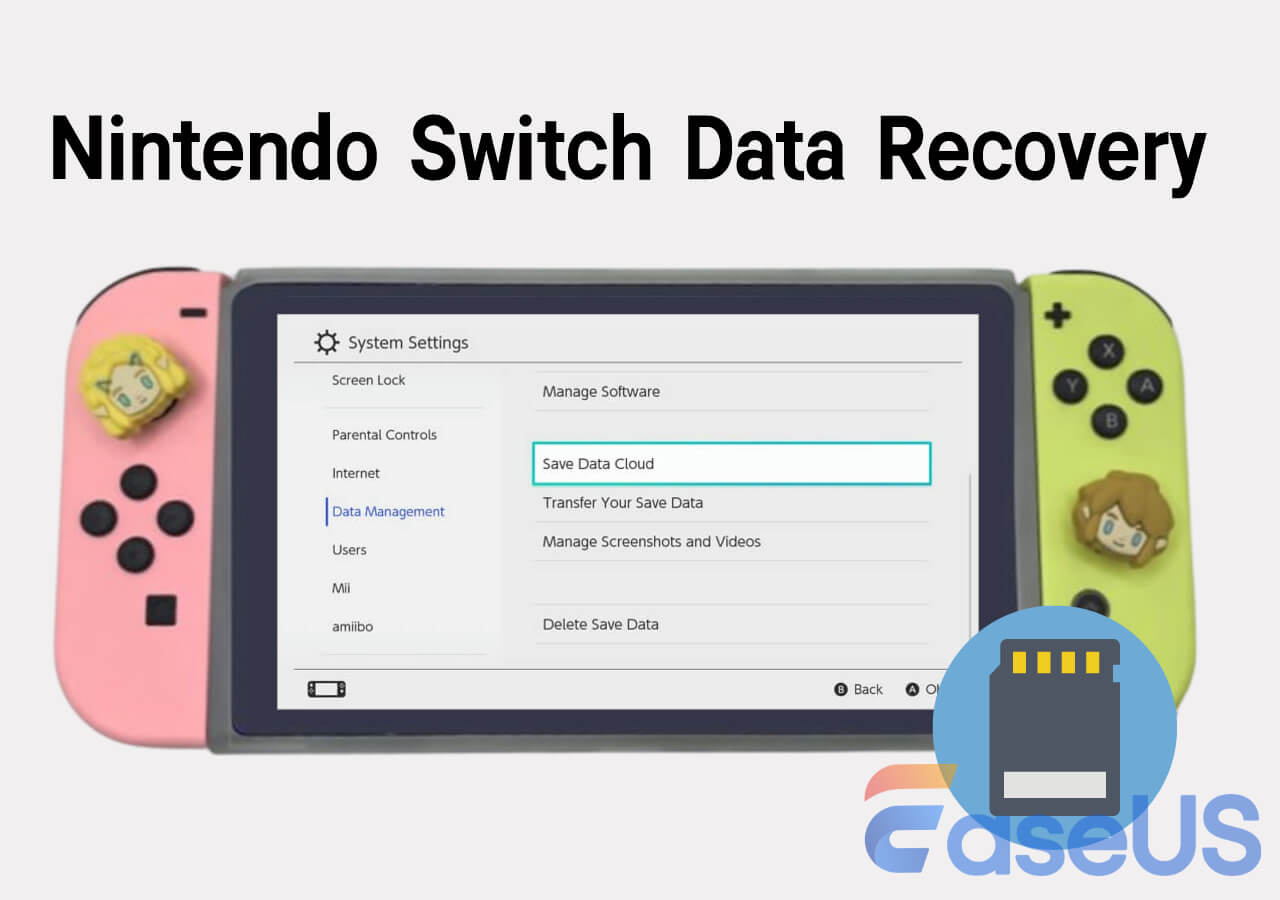
![]() Nintendo Switch Data Recovery: How to Recover Your Game DataJuly 24,20246 min read
Nintendo Switch Data Recovery: How to Recover Your Game DataJuly 24,20246 min read
Page Table of Contents
PAGE CONTENT:
Elevate your gaming adventure with your Steam Deck SSD upgrade. A larger and faster SSD ensures smoother gameplay and quicker load times, enhancing your gaming experience.
This guide will walk you through the process of upgrading your Steam Deck SSD, empowering you to harness the true potential of your device and take your gaming to new levels.
Introduction: What Is a Steam Deck SSD
Modern gaming demands ample storage space, and the Steam Deck is no exception. Upgrading your Steam Deck SSD allows you to craft a personalized gaming hub tailored to your preferences. With a larger and more efficient SSD, you can store an extensive game collection, including the latest releases and cherished classics. If you want to elevate your gaming performance to a new level, the Steam Deck SSD upgrade is your answer.
Where Are Steam Games Stored? How to Locate
In this passage, you will learn the Steam game location on Windows, macOS, and SteamOS. When you encounter Steam games accidental deletion, you can restore Steam game files.
This guide unveils the advantages of upgrading your Steam Deck's SSD, paving the way for more storage and smoother gaming.
How to Upgrade My Steam Deck SSD
Are you looking to enhance your Steam Deck experience with added storage? All you need is to perform a Steam Deck SSD upgrade.
In this guide, we'll take you through the steps for Steam Deck SSD upgrade on Windows for the best user experience. Whether aiming for more storage capacity or seeking a performance boost, upgrading your Steam Deck's SSD is worthwhile.
Let's explore how you can smoothly and effectively execute this upgrade to optimize your gaming setup.
- Stage 1. Extracting the Existing SSD
- Stage 2. Cloning the Steam Deck
- Stage 3. Inserting the New SSD in the Steam Deck
- Stage 4. Close Up Your Steam Deck
Stage 1. Extracting the Existing SSD
For safety precautions, it's advisable to discharge your Steam Deck battery to below 25% before proceeding, reducing the risk of unexpected damage to the Li-Ion battery.
Activating battery storage mode is also recommended before initiating any modification. We'll also provide a video to guide you through the upgrading process:
00:26 - Upgrading the SSD
00:42 - What You'll Need
Let's get started with the process:
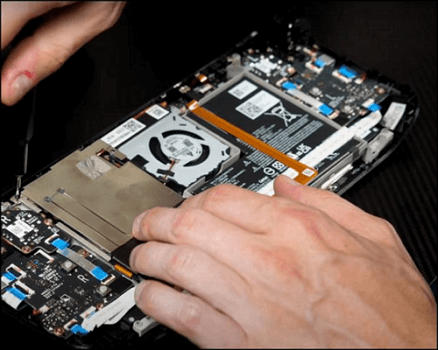
Step 1. Loosen the screws on the back cover, detach it, and carefully remove it.
Step 2. Locate and remove the concealed screw securing the shield.
Step 3. Disconnect the battery to ensure a safe working environment.
Step 4. Unscrew and extract the SSD, detaching it from its current position.

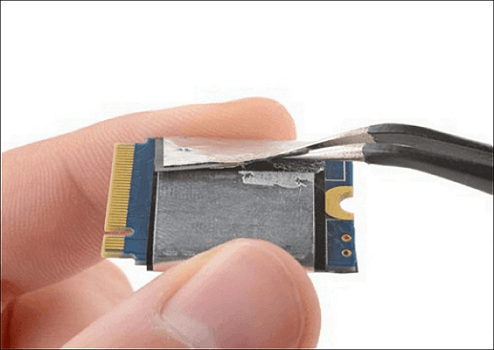
Step 5. Uncover and remove the SSD shielding to access the original SSD.
Many SSD users have proved the efficacy of the poat. If you are interested in resolving the disk repair, share it on Facebook, Twitter, Instagram, and other social media platforms!
Stage 2. Cloning the Steam Deck
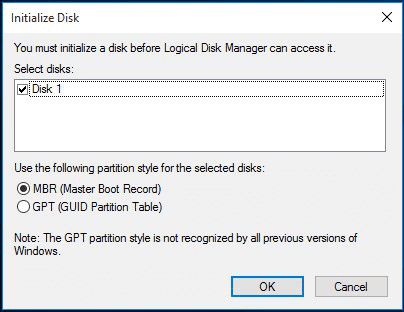
You'll insert the initial and new SSD into a Windows PC at this stage. The goal is to clone and shift all game data from the old SSD to the new one.
However, be careful because if the new SSD is unused, it might prompt an "SSD not initialized" error. In such a scenario, you'll need to initialize the new SSD before proceeding with the data transfer.
Fix SSD Not Showing Up in Windows 10/11 [2023 Tips]
Here we will show you how to fix the issue in four cases. Try it to gain access to your SSD and data if the SSD is not showing in Windows . Read more >>
Stage 3. Inserting the New SSD in the Steam Deck
In this section, you'll need to focus on integrating the new SSD seamlessly into the Steam Deck to ensure its proper functionality, mirroring the performance of the previous SSD. Here are the steps:
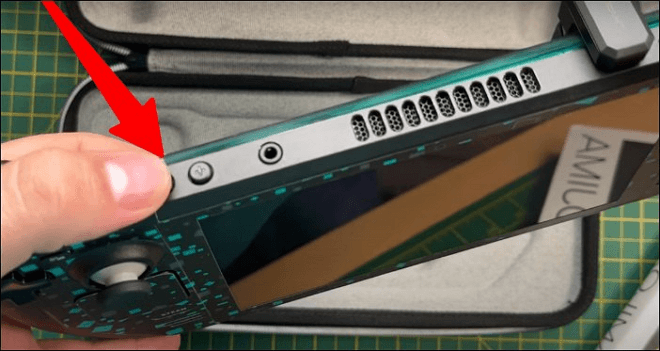
Step 1. Place the foil shielding, initially removed from the old SSD, onto the new SSD securely.
Step 2. Gently insert the new SSD into its designated slot and secure it by tightening the screws.
Step 3. Re-establish the connection with the battery. Delicately insert the connector into the battery port using the fabric strip. When successfully connected, a brief white flash in the power light confirms the accurate connection.
Step 4. Reattach the shielding. Slide the shield back into its original position, ensuring alignment with the screw holes beneath. Confirm that the fan wires are positioned above the shield.
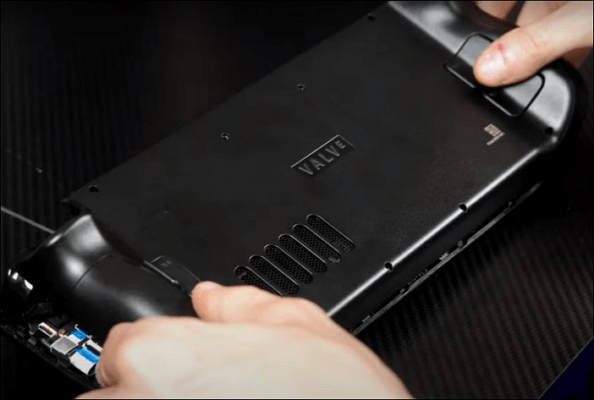
Step 5. Reattach and secure the backplate by placing it onto the Steam Deck and securely screwing it in place.
Stage 4. Close Up Your Steam Deck
Now, it's time to retrace our steps. Reconnect the battery ribbon carefully, reseal the board shield, and tighten the securing screw. Snap the Steam Deck case securely back into place, reinsert, and tighten all the screws.
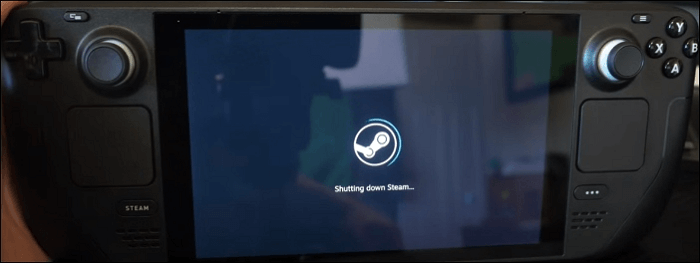
Once the Steam Deck is reassembled and secure, power it on and confirm the expanded storage space in the settings. That's all.
Ensure the battery ribbon is securely inserted if the Steam Deck doesn't power up. If the Steam Deck still doesn't boot up, carefully reopen it and verify the SSD's secure placement in its port.
How to Replace the Steam Deck SSD
Updating the SSD on your Steam Deck requires precision and the appropriate tools, but it's manageable with careful steps. Follow these quick steps:
Step 1. Power down the Steam Deck and disconnect it from the power source.
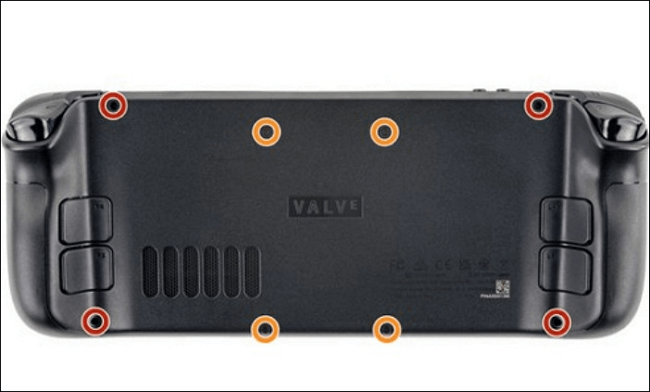
Step 2. Remove the back cover. The Steam Deck's rear side has eight screws; use a head screwdriver to unscrew them.
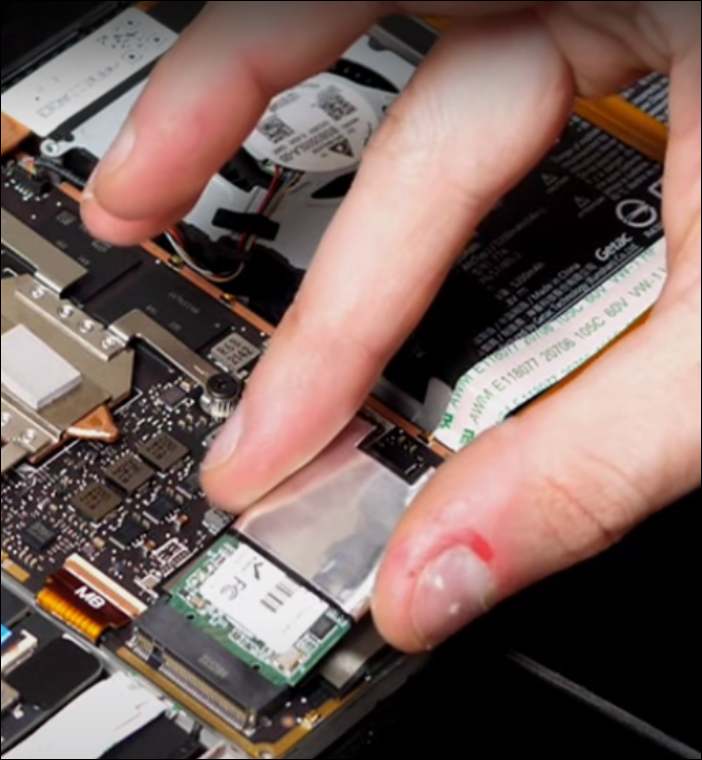
Step 3. Disconnect the battery. Underneath, locate the battery connector and delicately detach it using a plastic opening tool.
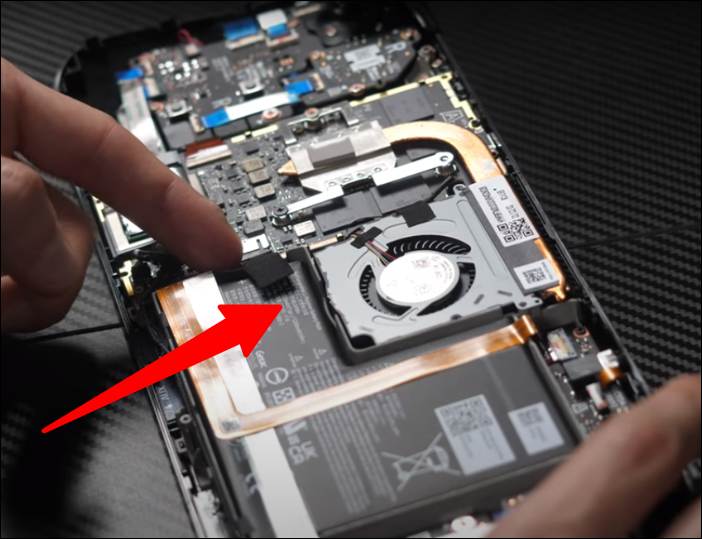
Step 4. Take out the existing SSD. Gently lift the SSD from its slot on the mainboard.
Step 5. Insert the new SSD. Slide the new SSD into the designated slot and secure it with a screw.
Step 6. Reconnect the battery. And then reattach the connector at the base of the battery.
Step 7. Return the back cover. After that, securely screw the back cover back into position.
Step 8. Switch on your Steam Deck. Remember, the Steam Deck should initiate and function normally.
Recover Data from the SSD After the Update
When engaging in an SSD update, the risk of potential data loss is a crucial concern. Protecting your data's safety during this process is paramount. If any files are inadvertently lost during the update, a specialized data recovery tool can come to the rescue.
A highly recommended data recovery solution is EaseUS Data Recovery Wizard Pro, a robust and efficient program designed to recover deleted files due to file system malfunctions, crashes, or unintentional file deletions. This software has powerful features that ensure a smooth data recovery process.
- It provides a straightforward and user-friendly interface and offers various highlights, including selective file recovery, preview options, and an array of supported file formats.
- EaseUS Data Recovery Wizard and its powerful SSD recovery feature can thoroughly scan and find all missing data on your Steam Deck SSD.
- Its WinPE bootable USB creation feature enables data recovery even when your computer fails to boot up.
With this tool, you can effectively recover lost game data, restoring your valuable information securely and efficiently.
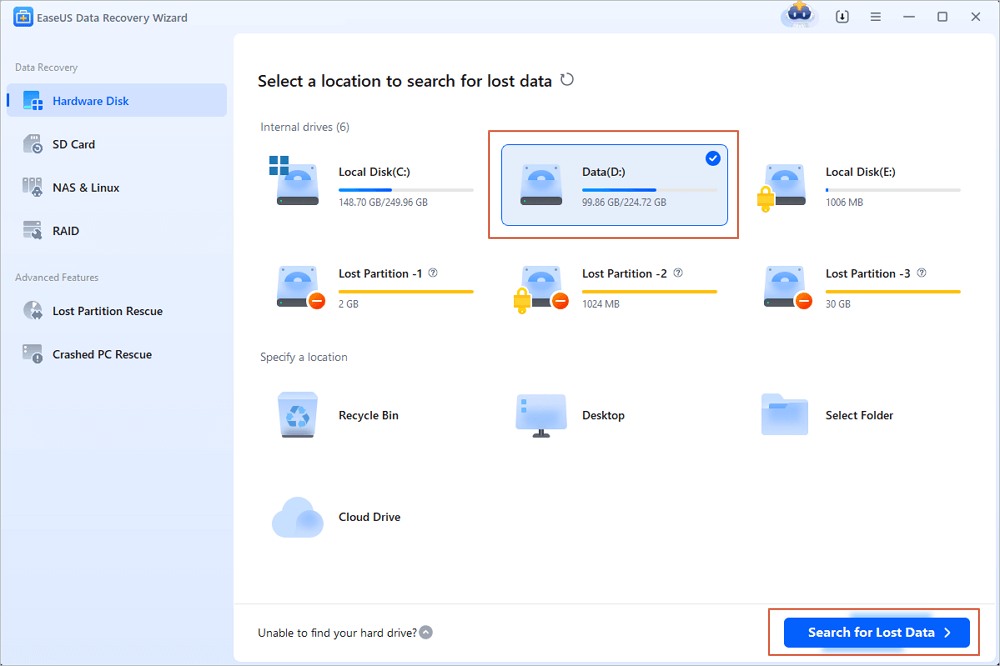
Step 1. Scan the SSD
Open EaseUS Data Recovery Wizard, select the SSD where you lost data, and click the "Search for Lost Data" button.
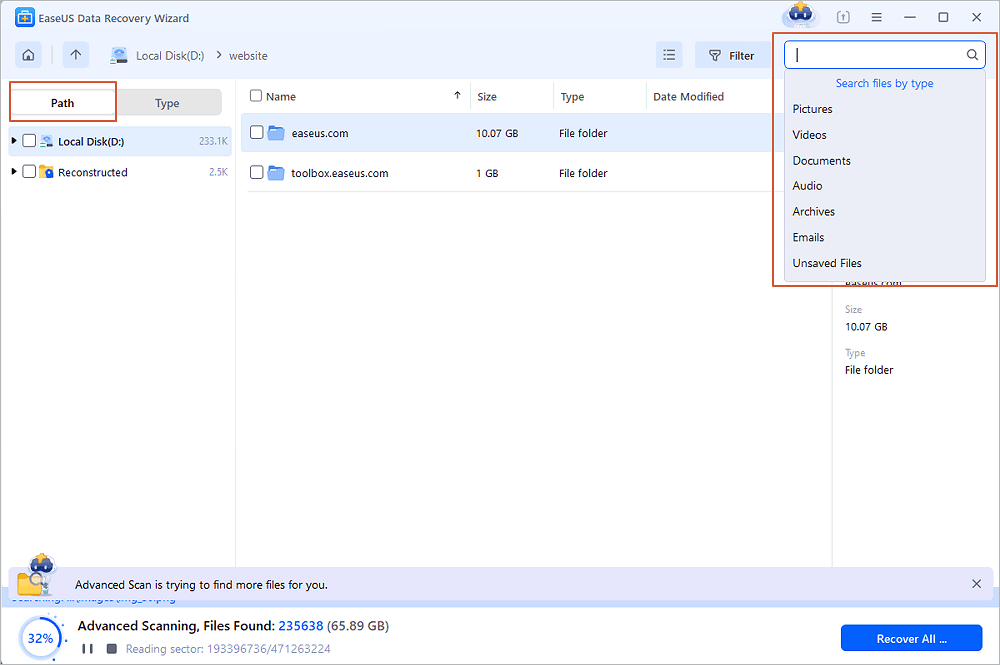
Step 2. View the results
When the scanning finishes, find lost SSD data by using the "Filter" and "Search" options after checking the "Deleted Files" and "Other Lost Files" folders.
Step 3. Recover SSD files
Select desired data and click the "Recover" button to get back lost SSD files.
💡Tip: You can restore data on the local disks, external hard drives, and also the cloud storage.

Final Thoughts
As game files continue to expand in size and complexity, upgrading your Steam Deck SSD becomes an investment in the future.
A spacious SSD allows you to adapt to evolving gaming needs without worrying about storage limitations. It's a forward-thinking move that ensures your Steam Deck remains relevant and efficient for upcoming game releases and updates.
- The gaming field became more captivating with insights on upgrading your Steam Deck SSD. With this guide, you can amplify your device's performance and storage capabilities.
- Take the plunge into enhanced gaming experiences with your Steam Deck SSD upgrade leading the way.
- Unlock the potential to recover deleted game files on PC swiftly and effectively by downloading EaseUS Data Recovery Wizard Pro.
- Safeguard your important files and regain peace of mind with this powerful data recovery tool.
Steam Deck SSD Upgrade FAQs
Now that you have learned how to upgrade Steam Deck SSD, here are a few questions to help you learn more.
1. Can I upgrade my Steam Deck SSD?
Yes, upgrading the Steam Deck's SSD is a straightforward process. Begin by removing the old SSD, clone all its data onto the new SSD, and finally, reinsert it. However, if your game library is small and your internet connection isn't limited, it might be more efficient to reinstall SteamOS. In this case, cloning the Steam Deck SSD saves you from the trouble of redownloading games, altering settings, and dealing with the intricacies of SteamOS based on Linux.
2. How big of an SSD can you upgrade in a Steam Deck?
If you have moderate skills, transitioning to a bigger 2230 SSD should not challenge you. Valve advises against user SSD modifications with 2242 SSDs, but there's a variety of 2230 drives accessible that don't need an upgrade.
3. Is there a 2TB SSD for Steam Deck?
Yes. If you enjoy an extensive collection of downloaded games and prefer to keep multiple games installed simultaneously, a 2TB hard drive would serve well. However, opting for a 3TB or 4TB hard drive is advised for content creators or individuals engaged in streaming. The optimal storage for gaming PCs varies depending on specific needs and usage.
4. Can the Steam Deck use an SSD?
Yes. You can insert a microSD card or upgrade to a larger SSD for increased storage capacity on your Steam Deck. Particularly for the 64GB version, which employs the comparatively slower eMMC storage, upgrading the Steam Deck's storage becomes even more compelling.
Was this page helpful?


20+
Years of experience

160+
Countries and regions

72 Million+
Downloads

4.8 +
Trustpilot Score


Hot Recovery Topics
Search