-
![]()
-
![]()
-
![]() How to Fix Crucial SSD Not Detected on Windows PC [No Data Loss]
How to Fix Crucial SSD Not Detected on Windows PC [No Data Loss] June 30,2026
 6 min read
 -
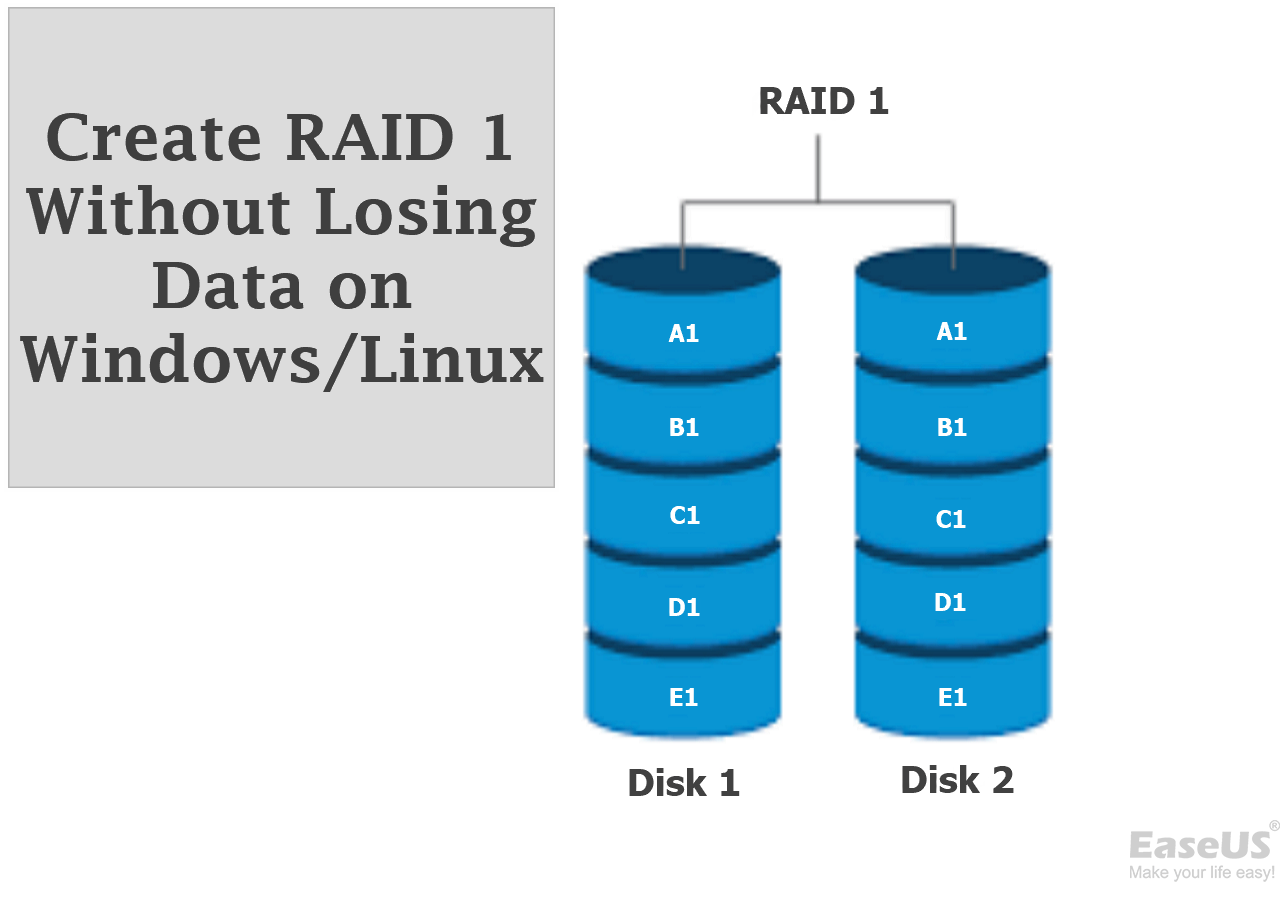
![]() How to Create RAID 1 Without Losing Data? Solutions for Windows and LinuxJune 30,20266 min read
How to Create RAID 1 Without Losing Data? Solutions for Windows and LinuxJune 30,20266 min read -
![]()
-
![]() Recover Deleted Files in Network Shared Folder | 3 MethodsJune 30,20266 min read
Recover Deleted Files in Network Shared Folder | 3 MethodsJune 30,20266 min read -
![]() Fix the Fatal Device Hardware Error Without Losing Data [6 Ways]June 17,20266 min read
Fix the Fatal Device Hardware Error Without Losing Data [6 Ways]June 17,20266 min read -
![]() How to Fix 'the device is not ready' on USB Flash Drive/HDDJune 16,20266 min read
How to Fix 'the device is not ready' on USB Flash Drive/HDDJune 16,20266 min read -
![]() How to Recover Data from Uninitialized Disk | 3 Straightforward MethodsJune 30,20266 min read
How to Recover Data from Uninitialized Disk | 3 Straightforward MethodsJune 30,20266 min read -
![]() How to Recover Data from Dead Laptop Hard Drive in Windows 10/8/7June 30,20266 min read
How to Recover Data from Dead Laptop Hard Drive in Windows 10/8/7June 30,20266 min read
Page Table of Contents
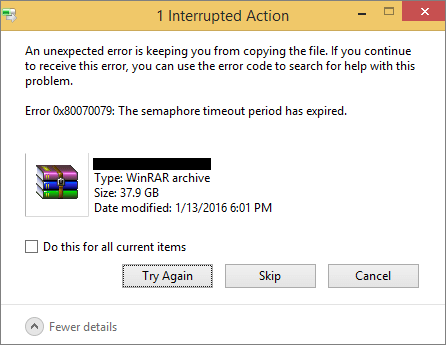
Often, Windows users report that Windows 10/11 won't be able to eject the external HDD after several attempts, which can be easily fixed by restarting your PC. If the HDD can't be ejected, the outcomes might be crashing, freezing, or even restarting. Many Windows users have claimed that "can't eject external hard drive" exhibits an error "problem ejecting USB mass storage device."
How to Fix External Hard Drive Won't Eject
Therefore, if you have faced this error text or can't eject the external hard drive, we will show you the top 6 fixes to the "external hard drive won't eject" issue. But before proceeding with the fixes, we have provided a video for help, whose main outlines are shown below:
- 00:38 - How to eject external drives
- 00:52 - Safely Remove Hardware
- 01:13 - Taskbar settings
- 02:01 - Troubleshooting
Let's get started with the fixes!
- Fix 1. Eject External Hard Drive with the Disk Management
- Fix 2. Update Windows USB Drivers
- Fix 3. Scan Windows and Hard Drive for Malware
- Fix 4. Restart or Reset Windows
- Fix 5. Run Windows Hardware Troubleshooter
- Fix 6. Force End Task in Windows
Fix 1. Eject External Hard Drive with the Disk Management
If you cannot eject the external hard drive Windows 11, you may utilize the Windows Disk Management tool to remove the drive without a hitch. The steps are the following:
Step 1. Launch "Disk Management" on Windows 11/10. Otherwise, you may hit "Windows + R," to open the "Run" box > type diskmgmt.msc > hit the "Enter" button.
Step 2. Locate the external hard disk you wish to eject by scrolling down. Select "Offline" after right-clicking on it.
After that, you can eject the HDD from your Windows PC safely.
Fix 2. Update Windows USB Drivers
If you notice the "can't eject external hard drive" error text on Windows 10/11, updating the USB drivers is one of the best fixes you can ever try. Windows 10/11 might fail to eject the USB devices due to damaged or older USB drivers. Therefore, it would be better to update the USB drivers. Go through the steps below to update Windows USB drivers:
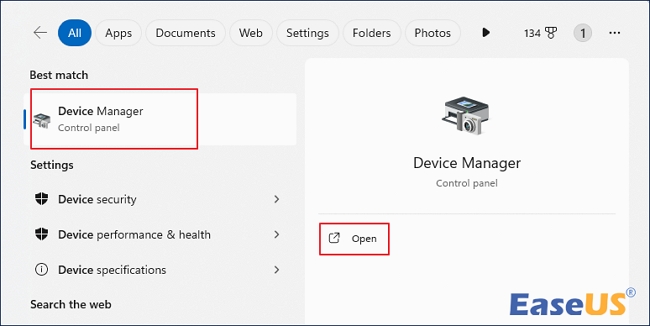
Step 1. Hit the Windows 10/11 search bar, and type Device Manager. Now, launch the "Device Manager" app from the list.
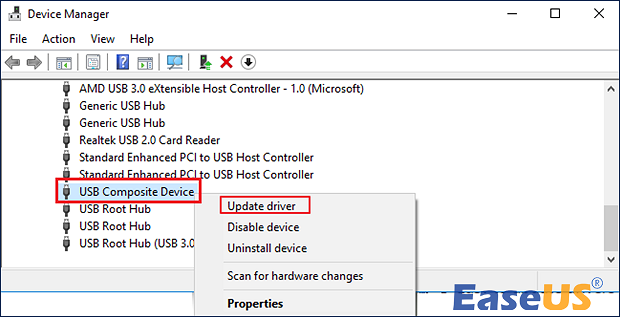
Step 2. Broaden the "Universal Serial Bus Controllers" section.
Step 3. Select "Update Driver" by right-clicking each entry with a yellow exclamation symbol.
It's done! You will be asked to select where you intend Windows 10/11 to search for the driver or include your own. Opt for the first one and go through the on-screen prompts to complete the drive update process.
Fix 3. Scan Windows and Hard Drive for Malware
People often employ external HDDs everywhere on any PC other than their systems. Therefore, the device might have been infected with malware from any susceptible computer. The top-notch practice is that whenever you link your external HDD to any PC, it would be better to search for malware. Steps are the following to scan your hard drive for malware:
Step 1. Navigate to "This PC."
Step 2. Right-click on the external HDD.
Step 3. Opt for "Show more options."

Step 4. Hit the option "scan with xxx" from the menu. Where the xxx is a third-party antivirus app.
If you have discovered any malware, your Windows OS will handle that. After that, you may eject the external HDD safely.

How to Use CMD to Remove Virus from Any Drive in Windows 10/11
This guide describes how to use CMD to remove the virus from a USB drive, SD card, pen drive, or any drive on a Windows 10 computer. Read more >>
Fix 4. Restart or Reset Windows
Restarting a PC is one of the most common ways to rule out the "can't eject external hard drive" error. Turning off your PC shuts down every app and third-party process. But if you want to reset Windows, these are the steps to follow:
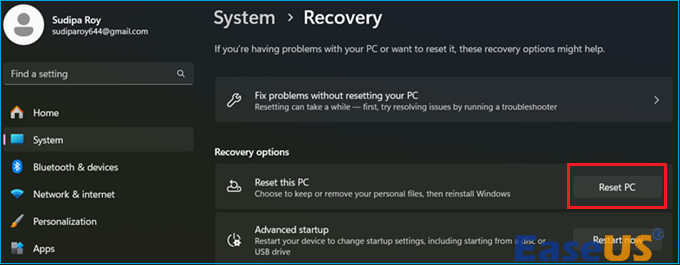
Step 1. Type and search Reset this PC in the search bar, and hit "open."
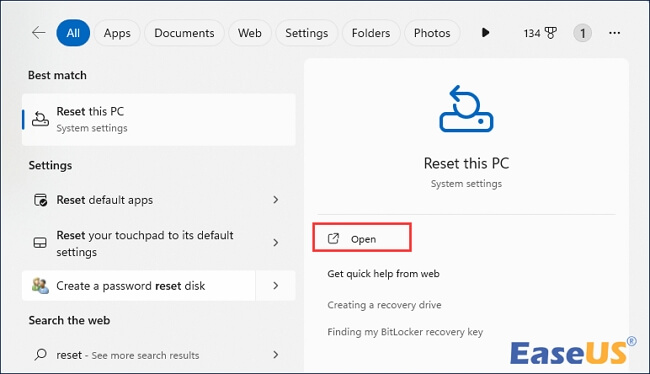
Step 2. Opt for "Reset this PC" under the "Reset this PC" field.
Step 3. Opt for "Keep my files."
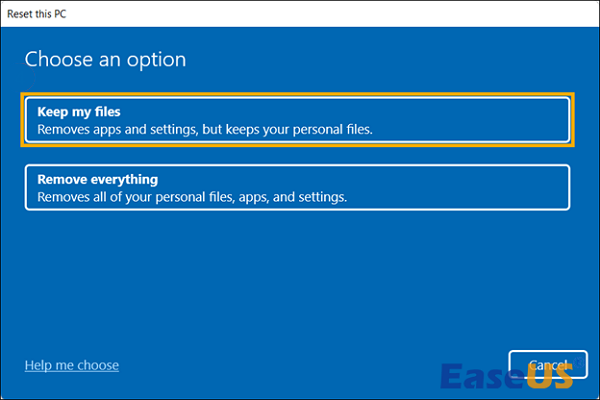
Step 4. Opt for "Local reinstall."
Step 5. Hit "Change settings."
Step 6. Toggle on the "restore apps and settings which came with this PC," and opt for "confirm."

Step 7. Hit the "Next" button.
Step 8. Hit the "Next" button again to go through the reset process.
Step 9. Hit "View apps that will be removed" and select "Back."
Step 10. Opt for "Reset" to start reinstalling Windows, and your PC will relaunch once the reinstallation is done.
If you find this information helpful, please share it with others on social media to assist them in overcoming this common challenge.
Fix 5. Run Windows Hardware Troubleshooter
Suppose your external HDD has a few hardware problems. If so, you should use the complimentary built-in "hardware and devices troubleshooter" provided with Windows to identify and address abnormalities with connected hardware and devices and see if it removes the "external hard drive won't eject" issue. The measures that one needs to take are as follows:
Step 1. You need to hit "Start"> "Settings" to launch Windows settings.
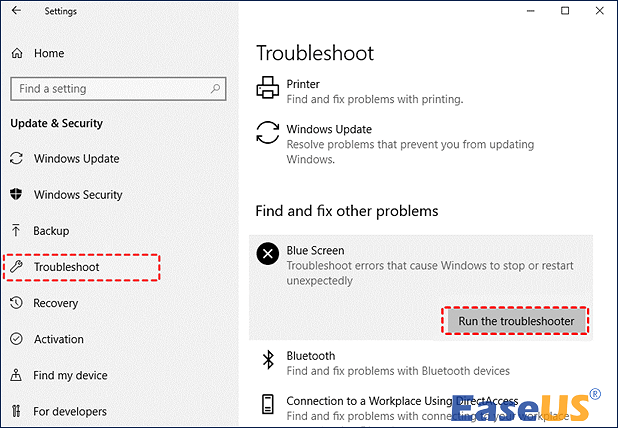
Step 2. Now, opt for "update & security."
Step 3. Opt for "Troubleshoot" from the left pane, and find "Hardware and Devices" after scrolling down, and select it.
Step 4. Click the "Run the Troubleshooter" button, and Windows will quickly troubleshoot errors with linked hardware and devices.
Fix 6. Force End Task in Windows
You may opt for Windows Task Manager to see and terminate every dubious task on Windows 10/11 if you're unsure which process or program uses files on the HDD in the background. These are the steps to follow:
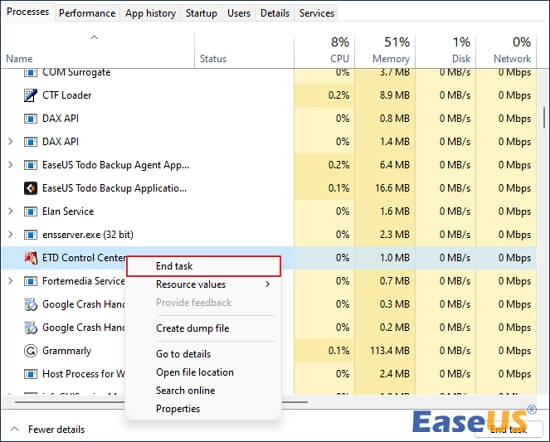
Step 1. Launch "Windows 10/11 Task Manager" and right-click the empty area of the Windows taskbar. Now, select "Task Manager" to launch it.
Step 2. If you cannot notice the detailed running processes, you need to hit "more details." Select the "process" tab to see every running process.
Step 3. To quit any process or software that appears to be interfering with the secure formatting of an external hard drive, right-click on it and select "End task."
Recover Lost Data from the External Hard Drive on the PC
A hard drive malfunction could result in the loss of specific data. Additionally, there is a significant chance of data erasure. As a result, consumers should prioritize safeguarding their data. Users may find a specialist retrieval tool handy.
Thus, people might download the potent retrieval software EaseUS Data Recovery Wizard, developed to help restore data deleted due to file system errors, system failures, and accidental file deletions. The main highlights of EaseUS are the following:
- It helps restore deleted files from HDD, USB, SD card, recycle bin, etc.
- It helps mend destroyed videos, pictures, and other files with its seamless file repair features.
- It helps retrieve lost data after formatting, deleting, virus infection, and OS malfunction.
- It provides the fastest scan, file filter, free preview, and recovery rate.
Download this professional data recovery software now!
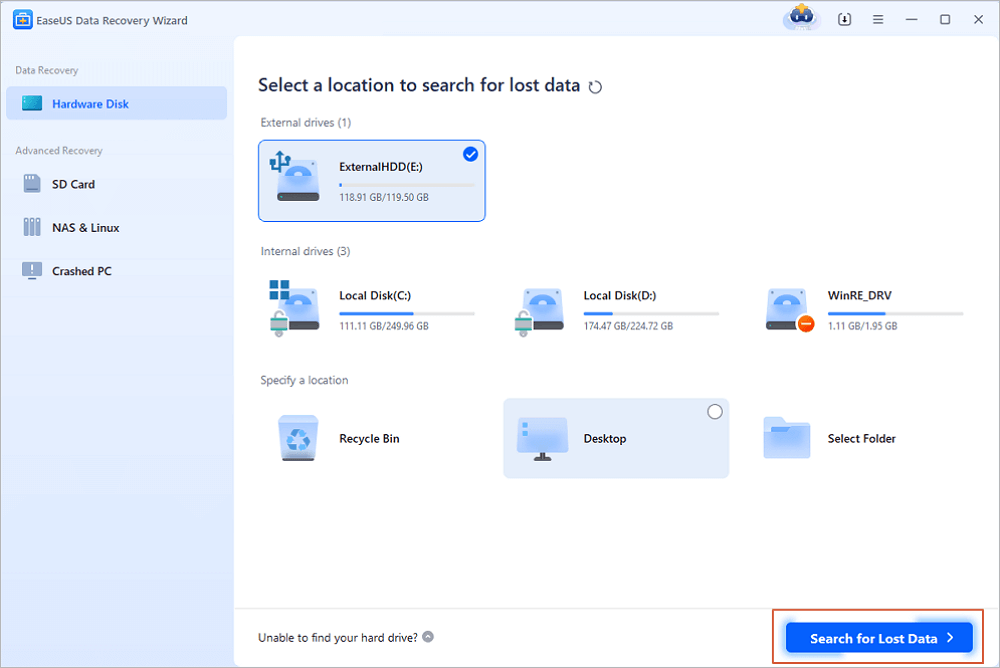
Step 1. Choose and scan the external hard drive
- Download and install EaseUS Data Recovery on your PC or laptop.
- Connect the external hard drive to your computer.
- Run EaseUS Data Recovery Wizard and choose the external drive from External drives list. Then, click "Search for Lost Data".
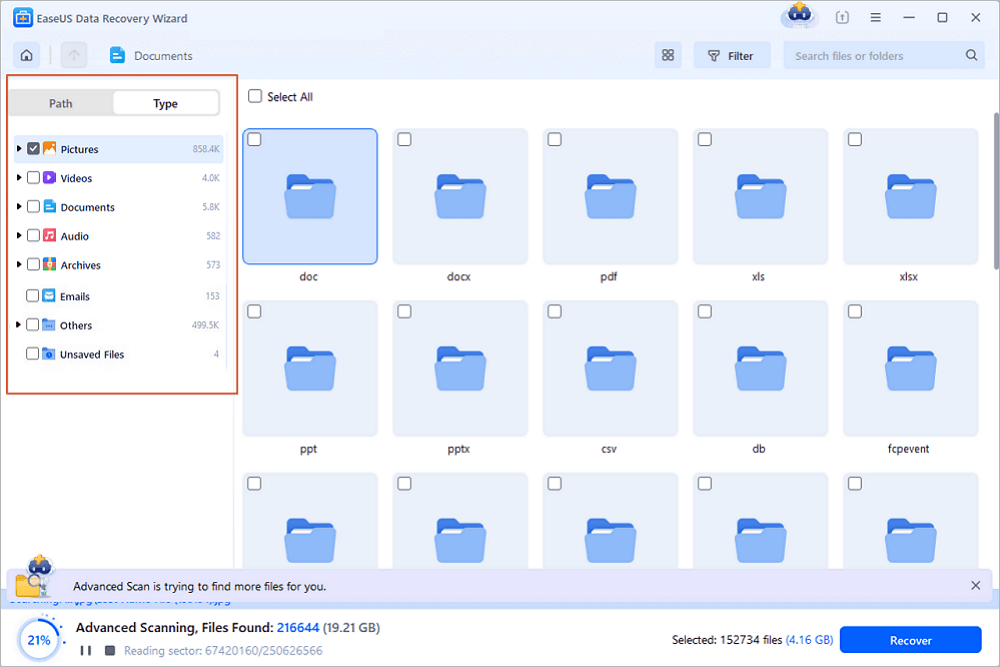
Step 2. Check the scan results
- EaseUS data recovery software will immediately scan the selected drive for all data, including deleted, corrupted, and existing data.
- You can use the Filter feature to quickly locate the files of one kind, such as Pictures, Word, Excel, PDF, videos, emails, etc.
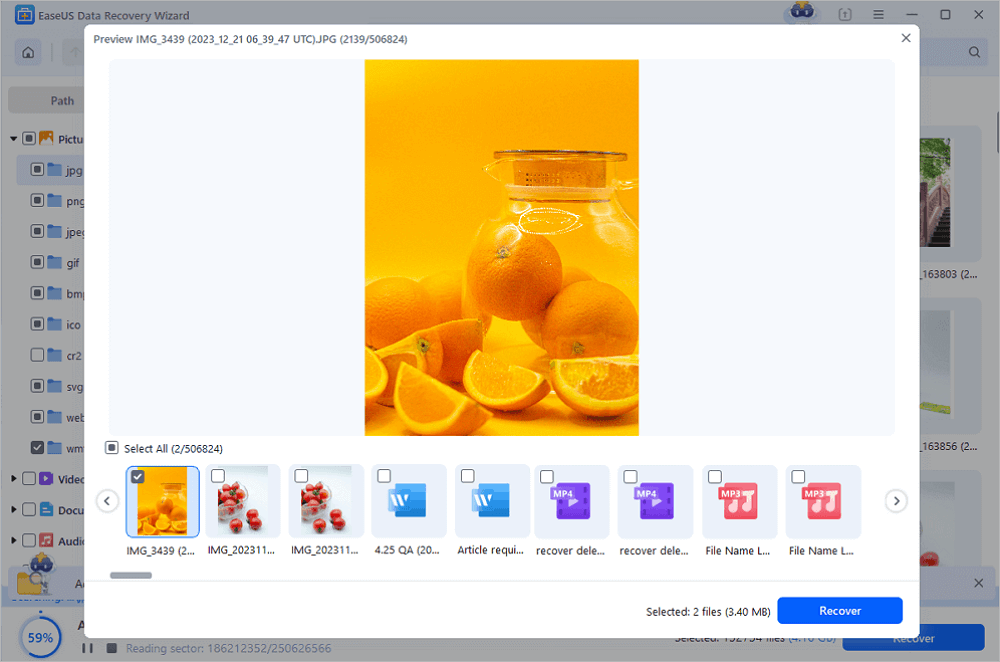
Step 3. Preview and recover data
- Double-clicking a file from the scanned results to preview.
- Choose the files you want and click "Recover".
- Select a different drive to save the recovered files instead of the original one.
💡Tip: You can restore data on the local disks, external hard drives, and also the cloud storage.
Why Won't My PC Let Me Eject External Hard Drive
When the "can't eject external hard drive" error happens, many culprits are lurking here and there. These are the reasons why your PC won't allow you to eject the external HDD safely:
| Reasons | Descriptions |
| The drive's contents are being used | The majority of the time, the issue arises from the drive's material being used. This could be challenging if programs or routine tasks access files from the external hard drive. |
| Windows USB drivers | The machine's problem can be with the Windows USB controllers if the material isn't the problem. Your system needs to be fixed, or updated USB drives may be the source of the problem. |
To Sum Up
Here, we have demonstrated the top 6 methods to assist you in fixing the "can't eject external hard drive" issue. This post has also introduced the easy-to-use data retrieval software for Windows, EaseUS Data Recovery Wizard, to quickly retrieve lost data from an external HDD.
Can't Eject External Hard Drive FAQs
These are the FAQs to consider for a better understanding of the topic:
1. How to fix can't eject external hard drive on Mac?
On your MacBook, you need to hit the "Apple" icon > "Log out," then log back in again. You must try to eject the disk again.
2. How do I eject an external hard drive that won't eject?
- To eject an external HDD that won't boot, you need to follow the steps below:
- Restart your PC.
- Run Windows Hardware and Devices Troubleshooter.
- Update the USB drivers.
- Employ Task Manager to terminate tasks in Windows 11/10.
- Eject the external HDD with Disk Management.
4. How do I force an external hard drive to be ejected?
In that case, you need to:
- Move to the bottom right corner of the toolbar.
- Hit the "Up" arrow in case the USB symbol is concealed.
- Find the "USB symbol" and your external HDD.
- Hit "Eject," and wait for a text saying it's safe to eject.
5. How do I force eject a USB?
In that event, you need to follow the steps below:
- Open "File explorer."
- Right-click "This PC," and opt for "Manage."
- Navigate to "Storage"> "Disk Management."
- Finally, right-click the external HDD and hit "eject."
Was this page helpful?


20+
Years of experience

160+
Countries and regions

72 Million+
Downloads

4.9 +
Trustpilot Score


