Page Table of Contents
Reviews and Awards
| ⚙️Complex Level | Low, Beginners |
| ⏱️Duration | 3-5 minutes |
| 💻Applies to |
|
| ✏️Fixes |
Encountering errors related to file management can be a source of immense frustration. One such error that has left countless users scratching their heads is the infamous "We Couldn't Set Your Default Save Location" message. This troublesome problem has the potential to interrupt your workflow. Encountering this error may impede your capacity to save, organize, and access your files with efficiency.
Nevertheless, there's no reason to despair when faced with this issue. This extensive guide from EaseUS will explore the details of the "Couldn't Set Your Default Save Location" message. The guide will present you with precise, step-by-step solutions to rectify it.
How to Fix We Couldn't Set Your Default Save Location Error
The error can stem from various underlying causes within your Windows operating system. Many users ask for a solution on a forum, such as Microsoft. Each solution we discuss addresses a unique aspect of the problem, so be sure to read through them all to find the one that best suits your situation. Now, let's explore the four effective solutions to resolve this frustrating error:
Solution 1: Set Your User Account to Administrator
Should you find yourself facing the vexing "Couldn't Set Your Default Save Location" error, it's possible that the root cause lies within your user account permissions. This comprehensive guide will carefully navigate you through the process of elevating your user account to Administrator status.
This elevation will bestow upon you enhanced control over system settings, effectively eliminating future errors when modifying your default save location. Don't hesitate to share this article with more people.
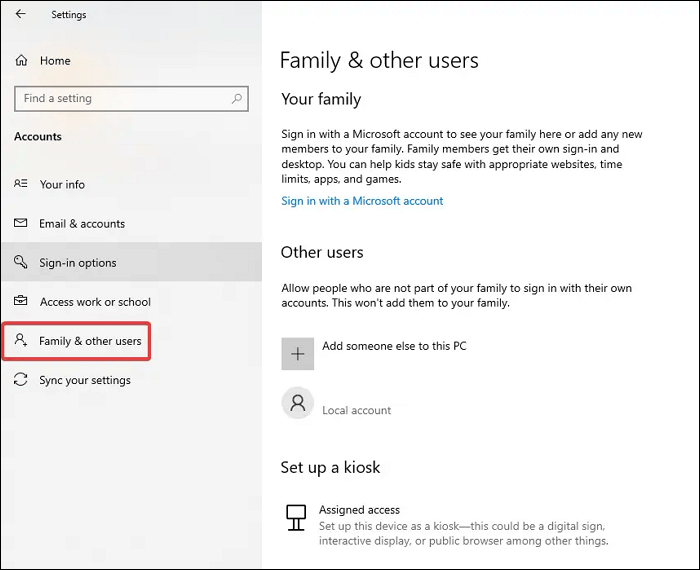
Step 1: You can start by launching the Settings panel on your Windows computer. For it, use the "Win + I" keys, and within the Settings panel, locate and click on "Accounts." Afterward, search for the "Family & other users" option.
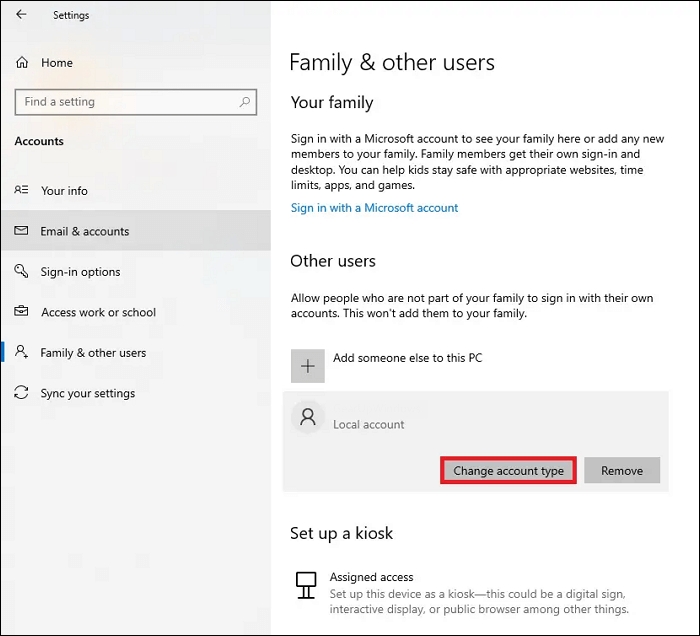
Step 2: In the "Family & other users" tab, navigate to "Other users" and select the targeted account. Now, "Change account type" of the targeted account to "Administrator."
Solution 2: Rename the WindowsApps Directory
A common source of the "Couldn't Set Your Default Save Location" error lies within the WindowsApps directory. This directory houses essential files related to your installed applications. If it becomes corrupted or inaccessible, it can lead to this frustrating error message.
Renaming it means Windows no longer accesses the old directory and instead creates a new one to store data. Follow these steps to rename the WindowsApps folder:
Step 1: On your Windows computer, access "File Explorer" and navigate to "disk C" where you install the apps. Here, move to "Program Files," and from the top toolbar, access the "View" tab.
Step 2: Navigate to the "View" tab, where you'll need to tick the "Hidden Item" option in order to unveil concealed folders. After that, simply scroll down to locate "WindowsApp" and perform a right-click action on it. From the context menu, choose "Rename" and name the folder "WindowsApps_OLD" or any other name of your choice.

Solution 3: Delete or Rename the WpSystem Folder
Sometimes, the "We Couldn't Set Your Default Save Location" error can be attributed to problems with the WpSystem folder, which contains critical system files. You can fix this issue by either deleting or renaming the WpSystem folder.
By taking these actions, you can potentially eliminate any conflicts or corruption within the folder that might be triggering the error. Following are the step-by-step instructions on how to perform these tasks:
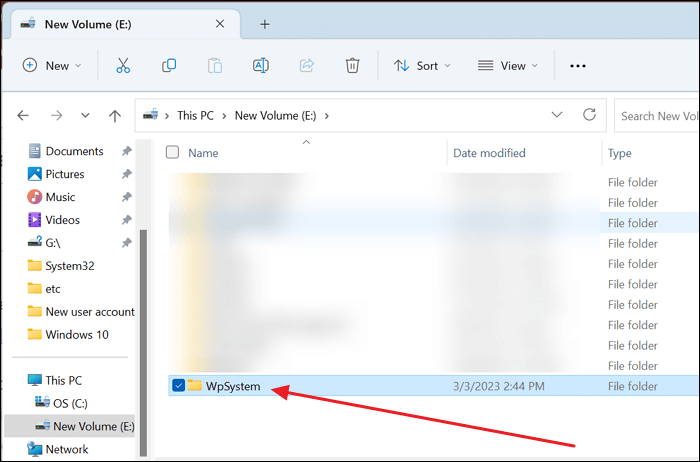
Step 1: Access the Drive C: your system and navigate to “Program Files.” In this folder, scroll down and find the “WpSystem" folder and right-click it.
Step 2: Now, either choose to "Delete" the folder or rename it to "WpSystem_old" or any other name. After doing this, check if the error has been resolved.
Solution 4: Set Full System Permission for the System Volume Folder
If the previous solutions haven't proven successful, it's time to delve deeper into system permissions. A more advanced method of addressing the "We Couldn't Set the Default Save Location" error is by granting full system permission to the System Volume folder.
It is an important folder when it comes to system operation. If it doesn't have the required access and permissions, it can lead to various errors, including the current one.
Step 1: To start, open File Explorer and go to the "View" tab. Then, click on "Options." In the ensuing window, head to the "View" tab again. Now, find the option that reads "Hide protected operating system files (Recommended)" and ensure it's unchecked.
Step 2: Ensure the "Show hidden files, folders, and drives" option is checkmarked. Once you've applied these changes, click the "Apply" button to confirm your updated Explorer settings. Return to the primary File Explorer window and pick the desired drive. Then, right-click on the "System Volume Information" folder.
Step 3: In the ensuing context menu, opt for "Properties," and proceed to the "Security" tab. To access the Advanced Security Settings window, simply click on the "Advanced" button. If a "Continue" button appears in this window, click it to proceed.
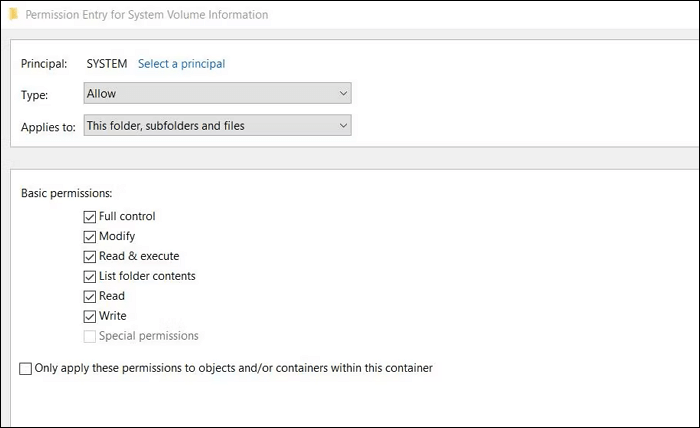
Step 4: Within the same Advanced Security Settings window, initiate the creation of a new permission entry. To do so, click the "Add" button. This action will unveil a "Permission Entry" window, where you'll be prompted to choose the "Select a principal" option. In the "Select User or Group" window, input "SYSTEM" into the "Object name" field.
Step 5: Confirm your selection of the "SYSTEM" principal by clicking the "OK" button. Back in the Permission Entry window, select the "Full control" permission setting to grant complete control to the SYSTEM principal. Confirm your selections by clicking "OK" in the "Permission Entry and Advanced Security Settings" window.
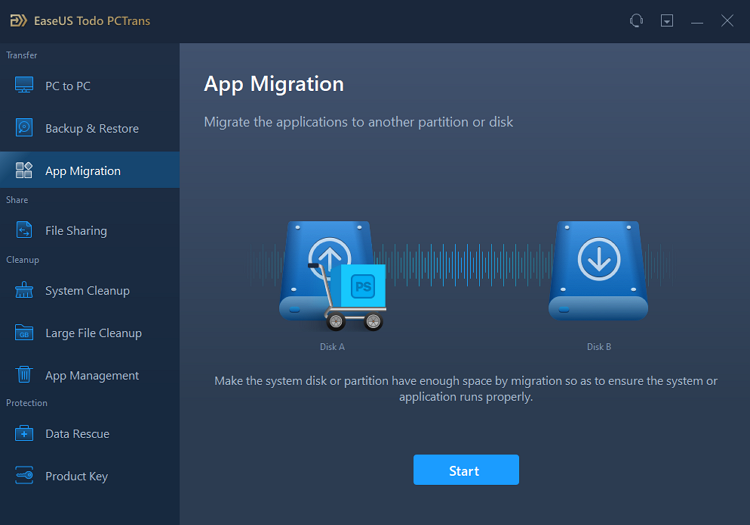
One-click Move Apps From WindowsApps Folder to New Folder
Managing and relocating applications from your WindowsApps folder to a new destination can be a tedious and time-consuming task. Thankfully, EaseUS Todo PCTrans offers a seamless solution with its "App Migration" feature, allowing you to move apps with a single click effortlessly. This application is user-friendly, with the primary goal of streamlining the transfer of software, files, and settings between Windows PCs.
It offers an intuitive interface, extensive compatibility across various Windows versions, and exceptional ease of operation. Moreover, it has solidified its reputation as a dependable option for those searching for a straightforward yet efficient solution for system migration and application management. Its extensive support ensures its adaptability to various operating environments.
Beyond just facilitating the transfer of applications, it also enables the seamless relocation of files, settings, and user profiles, rendering it an all-encompassing solution for all your migration requirements. Here, we outline the straightforward steps to effortlessly move your applications from the WindowsApps folder to a new location with a single click:
Step 1. Launch EaseUS Todo PCTrans and select transfer mode
On the main screen of EaseUS Todo PCTrans, go to "App Migration" section and click "Start" to continue.
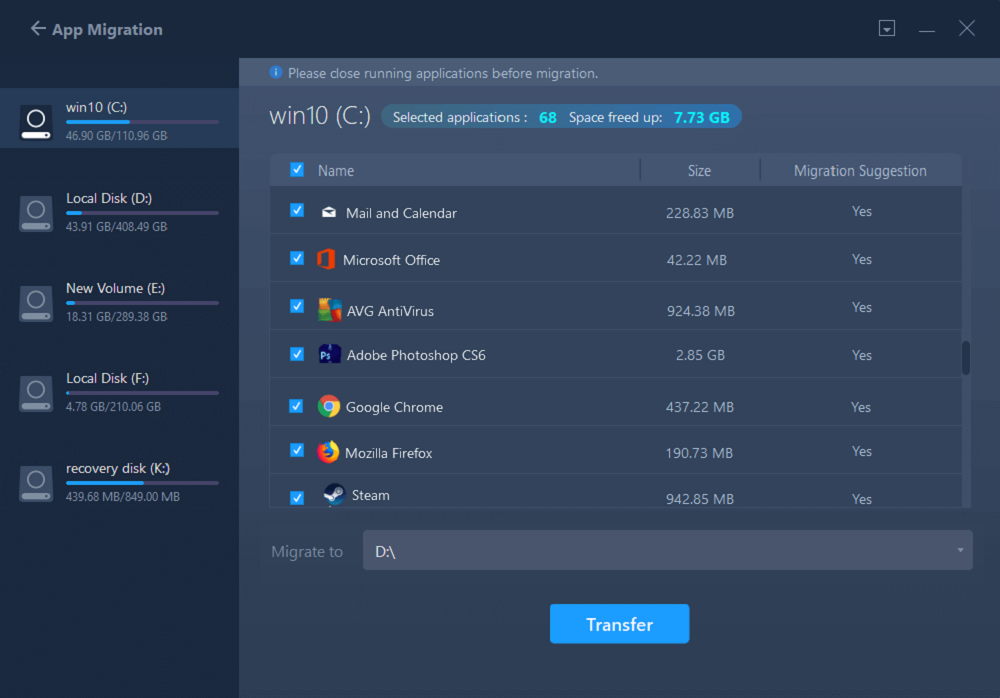
Step 2. Select apps and another drive to transfer
1. Select the source partition and tick applications, programs and software (marked as "Yes") that you'd like to migrate.
2. Click triangle icon to select another drive or disk as your target device and click "Transfer" to start the migration.
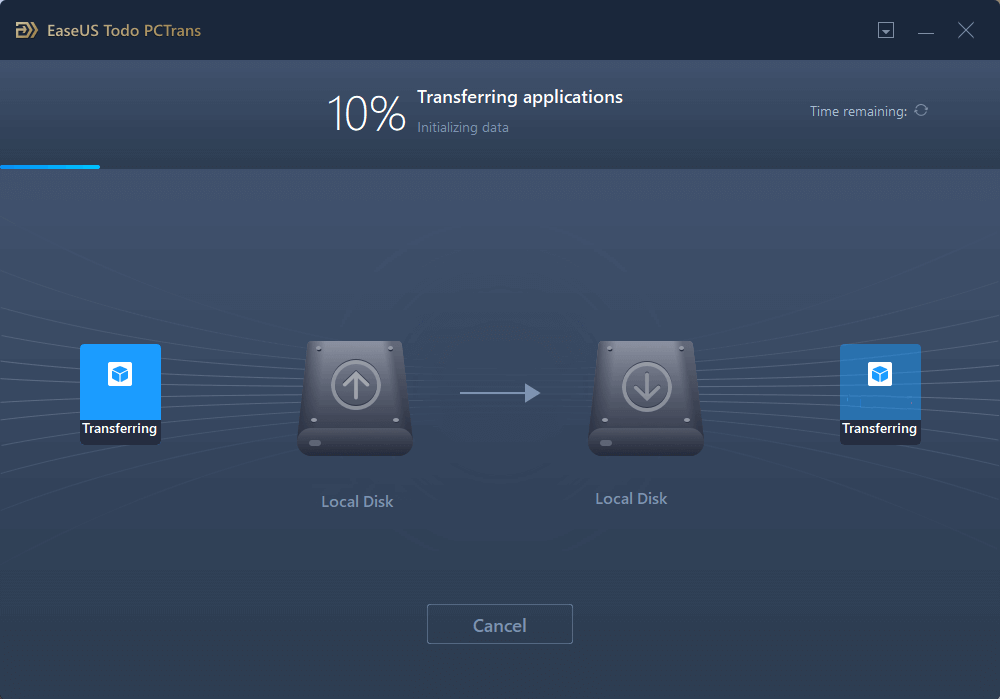
Step 3. Finish the migration process
When the transferring process finishes, click "OK" to complete.
You can restart your PC to keep all the changes, and you should be able to run your migrated apps on the other drive again.
Read Also:
Conclusion
In conclusion, finding reliable tools that simplify complex tasks is invaluable. As we've explored the solutions to the "We Couldn't Set Your Default Save Location" error, we've also introduced you to EaseUS Todo PCTrans and its remarkable "App Migration" feature. EaseUS Todo PCTrans stands out as an excellent choice for users seeking a hassle-free solution for application management and system migration.
With its intuitive user interface, broad compatibility across various Windows versions, and straightforward operation, this tool stands out as an exceptional choice. When you download this utility, you not only acquire the capability to effortlessly relocate applications from your WindowsApps folder to a different location in just a single click but also gain access to a versatile array of functionalities for efficient management of your software, files, and system settings.
We Couldn't Set Your Default Save Location FAQs
Here, we address some common queries related to this issue and invite you to explore the comprehensive solutions discussed earlier. If you're experiencing similar issues, this FAQ section is a valuable resource.
1. Why couldn't Windows set the default save location?
Windows may fail to set the default save location due to various factors, including user account permissions, corrupted system directories, or issues with the WindowsApps directory. To find a solution, refer to the detailed explanations and steps provided in the solutions mentioned above.
2. How can I fix the default save location error in Windows?
Resolving the 'We Couldn't Set Your Default Save Location' error requires a systematic approach, and here are the solutions that you can use to fix this problem:
Solution 1: Set Your User Account to Administrator.
Solution 2: Rename the WindowsApps Directory.
Solution 3: Delete or Rename the WpSystem Folder.
Solution 4: Set Full System Permission for the System Volume Folder.
These solutions address different aspects of the problem, so it's advisable to go through each of them to find the one that matches your situation.
3. What is error 0x80070005 default save location?
The Microsoft Store allows you to store the data of the application in separate folders. The error 'We couldn't set your default save location (Error code – 0x80070005)' appears when trying to move the app data but doesn't have sufficient permissions.
About the Author
Sherly joined EaseUS in 2022 and she has always loved writing articles and enjoys the fun they bring. She receives professional training here, focusing on product performance and other relative knowledge. She has written over 200 articles to help people overcome computing issues.
Reviews and Awards
-
EaseUS Todo PCTrans Free is a useful and and reliable software solution created to serve in computer migration operations, be it from one machine to another or from an earlier version of your OS to a newer one.
Read More -
EaseUS Todo PCTrans is by the folks at EaseUS who make incredible tools that let you manage your backups and recover your dead hard disks. While it is not an official tool, EaseUS has a reputation for being very good with their software and code.
![]() Read More
Read More
-
It offers the ability to move your entire user account from your old computer, meaning everything is quickly migrated. You still get to keep your Windows installation (and the relevant drivers for your new PC), but you also get all your apps, settings, preferences, images, documents and other important data.
Read More
Related Articles
-
How to Transfer iTunes to a New Computer [Windows & Mac]
![author icon]() Daisy/2024/06/13
Daisy/2024/06/13 -
Transfer Files from PC to PC with Ethernet Cable on Windows 10
![author icon]() Cedric/2024/06/13
Cedric/2024/06/13 -
Wi-Fi Direct and File Transfer Windows 10/11: How to Send Files From PC to PC/Phone to PC
![author icon]() Tracy King/2024/06/13
Tracy King/2024/06/13 -
How to Move Diablo III 3 to Another Drive/PC Without Re-downloading
![author icon]() Tracy King/2024/06/13
Tracy King/2024/06/13