Batch computer program transfer, Windows account transfer, domain account transfer, virtual-physical machine transfer, local to cloud desktop transfer.
Technical Chat 24/7Data Recovery Wizard for Windows
Recover lost data from HDD, SSD, SD cards, USB drives on Windows PC.
Recover lost files from Mac SSD, Time Machine backups, memory cards, Trash, and external storage devices.
Recover Lost iPhone/Android Data – Photos, Messages, Contacts & More in 3 Clicks.
Windows partition manager: create, resize, clone partitions and upgrade HDDs/SSDs safely.
Windows Backup Freeware - One-click system, disk, and file backup with reliable recovery for peace of mind.
PC data transfer software: transfer data, apps, user account and personal files to new PCs and disks.
Remove vocals from songs and separate vocal and instrumental tracks from audio or video with AI.
Capture any area of your screen with customizable settings and record video/audio/webcam.
Channel Partnerships
Affiliate Earn commissions when you drive sales through your affiliate links. Resellers Sell EaseUS products as a distributor. Creators & Influencers Partner with us on YouTube, TikTok, Twitch to earn commissions. OEM & Outsourcing Service Put your brand on EaseUS software, or get custom solutions.Self-Service
Manage your products, licenses, and subscriptions in one place. Find guides and resources for quick self-service.
Live Chat Support
Get real-time answers from our experts.
Call Our Support Team
Speak directly to a specialist for urgent matters.
Premium Human Services
Human-led solutions for complex system & data emergencies.
EaseUS Todo PCTrans
100% Secure
Free Inquiry
Page Table of Contents
Reviews and Awards
"Does anyone know how to transfer Active Directory to another Windows Server computer? For example, I purchased a new Windows Server 2022 and want to move AD from my old Windows Server 2016 to 2022. How do I do it?"
Are you looking for a reliable way to migrate the Active Directory database from a Windows Server computer to a new Server machine? Relax, and don't worry if you are a new Server manager. EaseUS will show you the complete procedure for successfully migrating AD from server to server. First, let's see the details:
To quickly transfer Active Directory, you can try to apply an Active Directory migration tool. EaseUS Todo PCTrans Technician, with its PC-to-PC file Transfer feature, can fulfill this task for you. The tool simplifies the migration steps and can provide comprehensive migration content, including all data and settings.
We provide two ways in this tutorial. Both methods work to transfer Active Directory from one Server to another Server on Windows Server 2022/2019/2016/2012 r2/2012/2008 r2/2008/2003, etc.
100% Secure
Free Inquiry
Here is the complete process you can follow to migrate and easily transfer the Active Directory database from one server to another:
Step 1. Set Up the Old Server Computer
Step 2. Set Up the New Server PC
Step 3. Select the Files to Transfer
Once done, you can reboot the target Windows Server computer and log in as administrator.
If you need further guidance or online tech support for Server Active Directory Migration, click the chat button below to reach the EaseUS tech support team instantly:
Batch computer program transfer, Windows account transfer, domain account transfer, virtual-physical machine transfer, local to cloud desktop transfer.
Technical Chat 24/7Suppose you've got two Windows Server computers, and now you are about to transfer the active directory database from one Server to another Server computer. Here are the manual steps that you can follow:
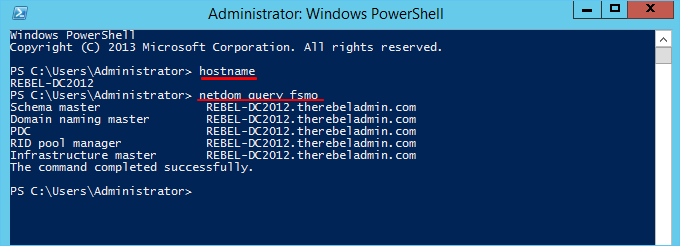
Step 1. Introduce a new domain controller with the target Server to be the new FSMO role holder for the domain.
To migrate the FSMO role, refer to this post in the Microsoft community for help: Transfer FSMO Roles in Active Directory.
Step 2. Introduce new domain controllers to the forest root and domain tree levels.
Open PowerShell type the following two command lines, and hit Enter each time:
Step 3. Log in to the target server computer as a member of the local administrator group. And add the Server to the existing domain as a member.
Step 4. Restart the Windows Server and logo into the Server as Enterprise Administrator.
And assign the static IP address to the Server.
Step 5. Right-click the Windows icon and select "Windows PowerShell (Admin)."
Step 6. Type Install-WindowsFeature –Name AD-Domain-Services -IncludeManagementTools in PowerShell and hit enter.
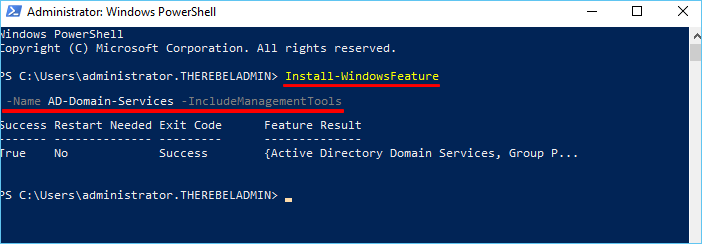
This will install the Active Directory Domain Service Role in the given Server.
Step 7. Type the following syntax command lines individually and hit Enter each time in PowerShell. This will configure the new Server as an additional domain controller:
There are no line breaks for the command listed above. So, what are the meanings of this syntax? Check this out:
| Syntax Content | Description |
|---|---|
| Install-ADDSDomainController | This cmdlet will install the domain controller in the active directory infrastructure. |
| -CreateDnsDelegation | This parameter can define whether to create DNS delegation referencing active Directory integrated DNS. |
| -InstallDns | Using this can specify whether the DNS role needs to install with an active directory domain controller. For a new forest, it is the default requirement to set it to $true. |
| -DomainName | This parameter defines the FQDN for the active directory domain. |
| -SiteName | This parameter can be used to define the active directory site name. The default value is Default-First-Site-Name. |
| -ReplicationSourceDC | Using this parameter can define the active directory replication source. By default, it will use any available domain controller. But if needed, we can be specific. |
| -DatabasePath | This parameter will define the folder path to store active directory database file (Ntds. dit). |
| -LogPath | A log path can be used to specify the location to save domain log files. |
| -SysvolPath | This is to define the SYSVOL folder path. The default location for it will be C:\Windows |
| -Force | This parameter will force the command to execute by ignoring the warning. For example, it is typical for the system to pass a warning about best practices and recommendations. |
Step 8. Enter a new complex password if the command requests a SafeModeAdministrator Password.
After this, restart the Server system and login as administrator.
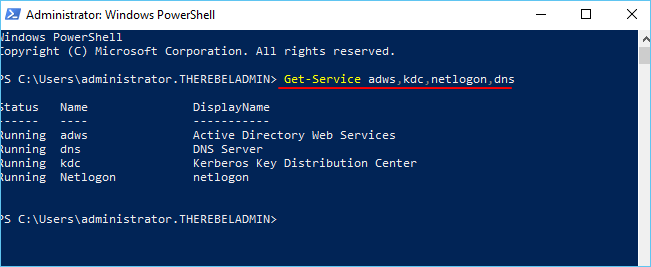
Step 9. Open PowerShell again, type Get-Service ads,kdc,netlogon, DNS, and hit Enter to check the AD DS status.
Step 10. Type Get-ADDomainController -Filter * | Format-Table Name, IPv4Address, Site in PowerShell, and hit Enter.
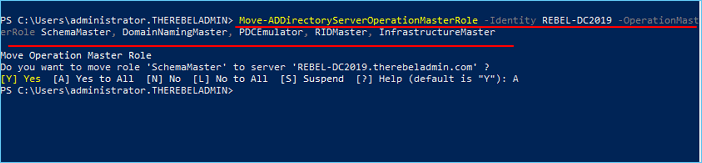
Step 11. Migrate all FSMO roles to the new domain controller by typing Move-ADDirectoryServerOperationMasterRole -Identity REBEL-DC2019 -OperationMasterRole SchemaMaster, DomainNamingMaster, PDCEmulator, RIDMaster, InfrastructureMaster in PowerShell and hit Enter.
Note: Replace REBEL_DC2019 with your new running Windows Server.
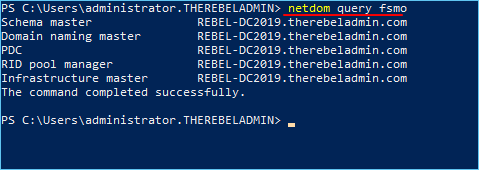
Step 12. Type Netdom query fsmo in PowerShell to verify the new FSMO role holder.
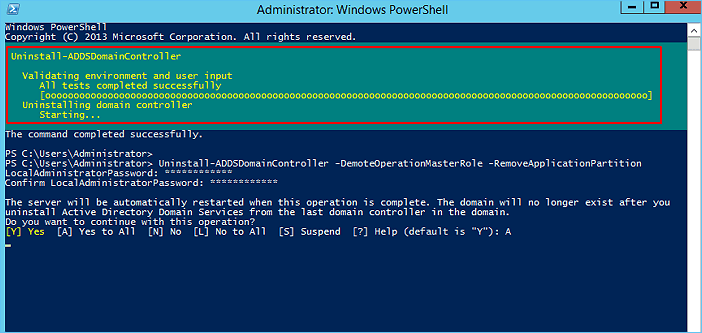
Step 13. Type Uninstall-ADDSDomainController -DemoteOperationMasterRole -RemoveApplicationPartition to decommission the old Windows domain controller.
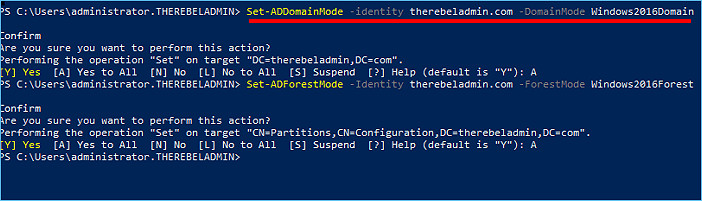
Step 14. Type Set-ADDomainMode –identity therebeladmin.com -DomainMode Windows2016Domain in PowerShell and hit Enter to upgrade the functional domain levels.
Step 15. Type Set-ADForestMode -Identity therebeladmin.com -ForestMode Windows2016Forest in PowerShell and hit Enter to upgrade forest functional levels.
Wait for the process to complete. After this, the Server AD migration process completes. You can then verify if it completes successfully by typing the following two command lines in PowerShell and hitting Enter each time:
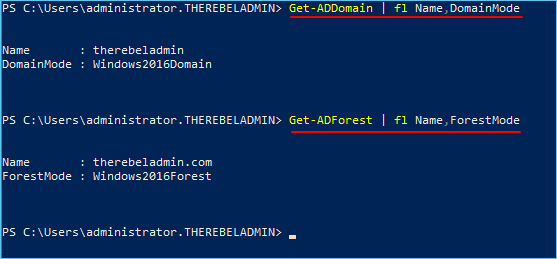
As shown above, if you see the result, you've successfully transferred Active Directory to a new Server machine. If you think this guide is complete and valuable, don't forget to share it with others in need.
- By Microsoft Active Directory Overview
According to the above description, an Active Directory can be regarded as a database called AD, which connects users to network resources to accomplish their tasks. So what does Active Directory include? Check this out:
While switching Server computers, one key step is transferring Active Directory to a New Server. Above the page, we've collected two methods that you can follow to successfully migrate the AD database to a new server on your own.
100% Secure
Free Inquiry
Aside from transferring Active Directory from one Server to another Server, you may still have much other content that needs to be moved, for example, user data, user accounts, domain accounts and settings, applications, etc.,
How do you completely transfer Sever data to another Server? Check this out:
EaseUS Todo PCTrans, with its account settings transfer feature, can help you fully migrate user data and accounts to a new Server with simple clicks.
100% Secure
Free Inquiry
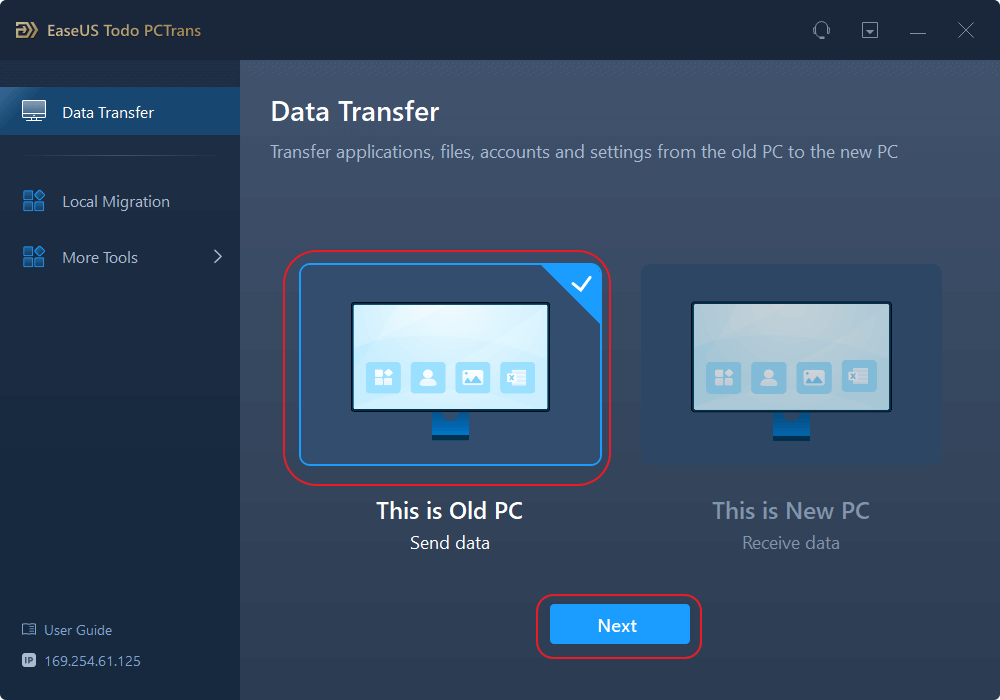
Step 1. Install and launch EaseUS Todo PCTrans on both two devices. On the source PC, select "PC to PC" to continue.
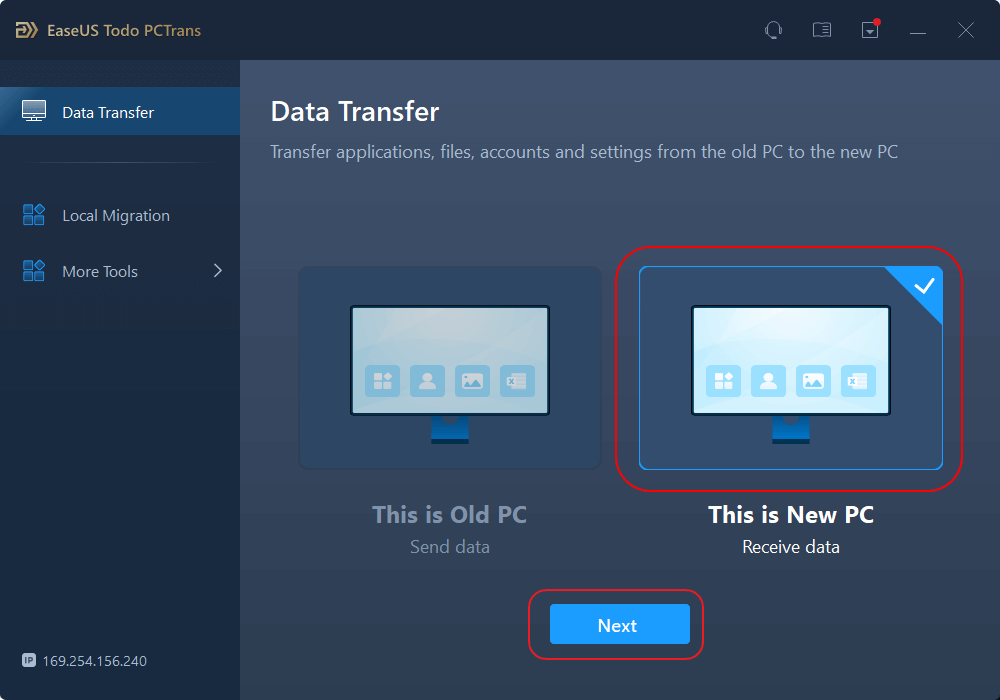
Step 2. Select the transfer direction - as an Old PC or a New PC.
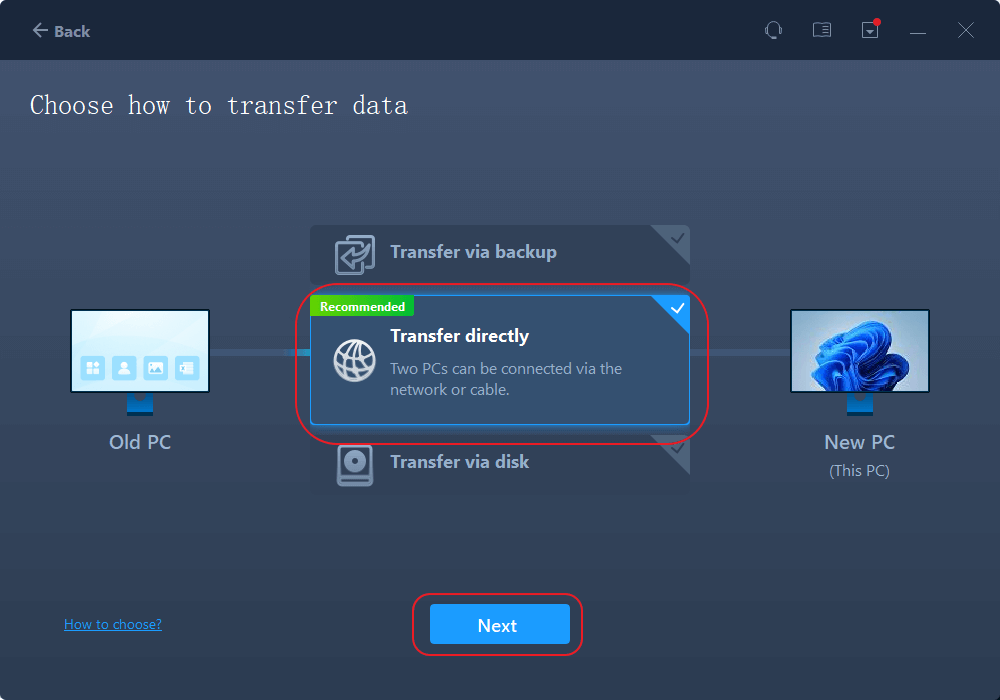
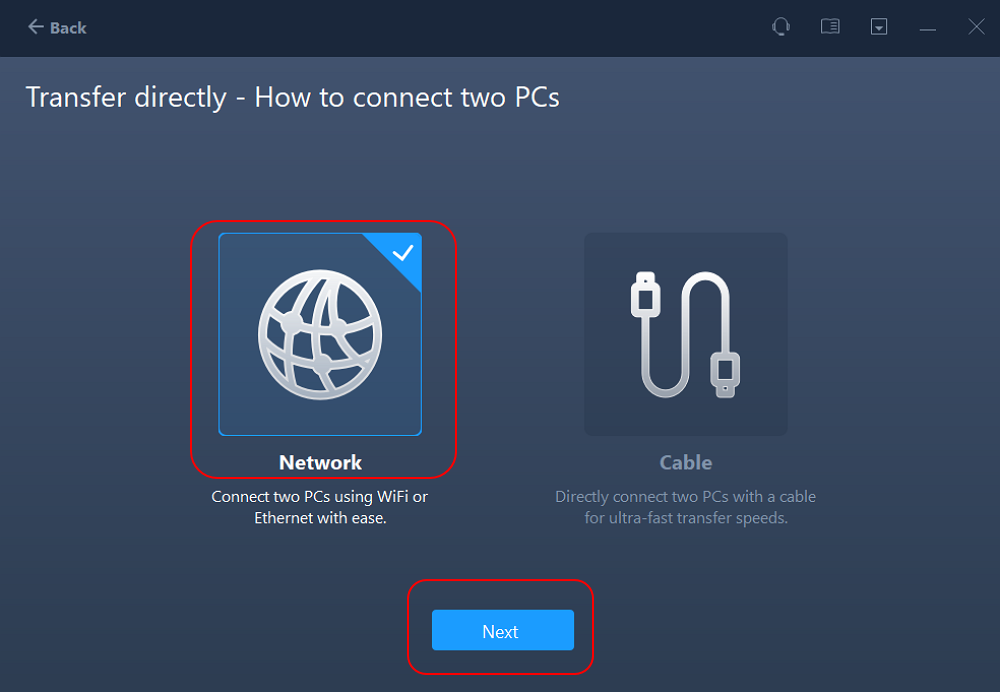
Then, on the new PC, select "Transfer directly" and click "Next" to continue.
Select "Network" and click Next to continue. This will automatically scan the old PC. (Make sure the two PCs are connected to the same LAN.)
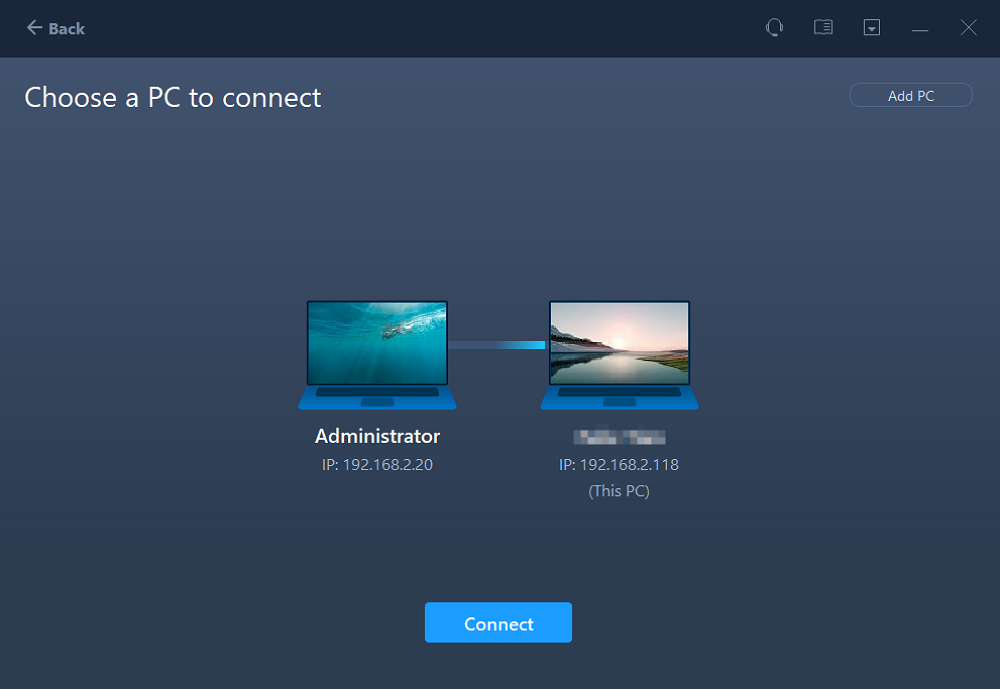
Select the target PC and click Connect. Then, it will take some time to scan and analyze the data in old PC.
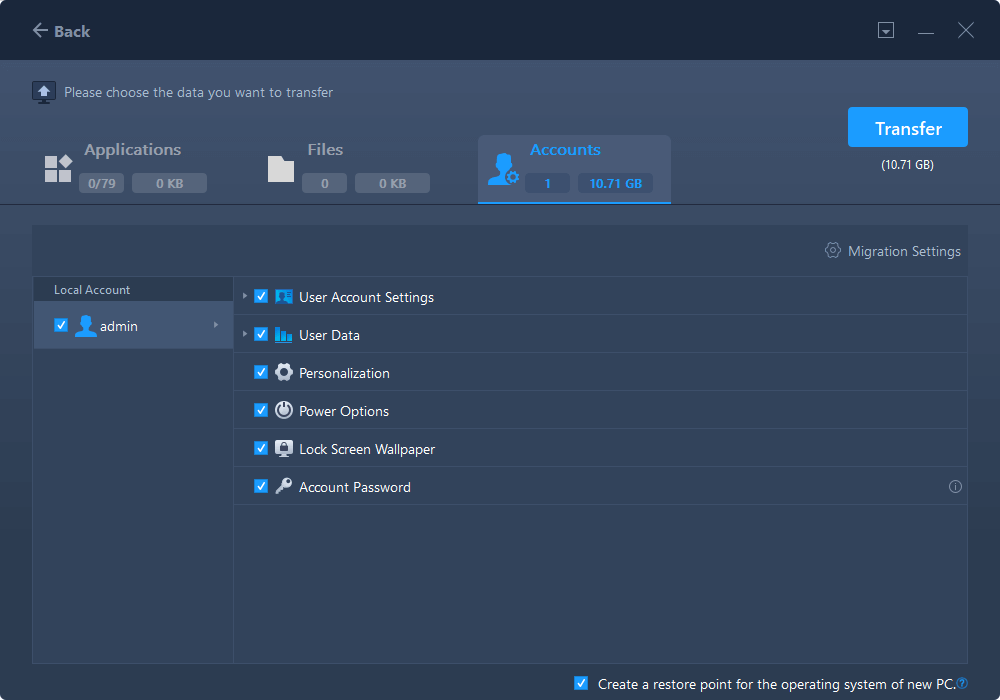
Step 3. Click at the "Accounts" section to specify User Accounts and Settings for transferring.
Step 4. Enter the user account and password of the source computer, select the User Account Settings, User Data and other settings that you want to transfer.
Step 5. After selection, click "Transfer" to start to transfer user accounts and settings.
Aside from server data, files, and accounts, you may also want to move some essential applications to a new server, such as the Windows Server Manager, SQL installer, Exchange, Quickbooks, Office, Adobe, etc.
You can simply manage this task and accomplish it independently with the help of reliable Windows Server file transfer software. Here is how to do so:
100% Secure
Free Inquiry
Step 1. Set Up the Old PC
Step 2. Set Up the New PC
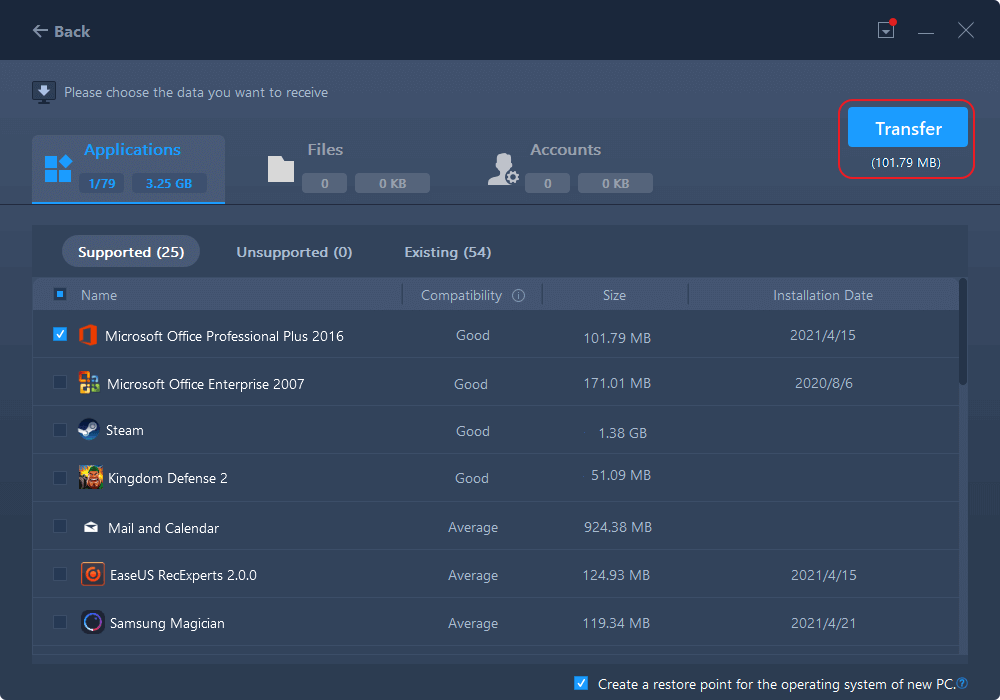
Step 3. Select the Apps to Transfer
This tutorial page describes what Active Directory is and why it is important for server administrators to migrate AD to a new server. We also introduced two methods that help to successfully migrate Active Directory to a new Server on Windows Server 2022/2019/2016/2012/2008/2003, etc. Note that the procedure is a bit complex. So be careful and patient while typing the command lines in PowerShell to execute the task. Otherwise, choose another professional AD migration tool - EaseUS Todo PCTrans.
100% Secure
Free Inquiry
Updated by Tracy King
Tracy became a member of the EaseUS content team in 2013. Being a technical writer for over 10 years, she is enthusiastic about sharing tips to assist readers in resolving complex issues in disk management, file transfer, PC & Mac performance optimization, etc., like an expert.
EaseUS Todo PCTrans Free is a useful and and reliable software solution created to serve in computer migration operations, be it from one machine to another or from an earlier version of your OS to a newer one.
Read MoreEaseUS Todo PCTrans is by the folks at EaseUS who make incredible tools that let you manage your backups and recover your dead hard disks. While it is not an official tool, EaseUS has a reputation for being very good with their software and code.
It offers the ability to move your entire user account from your old computer, meaning everything is quickly migrated. You still get to keep your Windows installation (and the relevant drivers for your new PC), but you also get all your apps, settings, preferences, images, documents and other important data.
Read MoreRelated Articles
How to Move Epic Games to Another Drive or PC in 3 Ways
![]() Tracy King/2026/04/19
Tracy King/2026/04/19
How to Copy and Transfer Games from PC to USB Efficiently
![]() Cedric/2026/03/29
Cedric/2026/03/29
How to Transfer Data from SD Card to Another on Samsung
![]() Cici/2026/06/12
Cici/2026/06/12
Transfer WhatsApp Backup from PC to iPhone free | Best Way
![]() Tracy King/2026/06/07
Tracy King/2026/06/07
2 Ways to Transfer Active Directory to a New Windows Server
Try smart Windows 11 data transfer tool to move all data in 1 click.
EaseUS Todo PCTrans
100% Secure
Free Inquiry
Copyright © EaseUS. All rights reserved.