Page Table of Contents
About the Author
Hot Topics
Updated on Jan 23, 2025
Is your Server computer disk space easy to get full after using it for 1 or 2 years? Or, if your Server data disk contains a small capacity, it's very easy to get "Low Disk Space" error or slow computer error in Windows Server systems.
So how do you free up disk space in Windows Server computers? On this page, we'll show you five efficient ways that most Windows experts and Server administrators apply to clean up disk space, make more available free space, and optimize the Server computer's performance.
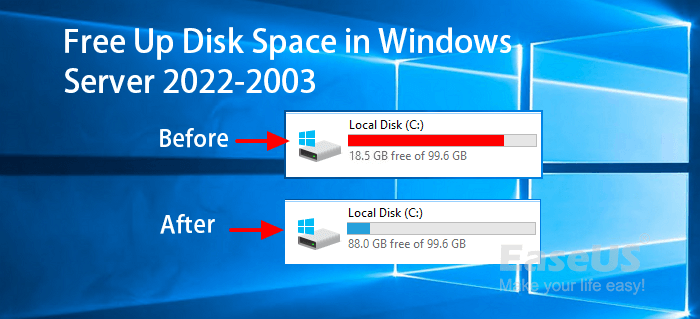
Disk Gets Full? 5 Ways to Free Disk Space in Windows Server
Applies to: Windows Server 2022, 2019, 2016, 2012, 2012 r2, 2008, 2008 r2, etc.
Follow the 5 ways that most exports apply to free up disk space in Windows Server computers, and you can successfully make your Server computer as fast as new immediately:
- #1. Disk Cleanup
- #2. Uninstall Apps
- #3. Reset Virtual Memory Page File Size
- #4. Add More Space, or Upgrade Disk to a Larger One
- #5. Move Large Files, Programs to Another Drive
IMPORTANT: In case you lose any essential content while freeing up disk space in Windows Server computers, remember to back up your valuable Server computer data to an external disk or cloud drive.
Your Quick Guide:
- Methods 1, 2, 3 are free methods that help clean up some junk files, useless apps, or temporary content.
- Method 4 mains to help you add more space to the target drive to make the computer faster.
- Method 5 guides you to change the location of large files and programs to free up the storage space on the target drive.
Let's get started here and follow Windows experts' guide to free up the disk space in Windows Server now.
#1. Disk Cleanup
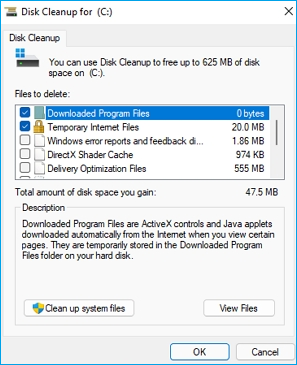
Disk Cleanup is a Windows built-in tool that enables all Windows users to efficiently clean up and delete large and useless files from all existing hard drive partitions.
What can you delete:
- Windows upgrade log files
- Downloaded Program Files
- Temporary Internet Files
- System error minidump files
- Windows error reports and feedback diagnostic files
- DirectX Sharder Cache
- Delivery Optimization Files
- Recycle Bin
- Temporary Files
- User file history
How Does Disk Cleanup Free Up Disk Space:
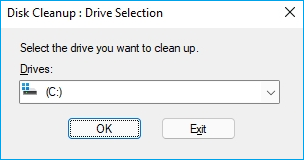
Step 1. Press Windows + S, type disk cleanup in the search box, click "Disk Cleanup" to open it.
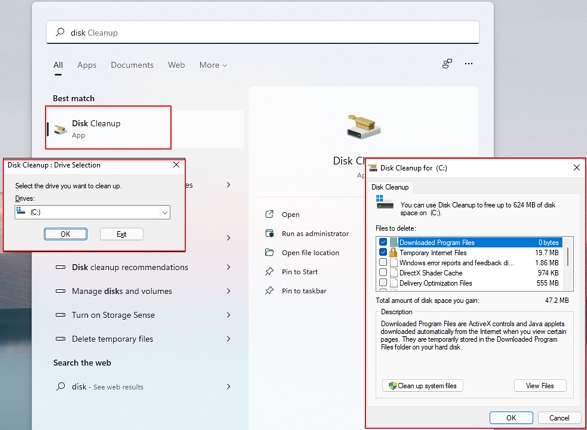
Step 2. Select the drive number you want to clean up and click "OK".
Step 3. Check the files or useless data that are taking up big space on the target drive, click "OK" to start freeing up space.
#2. Uninstall Apps
Aside from deleting or removing useless large files from computer hard drives, the other way that helps to free up disk space in Windows Server greatly is to remove corrupted or uninstall unwanted applications. Wise Windows experts know how to make full use of the disk space on Servers and they'll never allow big useless applications to take up such a big size.
What to be removed? Here is a list:
- Huge & unnecessary applications
- Useless games
How to Free Up Disk Space by Uninstalling Apps:
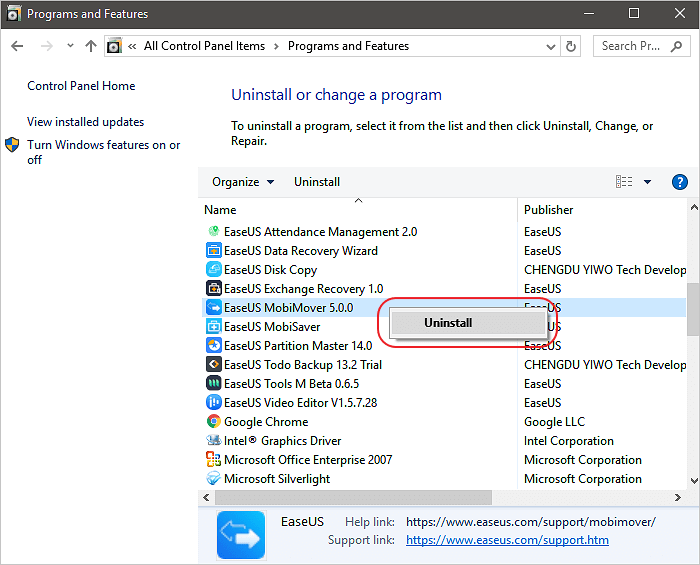
To do so, you can rely on the Programs and Features tool that helps you view the application size and remove unwanted programs successfully with the steps here below.
Step 1. Press Windows + X keys.
Step 2. Click "Programs and Features" from the result list to open this tool.
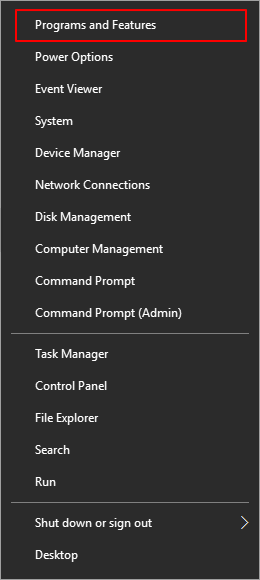
Step 3. Once the Programs and Features window opens, find and right-click on the programs or applications that you don't need in Server, click "Uninstall".
Repeat the steps above till you remove all useless apps on Server.
#3. Reset Virtual Memory Page File Size
The Page file is basically set for virtual RAM, and it takes up certain disk space in the system C drive. Mostly, when the Page Files gets too big, it would result in a 'high disk usage' issue in both Windows and Windows Server systems.
To free up the disk space in Server, the best way is to reset the virtual memory page file size. Here are two options, and you may try either one based on your needs:
Option 1. Reset Virtual Memory:
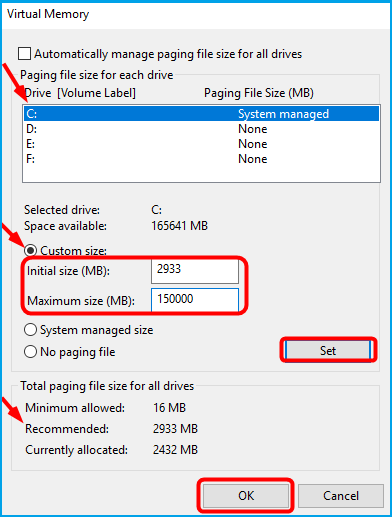
Step 1. Press Windows + R keys, type sysdm.cpl ,3 and hit Enter.
Step 2. Click "Settings" under Performance at the Advanced tab.
Step 3. Go to the Advanced tab on the Performance page, click "Change" under the Virtual Memory section.
Step 4. Uncheck the "Automatically manage paging file size for all drives" box.
Step 5. Select Windows drive like C, and enter the recommended size as its Initial size for the virtual memory.
Option 2. Move Page File from C Drive to Another Drive:
Step 1. Press Windows + R keys, type sysdm.cpl ,3 and hit Enter.
Step 2. Click "Settings" under Performance at the Advanced tab.
Step 3. Go to the Advanced tab on the Performance page, click "Change" under the Virtual Memory section.
Step 4. Uncheck "Automatically manage paging file", then click C drive and select "No paging file".
Step 5. Click "Set" to disable the page file on C drive.
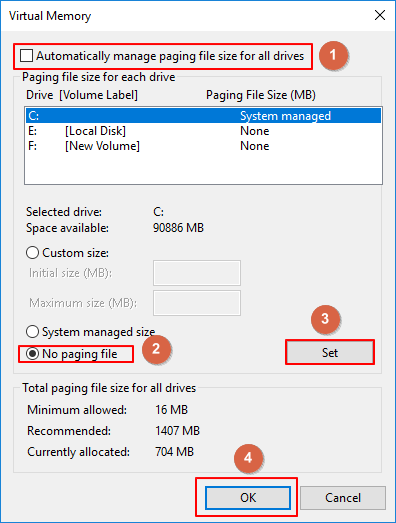
Step 6. Select a target drive to transfer page file, click "System managed size", click "OK".
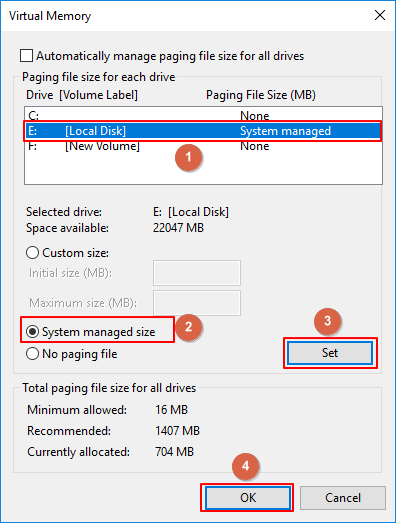
After this, you need to restart the computer to keep all changes so as to make the operation effective.
Notice: Some Server computer hard drive partition has small storage capacity, but there's still some unallocated space or free space on the disk. And if your Server is with this case, you are good to go and try Method 4 and Method 5 as introduced below.
#4. Add More Space, or Upgrade Disk to a Larger One
When your hard drive still has unallocated space that hasn't been used, you can add unallocated space to extend the hard drive partition. Or, if you tend to upgrade the disk to a larger one, you can clone the drive to a bigger HDD/SSD with reliable Server disk cloning software.
To do so, Windows Server administrators would prefer reliable Server partition manager software for help. Experienced Server users know how to pick such a tool, and EaseUS Partition Master Enterprise is one of the favored partition managers for Server users.
100% Secure
Free Inquiry
You can simply apply this tool to add more space for the target drive or upgrade the disk to a bigger one with ease. Here is how to do so:
1. Add More Space to Target Drive Volume
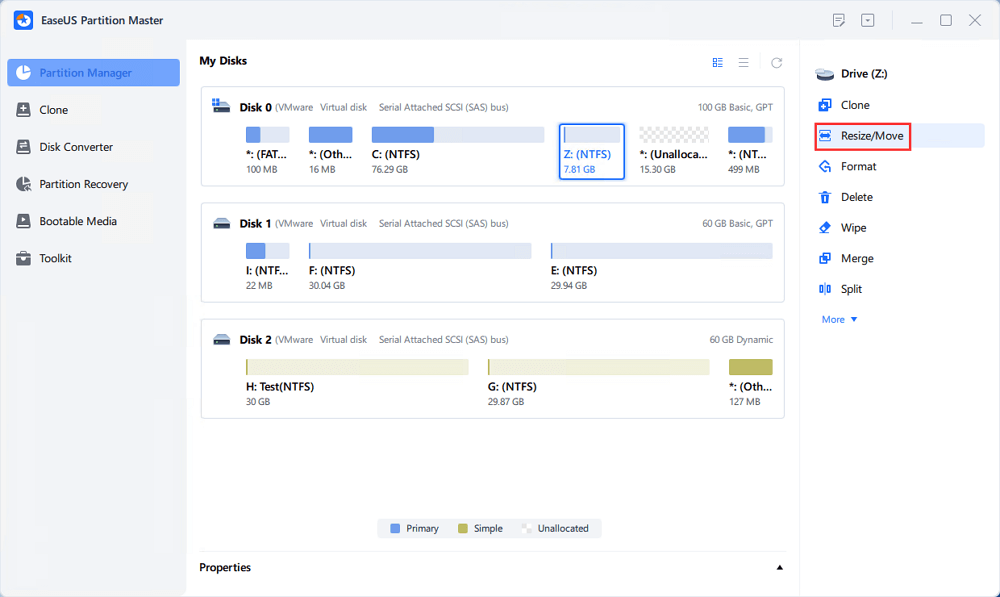
Step 1. Locate the Target Partition.
Go to Partition Manager, locate the target partition and select "Resize/Move".
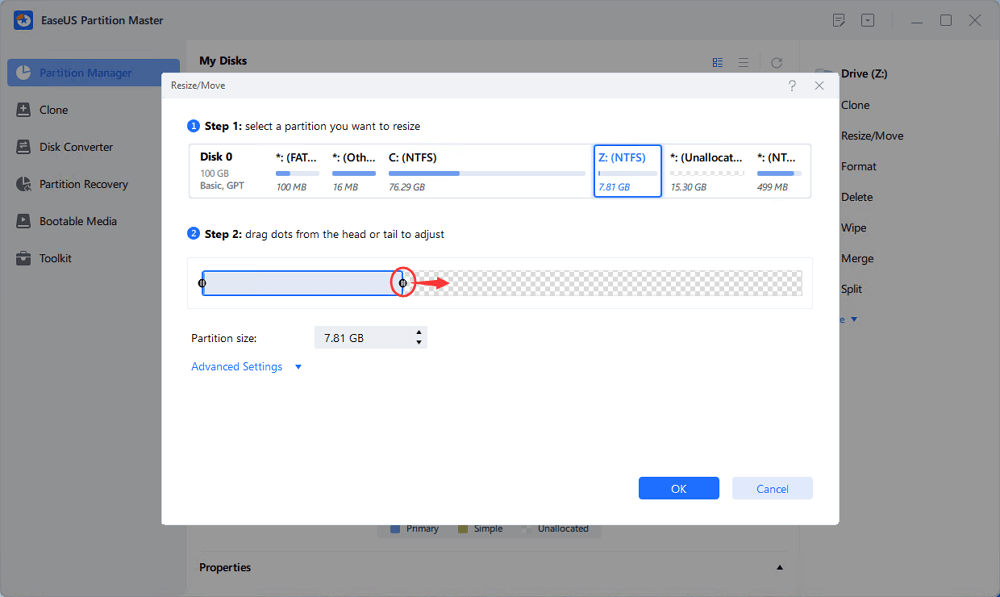
Step 2. Extend the Target Partition.
Drag the partition panel rightward or leftward to add the unallocated space into your current partition, or you can click click "fill in all unallocated" to allocate all space to the target partition. Then, click "OK" to confirm.
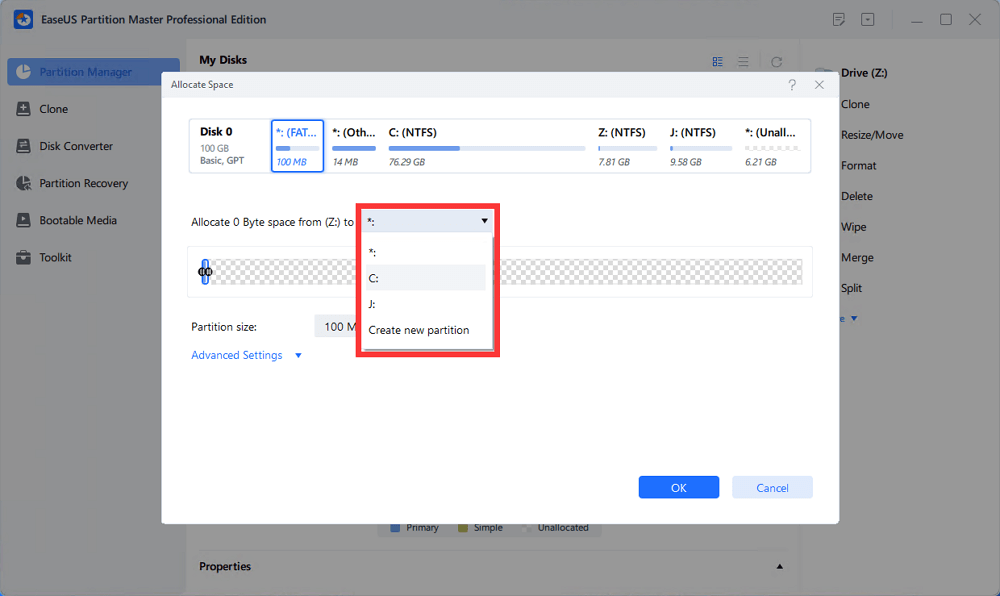
Extra Option: Get Space from Another Drive
If there is not enough unallocated space on your disk, right-click on a big partition with enough free space, select "Allocate space".
Then select the target partition that you want to extend at the allocate space to column.
Step 3. Execute Operations to Extend Partition.
Drag the dots of the target partition into the unallocated space and click "OK".
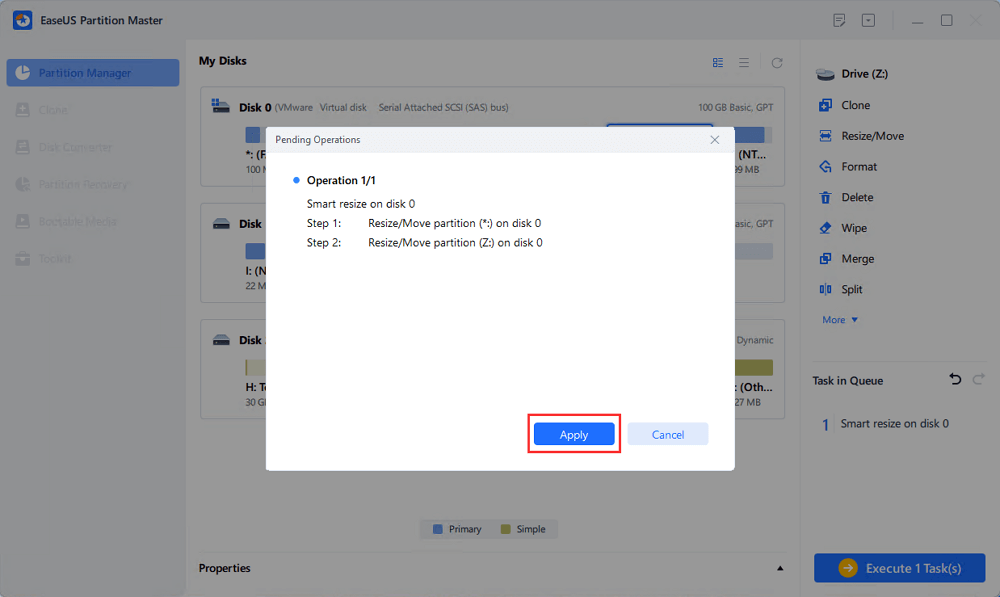
Then Click the "Execute Task" button and click "Apply" to keep all the changes.
2. Upgrade Disk to A Larger One
Step 1. Select the source disk.
- Click the "Clone" from the left menu. Select the "Clone OS Disk" or "Clone Data Disk" and click "Next".
- Choose the source disk and click "Next".
Step 2. Select the target disk.
- Choose the wanted HDD/SSD as your destination and click "Next" to continue.
- Read Warning message and confirm "Yes" button.
Step 3. View the disk layout and edit the target disk partition size.
Then click "Continue" when the program warns it will wipe out all data on the target disk. (If you have valuable data on the target disk, back up it in advance.)
You can select "Autofit the disk", "Clone as the source" or "Edit disk layout" to customize your disk layout. (Select the last one if you want to leave more space for C drive.)
Step 4. Click "Start" to start the disk cloning process.
#5. Move Large Files, Programs to Another Drive
Most Windows Server Managers would add a 2nd and even a 3rd hard drive to extend the storage capacity. When the system drive free space becomes smaller, the last way to free up disk space that wise Server Experts would try is to move large files and programs to another drive.
Reliable Windows Server app migration software is capable of helping. EaseUS Todo PCTrans Technician is the one that you can't miss.
And here is how experts move their big files, apps, and programs to another drive so to free up disk space in Server computers:
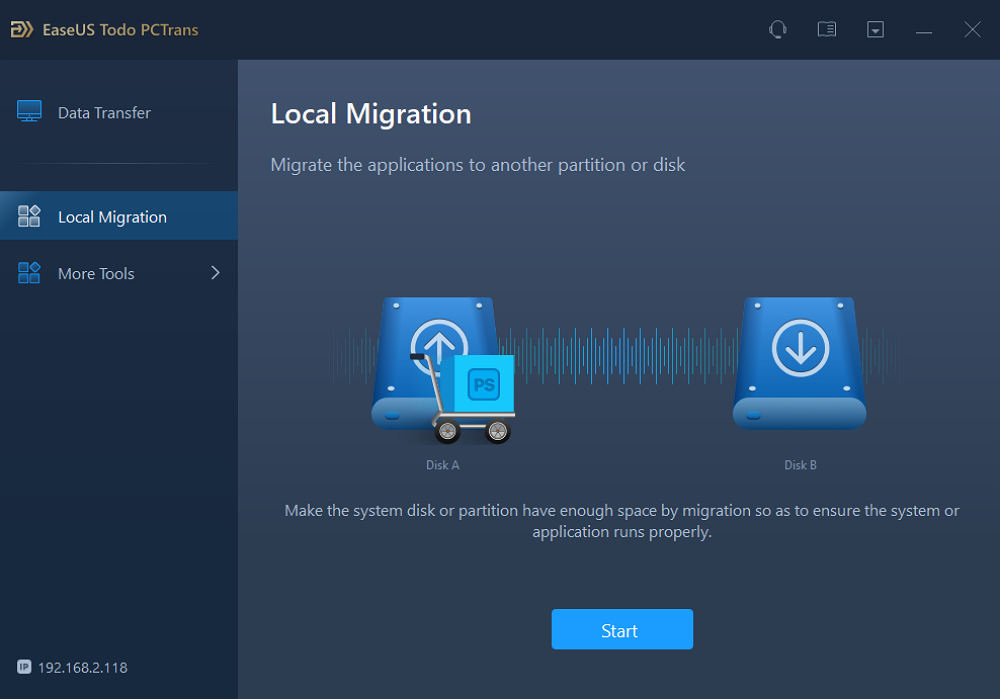
Step 1. Launch EaseUS Todo PCTrans and select transfer mode
On the main screen of EaseUS Todo PCTrans, go to "Local Migration" section and click "Start" to continue.
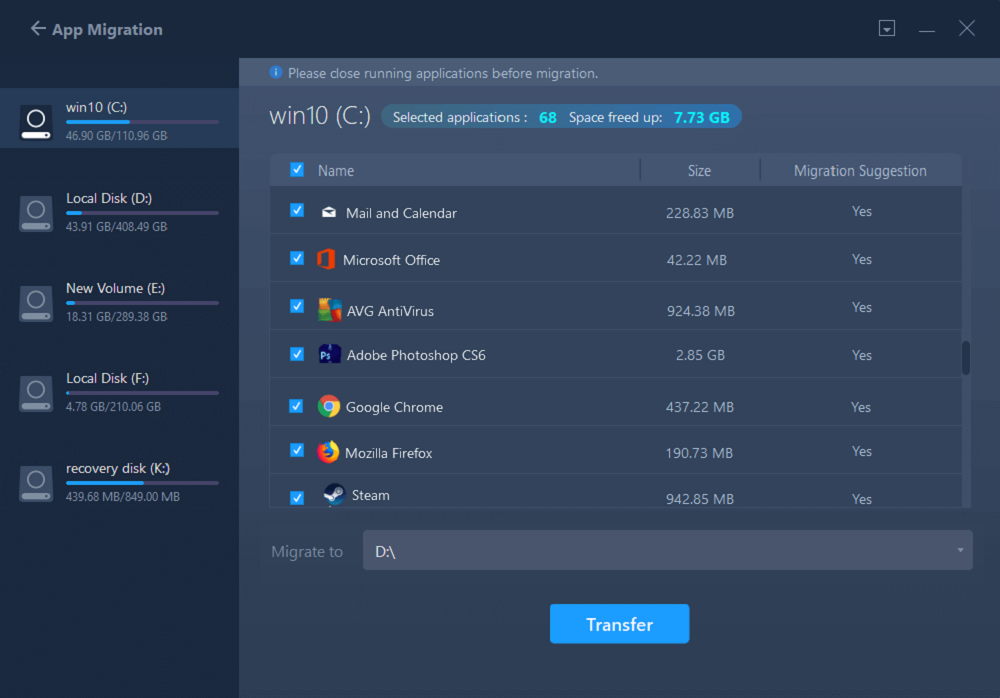
Step 2. Select apps and another drive to transfer
1. Select the source partition and tick applications, programs and software (marked as "Yes") that you'd like to migrate.
2. Click triangle icon to select another drive or disk as your target device and click "Transfer" to start the migration.
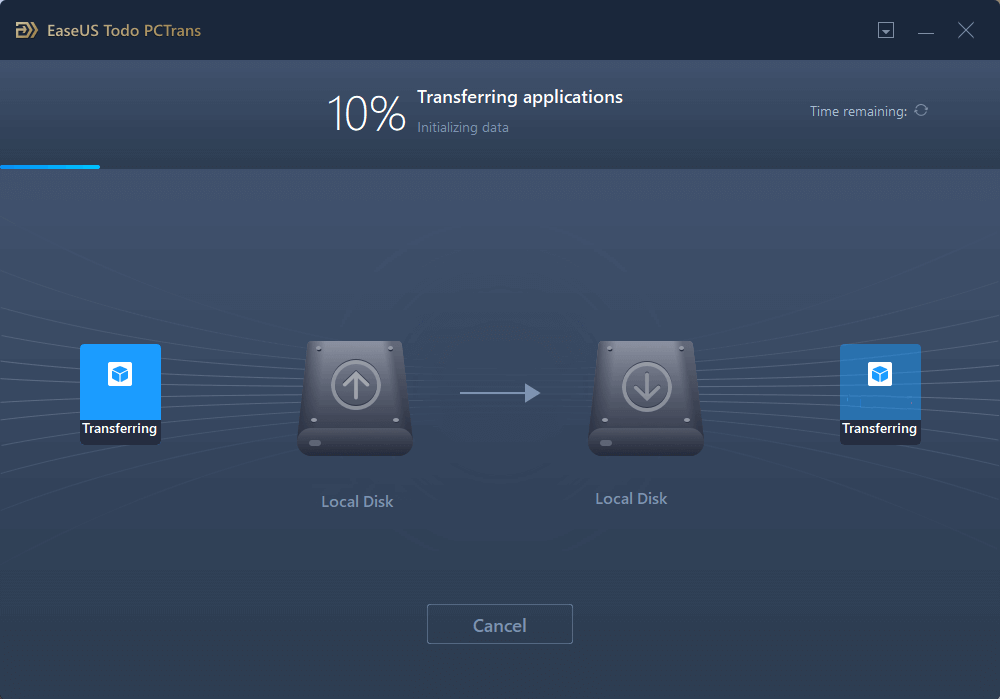
Step 3. Finish the migration process
When the transferring process finishes, click "OK" to complete.
You can restart your PC to keep all the changes, and you should be able to run your migrated apps on the other drive again.
Conclusion
On this page, we collect five ways that wise Windows Server experts often apply to free up disk space when the computer runs slow or warns low disk space error. Among the first three manual methods, Disk Cleanup is the most efficient way to clean up drive space by deleting junk files and temporary files. When adding more free space to a target drive or upgrading to a bigger drive, EaseUS Partition Master is always ready to help.
100% Secure
Free Inquiry
Are you ready to be an expert to extend or free up disk space on your Server computer? Follow the methods here, and you can be a professional geek.
How Can We Help You
About the Author
Updated by Tracy King
Tracy became a member of the EaseUS content team in 2013. Being a technical writer for over 10 years, she is enthusiastic about sharing tips to assist readers in resolving complex issues in disk management, file transfer, PC & Mac performance optimization, etc., like an expert.
Product Reviews
-
I love that the changes you make with EaseUS Partition Master Free aren't immediately applied to the disks. It makes it way easier to play out what will happen after you've made all the changes. I also think the overall look and feel of EaseUS Partition Master Free makes whatever you're doing with your computer's partitions easy.
Read More -
Partition Master Free can Resize, Move, Merge, Migrate, and Copy disks or partitions; convert to local, change label, defragment, check and explore partition; and much more. A premium upgrade adds free tech support and the ability to resize dynamic volumes.
Read More -
It won't hot image your drives or align them, but since it's coupled with a partition manager, it allows you do perform many tasks at once, instead of just cloning drives. You can move partitions around, resize them, defragment, and more, along with the other tools you'd expect from a cloning tool.
Read More
Related Articles
-
How to Unlock HP Laptop Without Password | 2025 Guide🔥
![author icon]() Cici/2025/01/23
Cici/2025/01/23 -
How to Install Windows 10 from USB Drive [Step-by-Step]
![author icon]() Cici/2025/01/23
Cici/2025/01/23 -
Download Partition Magic Freeware for Windows 10/11 Disk Partitioning [Don't Miss It]
![author icon]() Tracy King/2025/01/23
Tracy King/2025/01/23 -
How to Repair MBR in Windows 11? Here Is Your Guide
![author icon]() Tracy King/2025/01/23
Tracy King/2025/01/23
Hot Topics in 2024
EaseUS Partition Master

Manage partitions and optimize disks efficiently

