Page Table of Contents
About the Author
Hot Topics
Updated on Jan 29, 2026
Do you have a Dell laptop and are facing the "hard drive not installed" error? This Dell hard drive not installed error may show up in BIOS on Dell SupportAssist. This error message frequently indicates a hard disk problem that stops the system from correctly booting up on Windows 10/11.
EaseUS will introduce the common underlying causes of this error and get feasible solutions so you may resolve the issue and regain access to your data. So follow the methods below and learn how to fix the Dell hard drive not installed error. This tutorial is also suitable for hard drive not installed Dell Inspiron, Dell Latitude and Dell SupportAssist hard drive not installed.
How to Fix Dell Hard Drive Not Installed
The Dell hard drive not installed or Dell hard drive not detected issue may cause significant disruption while working. If you are facing any of these issues, follow the fixes below and solve the hard drive not installed error on Windows 10/11
- A Quick Check of Your Dell Hard Drive
- Check BIOS/UEFI Settings
- Change the Boot Priority Order
- Run Hardware Diagnostics
- Check for Hard Drive Failures
- Update or Install the Driver
- Reinstall or Replace the Hard Drive
If you think these solutions are useful to your Dell laptop and Dell hard drive not installed beeping error, share it with others.
A Quick Check of Your Dell Hard Drive
Sometimes, a complicated problem can be solved with simple fixes. So, here are three simple and quick tips that can solve the "Dell Hard Drive not installed" issue.
- Check for physical damage or loose connections to ensure your Dell hard disk is connected properly.
- Try hitting the F1 key repeatedly at startup so that you can check if your system correctly identifies and initializes the hard disk.
- Use a PC hard reset to reset system settings and potentially repair the Dell hard drive not installed problem.
Check BIOS/UEFI Settings
If the above solutions did not solve the problem, looking into the BIOS/UEFI settings may help fix the issue. Just verify the date and time settings in your BIOS settings to ensure your hard drive is being detected on your system. Ensure the date and time in the BIOS/UEFI settings are accurate, as disparities can sometimes lead to hardware recognition issues.
1. Check date and time: Enter the BIOS setup interface by pressing and holding F2 continuously, and under the General tab, click Date/Time.
2. Check boot mode: Enter the BIOS interface and select Boot Sequence under General Options. If it is set to Legacy, change it to UEFI. Also, make sure to enable Secure Boot and disable older ROMs.
Change Boot Priority Order
Check that the hard disk is in the proper boot order priority. You can go to your BIOS and adjust the boot priority order to prioritize the hard drive. This allows the system to identify the hard drive correctly and initialize it upon launch.
Here are two methods that you can use to change the boot priority order:
1. Adjust the BIOS manually. During system startup, navigate to the BIOS settings (typically by hitting F2, Del, or Esc). Locate the "Boot" or "Advanced" section and change the boot priority order.
2. Use a third-party tool. If you are new to BIOS settings and need a simple solution, use a third-party tool to change the boot priority order. For a more user-friendly solution, consider using the change boot drive feature of EaseUS Partition Master Professional. This gives you a simple process for adjusting the boot priority order without going into the complexities of the BIOS, making it a practical alternative if you are unfamiliar with manual BIOS settings.
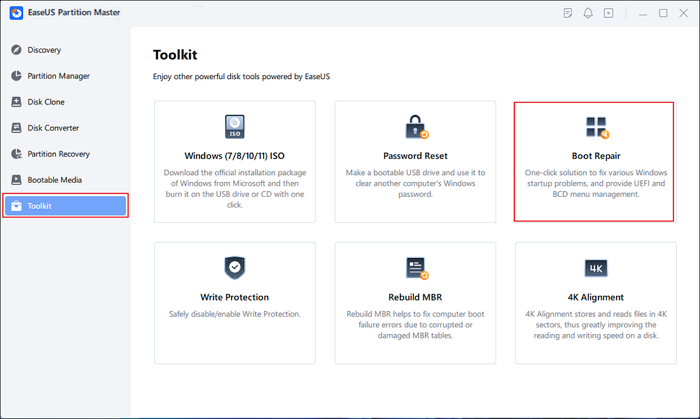
Step 1. Launch EaseUS Partition Master on your computer and navigate to the "Boot Repair" section in "Toolkit."
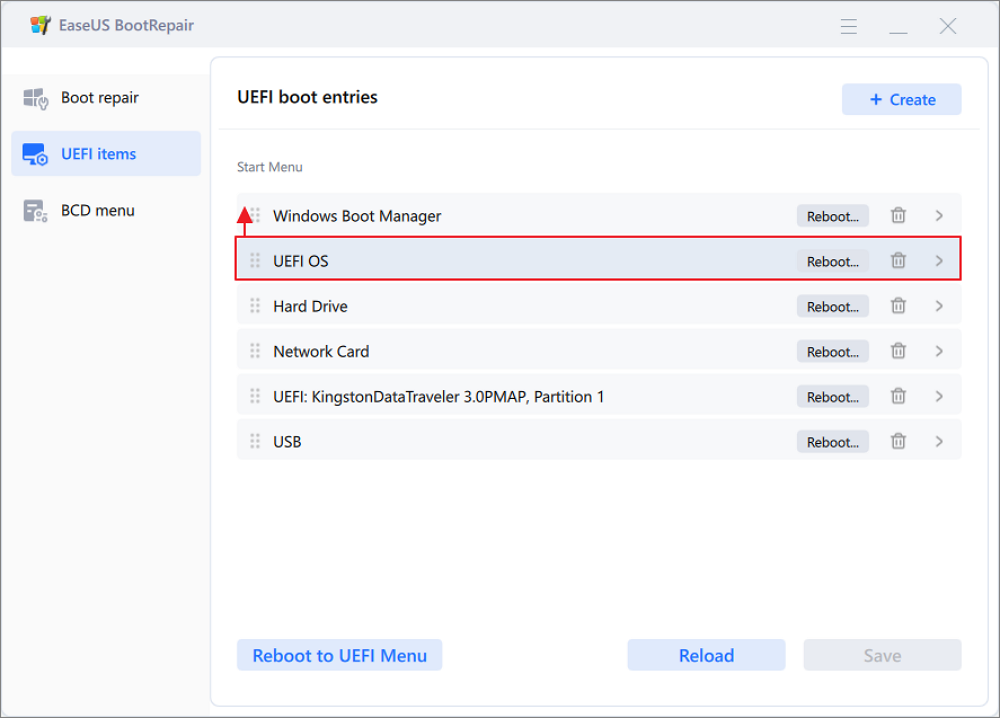
Step 2. Go to the "UEFI items" tab and change the boot order by dragging the drive to the first position.
Step 3.Click "Save" to apply the changes. Then, your OS is set to boot from the new hard drive.
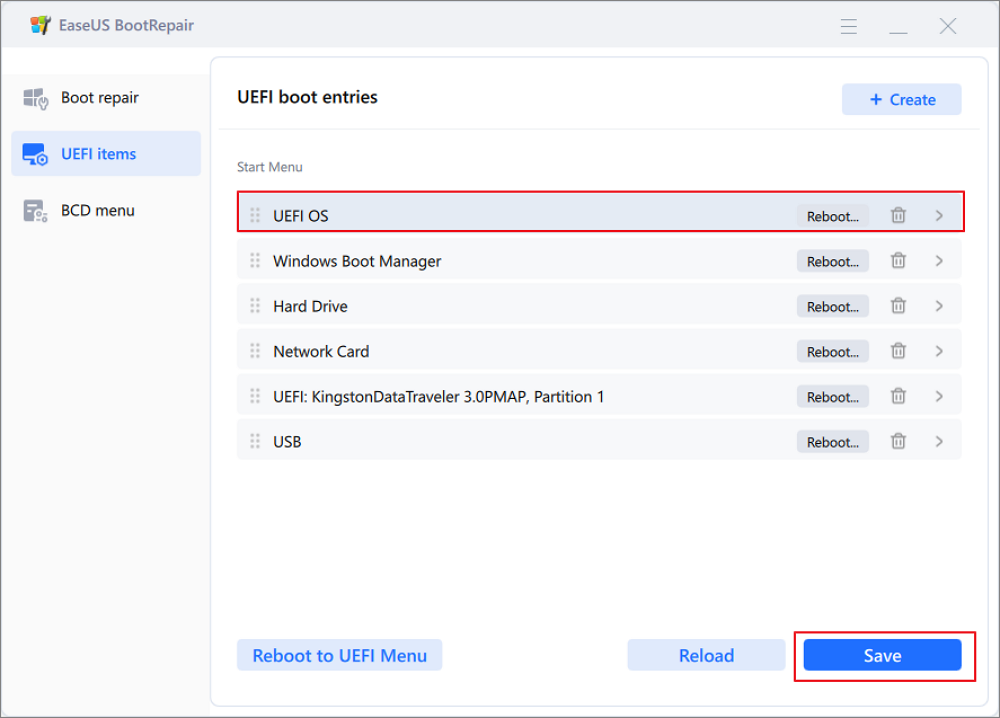
Note:If you hit on the "Reboot" button after the drive, the OS can boot from this disk at the next time for once.
If you encounter other errors in your computer, such as HP stream low disk space, you can also try this full-featured tool.
Run Hardware Diagnostics
if you meet the Dell SupportAssist hard drive not installed error, you can also choose the built-in tool. Dell laptops frequently have built-in diagnostic tools that you can use to solve hard drive not installed issues on Dell or Dell latitude laptop. Here's how you can use the Dell hardware diagnostics:
Step 1. To enter the diagnostics menu, restart your PC and press F12 as it boots.
Step 2. Choose "Diagnostics" to perform extensive diagnostics on your hardware, including the hard disk.
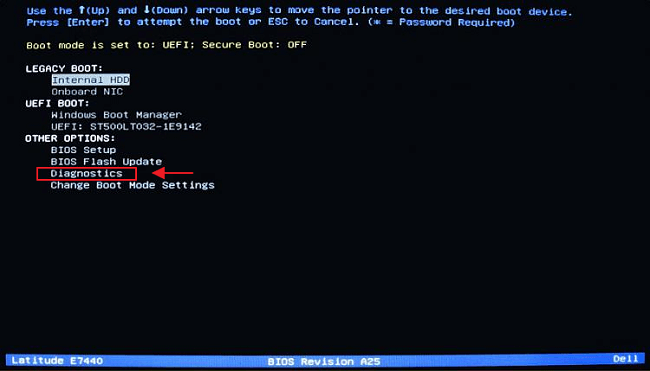
This can assist in discovering and resolving issues that are creating the "hard drive not installed" error.
Check for Hard Drive Failures
To protect the overall health of your Dell hard drive, you must look for and repair possible faults as soon as they occur. Bad sectors, if left unchecked, can cause performance reduction and data loss. So, this step is critical to ensuring the integrity of your storage device.
EaseUS Partition Master has an easy-to-use "Disk Surface Test" feature. This allows you to quickly examine the health of your hard drive by scanning for faulty sectors and measuring overall disk quality.
To get precise results and avoid interference with the scanning process, run the Disk Surface Test with EaseUS Partition Master on a different, healthy computer with the drive installed.
Step 1. Open EaseUS Partition Master. Go to Toolkit and select "Bad Sector Scan."
Step 2. Tick "Scan Disk" and choose the target disk from the drop-down menu.
Step 3. Click "Scan" to apply the bad sector scaning process.
Update or Install the Driver
To ensure the best performance and system compatibility, ensure your hard drive has the most recent drivers installed. This step is important since outdated or missing drivers might lead to hardware identification difficulties.
Here are the instructions for updating or installing the driver:
Step 1. Go to Device Manager and click "Storage Controllers" and "Disk Drives."
Step 2. Now right-click and update to the latest drivers on your computer.
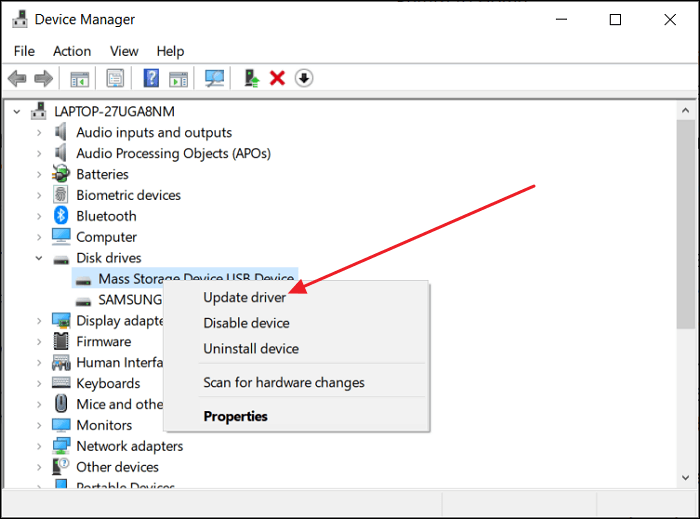
Step 3. Restart your system.
Now, check if the error persists.
Reinstall or Replace the Hard Drive
As a final resort, consider reinstalling the old hard drive or replacing your current hard drive with a new one. First of all, reinstall the hard drive and check if it is working.
Step 1. Carefully remove the hard disk from your Dell computer.
Step 2. Reinstall the hard disk securely in its slot.
Step 3. Restart your computer to determine whether the hard disk has been recognized.
If the hard disk remains unrecognized after reinstallation, it may be time to replace it. Opt for a new hard drive that is compatible with your Dell device.
To avoid data loss during the replacement, use EaseUS Partition Master's "Clone Disk" tool. This allows for a seamless transfer of data from the old hard drive to the new one, guaranteeing a smooth transition while protecting your essential information.

How to Replace Hard Drive in Dell Laptop [Step-by-Step]
This passage is dedicated to providing you with a step-by-step guide on how to replace hard drive in Dell laptop, along with the best cloning solution to move your data. Read more >>
Why Dell Hard Drive Not Installed
A "hard drive not installed" message on your Dell laptop might be very annoying, and here's a similar experience shared by a Reddit user.
Generally, many people face this issue for different reasons. And here are some common reasons why you might be facing the issue of "Hard Drive Not Installed" on your Dell laptop:
- Loose connections: Loosely attached connections might interrupt communication between the hard drive and the motherboard, resulting in an error in identification.
- Incorrect BIOS Settings: Misconfigurations in the BIOS or UEFI settings may cause the system to ignore the hard disk on startup.
- Windows Installation Errors: Problems caused by incomplete or faulty Windows installations might impair the operating system's ability to recognize and connect with hard drives.
- Hard Drive Corruption: Physical damage, faulty sectors, or general deterioration of the hard drive's health can impair functioning and cause recognition issues.
- Hard Drive Registry Corruption: Registry difficulties might interfere with the hard drive's operation, resulting in errors during detection and startup.
No matter what the reason behind your hard drive not being identified in your system, this article has given you some amazing solutions that will help you take back access to your hard drive.
So, what are you waiting for? Share this informative article with others experiencing Dell hard drive not installed issues to improve problem-solving by understanding the underlying factors contributing to this error.
Conclusion
To summarize, resolving the Dell Hard Drive Not Installed issue has become very easy with the help of this article. From initial checks to modifying BIOS settings and conducting diagnostics, this guide provides full answers.
Additionally, EaseUS Partition Master's user-friendly functions like "Change Boot Drive" and "Clone Disk" can help you manage your disks more efficiently. Ensure that your Dell laptop resumes full functionality while easily securing your data. EaseUS Partition Master may help you resolve your hard disk issues quickly and easily.
FAQs About Dell Hard Drive Not Installed
If you're looking for more information on the Dell Hard Drive Not Installed problem, check out these frequently asked questions:
1. Why is my hard drive not detected after installing it?
If your hard drive is not detected after installation, possible causes include loose connections or incorrect BIOS settings.
2. What causes a hard drive not to be installed on a Dell laptop?
Loose connectors, wrong BIOS settings, and Windows installation issues can all prevent the hard disk from being recognized properly on your Dell laptop.
3. How do I fix no hard drive installed?
To fix any hard drive installation issue, check for loose connections and physical damage to the hard disk. Then, check the BIOS settings to guarantee the right date, time, and boot priority order.
How Can We Help You
About the Author
Oliver is an EaseUS professional writer who dares explore new areas. With a passion for solving tech issues with straightforward guides for common users, Oliver keeps honing his writing craft by developing in-depth solutions for disk and partition management, computer boot-up issues, file transfer, etc.
Cici is the junior editor of the writing team of EaseUS. She accepted the systematic training on computers at EaseUS for over one year. Now, she wrote a lot of professional articles to help people resolve the issues of hard drive corruption, computer boot errors, and disk partition problems.
Product Reviews
-
I love that the changes you make with EaseUS Partition Master Free aren't immediately applied to the disks. It makes it way easier to play out what will happen after you've made all the changes. I also think the overall look and feel of EaseUS Partition Master Free makes whatever you're doing with your computer's partitions easy.
Read More -
Partition Master Free can Resize, Move, Merge, Migrate, and Copy disks or partitions; convert to local, change label, defragment, check and explore partition; and much more. A premium upgrade adds free tech support and the ability to resize dynamic volumes.
Read More -
It won't hot image your drives or align them, but since it's coupled with a partition manager, it allows you do perform many tasks at once, instead of just cloning drives. You can move partitions around, resize them, defragment, and more, along with the other tools you'd expect from a cloning tool.
Read More
Related Articles
-
Top 9 Best Hard Drive Format Software Free Download 🏆
![author icon]() Tracy King/2026/01/29
Tracy King/2026/01/29 -
Xbox 360 Hard Drive Upgrade: Step-by-Step Guide
![author icon]() Cici/2026/01/29
Cici/2026/01/29 -
How to Format 64GB SD Card for 3Ds Efficiently
![author icon]() Sherly/2026/01/29
Sherly/2026/01/29 -
How to Run Disk Speed Test on Mac - 3 Ways
![author icon]() Cici/2026/01/29
Cici/2026/01/29
Hot Topics
EaseUS Partition Master

Version 20.0 is here - full exFAT support, easier disk partitioning, and PC performance optimization.


