
Content
Page Table of Contents
About the Author
Hot Topics
"Whenever I am trying to run a CHKDSK on my External Hard Drive E: for error checking, I keep getting the [Errors found. CHKDSK cannot continue in read-only mode] error message. What should I do to fix the CHKDSK read-only error and make CHKDSK work normally?"
Any time when your hard drive starts misbehaving or reporting certain errors, CHKDSK can be a lifesaver. CHKDSK, short for check disk, is used to verify the file system integrity of a volume and fix logical file system errors. In Windows 10/8/7/XP and DOS, we can run CHKDSK in File Explorer, Disk Management and Command Prompt. Here on this page, we'll focus on one of the commonly seen CHKDSK command prompt issues that prevents you from running some CHKDSK commands and parameters like chkdsk /f/r, chkdsk /scan, with the error message "CHKDSK cannot continue in read-only mode".
All Five Ways to Fix CHKDSK Read-only Mode:
- 1. Schedule a CHKDSK on Reboot
- 2. Remove Disk Read-only Using Diskpart
- 3. Remove Disk Read-only Using Software
- 4. Change Read-only Files to Normal
- 5. Close All Programs and Files
Why CHKDSK Cannot Continue in Read-only Mode
CHKDSK not working issue occurs due to various reasons, for example, write protection, read-only issue, etc. when you are trying to use it to check disk errors or startup issues. If the cause is the read-only issue, it will report the error message reading as:
|
"This type of file system is NTFS. |
This error usually occurs in Windows 10/8/7/XP or other versions in three situations:
- You are trying to run CHKDSK on your system partition.
- The disk you are trying to scan is currently used by a program.
- The disk you are trying to scan has a read-only file system.
Related topic: The type of the file system is RAW. CHKDSK is not available for RAW drives.
Next, we will provide several solutions to fix CHKDSK cannot continue in read-only mode error. If you think this passage is helpful, click the social buttons below to share it with more people!
How to Fix CHKDSK Cannot Continue in Read-only Mode Error
In different situations where CHKDSK cannot continue in read-only mode, you should try different ways to get the problem fixed. The following tricks and tips will help.
Fix 1. Schedule a CHKDSK on Reboot
When CHKDSK cannot continue in read-only mode because you are trying to scan the system partition or a drive that is currently used by a program, the best fix is to schedule a CHKDSK on reboot.
Step 1. Press Windows + X keys to bring up the power users menu.
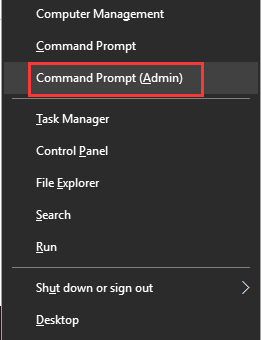
Step 2. In the power users menu, select the "Command Prompt (Admin)" option.
Step 3. Click "Yes" when you are presented with a UAC window requesting permission to launch the Command Prompt as Administrator.
Step 4. In the Command Prompt window, type chkdsk /r c: and press Enter. Here you should replace c with the drive letter of the disk.
Step 5. Click "Y" when you are asked if want CHKDSK to run when the system restarts next.
Step 6. Restart the system, CHKDSK will be automatically launched to check and repair disk errors in Windows.
Fix 2. Remove Read-only on a Disk Using Diskpart
Sometimes, the CHKDSK read-only mode is caused by the hard drive that it's checking is read-only. To run CHKDSK not in the read-only mode, you must change the drive from read-only status to read and write in the Windows command prompt.
Step 1. Press Windows + X keys and select Command Prompt (Admin).
Step 2. On the Windows Command Prompt window, you'll enter the following command lines each by each.
- diskpart
- list disk
- select disk + number (e.g. select disk 1)
- attributes disk clear readonly
- exit
Now you can continue using CHKDSK again.
Fix 3. Remove Read-only on a Disk Using Software
If you don't consider yourself a pro-computer user and you're not familiar with command-lines, don't worry. There are graphical-based solutions to help you remove write-protection from your hard drives, USB drives, and even SD cards.
EaseUS CleanGenius is one of these tools that helps you fix aforementioned issues on your drives without knowing a thing about command-line.
Here's an easy-to-follow guide on how to use this tool to get your issues sorted:
Step 1: DOWNLOAD and install EaseUS CleanGenius (free) on your computer.
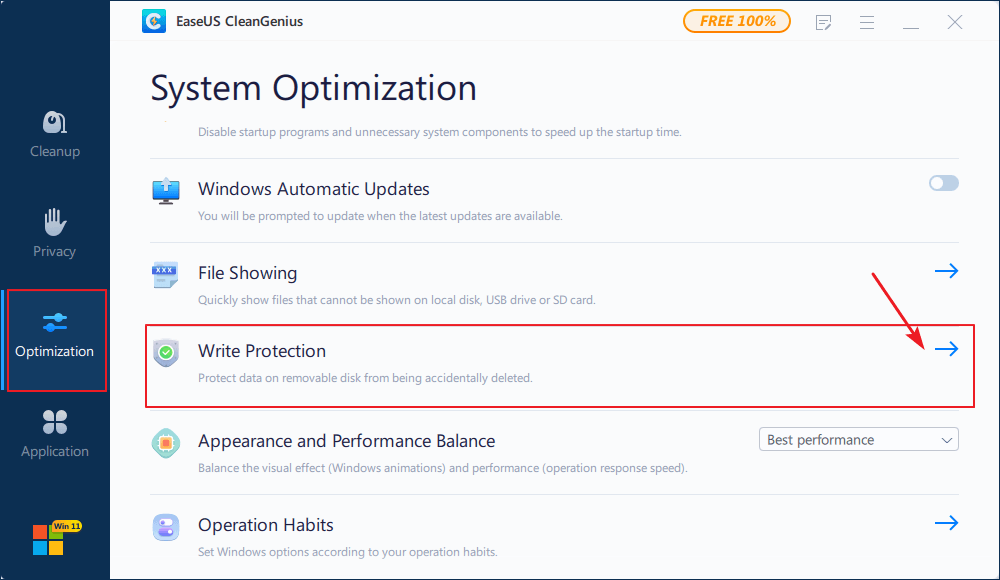
Step 2: Run EaseUS CleanGenius on your PC, select Optimization and choose the Write Protection mode.
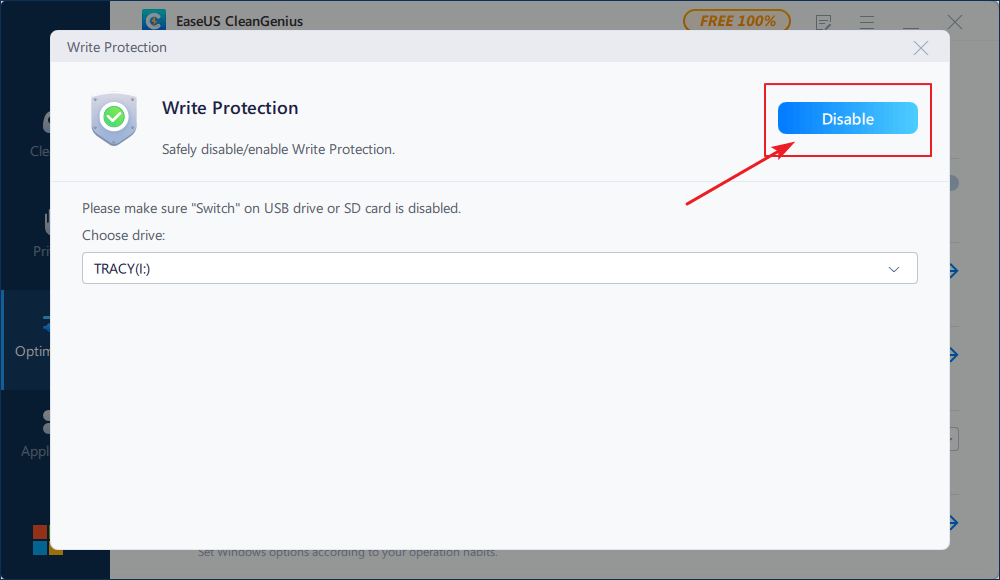
Step 3: Select the device that is write-protected and click Disable to remove the protection.
Fix 4. Change the Read-only File System to Normal
If the above method cannot help, it suggests that CHKDSK cannot continue in read-only mode because the disk you are trying to scan has an unrecognized or incompatible file system. To fix it, you have to change the read-only file system to a read-write format. EaseUS free partition software can help you manage the job by disk formatting.
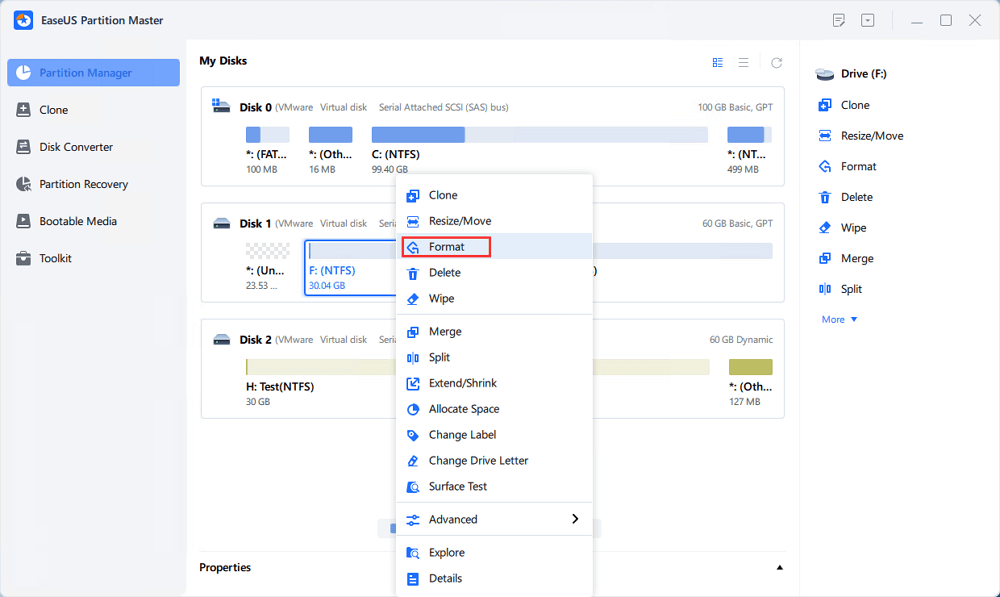
Step 1. Run EaseUS Partition Master, right-click the hard drive partition you intend to format and choose "Format".
Step 2. In the new window, set the Partition label, File system (NTFS/FAT32/EXT2/EXT3/EXT4/exFAT), and Cluster size for the partition to be formatted, then click "OK".
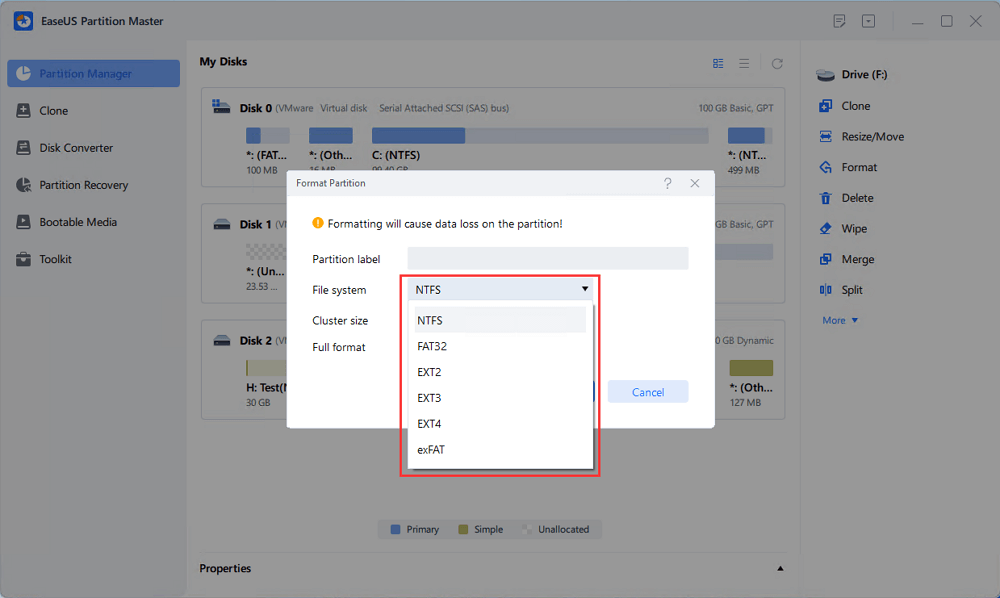
Step 3. Then you will see a warning window, click "Yes" in it to continue.

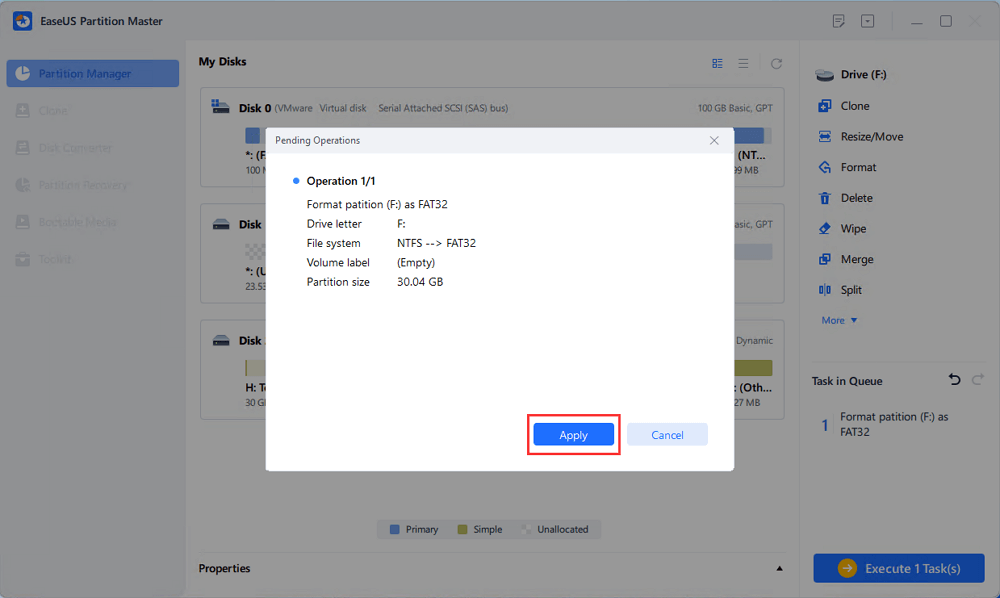
Step 4. Click the "Execute 1 Task(s)" button to review the changes, then click "Apply" to start formatting the partition on your hard drive.
Fix 5. Close All Running Programs and Files
The disk you are trying to scan is currently used by a program. If this is the case, you can close all programs, processes and files that might be using or accessing the target drive. Manually turning off the programs doesn't solve the CHKDSK read-only problem? You can have a further check in the Windows Task Manager.
Step 1. Press Ctrl + Shift + Esc to open Task Manager in Windows 10/8/7 to check what programs and processes are running in the background.
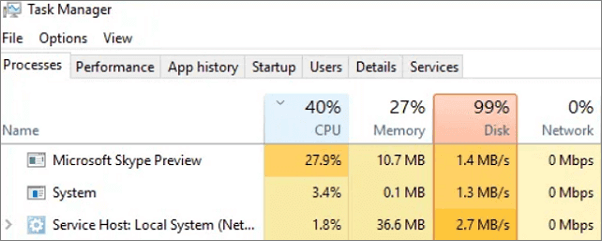
Step 2. Right-click the suspicious application or process and choose End task to force close a program.
Have You Solved the CHKDSK Read-only Mode Problem?
Regarding the topic "Errors found. CHKDSK Cannot Continue in Read-only Mode", we come up with five solutions to help you get rid of CHKDSK read-only mode. All methods are easy to apply, so keep patient and try each of the five until your problem was completely fixed.
For average computer users, CHKDSK running in Windows Command Prompt is not so friendly, let alone when it reports errors. Hence, to make it easier to check file system errors or fix file sysem corruption, users can feel no hesitated to download the CHKDSK free alternative - EaseUS Partition Master. It's a comprehensive partition manager software that comes with the "Check File System" feature, in a much simple operation.
How to check file system with CHKDSK alternative - EaseUS Partition Master:
How Can We Help You
About the Author
Sherly joined EaseUS in 2022 and she has always loved writing articles and enjoys the fun they bring. She receives professional training here, focusing on product performance and other relative knowledge. She has written over 200 articles to help people overcome computing issues.
Brithny is a technology enthusiast, aiming to make readers' tech lives easy and enjoyable. She loves exploring new technologies and writing technical how-to tips. In her spare time, she loves sharing things about her game experience on Facebook or Twitter.
Product Reviews
-
I love that the changes you make with EaseUS Partition Master Free aren't immediately applied to the disks. It makes it way easier to play out what will happen after you've made all the changes. I also think the overall look and feel of EaseUS Partition Master Free makes whatever you're doing with your computer's partitions easy.
Read More -
Partition Master Free can Resize, Move, Merge, Migrate, and Copy disks or partitions; convert to local, change label, defragment, check and explore partition; and much more. A premium upgrade adds free tech support and the ability to resize dynamic volumes.
Read More -
It won't hot image your drives or align them, but since it's coupled with a partition manager, it allows you do perform many tasks at once, instead of just cloning drives. You can move partitions around, resize them, defragment, and more, along with the other tools you'd expect from a cloning tool.
Read More
Related Articles
-
'Extend Volume Greyed Out'? Tips for Extending Volume Easily
![author icon]() Brithny/2026/06/30
Brithny/2026/06/30 -
How Do I Clone HDD to SSD in Windows 11 and Make It Bootable? 2026 Complete Guide
![author icon]() Tracy King/2026/07/01
Tracy King/2026/07/01 -
Computer Won't Boot? Causes & Fixes for PC Not Turning On
![author icon]() Tracy King/2026/07/01
Tracy King/2026/07/01 -
How to Clone SSD From BIOS | 2026 New Guide
![author icon]() Sherly/2026/06/17
Sherly/2026/06/17


