
Content
Page Table of Contents
About the Author
Hot Topics
Updated on Jun 17, 2026
The steps to create New Partition in Windows Server 2022/2019/2016 are discussed here in a step-by-step guide. Four different methods are mentioned and you can follow any one that is suitable for you:
| Workable Solutions | Step-by-step Troubleshooting |
|---|---|
| Fix 1. Use Thrid-Party Partition Manager Software | Step 1. Check for free space...Full steps |
| Fix 2. Use Disk Management | Step 1: Click "This PC" on your computer...Full steps |
| Fix 3. Use CMD | Step 1 - Press the "Win+R" buttons together on your keyboard...Full steps |
| Fix 4. Use PowerShell | Step 1. Right-click the Windows icon, select Run, type Powershell, and click "OK" to open it...Full steps |
The Necessity of Creating New Partitions in Windows Server
Whenever we purchase a new laptop/server/computer that has windows inbuilt, the hard disk always has a preset single partition unless someone has done partition deliberately. It is a default setting that every hard disk comes with. Now you may not see any issue with this initially, but quite a few genuine issues get solved once you partition your drive. Such as:
- Easy backing up of files
When you organize your drive with multiple partitions, it becomes easy to manage and backup your files in separate sections. Imagine you can have one complete partition to save your essential backed-up files.
- Perfect management
Partitioning your system will allow you to segregate your files based on the criteria you select. This will help you not mix up files between the 100 folders you create. For example, you can have three partitions for OS, another for work, and the last for personal.
- Better probability of retrieving data
When you have partitioned your system and accidentally lose access to any file. For example, you delete something. It becomes easier to retrieve that file.
- More than a single operating system
Once you create multiple parts in your server, you can install multiple operating systems in different partitions.
4 Methods to Create New Partitions in Windows Server 2019/2016 and Older Servers
Several ways are there following which you can partition your drives into your server. This blog will describe each method, starting with the easiest one coming first and the hardest one the last. And just for the information, the ascending order of difficulty of different methods is as follows.
- Method 1. Create New Partitions via Thrid-Party Partition Manager Software - Easiest
- Method 2. Create New Simple Volumes Using Disk Management - Medium
- Method 3. Create a New Partition Using CMD - Complex
- Method 4. Create a New Volume Using PowerShell - Complex
Method 1. Create New Partitions in Windows Server 2019/2016 Using Third-Party Software
Using third-party software is the easiest way to create new divisions in your hard drive. And the best tool available on the internet for disk partitioning is none other than the EaseUS Partition Master Enterprise. The tool is undoubtedly the best in the task as it has:
- One of the best interfaces which makes using the tool easy to use.
- Accurate and fastest execution time.
- Has all in one disk management toolkit which lets you manage and handle your hard drives properly post process.
EaseUS Partition Master is the best tool for both Windows and Mac-based computers. And it can be downloaded from their official website
EaseUS Partition Master Enterprise
Your trustworthy Windows Server disk manager.
- Extend System drive, combine/split partitions.
- Clone disk, migrate OS to HDD/SSD.
- Convert MBR to GPT, GPT to MBR, no data loss.
- 1-click adjust disk layout, create volumes at one time.
100% Secure
Free Inquiry
Let's see how to create new partition on your Windows Server computers now:
Step 1. Launch EaseUS Partition Master to check for free space at the Partition Manager section.
- If your hard drive has unallocated space, jump to Step 3 to create partition.
- If the hard drive has no unallocated space, continue with Step 2.
Step 2. Shrink a disk partition to create unallocated space.
Right-click on the target drive partition with a lot free space and select "Resize/Move".
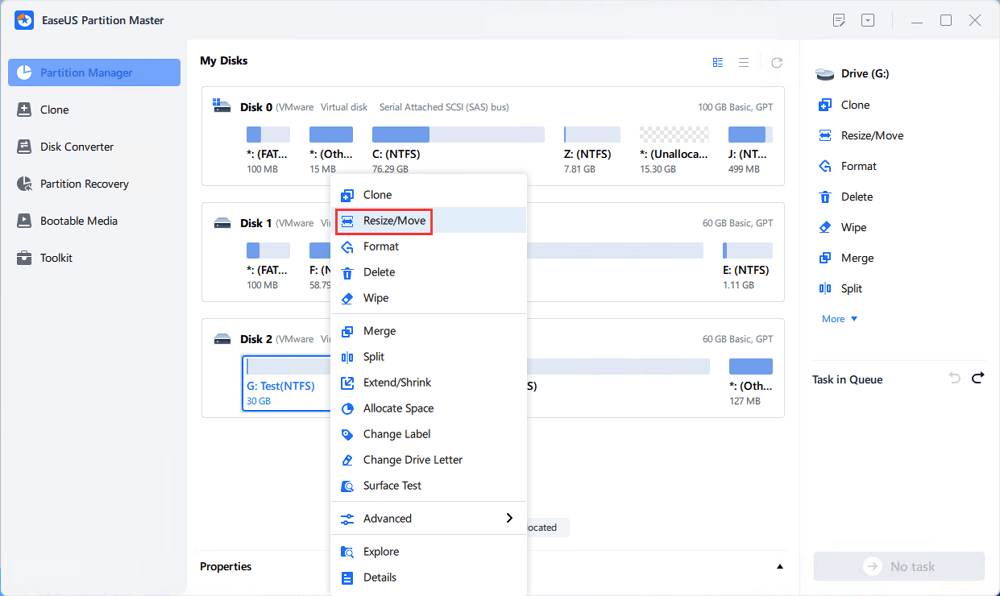
Drag either end of the partition rightwards or leftwards to shrink the partition size so as to get ample unallocated space. You can visually know how much space you've decreased in the "Size of partition" area. Click "OK".
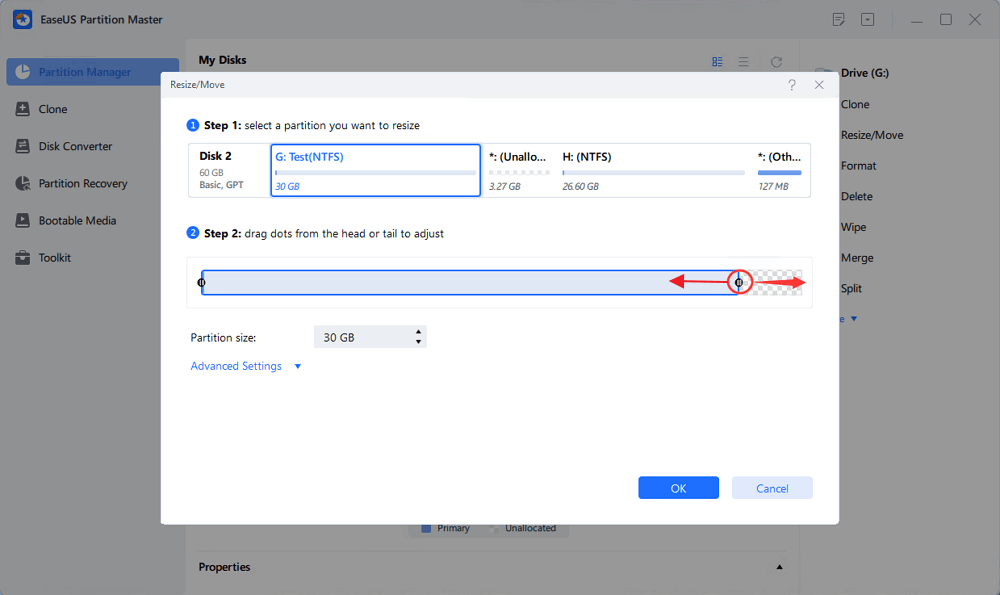
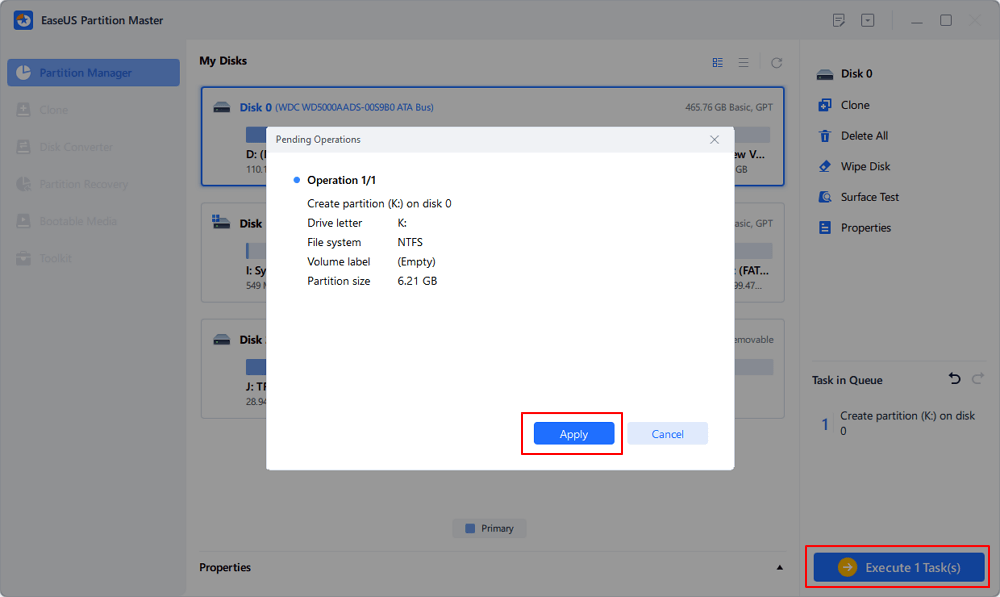
Click "Execute xx Task" and then "Apply" to save all the changes.

Go back to Partition Manager, there should be unallocated space appearing on the same disk and you can continue with the next step to create new partition on your hard drive.
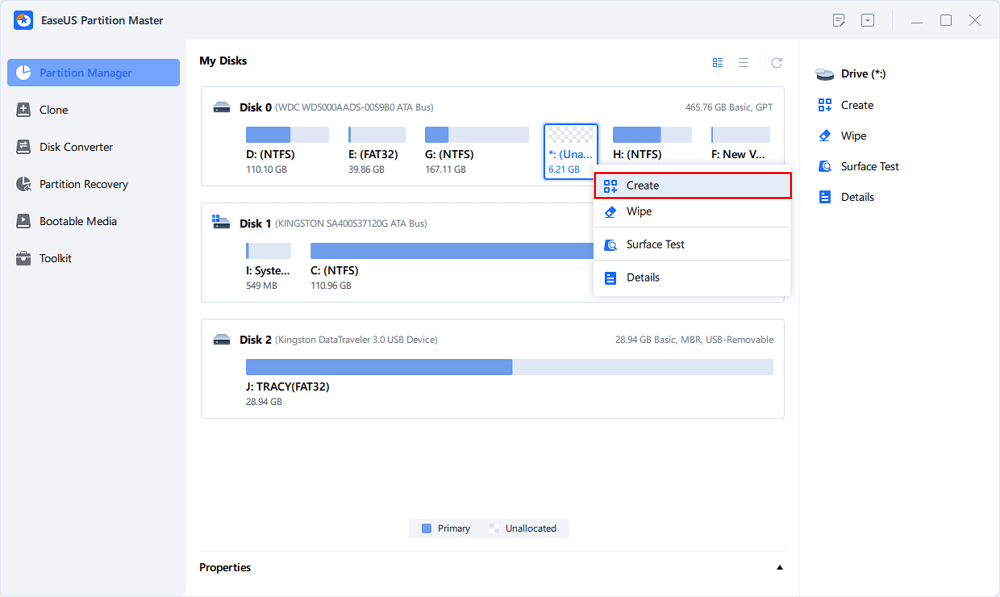
Step 3. Create a new partition with unallocated space on the target hard drive.
Right-click on the unallocated space and choose "Create".
Customize the partition size, partition drive letter, partition label, file system (NTFS, FAT32, EXT2/3/4, exFAT) and more in the Advanced Settings. Click "OK".
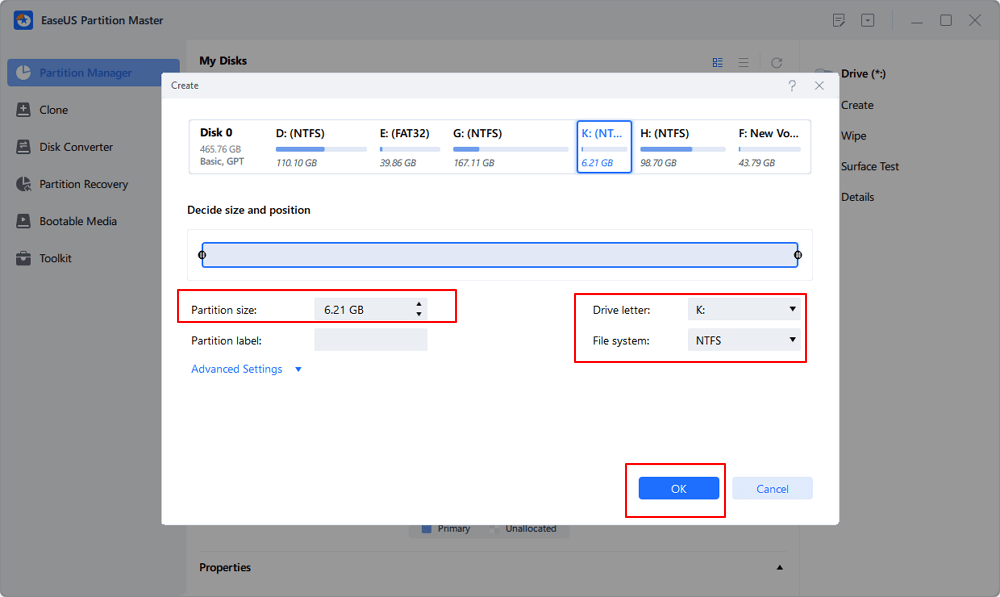
Finally, click "Execute * Task" and "Apply" to complete creating partition with the unallocated space on your disk. Repeat the steps to partition a hard drive and get many more partitions.
Method 2. Create New Simple Volumes in Windows Server 2019/2016 Using Disk Management
Starting with the easiest method possible. Disk management is a built-in tool in Windows that allows you to organize your server partitions and volumes. Follow the below steps to add or modify your current partition.
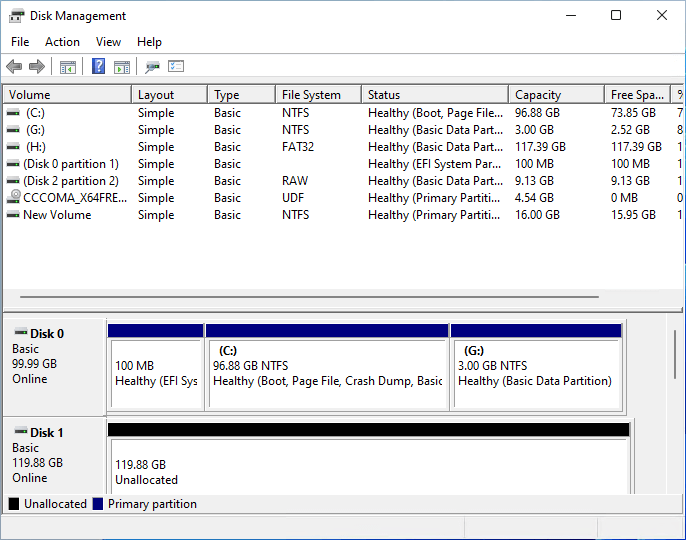
Step 1: Click on the "This PC" option on your computer. And then go to the manage option on the top. And then select "Disk Management."
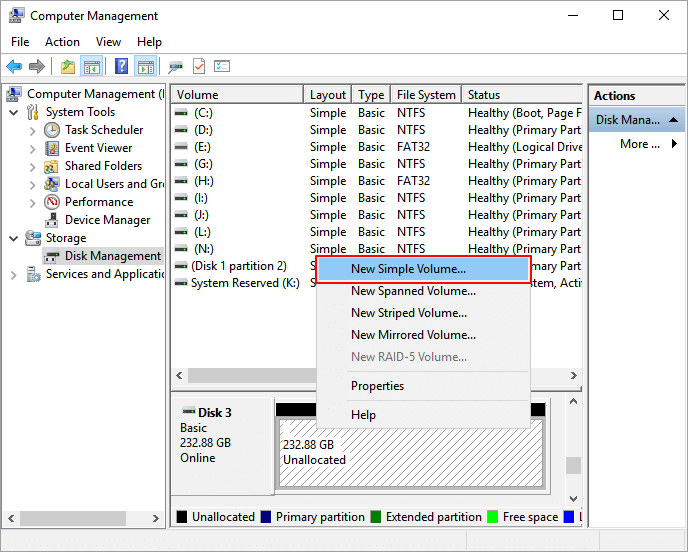
Step 2: Select the "unallocated space" option and click on "new simple volume."
Step 3: Click on the "next" button in the popped up New simple volume wizard.
Step 4: Put your desired size in the "simple volume size" blank.
Step 5: Mention the name of the drive, for example, E, F, G, etc.
Step 6: Selection of format is also possible for a different type of file system—for example, exFAT, NTFS, FAT, FAT32, etc. You can also custom-size the allocation unit size. If you don't want to, then select "default" and click next.
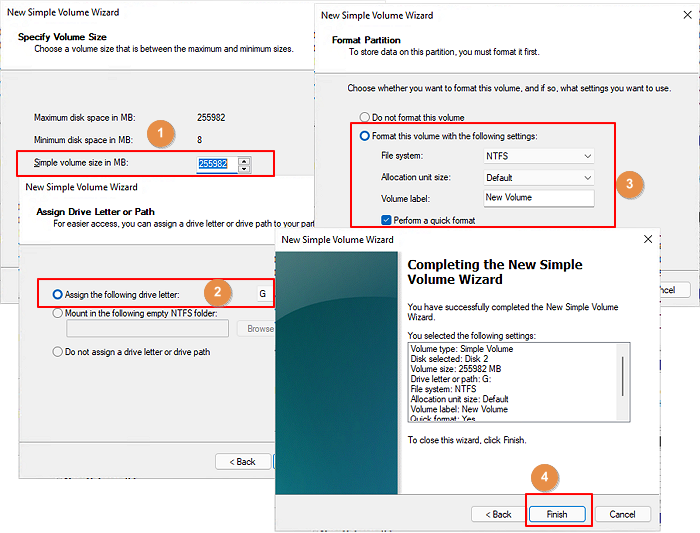
Complete! You will have a perfectly partitioned disk in a few minutes if you have done the above steps correctly.
Method 3. Create a New Partition in Windows Server Using CMD
The last method will be to use the Command prompt of your computer. It is kept as the most complex method since not everyone is familiar with the command prompt. Hence only those who have used CMD before or know a thing or two about this should try this in the first attempt. Others should try the above options and should use this only if nothing works.
Step 1 - Press the "Win+R" buttons together on your keyboard. This is to open the "Run" option on your computer.
Step 2 - Type "CMD" in the text section and click enter to go forward.
Step 3 - After opening the command prompt, enter the below-mentioned commands, in the same manner, they have been mentioned. Make sure you use the correct cases for each letter, and don't forget to click enter after each command mentioned.
- diskpart
- list disk
- select disk n ( instead of n, you must use the number of the disk where you want to create the partition. Suppose we want the 1st one to be partitioned, then write select the disk 1)
Step 4 - If your disk doesn't have unallocated space, please follow the below-mentioned commands and then move forward
- list disk
- list volume
- select volume number
- shrink desired=(*MB)
Step 5 - Now, you can move on and type the following command to create a new simple volume and set its file system to NTFS with the unallocated space:
- create partition primary size=*MB
- assign letter=G (choose any name)
- select volume number
- format fs=ntfs quick
Step 6 - Click "Ener".
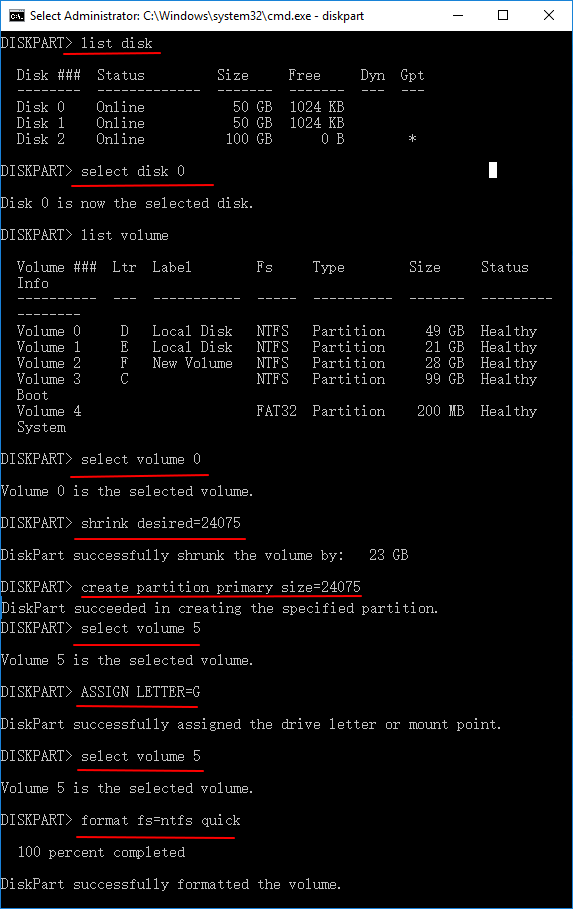
Complete! You have completed the partitioning of your system.
Method 4. Create a New Volume in Windows Server 2019/2016 Using PowerShell
The last method mentioned is the usage of PowerShell for partitioning. Again, use this only if you are familiar with the PowerShell. Otherwise, use the above steps as those will do the work most efficiently. Type the commands mentioned below to start the partitioning process.
Here we are partitioning 10GB and assigning the letter "G" to the new drive using PowerShell:
Step 1. Right-click the Windows icon, select Run, type Powershell, and click "OK" to open it.
Step 2. Type the following command lines in Powershell one by one and hit Enter each time:
- New-Partition –DiskNumber 0 -Size 20gb -DriveLetter G
- Get-Partition - DiskNumber 0
- Format-Volume - DriveLetter G - FileSystem NTFS
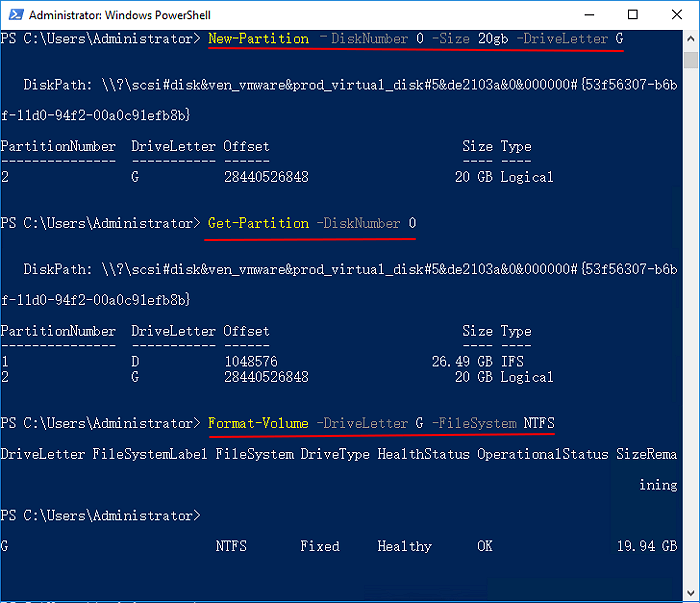
Done! If you follow the steps mentioned above and the commands correctly, you are just minutes away from a successful partition.
Conclusion
There are so many methods to create a partition for your server. The best method is to use the CMD or the third-party software in the market. But always be careful of all the fraud and virus-laden software that can harm your server. Use trusted tools that can do your work easily, like the EaseUS Partition Master tool. Using third-party tools has one of the biggest advantages, and it does not require too much technical knowledge.
Anyone with little computer knowledge can create a partition using any third-party software.
100% Secure
Free Inquiry
Besides EaseUS, numerous other tools can be used at the user's discretion.
Arranging the methods will help you choose the best method to follow. Only use a more complex procedure if the ones above it are not working out for you, or you cannot do it. In any case, you can always make use of the internet and learn more about the procedures. You can refer to our blogs to educate yourself more about disk partitioning methods.
How Can We Help You
About the Author
Updated by Tracy King
Tracy became a member of the EaseUS content team in 2013. Being a technical writer for over 10 years, she is enthusiastic about sharing tips to assist readers in resolving complex issues in disk management, file transfer, PC & Mac performance optimization, etc., like an expert.
Product Reviews
-
I love that the changes you make with EaseUS Partition Master Free aren't immediately applied to the disks. It makes it way easier to play out what will happen after you've made all the changes. I also think the overall look and feel of EaseUS Partition Master Free makes whatever you're doing with your computer's partitions easy.
Read More -
Partition Master Free can Resize, Move, Merge, Migrate, and Copy disks or partitions; convert to local, change label, defragment, check and explore partition; and much more. A premium upgrade adds free tech support and the ability to resize dynamic volumes.
Read More -
It won't hot image your drives or align them, but since it's coupled with a partition manager, it allows you do perform many tasks at once, instead of just cloning drives. You can move partitions around, resize them, defragment, and more, along with the other tools you'd expect from a cloning tool.
Read More
Related Articles
-
How to Burn Windows 7 ISO to USB [Step-by-Step Tutorial]
![author icon]() Sherly/2026/06/30
Sherly/2026/06/30 -
How to Merge Partitions in Windows 10 [Safe and Quick Guides]
![author icon]() Tracy King/2026/07/01
Tracy King/2026/07/01 -
How to Convert the File System to NTFS/FAT32/EXT2/EXT3
![author icon]() Tracy King/2026/06/30
Tracy King/2026/06/30 -
6 Best Free MBR to GPT Converter Software Recommend & Free Download
![author icon]() Tracy King/2026/06/30
Tracy King/2026/06/30


