| Workable Solutions | Step-by-step Troubleshooting |
|---|---|
| 1. Get Files Off from a Broken Mac with Software | Install and run EaseUS Data Recovery Wizard for Mac on another Mac computer, and select...Full steps |
| 2. Transfer Data from a Broken Mac to a New Mac with Recent Backups | You need to connect the Mac Time Machine backup drive to the brand-new Mac. Commence Mac Finder...Full steps |
| 3. Transfer Data to a New Mac with Migration Assistant |
Open Migration Assistant on your new Mac. After that, hit continue. Provide the admin password when...Full steps |
| 4. Transfer Data to a New Mac with Target Disk Mode |
Visit the Apple menu and choose "Startup Disk". Commence the Target Disk Mode...Full steps |
| 5. Transfer Data to a New Mac with Sharing Mode |
After entering Startup Options. Hit options and click "Continue". Select a user account on...Full steps |
Are you worried about your precious data being stuck on a dilapidated Mac? Is it not working properly or not booting? If so, it's not a serious issue you should be bothered by! As it's possible to get data off a broken Mac and transfer those files securely to a new one. But this article has your back if you're thinking of how to do such a transfer! Here, we will consult the top 5 strategies for transferring data from a broken Mac to a new Mac. So, let's get straight to it without delay!
Fix 1. Get Files Off from a Broken Mac via Software and Move to Your New Mac
How do you get files off from a broken Mac via software? We are talking about a good Mac data retrieval program, EaseUS Data Recovery Wizard for Mac. This professional tool can restore Mac Trash data and lost files after trash bin emptying and accidental deletion. It is also a portable tool that can recover data from an unbootable Mac or MacBook.
This Mac data recovery tool can retrieve data of all sizes from a broken/dead/unbootable Mac, including a single Office Word document and many images you save on your Mac, from various data loss circumstances. However, the several data loss scenarios for which you need to recover files are the following:
- macOS Ventura won't boot
- Hard drive damage
- Computer virus attack
- Partition loss
Download this professional tool today for its easy operability! Here's the tutorial to help you recover files from Mac that won't boot:
First, you need to enter the Recovery Mode on Mac:
|
For Apple Silicon Macs:
|
|
For Intel-based Macs:
|
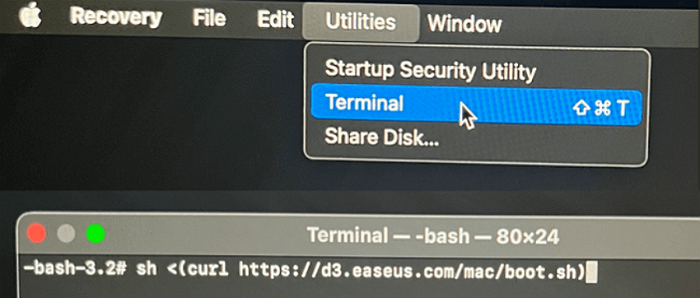
Step 1. Launch EaseUS Software in Recovery Mode
Select "Utilities > Terminal" from the top menu, and enter the command sh <(curl https://d3.easeus.com/mac/boot.sh). Hit "Return". Wait for the application to open, and it will take several minutes.
Note: If the Terminal displays either "No such file or directory" or "Could not resolve host," you should verify that the command line you entered is correctly spelled, ensure your Mac has a stable internet connection, and confirm that your macOS version is not lower than macOS 10.15.
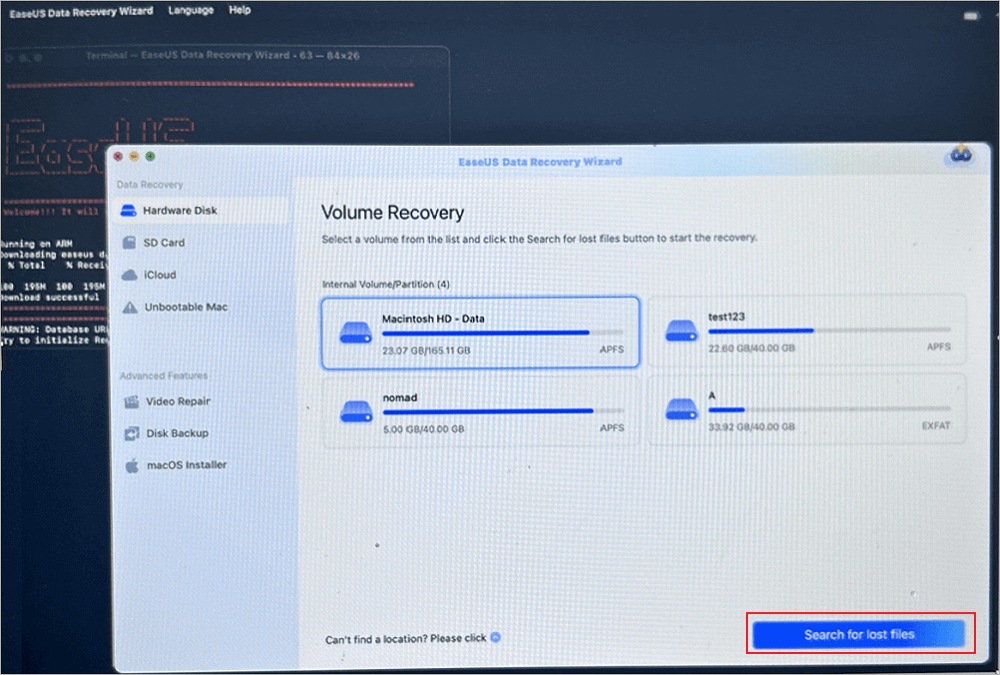
Step 2. Select the Volume on Your Mac Hard Drive
Select the volume where your lost data is stored, and click "Search for lost files". The EaseUS software will quickly locate all the recoverable data on the selected volume.
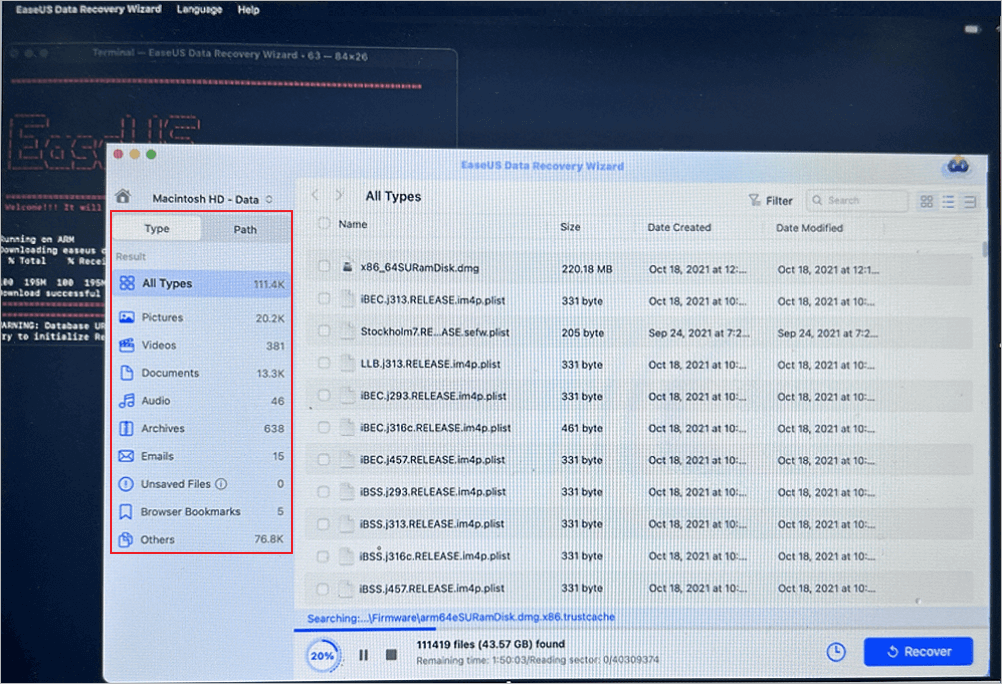
Step 3. Choose the Lost Data You Want
EaseUS software categorizes the scanned recoverable data by file type and storage path. Find the data you want by clicking "Type" or "Path" in the left panel. Then, check the boxes in front of the data you want to recover.
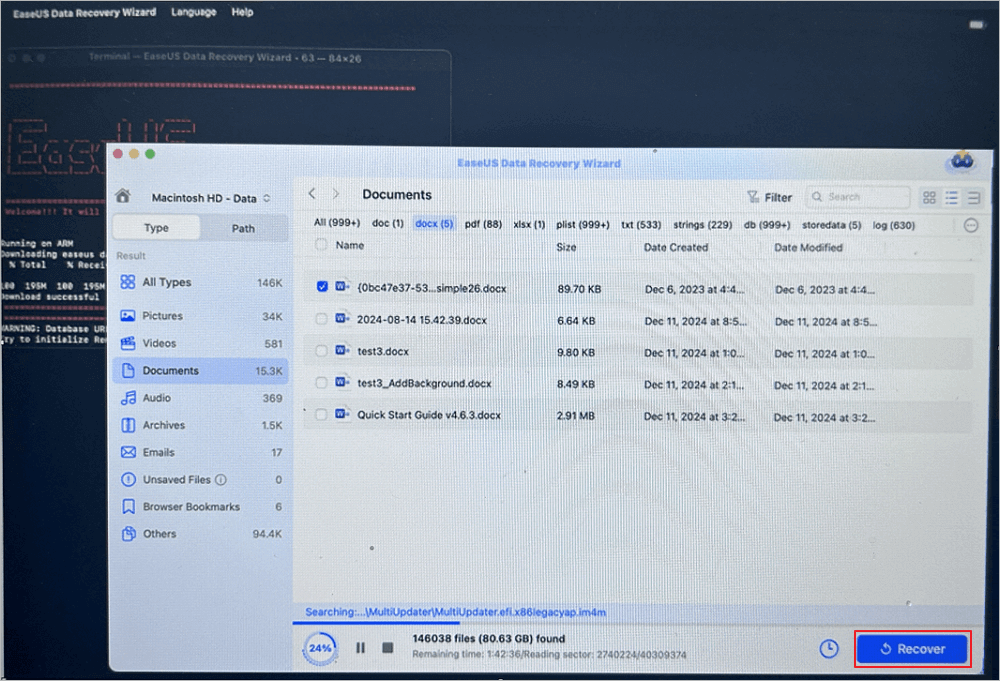
Step 4. Recover and Save Data on an External Disk
Click the "Recover" button, and a pop-up window will show up saying, "Please select a target location to save". Choose the external disk as the new storage location of your recovered data.
Fix 2. How to Transfer Data from a Broken Mac to a New Mac with Recent Backups
You can transfer data from a broken Mac to a new Mac is with recent backups. You're advised to maintain a data backup on your Mac. If you have used a time machine strategy to back up all the valuable documents on your broken MacBook to an external hard drive, it will become straightforward to transfer everything to a new Mac. However, follow the steps below to transfer data with recent backups:
Step 1. You need to connect the Mac Time Machine backup drive to the brand-new Mac.
Step 2. Commence Mac Finder, and the drive must be accessed under the Locations in the left sidebar.
Step 3. The Backups.backupdb must be double-clicked on, and after that, hit the folder with your broken Mac's name. By doing this, each of your backups is organized into a distinct folder with the date it was generated in the name (YYYY-MM-DD).

Step 4. You need to spot the folder marked with the date and time. After that, you must not forget to copy the folders and files from the newest backup to the internal storage of your brand-new Mac.
Fix 3. How to Transfer Data from a Broken Mac to a New Mac with Migration Assistant
Prior to commerce data transfer from a broken Mac to a new Mac, you must ensure that the dead and new MacBook have updated to the latest version of macOS. To check software updates, visit system preferences and select software update. After that, you place them in the vicinity of each other with Wi-Fi turned on. Next, you should open System Preferences and Share on your outdated Mac and ensure the Computer Name field has a name.
We'd like to show you how to utilize Migration Assistant:
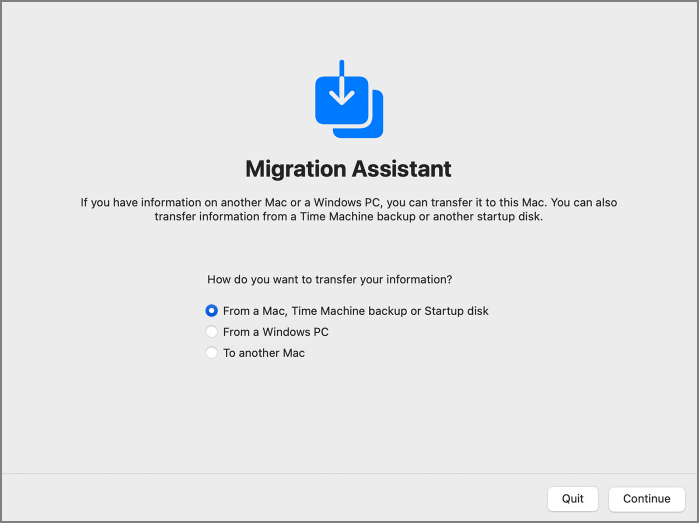
Step 1. Open Migration Assistant on your new Mac. After that, hit continue.
Step 2. Provide the admin password when the assistant demands your permission to make changes. Now, hit "OK."
Step 3. Upon asking about sharing your information, choose the option of transferring data through a startup disk, time machine backup, or a Mac. After that, hit OK.
Step 4. Open Migration Assistant on your outdated Mac, and after that, hit "Continue."
Step 5. You must opt to transfer data from a broken Mac to a new one upon asking how you want to share your details.
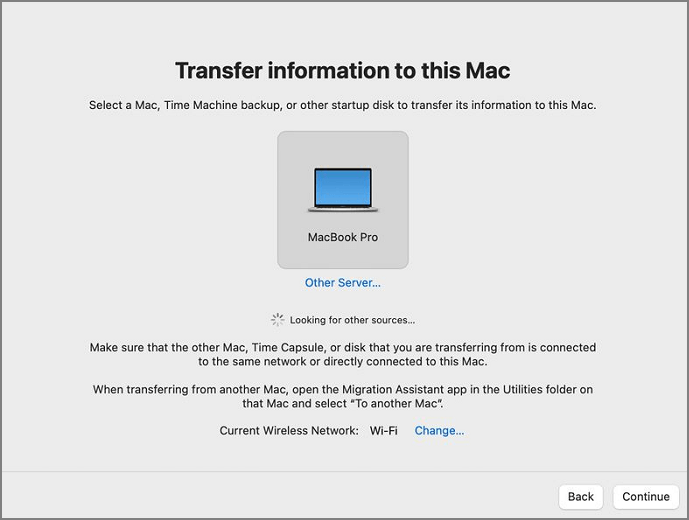
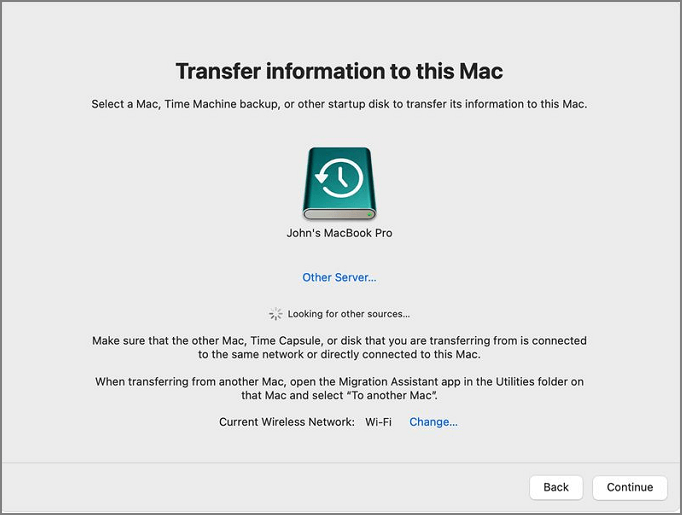
Step 6. When you're asked to choose a Mac on your new MacBook, you should opt for the Time Machine backup, choose another Mac, and hit "Continue."
Step 7. If you notice a security code on the outdated Mac, it should be similar to that demonstrated on the new Mac. Once done, hit the "Continue" button.
Step 8. Choose the files or information you want to transfer to the new Mac, and your name should refer to the user account.

Step 9. Hit the "Continue" button to commence the transfer. It might take a plethora of hours to complete.
Step 10. Shut down Migration Assistant once the Migration is over on both MacBooks. After that, you must log in to the migrated account on the new MacBook.
Now, let us find out how to migrate to a new Mac with Migration Assistant
Follow the steps below to migrate your files from an older Mac to a new one:
Step 1. You should look into the fact that the Time Machine backup disk must remain connected to your brand-new Mac and switched on.
Step 2. Hit "Continue" right after you open Migration Assistant.
Step 3. Pick the transfer option when asked how you wish to send your info. Choose a startup drive or Time Machine backup from a Macbook. Next, hit "Continue". (If you encounter Mac no startup disk issue, you can click the link to fix it.)
Step 4. Hit Continue right after selecting the Time Machine backup.
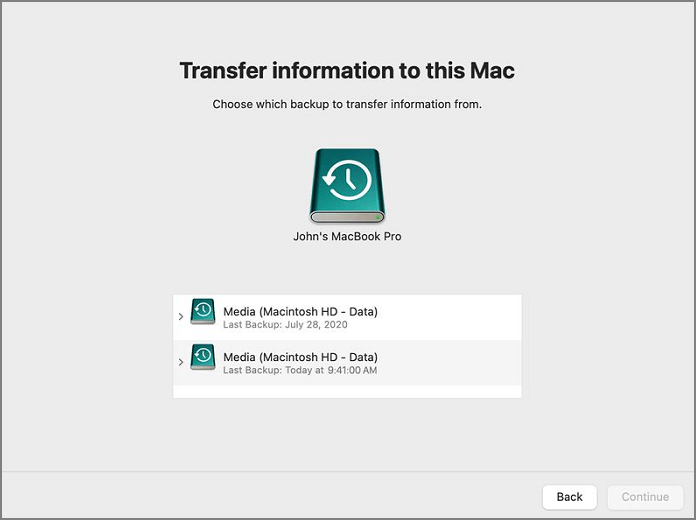
Step 5. You need to opt for a backup from the detailed list of timestamped backups. Once done, hit the "Continue" button.
Step 6. You must choose the data you wish to export from your old system. Your name identifies your user account.
Step 7. To commence the transfer, hit the "Continue" button, which could take countless hours to finish.
Step 8. Once the migration is done, shut down the Migration Assistant. After that, use your new MacBook to access the transferred account.
Fix 4. Transfer Data from a Broken Mac to a New Mac with Target Disk Mode [Only for Intel Mac]
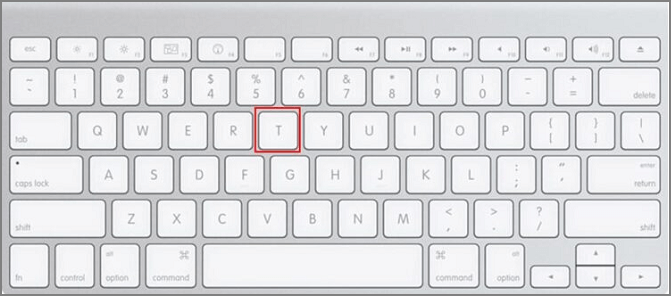
Only Intel Mac users may use this technique. Hence, you will never get the Disk sharing mode in such a type of Mac. However, you will obtain Target Disk Mode. In order to boot your MacBook into this mode, rebooting your MacBook is important while pressing T.
On the other hand, you may follow the steps below in recovery assistant:
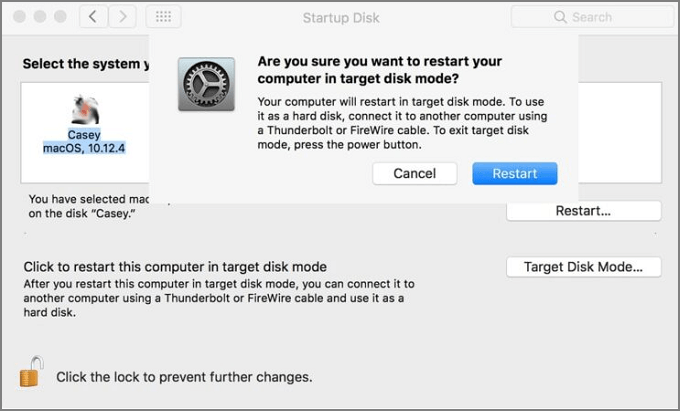
Step 1. Visit the Apple menu and choose "Startup Disk".
Step 2. Commence the Target Disk Mode.
Step 3. You will be advised in case you're willing to restart.
Use an appropriate cable to connect your old Mac to the newer one after you're in Target Disk Mode. After that, follow the steps:
Step 1. Choose the "Network" option.
Step 2. Choose the Mac from the list that you wish to transfer data to.
Step 3. On the top-right side, hit the "Connect" option.
Step 4. Choose "Guest".
Step 5. Click "Connect".
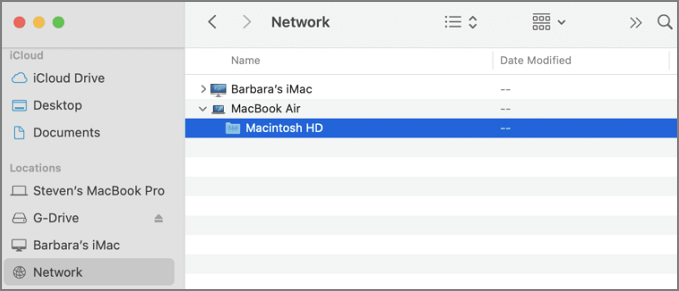
Your broken Mac will act like one of your portable storage devices once you're done linking. This is how you can migrate files from the older Mac.
Fix 5. Transfer Data from a Broken Mac to a New Mac with Sharing Mode [Only for M1 Mac]
Are you using an Apple silicon Mac and wondering how to transfer data from a broken Mac to a new Mac? In your M1-based Mac, sharing mode is one of the special features to get data off of a broken Mac. Follow the steps below to switch on sharing from the recovery of Mac:

Step 1. After entering Startup Options.
Step 2. Hit options and click "Continue".
Step 3. Select a user account on the shared Mac.
Step 4. Type the password and click "Continue".
Step 5. Opt for Utilities, and choose "Share disk".
Step 6. Decide which disk to share.
Step 7. Opt for "Start" sharing.
So, did you turn on the sharing option on your Mac? If yes, it's time to connect it utilizing a cable to the new Mac! Follow the steps below when you have finished connecting:
Step 1. Visit "Network."
Step 2. Opt for Mac.
Step 3. You wish to move data from the list.
Step 4. Hit the "Connect" option from the top-right side.
Step 5. "Guest" should be selected.
Step 6. Finally, hit "Connect."
You may see and copy anything from your previous Mac when replicated in a fresh one. When you're done moving data, detach the linked Mac from the computer and avoid sharing the drive on your broken Mac.
Conclusion
It's time to concentrate on fixing your damaged Mac now that you have completely moved your data from the old Mac to the new one. However, the best way to retrieve all the files and data from your broken Mac is to use the EaseUS Data Recovery Wizard for Mac. So, download this tool now, and please share your thoughts on this tool if you find this beneficial!
Transfer Data from a Broken Mac to a New Mac FAQs
The detailed FAQs are shown below to understand the topic better:
Can I recover data from a dead MacBook Pro?
It's possible to recover data from dead MacBook Pro using the EaseUS Data Recovery Wizard for Mac. This tool helps you retrieve different types of data from multiple devices.
- 1. Create a USB bootable media for your MacBook Pro.
- 2. Launch this tool in your dead MacBook Pro and scan the disk.
- 3. Filter and select the lost files.
- 4. Recover all the files you want.
Can you transfer data from a Mac that won't turn on?
The easiest way to restore your files from a Mac with starting issues is to boot it into repair mode and use EaseUS Data Recovery Wizard for Mac's bootable recovery option. This cutting-edge program makes it simple to restore files from a Mac that won't boot or has crashed.
What can I do with my broken Mac?
You can recycle a Mac if it is outdated or no longer functioning. You may recycle any of your gadgets using Apple's recycling system. They could even offer you a gift certificate if the computer is still worth something.
How do I get files off my hard drive that won't turn on my Mac?
You may use Target Disk Mode to transfer files from a broken MacBook. Thanks to this Target Disk Mode, your Mac with a cracked screen may be mounted as a computer hard disk on another Mac.
Was This Page Helpful?
Jaden is one of the editors of EaseUS, who focuses on topics concerning PCs and Mac data recovery. Jaden is committed to enhancing professional IT knowledge and writing abilities. She is always keen on new and intelligent products.
Dany is an editor of EaseUS who lives and works in Chengdu, China. She focuses on writing articles about data recovery on Mac devices and PCs. She is devoted to improving her writing skills and enriching her professional knowledge. Dany also enjoys reading detective novels in her spare time.
-
EaseUS Data Recovery Wizard is a powerful system recovery software, designed to enable you to recover files you’ve deleted accidentally, potentially lost to malware or an entire hard drive partition.
Read More -
EaseUS Data Recovery Wizard is the best we have seen. It's far from perfect, partly because today's advanced disk technology makes data-recovery more difficult than it was with the simpler technology of the past.
Read More -
EaseUS Data Recovery Wizard Pro has a reputation as one of the best data recovery software programs on the market. It comes with a selection of advanced features, including partition recovery, formatted drive restoration, and corrupted file repair.
Read More
Related Articles
-
SanDisk Drive Corrupted: 3 Effective Ways to Fix It
![author icon]() Brithny/Jun 28, 2026
Brithny/Jun 28, 2026 -
How to Recover Unsaved Illustrator Files on Mac
![author icon]() Jaden/Jun 30, 2026
Jaden/Jun 30, 2026 -
How to Find External Hard Drive on Mac In Case It's Working but Not Showing Up
![author icon]() Jean/Jun 07, 2026
Jean/Jun 07, 2026 -
How to Format a USB Flash Drive Without Losing Data on Mac [3 Proven Methods in 2026]
![author icon]() Brithny/May 19, 2026
Brithny/May 19, 2026