| Recover Mac Files | Full Guide |
|---|---|
| 1. Recover Mac Files from Trash Bin | Check if your lost files are in the Trash, if yes...Full steps |
| 2. Recover Mac Files from iCloud | Log in your Apple ID in iCloud.com...Full steps |
| 3. Recover from Time Machine Backup | Connect your Time Machine backup disk to the Mac...Full steps |
| 4. Recover Files using EaseUS Recovery Software | If you don't have a backup of the lost files, download EaseUS Data Recovery Wizard...Full steps |
"My MacBook Pro froze up last night, and I had to do a forced shutdown. When I rebooted, all was fine except for a Pages document that was open during the freeze was lost. Can this file be recovered?"
-- Apple Community
One MacBook Pro user asked for help in Apple Community, saying that his Pages document got lost during the Mac freeze and shutdown, and he wanted to know how to recover the file. Sudden Mac shutdown sometimes not only means restarting but also may cause data loss, and the type of data loss is uncertain. You may find that your Word document gets lost, or a few of your photos in the Photo Library disappeared. No matter what kind of data is lost, your priority is to recover Mac's files.
Can I Recover Mac Lost Files after Shutdown?
Is there any possibility for you to recover deleted files on Mac? This would be your biggest question. Luckily, the answer is positive. Users have many ways to recover data on Mac. They can try to find data in Mac Trash bin, check the iCloud backup and Time Machine backup. At last, they can take advantage of Mac data recovery software to retrieve the lost files.
1. How to Recover Files on Mac after Shutdown from Trash Bin
No matter what kind of data you lost, you can search the Mac Trash bin to see if the lost files are in it because it is likely for your Mac to delete your files after shutdown automatically. As long as you don't empty the Trash bin, the deleted files will be stored in the Trash bin for 30 days until they are completely deleted. If you don't see your lost files in the Trash bin, you can try Method 4. Now follow the steps below to see how to recover Mac files from the Trash bin.
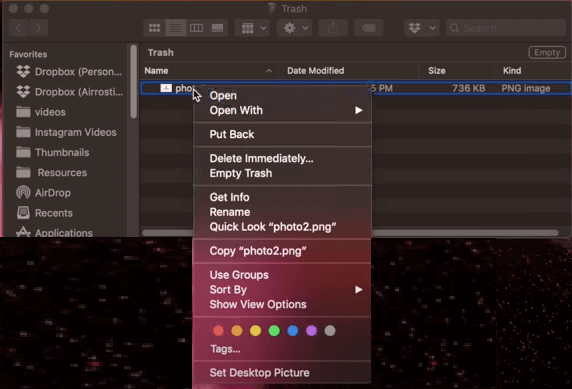
Step 1. Enter your Mac Trash bin, check if your lost files are in it.
Step 2. If you find your lost data, drag them to the desktop. Or right-click on them and select the "put back" option to recover deleted files on Mac from the Trash bin. The files will return to their original location.
2. How to Recover Files on Mac after Shutdown from iCloud
If you have enabled iCloud on your Mac, iCloud would automatically sync your Mac files. So you may find a backup of the lost files in your iCloud account. But this method only works for iCloud-supported files.
iCloud supports backing up the following files on Mac:
- Calendar
- Note
- Pages
- Numbers
- Keynote
- Reminder
- Photos
- Mails, etc
If your lost files belong to the categories mentioned above, you might find a copy in iCloud. Here are the detailed steps of how to recover files on Mac after shutdown from iCloud.
Step 1. Log in to your Apple ID in iCloud.com.
Step 2. Click the Account Settings option.

Step 3. At the bottom left, there are options including the one we want: Recover Files. Click on this option to see if you can recover the lost files. If you can't find the lost files in iCloud, go to Method 4 to try to get them back.

3. How to Recover Files on Mac with Time Machine
Time Machine is Mac's backup solution. It will automatically back up all Mac content, including apps, music, photos, email, documents, and system files. If you have set up Time Machine to back up all the Mac content, you can recover files in Time Machine. If you can make sure the files you lost have already been backed up by Time Machine, follow the steps below to restore Time Machine backup.
Step 1. Connect your Time Machine backup disk to your Mac. Launch Time Machine on your Mac. You can click on the icon in the menu bar and choose Enter Time Machine or search for Time Machine using Spotlight.
Step 2. You can find the specific files you want to restore using the onscreen up and down arrows to locate them. Then you can preview it by pressing Space Bar.
Step 3. Finally, click the "Restore" button, and then the deleted file will be returned to its original location.
4. How to Recover Files on Mac after Shutdown with EaseUS Recovery Software
All the methods mentioned above have more or fewer disadvantages. For example, the missing files happened not to be backed up because the backup has a time interval. Or the Mac does not put your files into the Trash bin, but the files just disappeared. And that's why we want to recommend a professional Mac data recovery software to you.
EaseUS Data Recovery Wizard for Mac is developed to help Mac users to recover lost, deleted, and damaged files, for example, unsaved Word documents. Besides, it can help Mac users to restore data from external hard drives on Mac and media devices like cameras and iPods. EaseUS Data Recovery Wizard will deeply scan all your lost Mac files at a quick speed and recover the files you need without the hassle.
Please download the software and check the following guide to see how to recover files on Mac after shutdown with the EaseUS recovery tool.
Step 1. Select the location to scan
Launch EaseUS Data Recovery Wizard for Mac and choose the hard drive, SSD, SD card, USB flash drive, or TF card where you lost data. Click "Search for lost files" to start scanning.

Step 2. Filter lost Mac data
The software will automatically scan for lost data on MacBook/iMac. When the scan completes, filter wanted data through the "Type" and "Path" buttons.

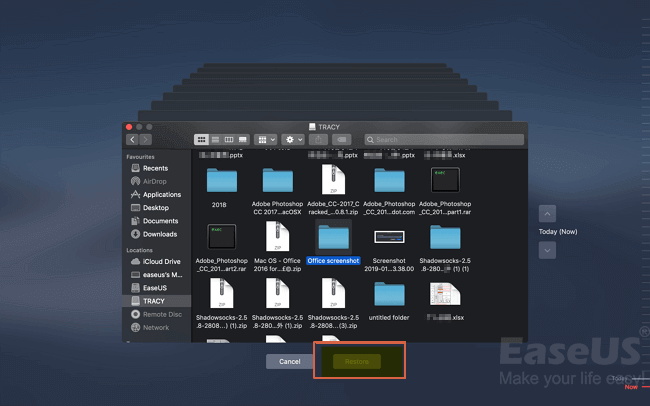
Step 3. Recover lost data or files
Double-click a file to preview it. Then, click the "Recover" button to restore the lost data to another place.

The Bottom Line
You might get back the lost files on Mac after reading this guide. The best way to prevent you from data loss again is to make backups regularly. For Mac users, there are a lot of choices, such as iCloud and Time Machine. And if you do not make backups, you don't need to worry about it because professional data recovery tools like EaseUS Data Recovery Wizard will always help you out.
Was This Page Helpful?
Cedric Grantham is a senior editor and data recovery specialist of EaseUS. He mainly writes articles and how-to tips about data recovery on PC and Mac. He has handled 10,000+ data recovery cases and is good at data recovery of NTFS, FAT (FAT32 and ExFAT) file systems, and RAID structure reorganization.
Jean is recognized as one of the most professional writers in EaseUS. She has kept improving her writing skills over the past 10 years and helped millions of her readers solve their tech problems on PC, Mac, and iOS devices.
-
EaseUS Data Recovery Wizard is a powerful system recovery software, designed to enable you to recover files you’ve deleted accidentally, potentially lost to malware or an entire hard drive partition.
Read More -
EaseUS Data Recovery Wizard is the best we have seen. It's far from perfect, partly because today's advanced disk technology makes data-recovery more difficult than it was with the simpler technology of the past.
Read More -
EaseUS Data Recovery Wizard Pro has a reputation as one of the best data recovery software programs on the market. It comes with a selection of advanced features, including partition recovery, formatted drive restoration, and corrupted file repair.
Read More
Related Articles
-
How to Find Downloads on Mac | 5 Quick Solutions
![author icon]() Dany/Jul 05, 2026
Dany/Jul 05, 2026 -
This Volume Is Not Formatted as APFS on a Mac: Why and How to Fix It
![author icon]() Brithny/Jun 30, 2026
Brithny/Jun 30, 2026 -
3 Ways to Fix the Mac Mount Failed with 77 Error [Without Data Loss]
![author icon]() Brithny/May 19, 2026
Brithny/May 19, 2026 -
[Mac SSD Recovery] How to Recover Data from SSD on Mac
![author icon]() Jaden/Jun 30, 2026
Jaden/Jun 30, 2026