- Video Recovery
- SD Card Recovery
- Recycle Bin Recovery
- Recover Data from USB
- Recover Deleted Emails
- Hard Drive Not Showing Up in Windows
- Recover Unsaved Word Documents
- Recover Deleted Files in Windows 10
- Recover Files from Virus Infected Hard Drive
- Best Free Photo Recovery Software
- Recover Files from Formatted Hard Drive
Have you ever opened your photo library on your Mac and seen the message Photos can't find the System Photo Library? Well, it's pretty annoying, and it would make anyone think about how it happened and what you can do about it! You're not alone. The good news is that we have suggestions to help you fix the "photos can't find the system photo library" error.
This guide will walk you through the issue and share simple tricks to regain your precious photos. Let's dive in and sort out your Mac photos library problem together!
- Fix 1. Check and Delete Empty Photo Library Folders
- Fix 2. Create a New Photo Library
- Fix 3. Designate the System Photo Library on Your Mac
- Fix 4. Use Repair Tool in Photos Library
- Fix 5. Reboot Your Mac in Safe Mode
- Fix 6. Update Your Mac
When it is about to face the message "Photos can't find the System Photo Library", it is crucial to know the fix with a quick process—the quick, efficient, and reliable photo recovery software in rescue.
How to Recover Missing Photos on Your Mac Using Software
A super-easy data recovery software, EaseUS Data Recovery Wizard for Mac, is like a magic wand for your lost files, whether they accidentally end up in the Trash Bin, disappear without a trace, or missing photos after updating macOS Sonoma.
Using this tool is very handy. Choose a hard drive, let the software find your missing photos, and bam! You can see all your missing or hidden photos; even more, recover deleted photos on a Mac. It's like having your own personal data guard right on your Mac!
The beauty of this software is that It works with all your significant devices: SD card recovery on a Mac, USB flash drive recovery, Mac hard drive recovery (both external and internal hard drives), and more.
You don't need to stress about file types either – it tackles photos, videos, music, documents, emails, etc. And the best part? You don't need to be a tech whiz. With just a click, EaseUS Data Recovery Wizard for Mac lets you recover permanently deleted files on Mac, making it the ultimate do-it-yourself data recovery tool.
To help you understand how to recover missing photos on your Mac, here are the steps:
Note: You can create a backup by clicking the "Disk Backup" on the left first and then recover from the backup image, it can prevent further damage to the photos in Mac Library, making it safer and more reliable.
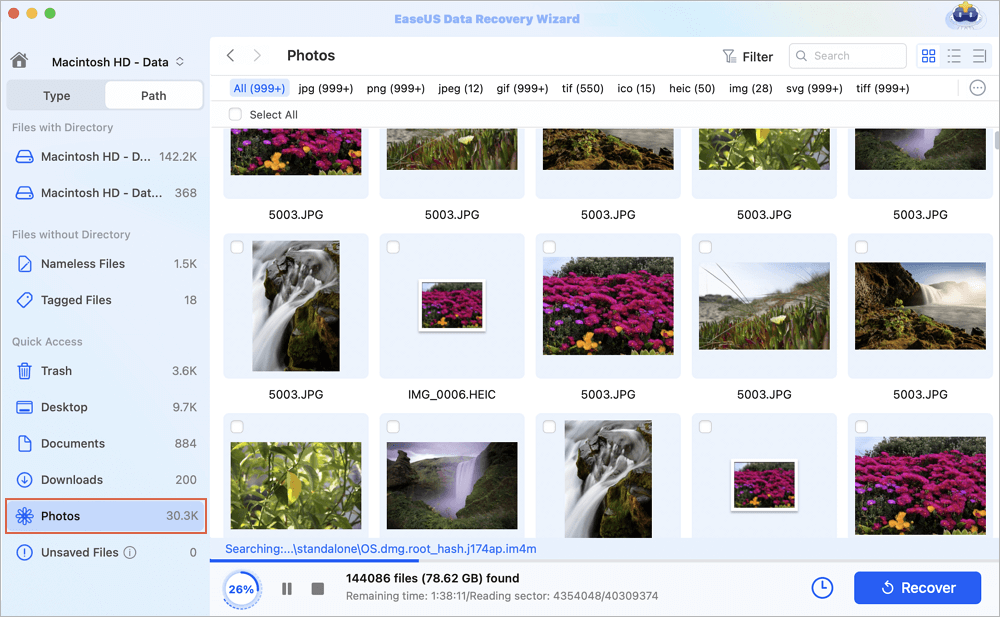
Step 1. Search for lost photos
Launch EaseUS Data Recovery Wizard for Mac, hover the mouse over the system drive where the Photos Library is, and click "Search for lost files".

Step 2. Find pictures from the library
After finishing the scan, click "Photos" under the "Path" tab. All your lost photos will list here.
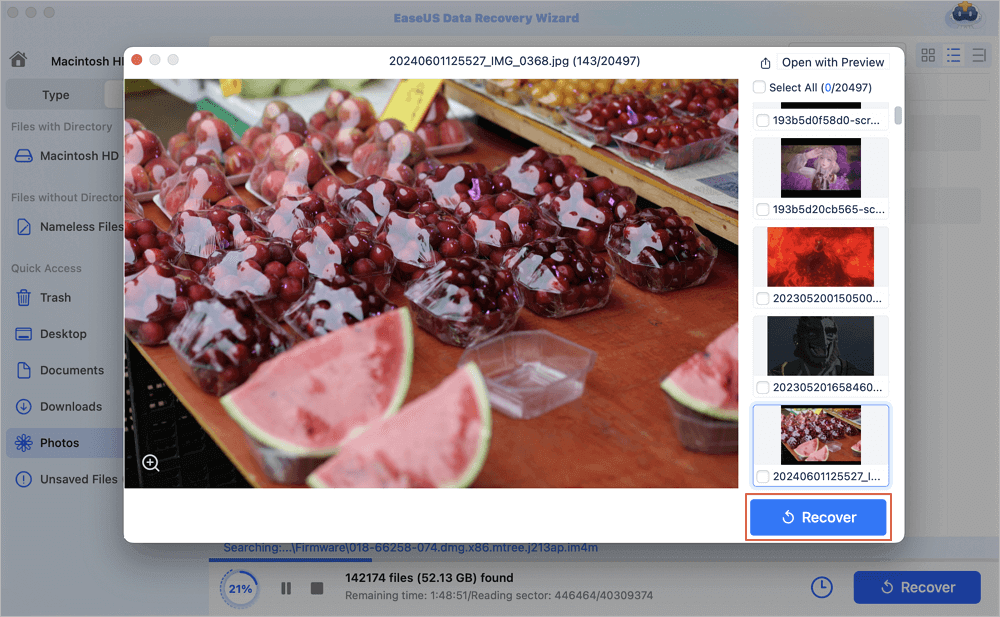
Step 3. Recover photos from the library
Double-click to preview the photo, select the right one and click "Recover" to save the images to another secure location on your Mac.
How to Fix Photos Can't Find the System Photo Library on Mac
Apart from using the quickest and most reliable workaround, some inbuilt lengthy procedures are used to fix the issue. Let's dig into the details!
Fix 1. Check and Delete Empty Photo Library Folders
There's a chance that your system has more than one photo library. There's one empty library, and Mac is using that to access your photos. Here's where you should change the default library to eliminate the issue.
Step 1. Open the Finders window.
Step 2. Find the folder with your photo library that needs a fix.

Step 3. Click "Photo Library" and select the "Disable" and "Delete" options.
Step 4. Click "Done" to save changes
Now, you can set up a new photo library as your System Photo Library hassle-free!
Fix 2. Create a New Photo Library
If Photos didn't have another empty photo library, then creating a New Photo Library would be a great option.
Step 1. Close "Photos" from the "Activity Monitor". Now, reopen the "Photos" app.

Step 2. In the "Choose Library" window, click the "Create New" button.
Step 3. Type a name for your new library and select the location where you want to store it. Click "OK" to save changes.
Now, you can move your photos to the new library. Remember that iCloud photos won't automatically appear here since it's not the System Photo Library. If you think this article is informative and helpful, share it on social media to help others learn how to fix the "photos can't find the system photo library" error.
Fix 3. Designate the System Photo Library on Your Mac
Another fix is to designate the system photo library to another folder to fix the issue.
Step 1. Close the "Photos" app.
Step 2. Press the "Option" key and open "Photos". Your libraries will appear, and one will be labeled YourLibraryName (System Photo Library).

Step 3. Select the Library you want as the System Photo Library.
Step 4. After Photos opens that library, go to "Photos > Settings (or Photos > Preferences)" from the menu bar.

Step 5. Expand the "General" tab.
Step 6. Press the "Use as System Photo Library" button. If it's grayed out, your current library is already the System Photo Library.
If you open a different library in Photos without designating it as the System Photo Library, other apps will still use photos from the original System Photo Library. So remember to Hold down the Option key when opening Photos to check which library is set as the System Photo Library.
Fix 4. Use Repair Tool in Photos Library
If your Photo library version is causing compatibility issues with the Photo app, don't worry; your Mac has a built-in repair tool to sort things out.
Step 1. Close the Photos app if it's open. Press the "Command + Option" keys simultaneously while clicking the Photos icon to open the app.

Step 2. A black window will open with the "Repair" and "Quit" option. Click on "Repair" and enter the password for your user account.
Step 3. Now, be patient as the repair process does its thing. The time it takes can vary based on your library size.
Once the repairs wrap up, Photos will open the library, and with some luck, any unexpected issues should be sorted out.
Fix 5. Reboot Your Mac in Safe Mode
Another effective method to solve the issue If you're facing giving your Mac a Safe Mode reboot might solve the problem. Here's how:
Step 1. Shut down your Mac and wait for 10 seconds.
Step 2. Press the power button until the "Startup options" and the options gear icon appear on the screen.
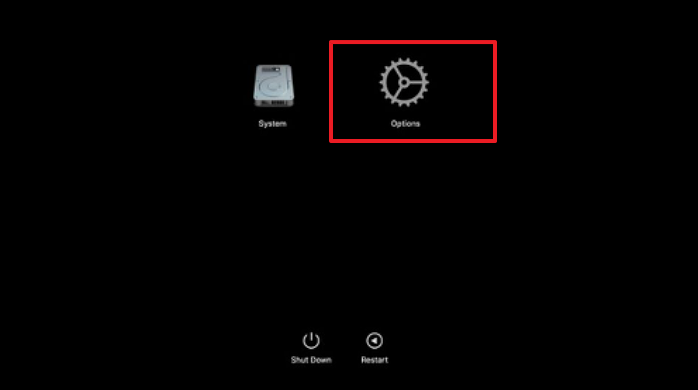
Step 3. Choose your Startup disk.
Step 4. Press the shift key and click Continue in Safe Mode. Now, release the Shift key.

Step 5. Once that's done, reopen Photos to see if the problem is fixed.
Safe Mode does a disk check, clears out caches, runs file repairs, and only lets essential stuff load at startup. It's like a tech-savvy detox for your Mac!
Fix 6. Update Your Mac
Using an obsolete version of macOS is also responsible for such errors. Hence, updating your Mac would fix the issue.
Step 1. Go to Settings and select the "General" option from the left pane.
Step 2. Click "Software Update" from the right pane.
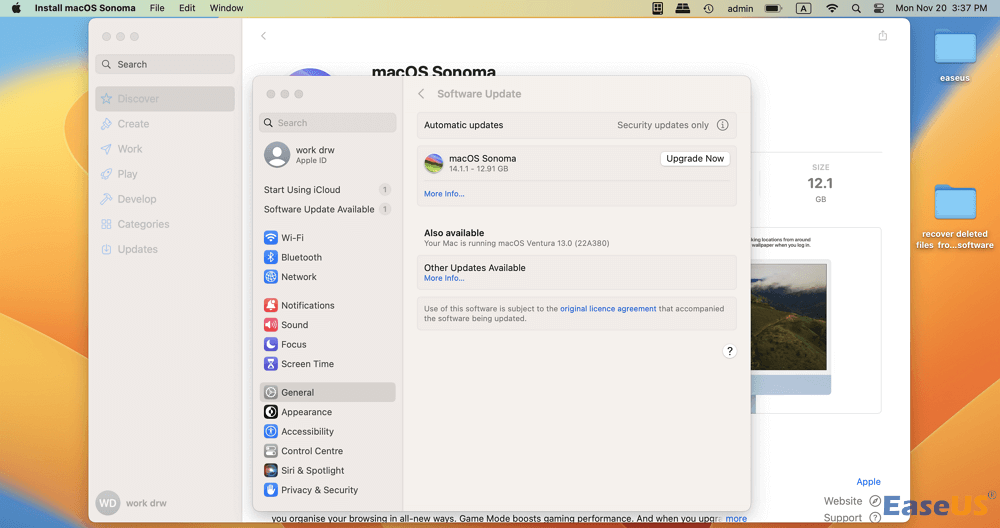
Now, check for software updates, and if there are any available, then update it to debug the issue. After the update, check, and your error will be fixed.
Conclusion
If you were looking for how to fix Photos can't find the System Photo Library error on Mac, you would have got your answer. While many methods consist of hit and trial depending on the cause, the quickest and most reliable is using EaseUS Data Recovery Wizard. It provides an additional layer of security. It's like your photo-saving tool, ensuring your Mac stays good with the System photos library. So you don't have to be concerned about your memories again!
Photos Cannot Find the System Photo Library FAQs
Users did have many queries related to the error message, and we have tried to answer them all!
1. What does Photos Cannot find the system photo library mean?
If you're one of those users encountering this error message 'Photos Cannot find the system photo library,' you won't be able to view, share, edit, or copy your stored images in the iPhoto library.
2. Where is the system photo library on my Mac?
Your System Photo Library is initially in the Pictures folder on your Mac, but you can relocate it to another spot on your Mac or even store it on an external storage device.
3. How do I switch to the System photo library?
To switch to another library and set it as the System Photo Library, follow these steps in the Photos app on your Mac: click Photos > Settings, then select General. Click the Use as System Photo Library option to make the current library the System Photo Library.
Was This Page Helpful?
Brithny is a technology enthusiast, aiming to make readers' tech lives easy and enjoyable. She loves exploring new technologies and writing technical how-to tips. In her spare time, she loves sharing things about her game experience on Facebook or Twitter.
-
EaseUS Data Recovery Wizard is a powerful system recovery software, designed to enable you to recover files you’ve deleted accidentally, potentially lost to malware or an entire hard drive partition.
Read More -
EaseUS Data Recovery Wizard is the best we have seen. It's far from perfect, partly because today's advanced disk technology makes data-recovery more difficult than it was with the simpler technology of the past.
Read More -
EaseUS Data Recovery Wizard Pro has a reputation as one of the best data recovery software programs on the market. It comes with a selection of advanced features, including partition recovery, formatted drive restoration, and corrupted file repair.
Read More
Related Articles
-
How to Stop macOS Automatic Update Step-by-Step
![author icon]() Jean/Jul 24, 2024
Jean/Jul 24, 2024 -
3 Ways to Fix the Mac Mount Failed with 77 Error [Without Data Loss]
![author icon]() Brithny/Jul 24, 2024
Brithny/Jul 24, 2024 -
How to Recover chat.db Deleted Messages on a Mac
![author icon]() Brithny/Jul 24, 2024
Brithny/Jul 24, 2024 -
How to Recover Deleted Folders on Mac [5 Simple Methods in 2024]
![author icon]() Dany/Jul 24, 2024
Dany/Jul 24, 2024