Encountering the "mount: / failed with 77" error on your Mac can be a roadblock, especially when trying to access important data. Fear not, as we present three effective methods to overcome this error without risking your precious data.
We will discuss three effective ways to fix the "mount failed with 77" error:
Recover Data from a Hard Drive When the 'Failed with 77' Error Occurs💎
When you face a "failed with 77" error message when trying to mount a disk and access its stored data, EaseUS Data Recovery Wizard for Mac offers you a handy path to access the data in clicks! This useful tool can restore data from an unmountable external hard drive, including images, videos, documents, etc.
You Can Trust EaseUS Data Recovery Software
EaseUS Data Recovery Wizard has acquired an extensive technical base in data recovery and trusted by billions of users since 2005. Check out reviews on G2.
The EaseUS software can quickly scan the recoverable data when the mounting errors occur, such as "failed with 77", "couldn't unmount disk. : (-69888)", and the common unmounting issue "com.apple.DiskManagement.disenter error". Download this powerful hard drive recovery software and follow the steps below to recover your hard drive when the "failed with 77" error occurs:
Step 1. Launch the EaseUS data recovery tool, choose the unmountable volume, and click "Search for lost files".

Step 2. This powerful software will deep scan all the recoverable data on the unmountable hard drive. Choose the files you want by checking the box in front of them.

Step 3. Click "Recover" to recover the files from the unmountable external hard drive, and select a safe storage location on your Mac to save them.
3 Ways to Fix the Mac Mount Failed with 77 Error
After saving the recovered data from the unmountable hard drive to avoid permanent data loss, here are 3 effective ways to fix error 77:
Fix 1. Check the USB Port/Cable and Re-insert the Disk Again
Sometimes, the issue could be with the USB port or cable. Follow these steps:
Step 1. Disconnect the external disk from your Mac.
Step 2. Inspect the USB port for any visible damage or debris.
Step 3. If using an external USB hub, connect the disk directly to your Mac to rule out any issues with the hub.
Step 4. Try a different USB cable, preferably a known working one.
Step 5. Re-insert the disk into the USB port firmly.
After re-inserting the disk, check if it mounts successfully. If not, proceed to the next fix.
Share this article on social media to help others learn how to fix the "failed with 77" error when mounting a disk on a Mac.
Fix 2. Force Mount a Disk on a Mac via Terminal
If the disk still fails to mount after trying different USB ports and cables, you can attempt to force mount an external hard drive using Terminal:
Step 1. Open Terminal. You can find it in "Applications > Utilities".

Step 2. Type the following command: diskutil list. This command will display a list of all connected disks.
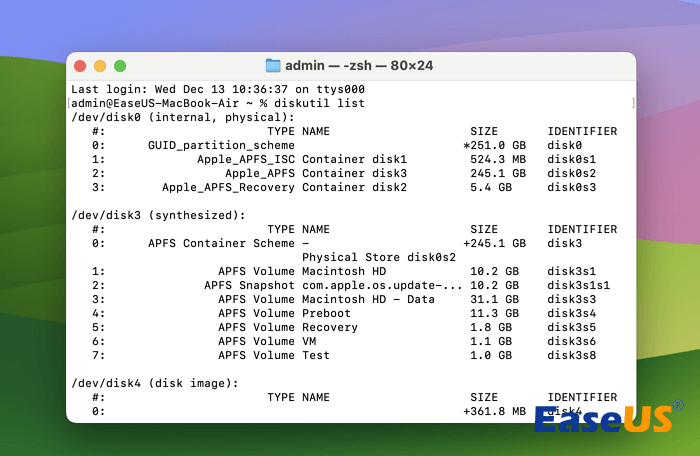
Step 3. Figure out which disk you're looking to connect. It usually has a label such as "/dev/disk2" or "/dev/disk3".
Step 4. Once you've identified the disk, type the following command to attempt to force mount it:
sudo diskutil mount force /dev/diskX
Substitute "diskX" with the name of your disk (for example, disk2, disk3). You will then need to provide your administrator password. Type it and press "Enter".
After entering the password, the Terminal will attempt to force-mount the disk. Once the process is complete, check if the disk is successfully mounted.
Fix 3. Reformat the Disk to a macOS-Compatible File System Format
If you see the "mount failed with 77" message on your Mac, it might be because of compatibility problems with macOS. One effective fix is to change the disk to a file system format that works well with macOS.
Before you start formatting, remember to back up any data saved on the disk. Formatting will delete everything on the disk, so ensure you have copies of all your files.
If you can't access your data due to a mounting problem, such as "com.apple.DiskManagement.disenter error 49244", you can use EaseUS software to recover and back up your files before formatting them. EaseUS offers data recovery solutions that can help you retrieve and protect your files before taking any steps.
Back Up Your Mac and Never Lose Data
Back up and restore your MacBook/iMac without Time Machine, iCloud, or external hard drives.
After backing up your data, proceed with reformatting the disk by following these steps;
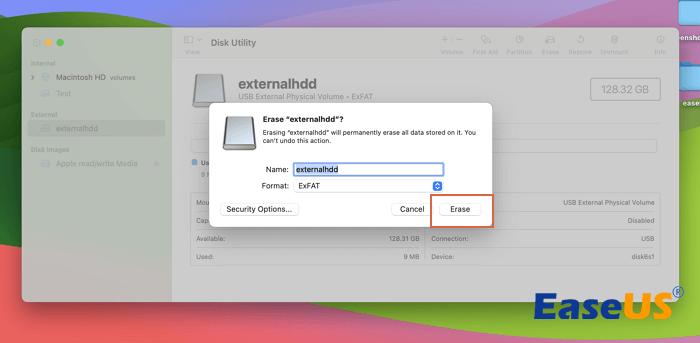
Step 1. Navigate to "Applications > Utilities > Disk Utility".

Step 2. Choose the disk from the list of drives in the Disk Utility sidebar.
Step 3. Click on the "Erase" button at the top of the Disk Utility window.
Step 4. Choose the desired file system format for your disk. For compatibility with macOS, select HFS+, APFS or Mac OS Extended. Name your formatted disk and click the "Erase" button to begin the formatting process.
Conclusion
This article introduces 3 effective methods to fix the "mount failed with 77" error and recover the stored data from an uncountable hard drive with EaseUS Data Recovery Wizard for Mac.
Mac Mount Failed with 77 Error FAQs
Now that we've discussed some inquiries about mounting and detecting drives on Mac systems, let's explore the remedies for each situation.
1. How do I force a drive to mount in a Mac terminal?
First, identify the disk identifier using the diskutil list command. Then, unmount the drive with diskutil unmountDisk /dev/diskX (replace X with the disk identifier). Finally, remount it forcibly with sudo mount -rw /dev/diskX. This should make the drive accessible again in the system.
2. How do I remount my internal hard drive Mac?
If you need to remount your internal hard drive on Mac, you can do so by:
Step 1. Restart your computer in "Recovery Mode".
Step 2. Once in Recovery Mode, launch "Disk Utility".
Step 3. Select your internal drive, and click on the 'Mount' button.
3. Why is my Mac not detecting external hard drives?
It might be because of problems with the drive's formatting, a faulty or inadequate power supply, a damaged cable, or the drive itself could be corrupted or failing. Ensuring the drive is properly connected and checking the Mac's settings to display external drives can often resolve the issue.
Was This Page Helpful?
Brithny is a technology enthusiast, aiming to make readers' tech lives easy and enjoyable. She loves exploring new technologies and writing technical how-to tips. In her spare time, she loves sharing things about her game experience on Facebook or Twitter.
-
EaseUS Data Recovery Wizard is a powerful system recovery software, designed to enable you to recover files you’ve deleted accidentally, potentially lost to malware or an entire hard drive partition.
Read More -
EaseUS Data Recovery Wizard is the best we have seen. It's far from perfect, partly because today's advanced disk technology makes data-recovery more difficult than it was with the simpler technology of the past.
Read More -
EaseUS Data Recovery Wizard Pro has a reputation as one of the best data recovery software programs on the market. It comes with a selection of advanced features, including partition recovery, formatted drive restoration, and corrupted file repair.
Read More
Related Articles
-
Trash Not Working Mac? Here to Avoid Bypassing Mac Trash
![author icon]() Jaden/Jun 30, 2026
Jaden/Jun 30, 2026 -
How to Fix USB Not Mounting Mac in 4 Ways
![author icon]() Dany/Jun 12, 2026
Dany/Jun 12, 2026 -
How to Recover Deleted Items Outlook for Mac [4 Tested Solutions]
![author icon]() Brithny/Jun 30, 2026
Brithny/Jun 30, 2026 -
How to Download and Create macOS ISO File in 2026 [No Skill Requirements]
![author icon]() Brithny/Jan 19, 2026
Brithny/Jan 19, 2026