- Video Recovery
- SD Card Recovery
- Recycle Bin Recovery
- Recover Data from USB
- Recover Deleted Emails
- Hard Drive Not Showing Up in Windows
- Recover Unsaved Word Documents
- Recover Deleted Files in Windows 10
- Recover Files from Virus Infected Hard Drive
- Best Free Photo Recovery Software
- Recover Files from Formatted Hard Drive
Quick Navigation:
| Workable Solutions | Step-by-step Troubleshooting |
|---|---|
| 1. Mouse Go the Opposite Direction | Click the Apple icon from the menu bar...Full steps |
|
2. Right Click on A Mac |
Click the Apple icon from the menu bar...Full steps |
|
3. Keyboard Shortcuts on Mac |
Take a screenshot on Mac...Full steps |
For most people, the first computer they come into contact with is basically the one with Windows system, and even in their later work and life, they have been using Windows-based computers. So when people who are used to Windows systems buy a Mac computer, they may find everything about macOS very unfamiliar. Those once-familiar operations do not work at all on the Mac. This is also the reason why many people refuse to use Mac computers.
If you've already bought a new Mac and want to quickly familiarize yourself with the operating system, where should you start? Don't worry, this article will comprehensively introduce the precautions for switching from a Windows computer to a Mac computer to help you quickly familiarize yourself with your Mac.
EaseUS Data Recovery Wizard for Mac
- Recover deleted files on Mac, including documents, photos, audio, music, and emails effectively
- Recover unsaved Office files such as unsaved Word document and Excel document
- Support data recovery for external hard drive sudden deletion: Camera SD cards, HDDs and SSDs
- Enable users to preview before performing actual recovery
Step 1. Search for lost files
Select the disk location to search for lost files (it can be an internal HDD/SSD or a removable storage device) on macOS Sierra, High Sierra, Mojave, Catalina, Big Sur, Monterey, Ventura, and the latest Sonoma. Click the "Search for lost files" button.
Note: Before data recovery, you'd better click "Disk Backup" from the left sidebar to create a backup of your Mac to avoid further data loss. After backing up, the software can recover data from the Mac backup, and your computer can wirte new data again.

Step 2. Go through the scanning results
EaseUS Data Recovery Wizard for Mac will immediately scan your selected disk volume and display the scanning results.

Step 3. Select the file(s) and recover
In the scan results, select the file(s) to preview and click the "Recover" button to have them back.

Overview of Windows and Mac
Before comparing Windows and Mac, we should clarify the concept that Windows and macOS are actually both operating systems. Mac is just the brand name for Apple's laptops, which use macOS, an operating system designed and developed by Apple. The Windows system is designed and developed by Microsoft, and most brands of computers on the market, such as Dell, HP, Lenovo, etc., use this system. Once you figure this out, you'll see why switching from a Dell to an HP shouldn't be difficult, but switching from a Dell to a Mac feels unfamiliar because you're actually going from one operating system switched to another.
So here, we will not introduce the system features of macOS in detail, because it's too complicated and it's pointless for ordinary users to learn about it. What we think is important are the operations that are involved the most in everyday use.
#1. Why Does My Mouse Go the Opposite Direction on Mac?
I believe the direction of the mouse must be the first problem most people encounter when switching from Windows to Mac. When you scroll the wheel down, the page goes up; when you scroll the wheel up, the page goes down instead. This is really very annoying for users who are used to the Windows system. In fact, you can manually change the scroll direction of the mouse. Here are the detailed steps of how to change it.
Step 1. Click the Apple icon from the menu bar, and select "System Preferences".
Step 2. Click on "Mouse" and choose "Point&Click".
Step 3. Tick the option of Scrolling direction: natural to make the mouse scroll in the same direction that your finger moves.
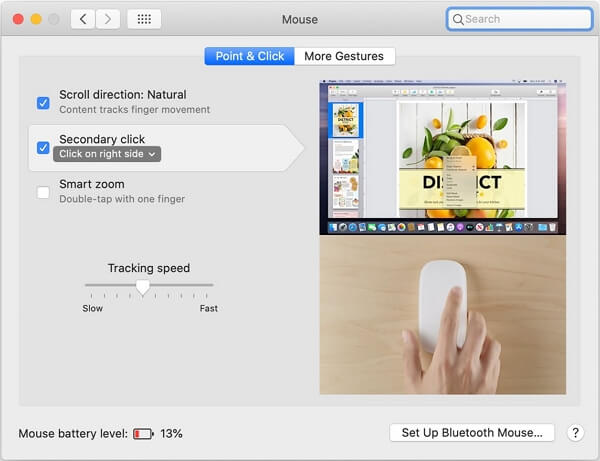
Confirm the changes, now you can use your mouse the same way as on a Windows computer.
See also:
#2. How to Right Click on A Mac?
Another thing that users are very unaccustomed to in the early days of switching computers is the inability to right-click. On Windows computers, we are used to right-click to refresh, right-click to create a new folder, right-click to open a software or file, and so on. But on a Mac, there's nothing happens when we right-click. The great news is, we can also change the mouse settings to enable right-click. Here's how to do it.
For users who have a magic mouse:
Step 1. Click the Apple icon from the menu bar, and select "System Preferences".
Step 2. Click on "Mouse" and choose "Point&Click".
Step 3. Find and check the "Secondary Click" option.
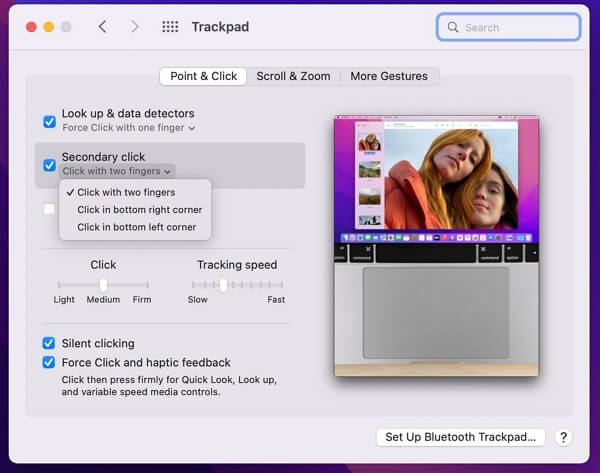
For users who use the Trackpad:
Step 1. Click the Apple icon and select "System Preferences".
Step 2. Click "Trackpad".
Step 3. In the Trackpad Preferences, tick the option "Click with two fingers".
Now you can tap with two fingers as a right-click.
#3. Keyboard Shortcuts on Mac
If you used to be a Windows user, the keyboard shortcuts should bring you lots of conveniences. On a Mac computer, the keyboard is a little bit different from that of Windows. The most obvious difference is that Mac keyboards have Command and Option keys, but there are also different keyboard shortcut combinations. Here we will list some of the common ones for you.
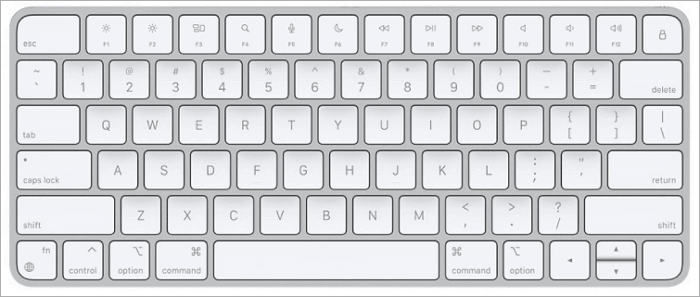
1. Take a screenshot on Mac:
Press Shift + Command + 3/4/5 at the same time. Shift + Command + 3 would capture the whole screen. And Shift + Command + 4 is used to capture a portion of the screen. If your macOS is Mojave or later, you can also try Shift + Command + 5.
2. Copy and Paste on Mac
When cutting, copying, and pasting the content on Mac computers, shortcuts are very similar to Windows computers. You just need to change the CTRL key to the Command key.
- Cut: Command + X
- Copy: Command + C
- Paste: Command + V
3.Undo an Operation on Mac
This is another similar shortcut to Windows computers. Press Command + Z, you can undo the previous operation. The more different is you can press Shift + Command + Z to reverse the undo command.
4. Other Common Shortcuts on Mac
Command + A: Select All items.
Command + F: Find items in a document or open a Find window.
Command + H: Hide the windows of the front app. To view the front app but hide all other apps, press Option + Command + H.
Command + S: Save the current document.
Command + T: Open a new tab.
Command + O: Open the selected item, or open a dialog to select a file to open.
Command + M: Minimize the front window to the Dock. To minimize all windows of the front app, press Option + Command + M.
Option + Command + esc: Force quit an App.
Closing Words
In general, switching from Windows to Mac means you're learning to use a new system, so it's normal to find it difficult and unfamiliar at first. We're writing this article is meant to make it easier for you to switch from one system to another. Also, on Apple Support, there are plenty of official guidelines for you to solve the problem. Use your search engine when needed.
Mac Cache Recovery: How to Recover Deleted Cache Files on Mac
One of the good habits to maintain the fast performance of macOS and applications on Mac is to regularly clear the cache on Mac. What if you accidentally deleted caches that contain very important system files, libraries or logs? Do not worry. You can recover deleted cache files on Mac by following the guide here.
Was This Page Helpful?
Cedric Grantham is a senior editor and data recovery specialist of EaseUS. He mainly writes articles and how-to tips about data recovery on PC and Mac. He has handled 10,000+ data recovery cases and is good at data recovery of NTFS, FAT (FAT32 and ExFAT) file systems, and RAID structure reorganization.
Jean is recognized as one of the most professional writers in EaseUS. She has kept improving her writing skills over the past 10 years and helped millions of her readers solve their tech problems on PC, Mac, and iOS devices.
-
EaseUS Data Recovery Wizard is a powerful system recovery software, designed to enable you to recover files you’ve deleted accidentally, potentially lost to malware or an entire hard drive partition.
Read More -
EaseUS Data Recovery Wizard is the best we have seen. It's far from perfect, partly because today's advanced disk technology makes data-recovery more difficult than it was with the simpler technology of the past.
Read More -
EaseUS Data Recovery Wizard Pro has a reputation as one of the best data recovery software programs on the market. It comes with a selection of advanced features, including partition recovery, formatted drive restoration, and corrupted file repair.
Read More
Related Articles
-
How to Recover Data from a Dead SD Card on Mac [Dead SD Card Recovery]
![author icon]() Dany/Jul 24, 2024
Dany/Jul 24, 2024 -
Mac Downloads Folder Empty - 4 Solutions to Fix It Without Data Loss
![author icon]() Brithny/Jul 24, 2024
Brithny/Jul 24, 2024 -
How to Find Documents on Mac | Include Missing/Disappeared Documents
![author icon]() Brithny/Jul 24, 2024
Brithny/Jul 24, 2024 -
Recover Screen Recordings on Mac in 4 Ways
![author icon]() Dany/Jul 24, 2024
Dany/Jul 24, 2024