- Video Recovery
- SD Card Recovery
- Recycle Bin Recovery
- Recover Data from USB
- Recover Deleted Emails
- Hard Drive Not Showing Up in Windows
- Recover Unsaved Word Documents
- Recover Deleted Files in Windows 10
- Recover Files from Virus Infected Hard Drive
- Best Free Photo Recovery Software
- Recover Files from Formatted Hard Drive
Quick Navigation:
- 1. Why Should You Format the MacBook Pro/Mac
- 2. Things to Consider Before You Format the Macbook Pro/Mac (5 Things You Should Keep in Mind)
- 3. How to Format the MacBook Pro or Any Other Mac Computer (3 Effective Methods!)
- 4. What to Do if Data Is Erased During the Formatting Process (Best Data Recovery Tool Recommended!)
Before you format your Mac and restore it to factory settings, you need to know and understand how to do it right and how to recover files after factory reset Mac if accidents happen during the formatting process. If anything goes wrong when formatting your Mac, You may need to choose the best Mac data recovery software to recover those lost data. You can't afford to risk your data. So, it's natural for users to ask the "how to format the mac" question.
This guide takes you through how to format the MacBook pro and any other Mac computer for any reason or to resolve any underlying issues. It also includes information on what to do if you erase your data during formatting.
Why Should You Format the MacBook Pro/Mac
There are different reasons why you would want to format your Mac to factory settings, including:
To prepare it for a new owner: If you plan to sell, trade in, or give away your Mac, you will need to erase the data to give the new owner a fresh device.
Booting and performance issues: If your Mac is slow or has booting issues because of many applications or age formatting, it can speed it up.
Viruses or malware attacks: Viruses and malware can attack your Mac and capture its functionalities. Formatting the Mac can help remove viruses.
How to Format USB Flash Drive to FAT32 on Mac without Data Loss
Computer users who use a USB might have the demand for formatting it to the FAT32 file system.
Things to Consider Before You Format the Macbook Pro/Mac
To prevent data loss and your data landing in unauthorized hands, consider doing the following before formatting your Mac:
- 1. Back-Up Your Data
- 2. Unlink Your Apps and Accounts
- 3. Sign Out of iCloud
- 4. Sign Out of Messages
- 5. Unpair Bluetooth Devices
1. Back Up Your Data
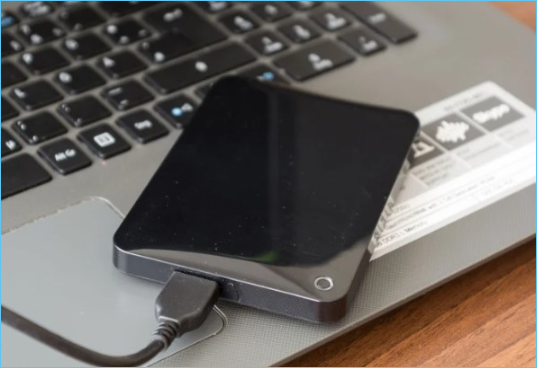
Before erasing your Mac, make sure you back up all the data and files it contains because you'll lose your data if you don't. If you use Time Machine, your contacts, photos, documents, mail, and other data you selected should be automatically backed up on your Mac. In addition, it is also very convenient to restore time machine backup to your Mac if you have found that significant data has been erased during the formatting process. If not, you can back up your data manually by copying the files to an external drive.
2. Unlink Your Apps and Accounts
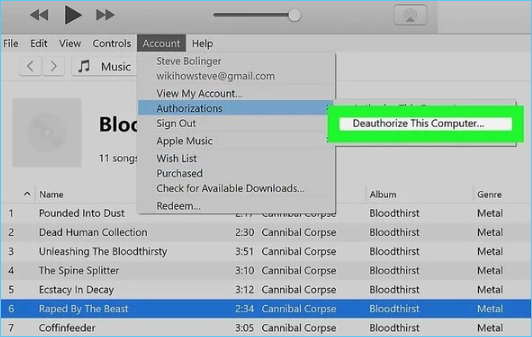
You need to manually sign out of all your accounts and apps and unlink them from the Mac before you erase all data. Initially, you could do this using iTunes. But now, you must manually deauthorize individual apps - iTunes Music, TV, and Books - from your accounts to remove their access to content that you bought, such as music, apps, movies, books, etc. To do this:
Step 1. Open up any of those apps > Go to Account > Authorizations > Deauthorize This Computer.
Step 2. Enter your Apple ID and password
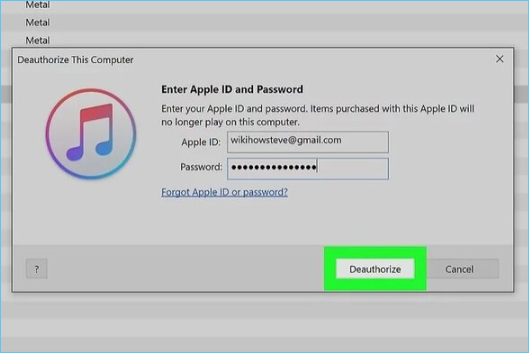
Step 3. Hit the Deauthorize button
Also, sign out of other third-party apps on your Mac that have licenses that only work on a limited number of devices.
3. Sign Out of iCloud
You'll also need to remove all lingering information linking your Apple ID to the device. That means signing out of all the accounts associated with you from the device. To sign out of iCloud:
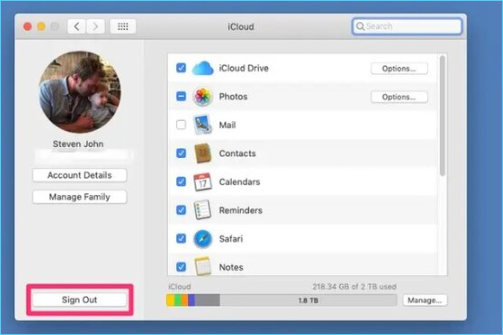
Step 1. Click the Apple symbol in the MacBook Pro's top left corner > Select System Preferences.
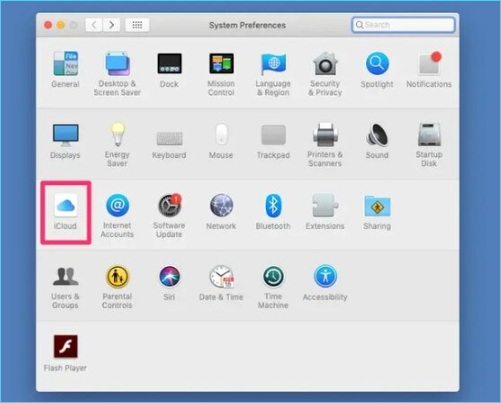
Step 2. In preferences, click iCloud > From the list, uncheck all the boxes to remove copies of related data on the Mac > Click Sign Out.
4. Sign Out of Messages
You'll also need to sign out of your Mac Messages and remove all the messages/traces from the Mac.
Step 1. Open the Messages app on Mac > Go to Messages > Preferences.

Step 2. Click the iMessage tab > Sign Out.
5. Unpair Bluetooth Devices
If you're giving away your Mac to someone in your house - your kid, sibling, wife, etc. - unpair any Bluetooth device connected to it to stop your mouse or keyboard controls from interfering with it. To do this:
Step 1. Go to System Preferences > Bluetooth > Mouse over the device/gadget you want to unpair.
Step 2. Click the X button on the right of its name.
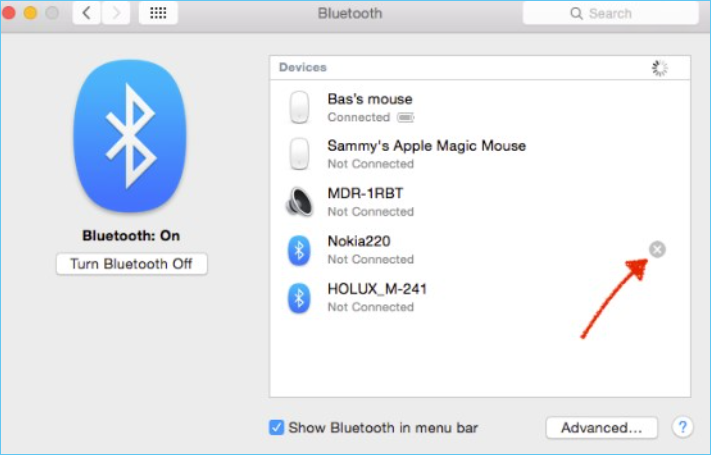
Step 3. Click Remove.
Now the Mac is ready for factory reset, and you don't risk losing your data or handing them over to other users.
How to Format the MacBook Pro or Any Other Mac Computer
There are different methods to format a MacBook Pro or any other Mac computer. The following are the key methods you can use.
- Method 1. Format By Disk Utility feature
- Method 2. Format By Reinstalling OS
- Method 3. Format By Terminal
Method 1. Format By Disk Utility feature
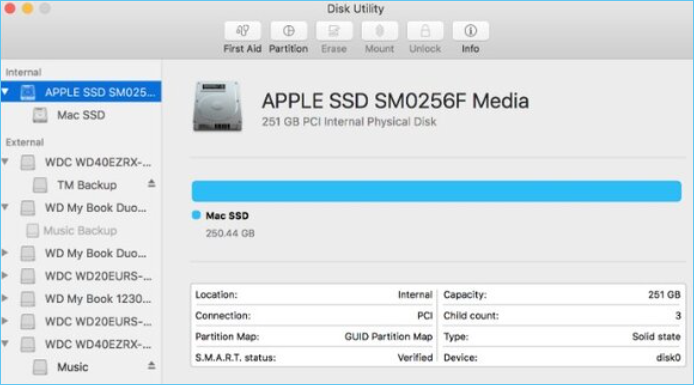
Disk Utility is Mac's built-in tool that can help erase your Mac. Use the following steps to format your Mac using the disk utility:
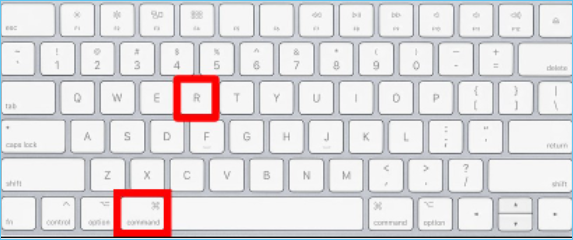
Step 1. Start Mac from macOS Recovery > Turn on/restart MacBook Pro > Press and hold Command (⌘) and R keys together.
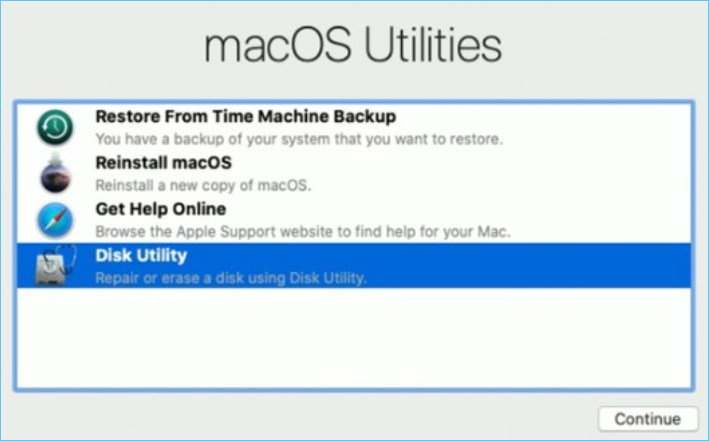
Step 2. Select user password > In the macOS utility window, select Disk Utility >Continue.
Step 3. Choose your Mac's system drive - named Macintosh HD > In the toolbar, click the Erase button > enter the requested format details when prompted:
Format: Mac OS Extended (Journaled) or APFS (or recommended by Disk Utility).
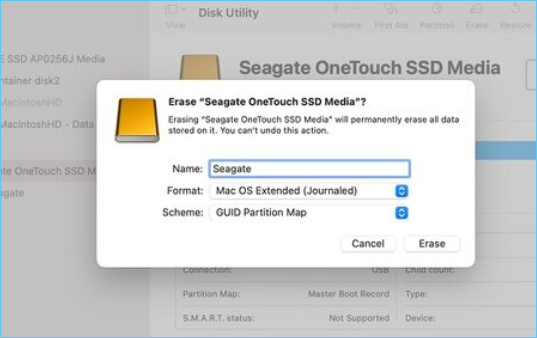
Step 1. Click Erase and enter your Apple ID and password if prompted and wait for the formatting to complete
In this step, if you see an Erase Volume Group button, you'll click this button instead.
After the erase is complete, you can delete any other internal volumes from the sidebar. Disregard any internal volume with the name Macintosh HD or Macintosh HD Data.
Step 2. Now, quit Disk Utility to return to the macOS utility window > Finish the factory reset Mac formatting by reinstalling macOS.
Step 3. Go back to the macOS utility window > Select the Reinstall macOS option > click Continued.

Step 4. Follow the on-screen prompts/instructions to reinstall a new macOS
Method 2. Format By Reinstalling OS
Another way of formatting a Mac is by reinstalling OS X. You'll start this process from macOS recovery as you did with disk utility. This process also needs an internet connection to complete the macOS installation.
Step 1. Turn on or restart your MacBook Pro and press and hold Command (⌘) and R keys together until you see an Apple logo or other startup screen or image.
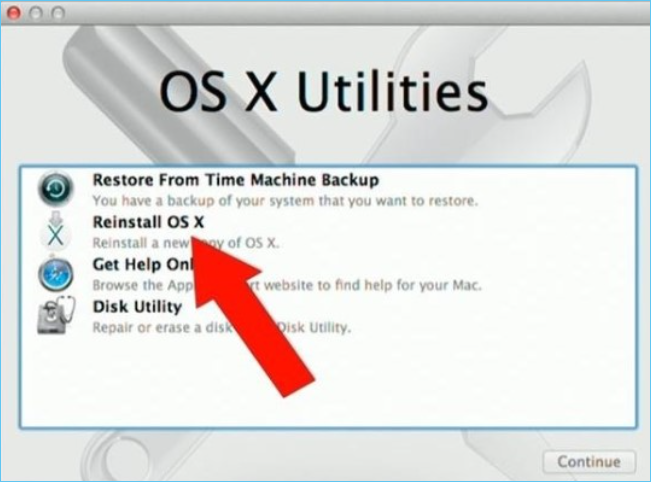
Step 2. Click Reinstall macOS or Reinstall OS X and Continue > In the left panel, click your startup disk: called Macintosh HD by default.
Step 3. If your disk was renamed, select the name it was renamed to > Click Install > Wait for the installation to complete > Your MacBook Pro will restart.
Step 4. If you're keeping the Mac within the house, continue the setup process. If selling the Mac, transfer your saved files onto an external drive, then press Command ⌘ + Q to quit the setup assistant.
Step 5. Power down the Mac, and you're good to go.
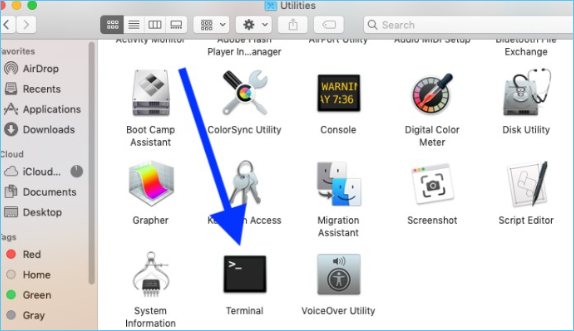
Method 3. Format By Terminal
The Terminal or command line approach to macOS formatting is different and requires precision syntax to ensure that you erase the Mac correctly. This method is only appropriate for advanced users, but if you are up for the task, follow the steps below:
Step 1. Navigate to Applications > Utilities and choose Terminal.
Step 2. Alternatively > restart Mac, hold the Command ⌘ + R keys > Utilities and Terminal from the macOS utility window.
Step 3. In the Terminal, type xartutil –erase-all > then press Return > Type yes if prompted > then press Return again > Choose Terminal and click Quit.
What to Do if Data Is Erased During the Formatting Process
Your data will be erased from the MacBook Pro during the formatting process. If you didn't back up the data, you'd be unfortunate to lose your important information. But no hope is lost.
You can still try and recover the erased data using efficient software - EaseUS Data Recovery Wizard for Mac. This tool helps to recover data loss from different cases such as, deletion, formatting, system crash, macOS wrongly restored, virus attack, hard driver damage, and more.
It can not only recover trash data on Mac, but also etrieve music files, photos, videos, emails, documents, and other data from different Mac-based devices: SSD, HDD, fusion drive, Time Machine backup, etc. It will recover your data no matter the size.
Here are the steps to download, install, and use the EaseUS Data Recovery Wizard for Mac:
Step 1. Select the drive to be scanned
In the main EaseUS Data Recovery Wizard window, there will be a list of the drives connected to your Mac. Select the drive you need to recover lost/deleted files from, and click the "Search for lost files" button.
Note: Before data recovery, you'd better click "Disk Backup" from the left sidebar to create a backup of your Mac to avoid further data loss. After backing up, the software can recover data from the Mac backup, and your computer can wirte new data again.

Step 2. Select your lost data/files
EaseUS Data Recovery Wizard for Mac will immediately scan your selected disk volume and display the scanning results on the left pane. You can sort the results to find the wanted files if you are looking for certain files.

Step 3. Recover lost/deleted data
Once you have found the desired files, preview the files and then click "Recover" to begin the recovery of your deleted/lost Mac files.

Conclusion
Don't let it go with your data and accounts intact if you want to sell, trade-in, or give away your Mac. Your data security is important, and formatting the Mac will help secure your data. Now, you know how to format the MacBook or any other Mac computer using the three methods: Disk Utility, Reinstalling Mac OS X, and Mac Terminal.
We've also given you pointers you can use to ensure that you don't lose your files, apps, photos, and other data when you format your MacBook pro. If you, unfortunately, erase your data during formatting, use the EaseUS Data Recovery Wizard for Mac to recover them.
Was This Page Helpful?
Cedric Grantham is a senior editor and data recovery specialist of EaseUS. He mainly writes articles and how-to tips about data recovery on PC and Mac. He has handled 10,000+ data recovery cases and is good at data recovery of NTFS, FAT (FAT32 and ExFAT) file systems, and RAID structure reorganization.
Jean is recognized as one of the most professional writers in EaseUS. She has kept improving her writing skills over the past 10 years and helped millions of her readers solve their tech problems on PC, Mac, and iOS devices.
-
EaseUS Data Recovery Wizard is a powerful system recovery software, designed to enable you to recover files you’ve deleted accidentally, potentially lost to malware or an entire hard drive partition.
Read More -
EaseUS Data Recovery Wizard is the best we have seen. It's far from perfect, partly because today's advanced disk technology makes data-recovery more difficult than it was with the simpler technology of the past.
Read More -
EaseUS Data Recovery Wizard Pro has a reputation as one of the best data recovery software programs on the market. It comes with a selection of advanced features, including partition recovery, formatted drive restoration, and corrupted file repair.
Read More
Related Articles
-
Turned off iCloud Drive and Lost Documents! [Recovered]
![author icon]() Jaden/Jul 24, 2024
Jaden/Jul 24, 2024 -
Can't Find Documents Folder on Mac [2024 Update]
![author icon]() Finley/Jul 24, 2024
Finley/Jul 24, 2024 -
Show Hidden Photos Mac [macOS Ventura/Monterey Tips]
![author icon]() Finley/Jul 24, 2024
Finley/Jul 24, 2024 -
Find Deleted Messages on MacBook (2024 Tips)
![author icon]() Tracy King/Jul 24, 2024
Tracy King/Jul 24, 2024