-
![]() USB Device Not Recognized | Windows 10 USB Driver Error Solved!
USB Device Not Recognized | Windows 10 USB Driver Error Solved! July 23,2026
 6 min read
 -
![]()
-
![]()
-
![]()
-
![]()
-
![]() Fix: Need to Format the Disk in Drive Before You Can Use It USBJuly 23,20266 min read
Fix: Need to Format the Disk in Drive Before You Can Use It USBJuly 23,20266 min read -
![]()
-
![]()
-
![]() The Disk Is Write Protected: How to Remove Write Protection HDDJuly 23,20266 min read
The Disk Is Write Protected: How to Remove Write Protection HDDJuly 23,20266 min read -
![]()
Page Table of Contents
PAGE CONTENT:
What Is an ESD USB Drive
I have installed windows on an external hard drive ( it had very old photos), when i tried accessing the hard drive again after i have installed windows all the photos and data have been erased and the hard drive name has been changed to ESD-USB format... what do i do to retrieve my data??? - from Microsoft Learn
An ESD USB is a bootable flash drive made from an ESD file, which is Microsoft's typical format for sharing Windows installers. These ESD files pack everything into a smaller, more efficient package compared to the usual ISO files, so downloading them is faster and takes up less space.
ESD USB drives are widely used for installing or reinstalling Windows, upgrading systems, or repairing boot issues. Understanding how ESD works is essential if you want to create reliable installation media.
- ESD file - A highly compressed Windows image file format
- USB drive - Used to store and boot the installation files
- Bootable media - Allows system installation without OS
When Do You Need an ESD USB
This happens when someone accidentally picks the wrong drive while setting up Windows. The Media Creation Tool doesn't make it obvious, so you might easily wipe out the wrong USB stick or external hard drive.
Most of the time, people click on the wrong disk when making boot media. Sometimes, they use a huge USB drive, like 128GB or even 1TB, when they don't need to. And it's pretty easy to miss those formatting warnings during setup.
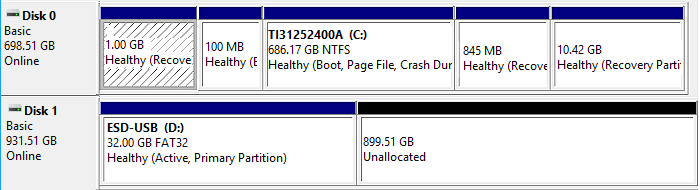
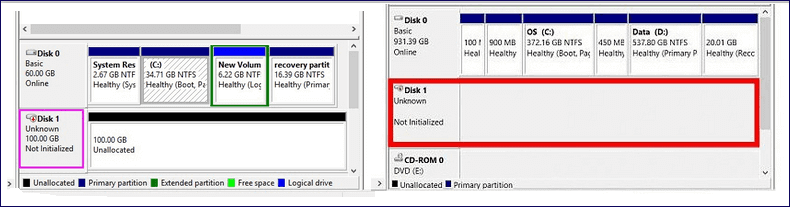
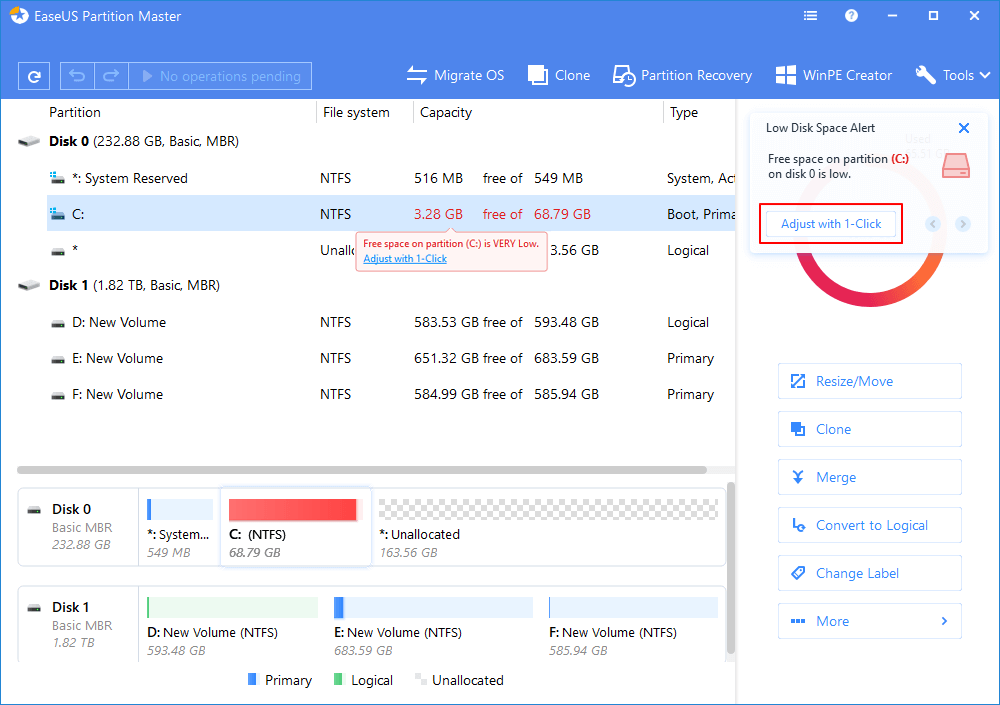
Afterward, you'll see your drive shrink down to a 32GB partition called ESD-USB. The rest of the storage looks like it disappeared; it's either unallocated or completely hidden.
Can You Recover Data from an ESD USB
If you create the Windows Media Installation Tool on the wrong drive, you will lose all partitions and data, leaving only a 32GB ESD-USB partition. The urgent task is to recover deleted files when your storage device turns into an ESD-USB drive.
It's recommended to apply file recovery software to scan and restore lost files from your ESD-USB drive first. If you have tried to convert an ESD-USB drive to normal by deleting the partition or reformatting the drive, that might overwrite your old files and cause permanent data loss. Go through this part and learn how to return your lost data as soon as possible.
Apply a professional USB data recovery tool, EaseUS Data Recovery Wizard, a practical and secure method to restore lost files from the ESD-USB device, to return your lost files immediately!
Download this outstanding USB data recovery software now and thoroughly scan existing and lost files from the ESD-USB drive and restore everything on the device in only three steps!
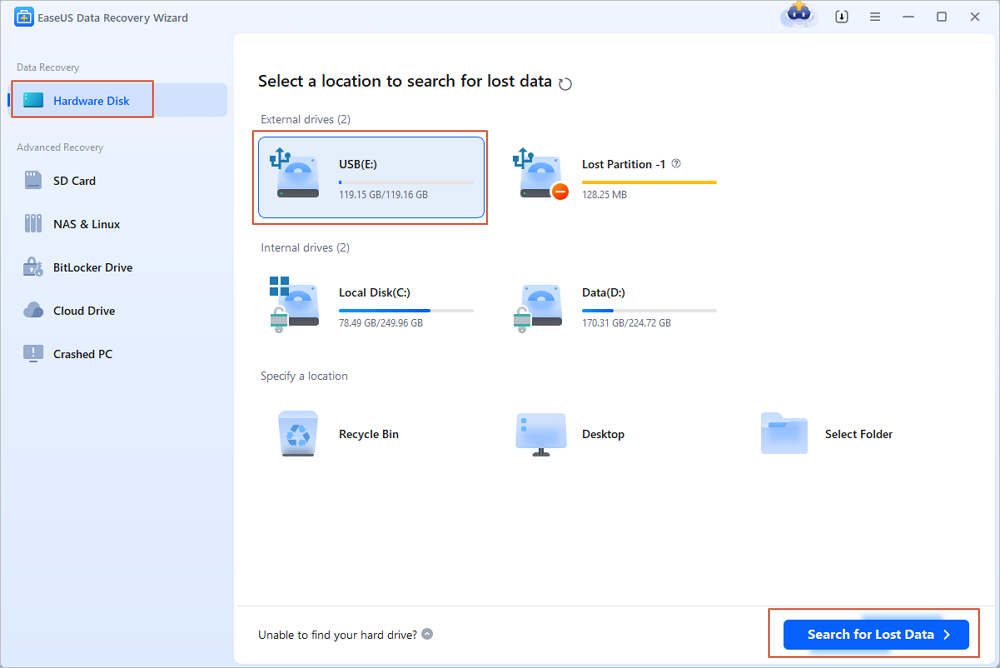
Step 1. Run USB Data Recovery Software
Connect the USB drive or pen drive to your computer and launch EaseUS USB data recovery software on your PC. Select the drive which is labeled as a External drives, and click "Scan for lost data" to start looking for lost files.
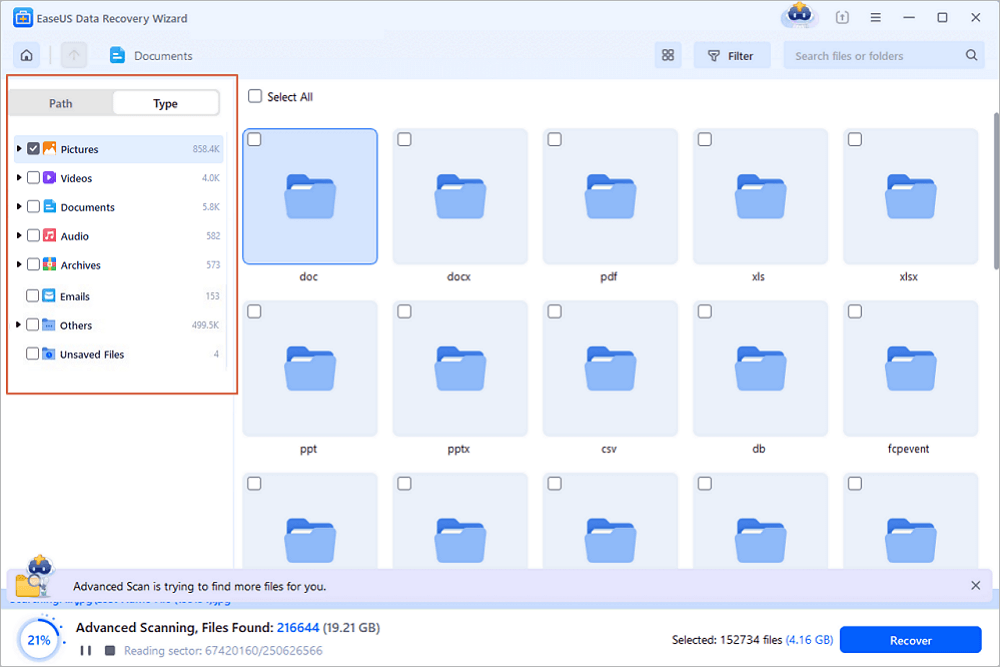
Step 2. Scan and Search Lost Files on a USB Drive
EaseUS Data Recovery Wizard will thoroughly scan your USB flash drive/pen drive and find all your lost data on it. When the scan process completes, use the Filter feature to find wanted files.
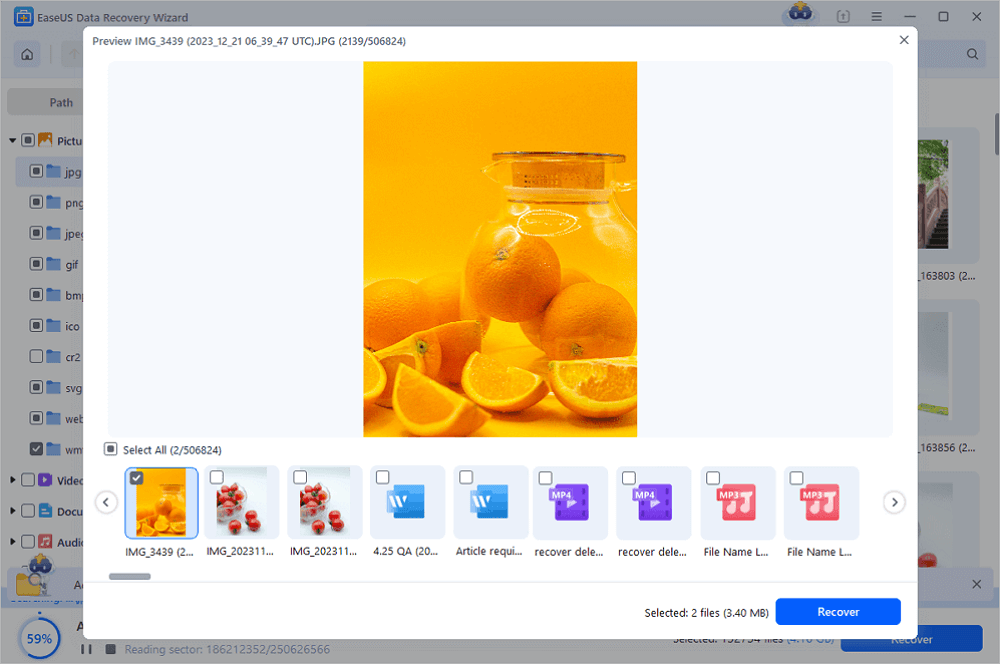
Step 3. Restore All Lost Files from USB
A double-click will allow you to preview the files. Select the target files to restore and click "Recover" to save them to a secure location on your PC or other external storage devices.
Many users trust EaseUS software, and you can check the reviews from Trustpilot or G2.
| 📒 |
Wonderful software,I had so much of my corrupted data on my sd card and could not find any way to recover that and so downloaded so many recovery softwares and the experience was best in EaseUS so easy to use, fast scanning and recovering unlimited data. Thanks EaseUS! - from Trustpilot |
| It is easy to download, open, maneuver through the options to recover data on an external drive, make a boot disk, backup and more. The scan was quick and found every file I thought I lost! - from Trustpilot |
After performing USB data recovery and saving your valuable data, read on to learn how to convert your ESD-USB drive or external hard drive back to normal. Before that, don't forget to mark this helpful guide by sharing it on Facebook, Twitter, or SNS.

How to Convert an ESD USB Back to a Normal Drive
Once you've saved your data, it's time to get your USB back to normal so you can use all its space again. You'll need to remove the ESD partition that got created during the process.
Here are three ways to do it, starting with the simplest:
Method 1. Manage Your ESD USB in Disk Management
Disk Management is straightforward and safer than messing around with command lines. You get a visual layout, so you're less likely to click the wrong thing.
Step 1. Start by right-clicking the Start menu, then choose "Disk Management" from there. Check if your USB stick is connected or not; mistaking another disk for the flash drive could lead to losing data on the wrong device.
Step 2. Start by locating the ESD-USB partition; once found, choose "Delete Volume" through a right-click action. That removal erases the bootable section created when setting up the ESD environment.
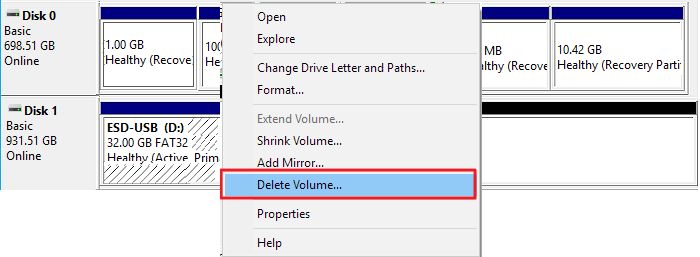
Step 3. Hit "OK" to confirm. There's no undo here, so make sure your files are backed up, the partition disappears immediately.
Step 4. Right-click the unallocated space and select "New Simple Volume." Just follow the prompts:
- Pick a drive letter.
- Choose a file system (either NTFS or FAT32 is fine).
- Finish the formatting.
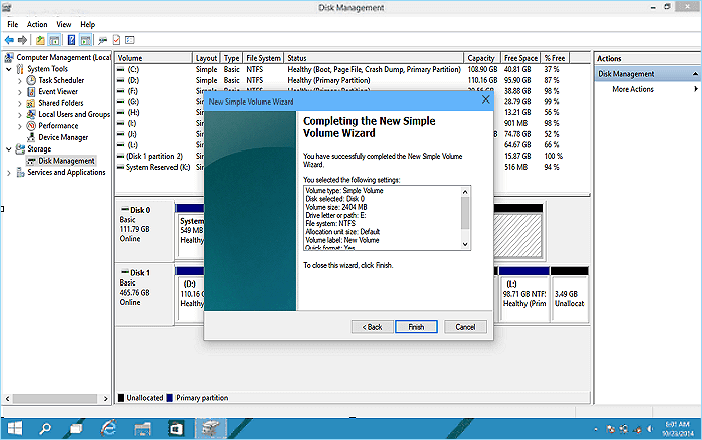
Once you're done, your USB drive will have all its storage back and work like usual again.
Method 2. Reset Your USB Drive with Command Prompt
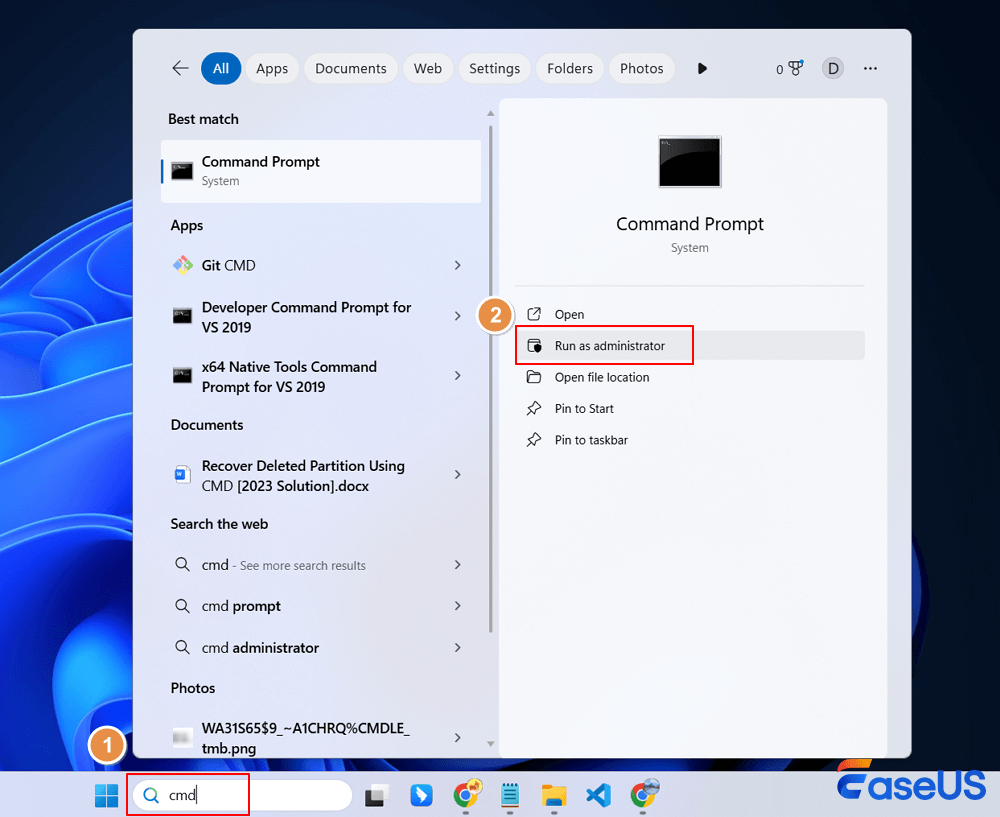
If Disk Management just isn't doing the trick, maybe you can't delete a partition or something's stuck; Command Prompt gives you more control.
Step 1. Search for "cmd" in your Start menu. Right-click on it and pick "Run as administrator." You've got to have admin rights for this to work since you're dealing with disks at a deeper level.
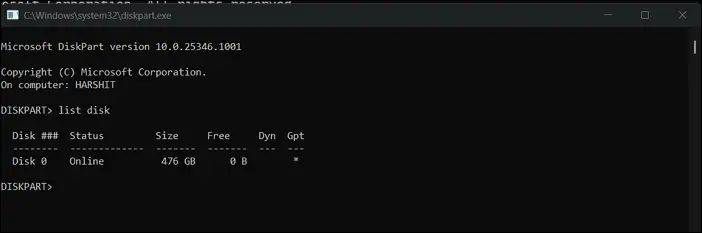
Step 2. Just type diskpart and hit Enter. This program lets you manage your disks directly.
Step 3. Type list disk to see all the drives connected to your computer. Find your USB drive's number, then type select disk X (swap out X for your disk's number). Be really careful, one wrong number and you'll wipe the wrong drive.
Step 4. Type clean and press Enter. This destroys all partitions and erases the drive completely. No going back. Make sure you've backed up anything you need before you hit Enter.
Step 5. Now, type these one by one, pressing Enter each time:
- create partition primary
- format fs=ntfs quick
- assign
When you're done, you'll have a fresh USB stick with a new file system and drive letter. Your USB drive should be good to go, just like new.
Method 3. Format Using File Explorer
If you're in a hurry, this is your go-to. Just know it doesn't always work, especially if your drive's locked or split into several partitions.
Here's what you do:
Step 1. First, open This PC and find your USB drive in File Explorer.
Step 2. Right-click the drive and pick "Format."
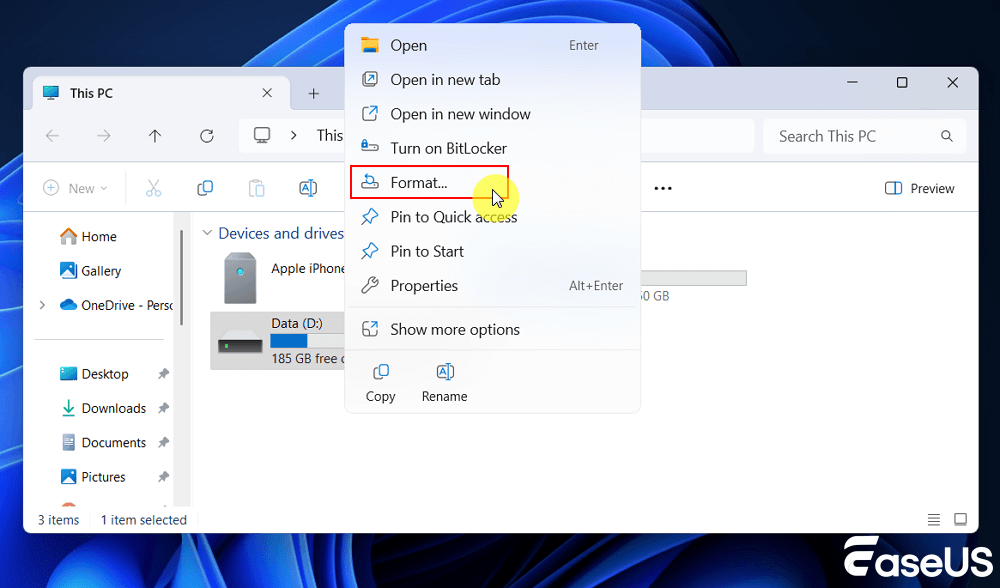
Step 3. Now, choose the file system you want:
- NTFS works best for big files and if you're mostly using Windows.
- FAT32 is better if you want your USB to work with more devices.
The file system basically decides how your stuff gets stored and accessed on the drive.
Step 4. Now, hit "Start" to kick off the formatting.
Quick format gets it done fast, though it only rebuilds the file system, full format takes longer, but checks for errors along the way. If there aren't any hidden partitions, your USB should work like new when it's finished.
Share these methods to help more users convert ESD-USB to normal.
How to Create an ESD USB (Step-by-Step Guide)
Making an ESD USB isn't too complicated if you walk through it one step at a time. Just check that your USB drive holds at least 8GB, and back up anything important before you dive in. Creating a bootable USB wipes everything, so don't skip this.
Step 1. Prepare the ESD File
First, you need a valid ESD file. Usually, you'll find these in Windows update packages or from official download sites. Double-check the file, if it's incomplete or damaged, you're going to run into issues later.
- Grab the Windows ESD file from a trusted site.
- Save it somewhere easy to find on your computer.
- Check the file size; make sure the download's finished and the file isn't broken.
Step 2. Convert ESD to ISO
Most tools only play nice with ISO files, not ESD. So, you have to turn your ESD into an ISO first. Plenty of free scripts and programs can handle this for you.
- Pick an ESD-to-ISO tool or script.
- Load your ESD file into the tool.
- Start converting.
- Wait until you get a finished ISO file out of it.
Step 3. Create Bootable USB
Now, with your ISO ready, it's time to build the bootable USB drive. This lets your PC install Windows directly from the stick.
- Plug your USB drive into your computer.
- Open a tool like Rufus or the Windows Media Creation Tool.
- Find and select the ISO file you just made.
- Pick your USB drive as the destination.
- Hit "Start" and let the tool do its thing.
How to Avoid ESD-USB Issues
Honestly, prevention is way easier than scrambling to fix a mess. Most of these issues happen because someone rushed through the Windows media creation process and missed a step. Here's what helps keep your data safe:
✅ Double-Check the Target Drive
Before you hit "Next" in any installation tool, take a second and make sure you've got the right drive. Check the name and the size. This tiny pause stops most accidental overwrites.
✅ Keep Regular Backups
Don't rely on just one place for your important files. Make copies on external drives or use the cloud. If one device bites the dust, your stuff's still safe.
✅ Use a Dedicated USB for Boot Media
Don't use your main storage USB to create installation media. Grab a separate device for this. That way, you won't lose anything important if something goes wrong.
✅ Avoid Using Large Drives for Installation
Stick to smaller USB drives, say between 8GB and 32GB, for Windows installs. If something goes sideways, you're not risking a ton of data.
USB ESD Protection FAQ
Here are some frequently asked questions about the ESD USB to help you better understand and use it effectively.
1. What is the difference between ESD and ISO?
ESD files are those super-compressed Windows images, basically, they're made for quicker, smaller downloads. ISO files are different. They're more like standard disk images that are easy to mount or use for creating a bootable USB drive. ISO files work with pretty much every setup tool out there, so if you want compatibility and ease, ISO is the way to go.
2. Can I create ESD USB without converting to ISO?
Not really. Most tools out there expect ISO files, so they won't recognize ESD directly. Converting ESD to ISO just makes life easier and avoids headaches for Windows installation. Sure, some advanced utilities support ESD, but honestly, ISO is still the hassle-free choice.
3. Is ESD USB safe to use?
Not really. Most tools out there expect ISO files, so they won't recognize ESD directly. Converting ESD to ISO just makes life easier and avoids headaches for Windows installation. Sure, some advanced utilities support ESD, but honestly, ISO is still the hassle-free choice.
Was this page helpful?
-
![]()
Written by
Tracy became a member of the EaseUS content team in 2013. Being a technical writer for over 10 years, she is enthusiastic about sharing tips to assist readers in resolving complex issues in disk management, file transfer, PC & Mac performance optimization, etc., like an expert.…

20+
Years of experience

160+
Countries and regions

72 Million+
Downloads

4.9 +
Trustpilot Score


