There's a Problem with This Drive
Featured Articles
- 01 You Must Initialize a Disk Before Logical Disk Manager Can Access It
- 02 Location Is Not Available
- 03 Drive Access Denied
- 04 Cannot Open Volume for Direct Access
- 05 The Disk Structure Is Corrupted and Unreadable
- 06 Data Error Cyclic Redundancy Check
- 07 Hard Drive Showing as Unknown Device
- 08 SamSung 870 Evo Not Detected Windows 10
- 09 Maxtor Hard Drive Not Working
"I have had a very long and frustrating day and now I'm turning to the forums for some help......pc which had a brand new Samsung EVO860 SSD in it, it has some very important files......Windows 10 does not show it at all, not in explorer, not in disk management. All I need is the SSD to be accessible so I can cut the files I need from it and move them to where they belong......"
Sometimes our hard drive tries to play hide-and-seek with us. You may not see your SSD from BIOS, disk management, Samsung Magician, and Device Manager. How to make it detected in Windows 10? No need to frustrating. Four corresponding topics are here to solve Samsung 860 EVO not detected in Windows 10. No need to worry, we also provide the remedy at the end of the article.
| Workable Solutions | Step-by-step Troubleshooting |
|---|---|
| Samsung 860 Not Detected in BIOS |
|
| Disk Management Can't See It |
|
| Samsung Magician Not Recognizing |
|
| Samsung 860 EVO Not Showing Up |
|
Samsung 860 EVO Not Detected in BIOS
An outdated BIOS may fail to support Samsung 860 EVO SSD, so you can update the BIOS to the latest version. Once it is done, see whether it is detected in BIOS.
Note: Updating BIOS is more dangerous than installing Windows programs. A fail could lead to a computer broke.
Update the BIOS to the Latest Version
Step 1. Check the computer outlet and BIOS version.
An accidental shutdown will damage your motherboard. Make sure your outlet and charging cable work well.
Follow steps to check BIOS version for downloading in the next step:
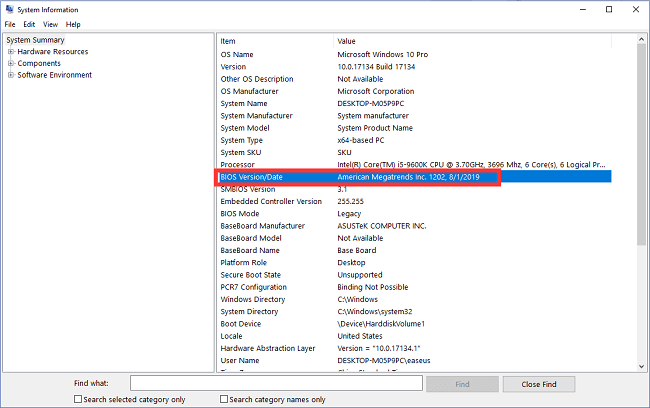
Type System Information on the search box > Click System Information > See the BIOS Version/Date on the panel > Download the BIOS version from the website > Unzip the BIOS version file.
Step 2. Go to Advanced Startup
Follow the path: Settings > Update & Security > Recovery > Restart now
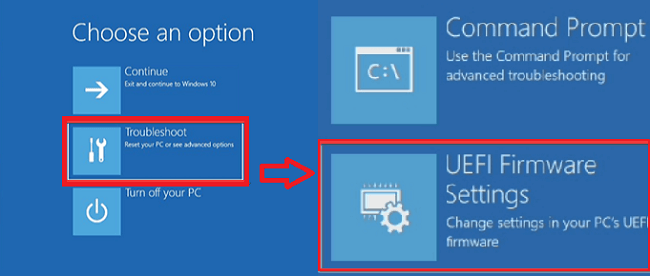
Step 3. Access the "Choose an option" page
Select Troubleshoot > Advanced options > UEFI Firmware Settings > Click Restart button
Read more methods about Samsung SSD not showing up in BIOS:
Fixed 2022: Samsung SSD Not Showing Up in BIOS
In this article, we will show you how to fix SSD not recognized in Windows 10 with updated BIOS, re-seated SATA cable, replace another SATA port, and configure BIOS setting.
Windows 10/11 Disk Management Can't See Samsung 860 EVO SSD
Here are three solutions to cope with Samsung not being detected in disk management.
Fix 1. Update 860 EVO SSD driver
Fix 2. Uninstall SSD Driver
Fix 3. Format the SSD
Fix 1. Update 860 EVO SSD Driver
Step 1. Press Windows + X, select Device Manager on the menu.
Step 2. Expand Disk drives, right-click the targeted drive and click Update Driver.

Step 3. Choose Search automatically for updated driver software.
Fix 2. Uninstall SSD Driver
Step 1. Press Windows + R to open the Run window.
Step 2. Type devmgmt.msc and click OK to run Device Manager.
Step 3. Expand Disk Driver, right-click Samsung drive and choose Uninstall Device.
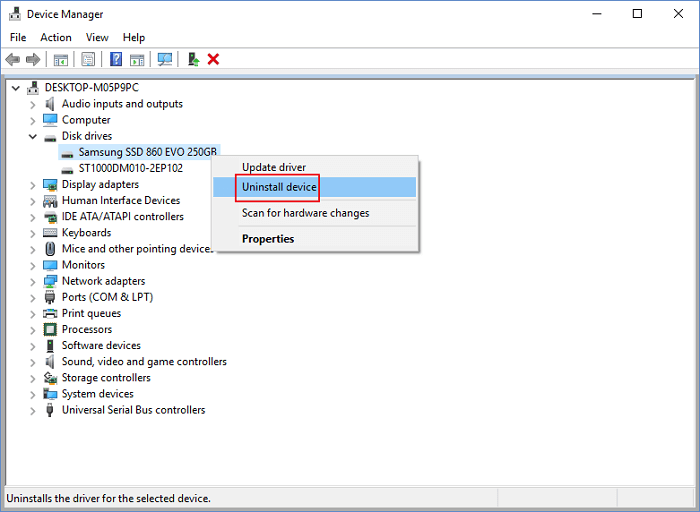
Step 4. Restart PC.
Windows will automatically update and re-install the driver.
Fix 3. Format the SSD
Formatting is the last method to try, but we will not recommend it only when the above two fixes don't work. The formatting will erase your data so you should do the backup at the very first. You can try EaseUS Partition Master to format the hard drive.
You can download the software, right-click the SSD and choose the "Format" feature.
Step 1. Right-click the hard drive partition and choose the "Format" option.
Step 2. In the new window, you can set a new name for your selected hard drive partition. Then click the "OK" button.
Step 3. Click the "Execute 1 Task(s)" button, then click "Apply" to start formatting the hard drive partition.
Samsung Magician Not Recognizing Samsung SSD
Try the three methods related to Samsung Magician, we've listed the website you may need to visit.
Fix 1. Update Samsung Magician to Latest Version
Fix 2. Install the NVMe Driver
Fix 3. Disable RAID Mode and Enable AHCI in Windows 10
Fix 1. Update Samsung Magician to Latest Version
Step 1. Type Control Panel on the search box, click to start.
Step 2. Click Programs and Features.
Step 3. Scroll down to find Samsung Magician, right-click it, and choose Uninstall.
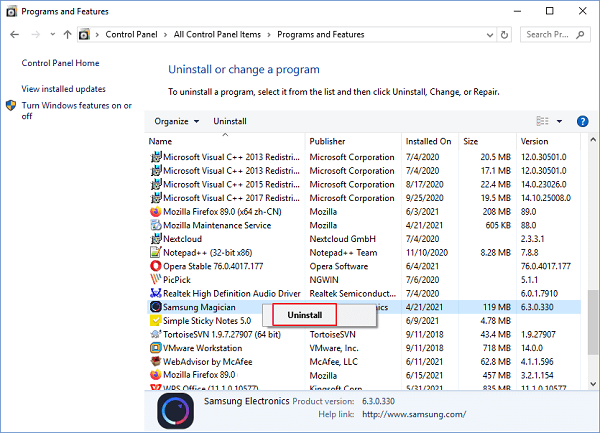
Step 4. Restart the computer and visit the Samsung website to download the latest Samsung Magician.
Fix 2. Install the NVMe Driver
Installing the compatible NVMe driver is the ideal choice to use Samsung Magician. If you have not set it up, you can do the steps as follows:
Visit the official website and scroll down to the Samsung NVMe driver part to download the NVMe driver. Usually, the NVMe driver is compatible with all Samsung models.
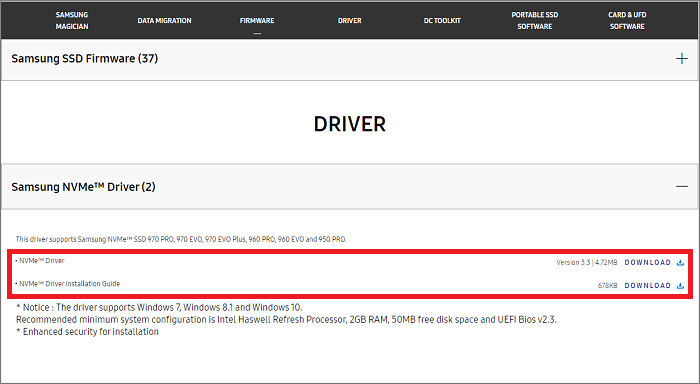
Once the downloading is done, you can open the related files to install the driver. After installing, you can restart the computer and check if SSD showing up in Samsung Magician.
Fix 3. Disable RAID Mode and Enable AHCI in Windows 10
Step 1. Type CMD on the search box, right-click it, and select Run as administrator.
Step 2. Type the command line and press Enter.
Bcdedit /set {current} safeboot minimal
Step 3. Restart the computer and enter BIOS settings.
Step 4. Change the SATA Operation mode to AHCI.
Step 5. Save changes and exit.
Step 6. Repeat step 1 to open CMD.
Step 7. Type the command line and press Enter:
bcdedit /deletevalue {current} safeboot
Step 8. Now restart your computer and run Samsung Magician. Check if your SSD is showing up.
Samsung 860 EVO Not Showing Up in Device Manager
If the device not showing up in the Device Manager, you should manually scan the device one more time. Or your hard drive just has a bad connection. See as follows:
Fix 1. Search New Devices in Windows Device Manager
Fix 2. Check Hard Drive Connection
Fix 1. Search New Devices in Windows Device Manager
Step 1. Press Windows + X and click Device Manager.
Step 2. Click Action and then click Scan for hardware changes.
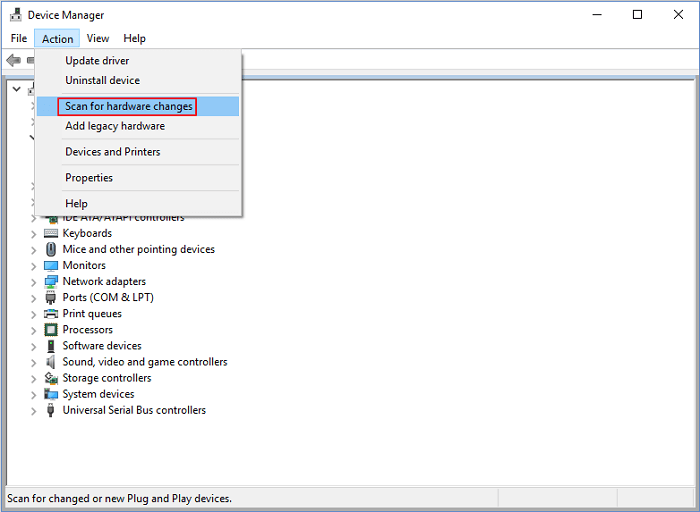
Step 3. Check the Disk drivers to see if it is working.
Fix 2. Check Hard Drive Connection
If your SSD is not correctly connected to your computer, the system can not detect the SSD. So you can disconnect the cable and reconnect it.
Step 1. Prepare a screwdriver. And cut off the power supply of your computer.
Step 2. Use the screwdriver to open the computer case.
Step 3. Disconnect the cable connected to the Samsung hard drive, then reconnect the SSD.
Remedy: How to Recover Data from Undetectable Hard Drive
If none of the fixes is available on your Samsung SSD, you should connect the hard drive to another PC. If the hard drive still disappears in another PC. That means your hard drive may have problems and what you should do next is to recover data from the hard drive via EaseUS Data Recovery Wizard.
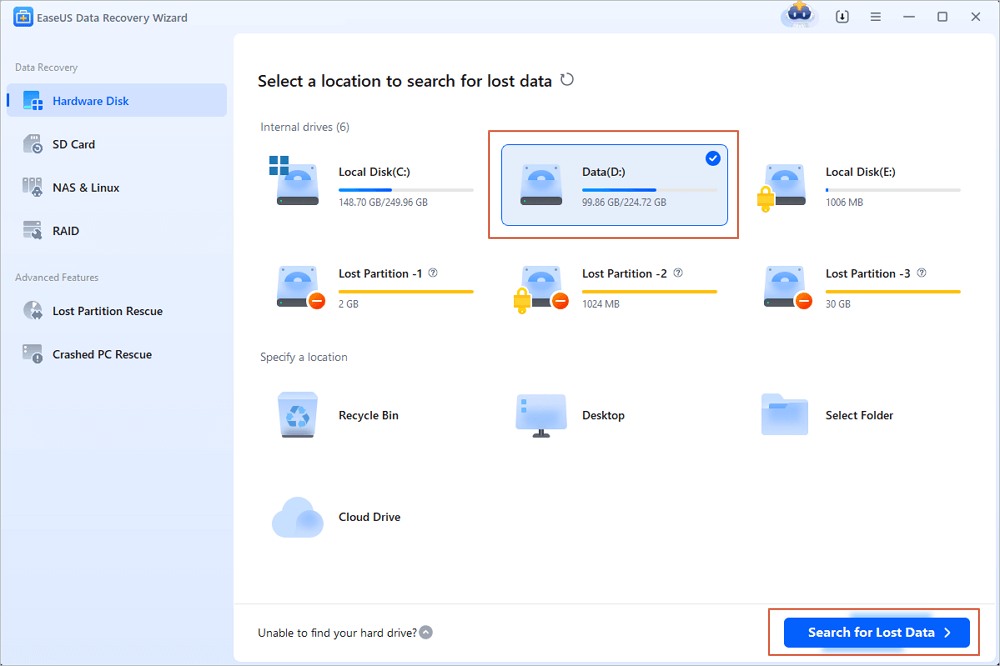
Step 1. Scan the SSD
Open EaseUS Data Recovery Wizard, select the SSD where you lost data, and click the "Search for Lost Data" button.
Step 2. View the results
When the scanning finishes, find lost SSD data by using the "Filter" and "Search" options after checking the "Deleted Files" and "Other Lost Files" folders.
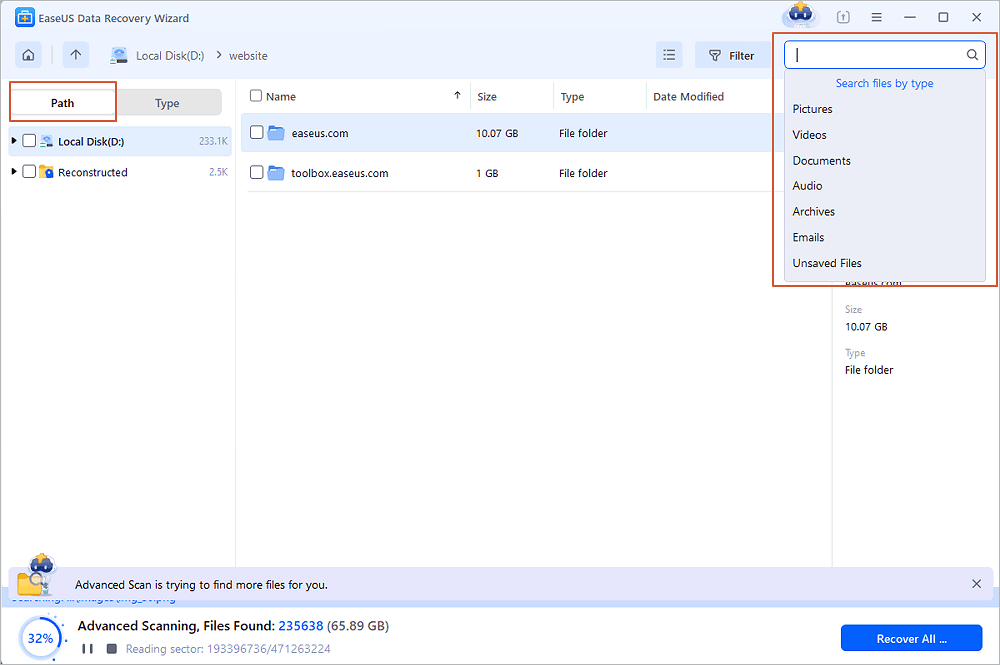
Step 3. Recover SSD files
Select desired data and click the "Recover" button to get back lost SSD files.
💡Tip: You can restore data on the local disks, external hard drives, and also the cloud storage.

Here's a video about how to fix SSD not showing up. You can check and learn more:
⌛Time Stamps:
- 00:15 Method 1. Assign Drive Letter
- 01:05 Method 2. Initialize Disk
- 01:35 Method 3. Corrupted File System
- 02:38 Method 4. Windows Driver Issue
Was This Page Helpful?
Dany is an editor of EaseUS who lives and works in Chengdu, China. She focuses on writing articles about data recovery on Mac devices and PCs. She is devoted to improving her writing skills and enriching her professional knowledge. Dany also enjoys reading detective novels in her spare time.
Written by Tracy King
Tracy became a member of the EaseUS content team in 2013. Being a technical writer for over 10 years, she is enthusiastic about sharing tips to assist readers in resolving complex issues in disk management, file transfer, PC & Mac performance optimization, etc., like an expert.
Related Articles
-
Free Download EaseUS Data Recovery Wizard Torrent, Serial Key
![author icon]() Tracy King/Jun 16, 2026
Tracy King/Jun 16, 2026 -
GetData Back Free Version Alternative Download [Quick&Safe]
![author icon]() Jean/Jun 17, 2026
Jean/Jun 17, 2026 -
Download EaseUS Data Recovery Wizard Professional 17.0 Full Version with Torrent
![author icon]() Tracy King/Jun 17, 2026
Tracy King/Jun 17, 2026 -
Repair Corrupted Word File Online [100% Free]
![author icon]() Cedric/Jun 30, 2026
Cedric/Jun 30, 2026