Screen recording on MacBook Air or Pro is a nifty tool for business persons, gamers, tech support professionals, and educators. Are you willing to capture the screen and share the on-screen activity? If yes, you must know how to screen record on Mac!
In various instances, you may need to record screens on your MacBook, for example, making training videos, recording Zoom meetings, and more. Therefore, you should know how to screen record on Mac with proper audio.
This article shows the best ways to record screens on a MacBook with internal audio and microphone sound. Out of the best ways to record screens on Mac, the following are the 3 easy ways:
| 💻Use Professional Mac Screen Recorder | With a great Mac screen recorder, you can record the screen hassle-free with a webcam or audio (system sound/microphone). Besides, there is no watermark on your recordings. |
| This way is quick and convenient, but remember that the screenshot toolbar can only record audio from the microphone. It is unable to record internal audio, for example, the sound from a video playing in a browser window. | |
| 🖼️Use QuickTime Player | QuickTime Player is free for the macOS. It's the best-in-class media player offering a screen recording feature, an added advantage. Moreover, it lets you share your recorded videos without any hassle. |
We provide a video on-screen recording on Mac, whose outlines are the following:
- 00:26 - Open the screen recorder app
- 00:48 - Select if you intend to record the entire screen or a portion
- 01:16 - Select the location where you wish to save the screen recording
- 01:35 - Opt for the microphone you would like to use when recording the screen with external audio
Now, let's begin to learn how to screen record on Mac step by step!
Best Way to Capture Mac Screen [Recommend]
The easiest way to screen record on macOS-based devices is to find the best free screen recorder for Mac. After testing a great many programs, we find that EaseUS RecExperts stands out in every aspect.
This Mac screen capture runs perfectly on various types of Macs, including M1/M2-based ones. With its aid, you can effortlessly record anything on your Mac desktop, like webcam videos, live streaming, TV shows, and more. Besides, it allows you to adjust the recording area flexibly based on your practical needs.
Most importantly, this tool supports recording your Mac screen and internal audio simultaneously without installing extra plugins. Just hit the below button to get it.
Once you got this tool, you can follow the below steps to capture your MacBook screen easily:
Step 1. Launch this software on your Mac, and click Full Screen or Region to select your desired recording area.
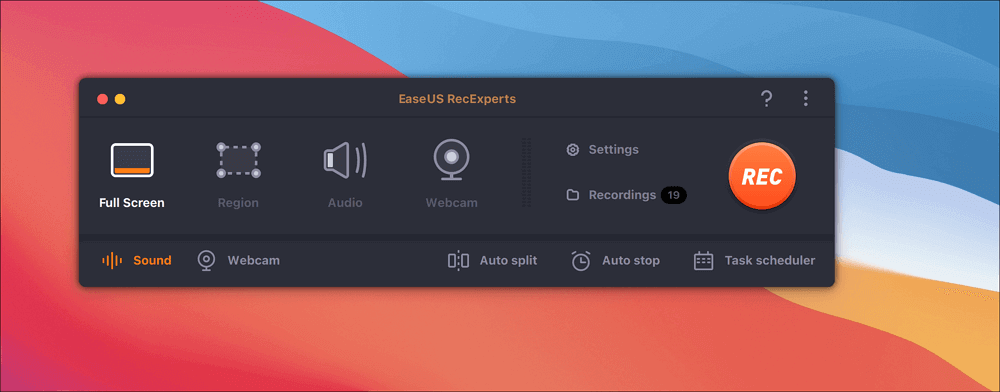
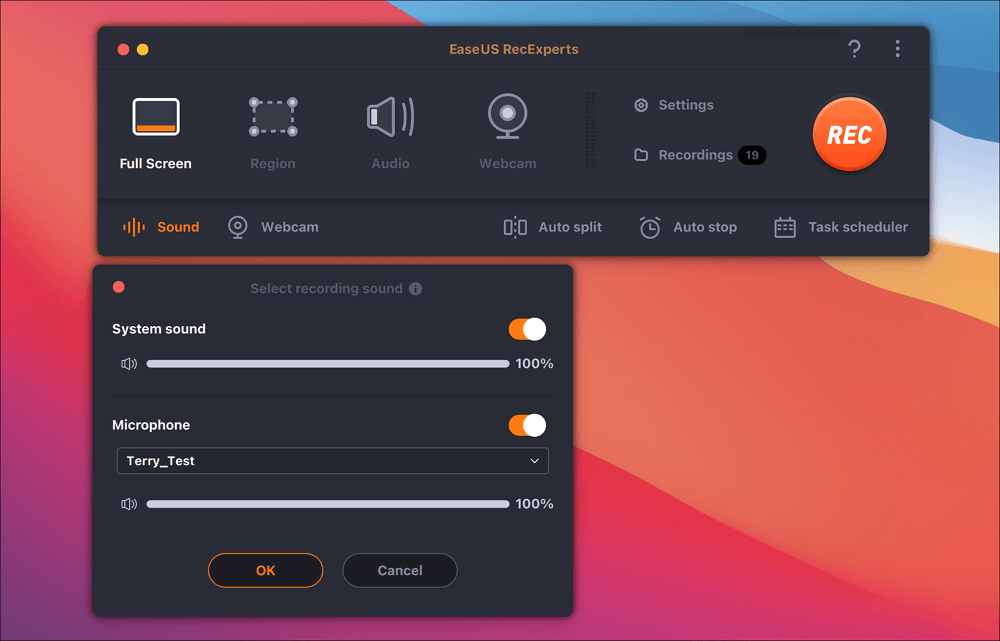
Step 2. To record a Mac screen with audio, you can click the Sound icon to choose your audio source.
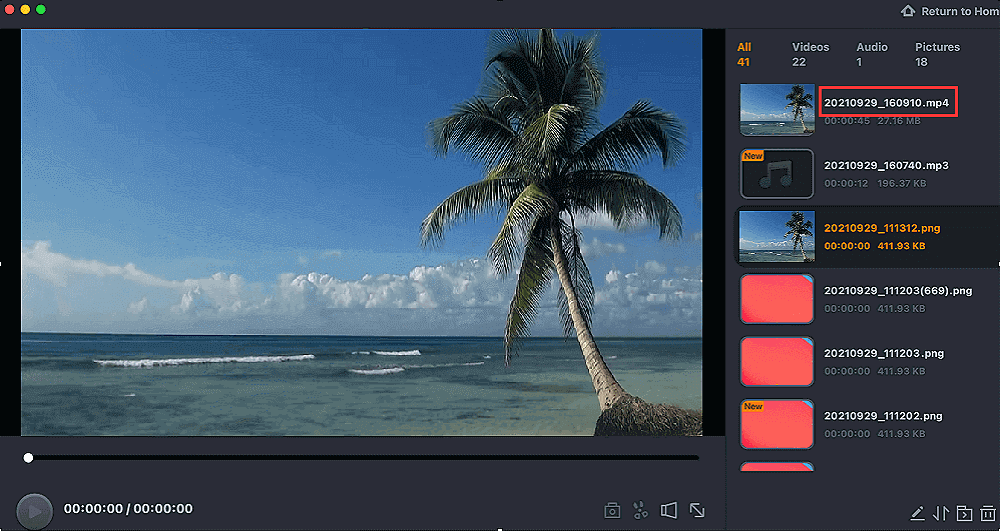
Step 3. Once done, click REC to begin your Mac screen recording. You will be led to the preview window when you finish the task.
Don't forget to share this helpful post with others in need!
Use Screenshot Toolbar to Screen Record on MacBook Air/Pro
Is your MacBook operating on the Mojave OS or a recent version of macOS Sonoma? If so, you may employ the pre-installed screenshot toolbar to capture everything on your MacBook's screen.
But initially, you need to ensure sufficient disk space to save your recording by checking RAM on Mac. You would also like to evaluate your Mac's performance to ensure your system functions smoothly and to impede crashes or glitches.
Follow the steps below to screen record on MacBook Air using the best screenshot toolbar:
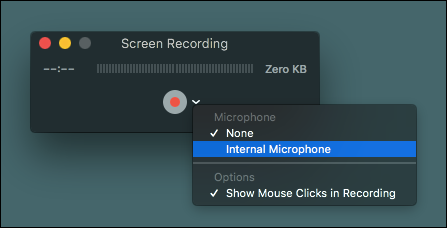
Step 1. Hit the "Command + Shift + 5" to trigger the screenshot toolbar.

Step 2. Hit the "Options" menu to modify the recording settings, including timer, storage location, and microphone.
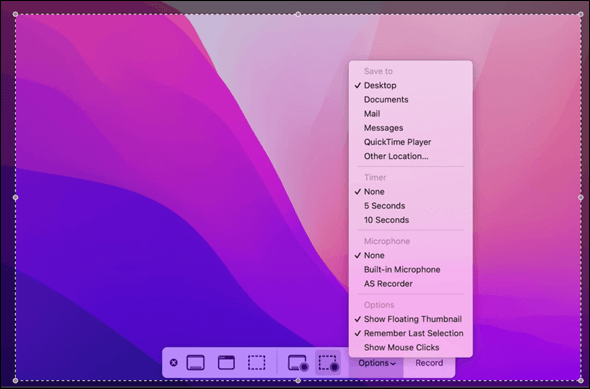
Step 3. Select "Record the whole screen" and hit the "Enter" button on the keyboard in order to commence recording. Otherwise, you may choose "Record chosen portion", drag to modify the portion you wish to record, and hit the "Record" option.
Step 4. The control bar will vanish automatically once the recording begins. You may hit the "Stop" symbol in the menu bar to finish the recording or simply hit "Command + Control + Esc".
![]()
Step 5. Once the recording is stopped, the recording's thumbnail will pop up at the bottom right side of the MacBook's screen for just 3 seconds. You may swipe right or do nothing to save it on your MacBook.

Share this article on social media to help others learn more about how to screen record on Mac.
Have you ever tried FaceTime, Skype, or Zoom meeting with someone, and your MacBook said, 'There Is No Connected Camera MacBook'? If so, read this article to solve your problem.

10 Steps to Fix There is No Connected Camera on Macbook Air/Pro/iMac 2023
This article will show you how to fix the error 'There is No Connected Camera on MacBook' with 10 steps. Read more >>
How to Screen Record on Mac Using QuickTime Player
The ideal approach might be to record your screen with audio using QuickTime Player on your Mac for an overview or instruction where audio is crucial. QuickTime Player comes pre-installed on Macs and is easy to navigate and use, much like the Screenshot toolbar.
Below are the major steps to screen record on Mac with sound using QuickTime Player:
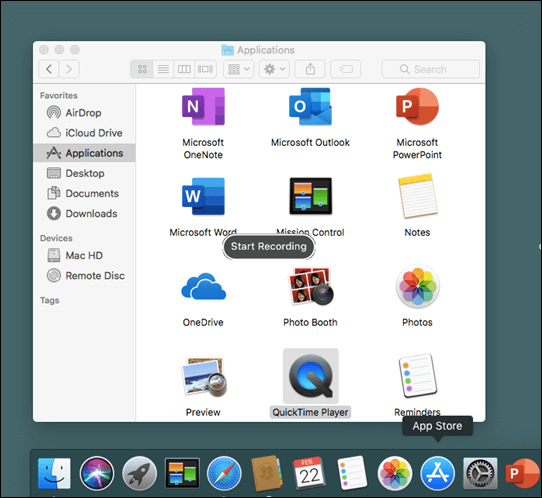
Step 1. Open this "QuickTime Player" application.
Step 2. Hit the "File" in the menu bar, and opt for the "New Record" button to set up the screen recording.
Step 3. In order to record the entire screen, click anywhere on your MacBook's screen to initiate the recording. For a portion to record, you must drag the cursor to opt for the portion you wish to record, then hit the "Start Recording" button.
Step 4. Hit the "Stop" button in the menu bar to finish the recording, and press "Command + Control + Escape".
Step 5. Your recorded video clip will shortly appear. Return to "System Preferences" and reset the audio output device to its initial setting. If not, your Mac's speakers remain silent.
If you accidentally deleted the QuickTime recording on your Mac, don't worry. You can read the article below to recover the deleted recordings.

How to Recover Unsaved/Deleted Quicktime Recordings in 2023
This guide offers full solutions for Mac users to recover unsaved Quicktime recordings from temp files. Read more >>
Best Screen Recorder for Mac with Internal Audio
You may record Mac's screen with audio using the methods mentioned above, but third-party screen recording software is the most hassle-free way for screen recording. These are the top 3 third-party screen recording software are shown below:
| Awesome Screenshot & Recorder | OBS studio | Apowersoft Screen Recorder | |
| 😀Pros |
|
|
|
| 😫Cons |
|
|
|
| Review | It's an all-in-one tool helping you capture screenshots on your MacBook, record screens with audio, edit recorded videos, annotate videos while recording, and much more! | Open Broadcaster Software, or OBS, is the most renowned program available to aid users in recording audio and videos from a Mac screen. | With this top-notch web-based screen recorder for Mac, you can quickly make a tutorial video with sound and screen under picture-in-picture mode. It means this is an ideal tool for recording all types of courses. |
How to Recover Screen Recording on Mac
Where do screenshots go on Mac? If you can't find a screen record on your Mac, you need to press the Mac Spotlight shortcut "Command + Space" to locate the screen captures you wish to reclaim by searching through the contents of your Mac.
Unable to find recordings on your Mac? It's possible that you accidentally deleted them! In this case, you should find professional screen recording recovery software to recover screen recordings on Mac. The best software to employ is EaseUS Data Recovery Wizard for Mac Pro.
Data loss situations are common, but you can retrieve everything with the help of this professional data recovery software. It can solve most data loss scenarios and recover permanently deleted files from Mac regardless of the file size.
Download this professional data recovery tool now! And follow only three steps to recover your lost or deleted screen recordings:
Step 1. Select the drive to be scanned.
Step 2. Select your lost or deleted screen recordings.
Step 3. Once you have found the desired files, preview the files and then click "Recover" to begin the recovery of your deleted/lost Mac files.
Note: Before data recovery, you'd better click "Disk Backup" from the left sidebar to create a backup of your Mac to avoid further data loss. After backing up, the software can recover data from the Mac backup, and your computer can write new data again.
Conclusion
Three ways to screen record on a Mac with audio are discussed in this post. You may simply attempt the built-in screen recording facilities of macOS if you only require a basic screen recorder and never wish to install any third-party apps. Generally speaking, screen recorders are secure as long as you choose high-quality software from a recognized vendor.
Third-party apps can jeopardize your system and personal information if you're not cautious. However, data loss scenarios are common. If you can't find recordings on your MacBook, install the EaseUS Data Recovery Wizard for Mac now!
Screen Record on Mac FAQs
Below are the leading FAQs on screen recording on MacBook:
1. How to use the Screenshot toolbar on MacBook Air?
On your MacBook, follow the steps below to use the Screenshot toolbar:
Step 1. Press "Shift + Command + 5" to open the screenshot and display the tools.
Step 2. Hit the "Options" menu to modify the recording settings, including timer, storage location, and microphone.
Step 3. Select "Record the whole screen" and hit the "Enter" button on the keyboard in order to commence recording. Otherwise, you may choose "Record chosen portion", drag to modify the portion you wish to record, and hit the "Record" option.
Step 4. The control bar will vanish automatically once the recording begins. You may hit the "Stop" symbol in the menu bar to finish the recording or simply hit "Command + Control + Esc".
Step 5. Once the recording is stopped, the recording's thumbnail will pop up at the bottom right side of the MacBook's screen for just 3 seconds. You may swipe right or do nothing to save it on your MacBook.
2. How do I record my Mac screen without QuickTime?
Select "File > New Screen Recording" in the QuickTime Player application on your Mac to launch Screenshots and show the available tools. You can choose what is recorded by selecting "Options". For instance, you can decide where to store your screen capture or whether it should include the pointer and mouse clicks.
3. How do I record my Mac screen with a keyboard?
These are keyboard shortcuts you can use to screen record on a Mac: The Screenshot toolbar can be opened by pressing "Shift + Command + 5". Choose your recording settings from the toolbar, and then press "Record".
4. Why can't I screen-record on my Mac?
If you can't record the screen on your Mac, you might not have screen recording turned on. Choose "System Preferences" or "System Settings" by clicking the apple symbol on the top-left side of your screen to find out. Select "Security & Privacy" from the options panel, then select the "Privacy" menu and "Screen Recording".
Was This Page Helpful?
Jane is an experienced editor for EaseUS focused on tech blog writing. Familiar with all kinds of video editing and screen recording software on the market, she specializes in composing posts about recording and editing videos. All the topics she chooses are aimed at providing more instructive information to users.
Brithny is a technology enthusiast, aiming to make readers' tech lives easy and enjoyable. She loves exploring new technologies and writing technical how-to tips. In her spare time, she loves sharing things about her game experience on Facebook or Twitter.
Related Articles
-
How to Fix Flashing Folder with Question Mark on Mac Without CD
![author icon]() Brithny/2024-03-11
Brithny/2024-03-11 -
How to Update/Reinstall macOS Without Losing Data
![author icon]() Tracy King/2024-01-11
Tracy King/2024-01-11 -
Fix IE Browser Shuts Down Suddenly in Windows 10/8/7 Error
![author icon]() Tracy King/2024-07-01
Tracy King/2024-07-01 -
[Fixed] Target Disk Mode Not Working on macOS Ventura/Monterey
![author icon]() Dany/2024-01-11
Dany/2024-01-11

EaseUS Data Recovery Services
EaseUS data recovery experts have uneaqualed expertise to repair disks/systems and salvage data from all devices like RAID, HDD, SSD, USB, etc.