This page covers the full process of how to update and install the latest macOS Big Sur, Catalina, Mojave, etc. on Mac without losing any data. If you need a detailed guide, follow through this page to get the desired macOS installed on your computer now:
| Workable Solutions | Step-by-step Troubleshooting |
|---|---|
| Phrase 1. Preparations | 2GB+ memory and 9GB+ storage space left on Mac > 45% + battery > Connect to internet...Full steps |
| Phrase 2. Change a USB port | Start Mac from macOS Recovery > Select "Reinstall macOS" > "Continue"...Full steps |
| Phrase 3. Recover Lost Data | After macOS installation, run EaseUS Mac data recovery software > Scan and recover lost data...Full steps |
Applies To: macOS Big Sur, macOS Catalina, macOS Mojave, macOS High Sierra, macOS Sierra, or earlier Mac operating systems
The need to update or reinstall your macOS always follow the release of a new operating system, the slow performance of your Mac, or a system crash. When it comes to reinstalling macOS, users biggest concern is losing data on their computer.
The good news is that, if you follow the instructions strictly to update your Mac Operating System, the chance to lose data on your Mac is quite slim, since a reinstallation just needs to create a new copy of the OS, your existing files stored on your Mac won't be lost. Thus, as long as you don't choose to erase your startup disk during the reinstallation, you won't lose files. However, you know what "Slim" means - it's not 100% safe and is still at the risk of losing some data.
Then how to reinstall macOS without any data loss? To provide a double guarantee to the precious data on your Mac, you can make a copy of the files on your Mac before you perform the reinstallation, or equip your Mac with a data recovery tool that can rescue your data after the reinstallation.
Preparations you Need to Make Before You Reinstall macOS
To reinstall macOS on your computer smoothly. Follow the tips below to prepare your Mac ready for the new macOS update now:
- Leave at least 2GB memory and 8.8 GB storage space on your Mac
- Leave at least 45% battery on your Mac
- Connect Mac to the internet or WiFi
- Update your Mac Apps to the latest versions
- Backup all your personal data and even create backups for your present Mac data through Time Machine
Remember to back up your Mac to an external hard drive for preventing system update failure or unexpected troubles from happening. Then follow the detailed guide below to reinstall Mac OS via macOS Recovery mode, which enables you to reinstall macOS, restore your files from Time Machine, repair or erase a disk, and more.
How to Update & Reinstall macOS Without Losing Data
*Print this page or open this page on another device so you can refer to it later.
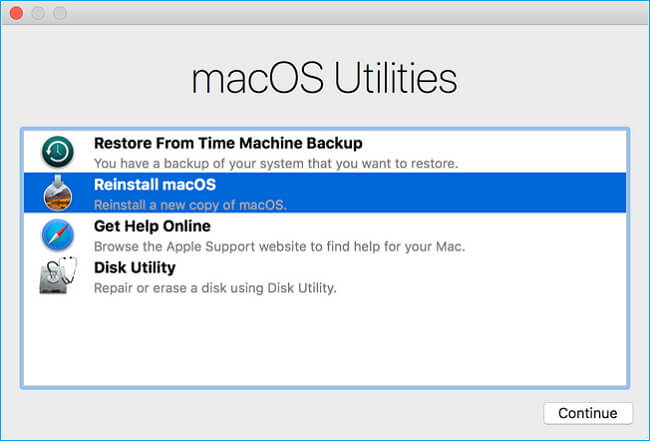
Step 1. Start up your Mac from macOS Recovery
- Turn on your Mac and immediately press and hold "Command + R", "Option + Command + R", or "Shift + Option + Command + R".
- Release the keys when the Apple logo, a spinning globe, or a pop-up for a firmware password appears.
Step 2. Select "Reinstall macOS" from the Utilities Window and click "Continue".
Step 3. Follow the onscreen instructions to select the hard drive you want to install the OS on and start the installation.
Step 4. Don't put your Mac to sleep mode or close its lid during the installation. It's normal to see your Mac restart several times or the screen is white while you reinstall the Mac OS. Just wait patiently for the process to finish.
If you don't know how to reinstall or update macOS, the easiest and most effective way is to use a tool. EaseUS Data Recovery Wizard for Mac provides a free macOS installation feature to help users install new or old macOS from an external hard drive smoothly! Check out the following steps:
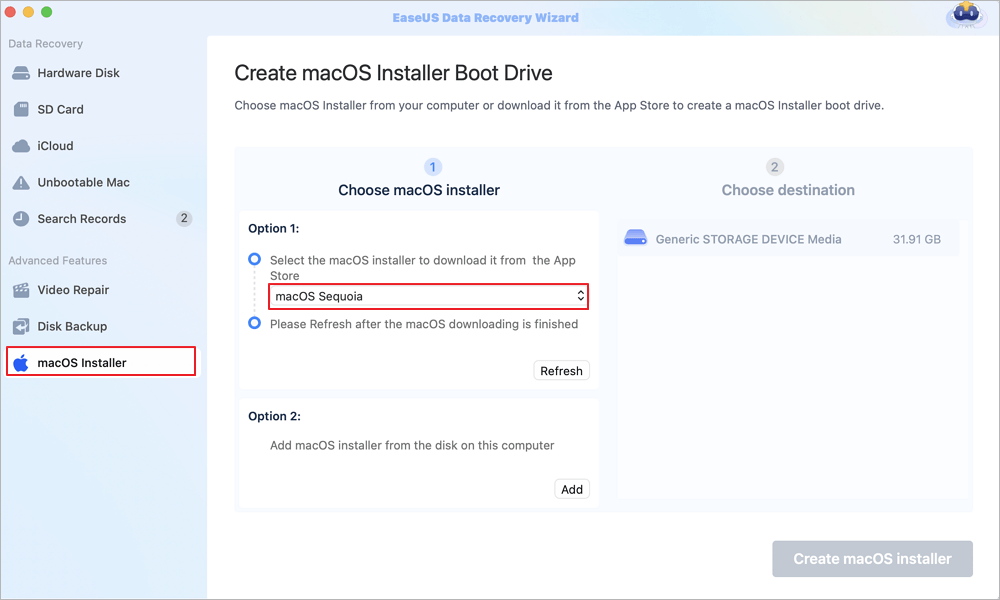
Step 1. Select a macOS version
Select a macOS version from the list, or click the "Refresh" option to get the downloaded macOS version. Or you can add a macOS installer from your disk by clicking the "Add" button. Insert a USB flash drive larger than 16 GB to save the macOS installer.
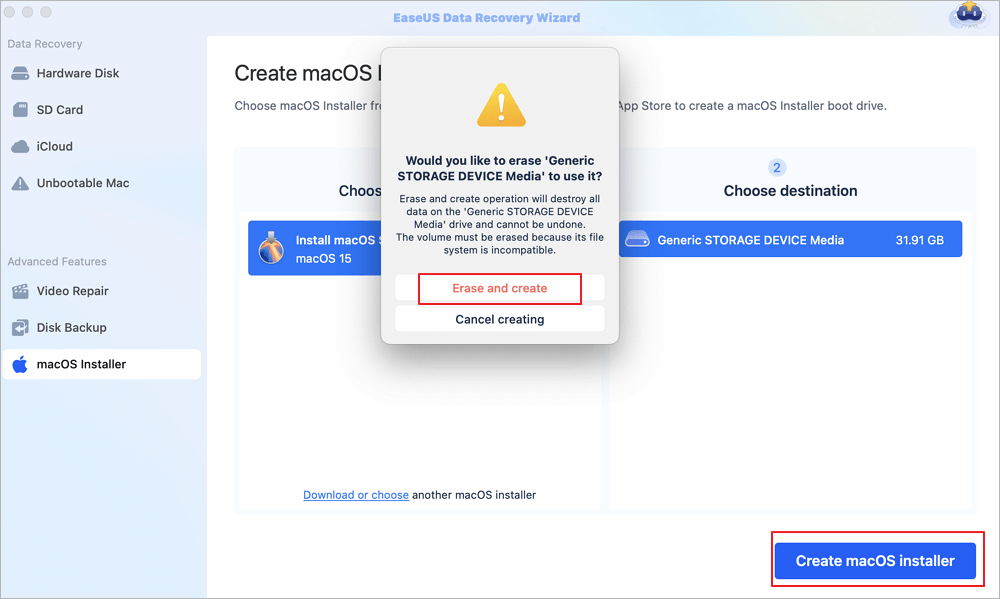
Step 2. Erase the USB flash drive
After choosing the USB flash drive, click the "Erase and create" option in the pop-up window to format your USB flash drive quickly, and then click the "Create macOS installer" button to continue.
- Note: This operation will delete all data on your USB flash drive, please back up important data in advance, or use EaseUS data recovery software to recover your data.
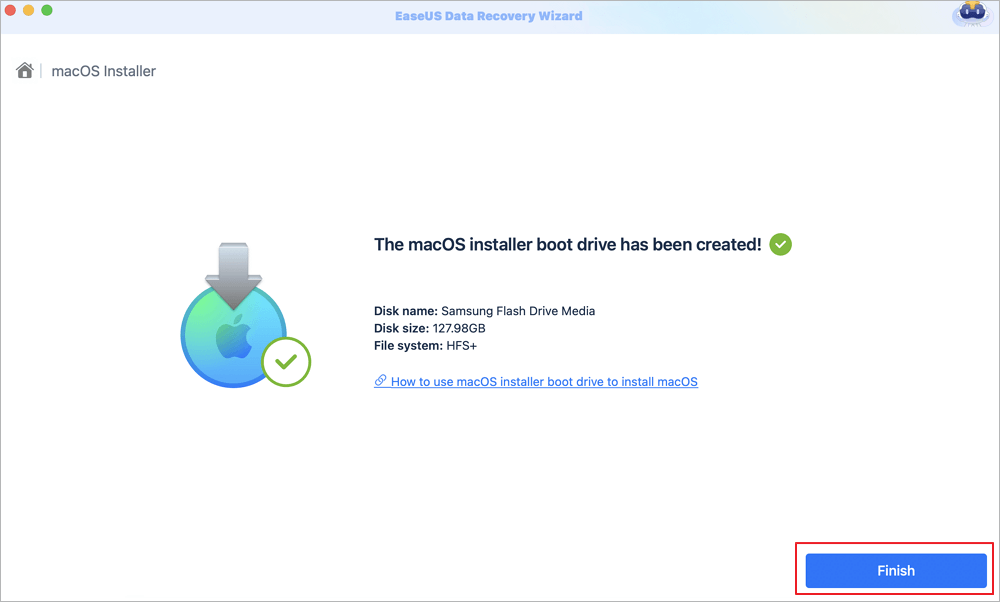
Step 3. Create the macOS installer boot drive
Wait for the process to complete, and click the "Finish" button. Your macOS installer boot drive has been successfully created!
If data loss occurred after you reinstalled macOS, you can follow the next part to recover your missing files.
Recover Lost Data After macOS Reinstallation
If you have backed up your Mac before the reinstallation, you can retrieve your data from Time Machine, an external hard drive, or somewhere else, depending on the way you used to make the backup. If you haven't created any backups for your Mac, then you'll need the professional Mac data recovery software tool - EaseUS Data Recovery Wizard, to perform data recovery. With the help of this tool, you can easily recover the data lost due to macOS reinstallation:
Step 1. Search for lost files
Select the disk location to search for lost files (it can be an internal HDD/SSD or an external hard drive) where you lost data and files. Click the "Search for lost files" button.

Step 2. Go through the scanning results
This software will immediately scan your selected disk volume and display pictures, documents, audio, videos, and emails on the left pane.

Step 3. Select the file(s) and recover
Click the data to preview, and click the "Recover" button to have them back.

There are lots of data recovery tools available. But EaseUS Data Recovery Wizard, one of the best Mac data recovery tools, is our pick. It fully supports all macOS systems including the newest Big Sur, Catalina, Mojave, High Sierra, Sierra, EI Capitan, Yosemite etc. It allows you to restore all lost data with simple clicks. Office files, music, videos, emails or other archives can all be restored on your own.
Was This Page Helpful?
Brithny is a technology enthusiast, aiming to make readers' tech lives easy and enjoyable. She loves exploring new technologies and writing technical how-to tips. In her spare time, she loves sharing things about her game experience on Facebook or Twitter.
Written by Tracy King
Tracy became a member of the EaseUS content team in 2013. Being a technical writer for over 10 years, she is enthusiastic about sharing tips to assist readers in resolving complex issues in disk management, file transfer, PC & Mac performance optimization, etc., like an expert.
Related Articles
-
How to Find SD Card on Mac | Step-by-Step Tutorial
![author icon]() Brithny/2025-09-17
Brithny/2025-09-17 -
How to Fix Mac/MacBook Pink Screen? Here Are Reasons and Solutions
![author icon]() Jaden/2025-09-17
Jaden/2025-09-17 -
Call of Duty Modern Warfare 2 File Location [All You Should Know]
![author icon]() Rel/2025-07-04
Rel/2025-07-04 -
How to Install Windows 10/11 on Chromebook Without USB
![author icon]() Jerry/2025-07-04
Jerry/2025-07-04
EaseUS Data Recovery Services
EaseUS data recovery experts have uneaqualed expertise to repair disks/systems and salvage data from all devices like RAID, HDD, SSD, USB, etc.