The active partition refers to one of the primary partitions on the hard drive. This partition contains the operating system and can be set up as a bootable partition. Only one primary partition can exist on each hard drive as the active partition. The active partition is suitable for loading the operating system and booting the computer. People use the "Mark Partition as Active" function in Disk Management to set the active partition.
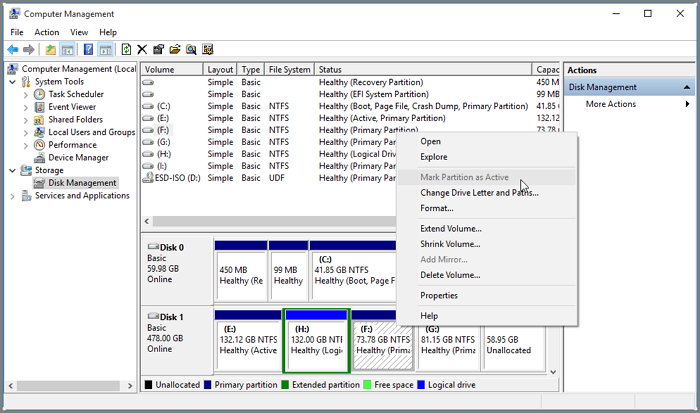
But when we activate the partition with Disk Management, we find that "Mark Partition as active" is greyed out in Disk Management. Why does this happen? This article will explore why "Mark Partition as Active" is greyed out and give you the best solution to set the partition as active in Windows.
Why Is Mark Partition as Active Greyed Out
If Mark Partition as Active Greyed Out, it is likely to be caused by the following reasons:
1. You have selected a logical partition
Windows only allow you to mark the primary partition as active, not the logical and extended partitions. Because the operating system and boot files only exist on the primary partition.
- Notice:
- Primary and logical partitions are different types of partitions and have a lot to do with MBR disks. You can click primary vs logical partition to learn the difference between them.
2. An active partition is already marked
Only one active partition is allowed per hard drive. Disk Management will unmark if you have previously marked a partition as active.
Both of these reasons may lead to Mark Partition as Active Greyed Out. To solve the problem, you need to create a primary partition or convert a logical partition into a primary partition and mark the correct partition as active. The following is a step-by-step guide to fixing Mark Partition as Active greyed out.
How to Solve Mark Partition as Active Greyed Out
This section will describe two methods of repairing Mark Partition as Active greyed out:
Method 1. Convert Logical to Primary Partition
Method 2. Mark the Right Partition as Active
After you have checked the causes of Mark Partition as Active greyed out, let's look at the step-by-step guide.
Method 1. Convert Logical to Primary Partition
If you lack a primary partition, you can easily convert the partition with EaseUS Partition Master. And you don't need to delete or format the partition before converting it. The operation is very easy. Even if you are not familiar with computers, you can quickly fix Mark Partition greyed out error.
Let's look at the step-by-step guide on converting a logical partition to a primary partition.
Step 1. Download and run EaseUS Partition Master and go to Partition Manager.
Step 2. Right-click the partition you want to convert and choose the convert option:
- 1. Primary to Logical
- 2. Logical to Primary
Step 3. Click the "Execute 1 Task" button and then choose "Apply" to begin the conversion.
0:00 - 0:28 Convert Primary to Logical; 0:29 - 0:54 Convert Logical to Primary.
EaseUS Partition Master is an excellent disk partition manager. It offers a complete conversion wizard for all types of disks and partitions. It supports:
- Convert MBR to GPT and vice versa
- Convert dynamic disks to basic disks
- Convert FAT32 to NTFS and vice versa
- Convert logical partitions to primary partitions
In short, EaseUS Partition Master can solve many problems related to disk partitioning. You can download it to learn more about its features if you have any questions.
Method 2. Mark the Right Partition as Active
If you have marked the wrong partition, you can select the correct primary partition and mark it as active again. Besides disk management, you can also easily mark partitions with the "Set Active" feature of EaseUS Partition Master.
Step 1. Run EaseUS partition manager software. On the disk map, right-click the target partition and choose "Advanced".
Step 2. Then, select "Set Active" from the drop-down menu. Click "Yes". And choose "Execute 1 Task(s)" and click "Apply".
The above is the solution to fix the Mark partition as active greyed out error in Disk Management. EaseUS Partition Master is an excellent all-in-one disk management tool. It can also solve various problems encountered by Disk Management. If you encounter these problems with Disk Management, you can click the button below for more reading.
Conclusion
Do you know why Mark Partition as Active greyed out in Disk Management? Because active partitions must be created on a primary partition, only one can exist on a hard drive. If you don't have a primary partition, you need to create a primary partition or convert a logical partition to a primary partition using EaseUS Partition Master. Then mark it as an active partition. And EaseUS Partition Master also supports conversion between more disks or different partitions without losing data.
Download it, and you can enjoy the convenience it brings to your computer.
FAQs About Mark Partition as Active Greyed Out
Here are some frequently asked questions about active partitions. Please read on if you also have some questions. And I hope these answers will be helpful to you.
1. What does it mean Mark Partition as active?
Marking a partition as active means making it an active partition and a bootable partition containing the operating system. The computer will use the loaders on that partition to boot the computer. This means marking a partition as active will help boot the computer's operating system.
2. What is the difference between active and inactive partitions?
The active partition is used to boot the computer's operating system. Only one active partition can exist on a hard drive. And the active partition must exist on the primary partition. An inactive partition can exist in a logical partition and can be used to store other files.
3. How do I enable the Mark partition as active?
There are three ways to mark a partition as active. The easiest way to mark the partition as active is to use EaseUS Partition Master, the second is to use Disk Management, and if you want to use Diskpart, you can also follow these steps.
Step 1. Right-click on the Windows button and select the "Run" option.
Step 2. Type "diskpart" and hit Enter.
Step 3. Input the following commands and hit Enter after each command.
list disk
select disk x
list partition
select partition x
active
Was This Page Helpful?
Daisy is the Senior editor of the writing team for EaseUS. She has been working at EaseUS for over ten years, starting as a technical writer and moving on to being a team leader of the content group. As a professional author for over ten years, she writes a lot to help people overcome their tech troubles.
Cici is the junior editor of the writing team of EaseUS. She accepted the systematic training on computers at EaseUS for over one year. Now, she wrote a lot of professional articles to help people resolve the issues of hard drive corruption, computer boot errors, and disk partition problems.
Related Articles
-
FIX: Game Stuttering with High FPS - 8 Tips
![author icon]() Oliver/2025-07-04
Oliver/2025-07-04 -
How to Get BitLocker Recovery Key with Key ID [Full Guide]
![author icon]() Finley/2025-07-04
Finley/2025-07-04 -
How to Fix WAN Miniport Driver Issues in Windows OS [Updated 2025]
![author icon]() Daisy/2025-07-04
Daisy/2025-07-04 -
What Does Wipe Cache Partition Mean and How to Wipe the Cache Partition
![author icon]() Jaden/2025-07-04
Jaden/2025-07-04
EaseUS Data Recovery Services
EaseUS data recovery experts have uneaqualed expertise to repair disks/systems and salvage data from all devices like RAID, HDD, SSD, USB, etc.