Delete File with PowerShell Overview
PowerShell is one of the free command automation tools offered by Windows operating software. PowerShell is the best .NET framework-based scripting language, which consists of a wide array of commands performing particular functions.
To summarize, PowerShell aids you in obtaining full-fledged control over the OS via the assistance of a Shell that begin inside a Command prompt window, including deleting files on Windows with command-let or Cmdlets syntaxes.
These are the in-built commands in PowerShell which assist you in executing particular deletion tasks. Therefore, whenever you want to delete a file with PowerShell, these are the specific Cmdlets you can use.
Now, let's check out two detailed PowerShell delete file methods without further ado.
How to Delete a File in PowerShell Using Remove-Item cmdlet
Are you thinking of deleting a file using PowerShell? With this Remove-Item cmdlet PowerShell delete file method, you can quickly delete single or multiple files or folders. Moreover, in PowerShell, this Remove-Item cmdlet eliminates one or more items from the list.
It uses a file path for the removal process. Hence, utilizing the "Remove-Item" cmdlet, you can quickly delete folders, files, registry keys, variables, and aliases. First, let's see the possible ways to delete the file using this method!
How to Delete a Single File or Folder Using Remove-Item cmdlet
Let's begin by utilizing the Remove-Item cmdlet to eliminate a single file or folder. This Remove-Item cmdlet is one of the most straightforward ways to delete file PowerShell. However, the major syntaxes for Remove–Item cmdlet are the following:
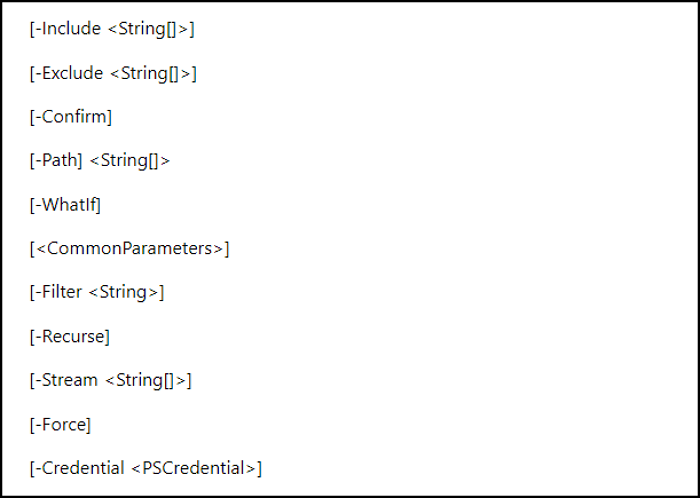
The descriptions of the parameters are shown below:
-Filter: It helps eradicate files and folders which complement the specified filter. Moreover, it works with daily expressions and wildcards.
-Confirm: It induces you to confirm the operation prior to operating the command.
-Include: It's been utilized to add a string array, item, or even the items, which must be affected by the operation.
-Exclude: It's been utilized to exclude a string array and items from the entire operation.
-Force: You may add this parameter when you want to eliminate the read-only or hidden files.
-WhatIf: This parameter shows what would happen if the cmdlet operates without operating it. In a nutshell, it's the proper parameter for inspection.
-Path: It helps specify the location for the items to be eliminated.
-Recurse: Itemize all the child items in the specific locations.
-LiteralPath: Describe the location for the items to be eliminated.
-Stream: It eliminates substitute data, such as Zone.Identifier from the files and directories.
Now let us start deleting a single file in PowerShell using the Remove-Item cmdlet. To delete a single file or folder from a particular path, it's essential to use the precise path of the file by utilizing the "-path" parameter to "Remove-Item." This is the best example of how you can delete a single file or folder using the Remove-Item cmdlet in PowerShell.
> Remove-Item -Path C:\New\Docs.txt

The aforementioned line of code can swiftly delete a single folder or file you have provided.
How to Delete Files and Folders in Batch Using Remove-Item cmdlet
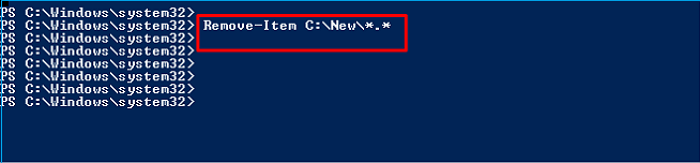
As you have understood how to delete a file with PowerShell using the Remove-Item cmdlet, this step will show you how to delete all the files and folders. Let's see how you can do it:
The Remove-Item command will use the wild card "*" to eradicate all the folders and files in the folder. Next, you must put the "*" in place of the file extension and name. Lastly, the performance of the below command will help delete all the files and folders from the folder path.
The command is: > Remove-Item C:\New\*.*
How to Delete a File Path Using Remove-Item cmdlet
The Remove-Item command of PowerShell also supports eliminating a file path. Therefore, the below-mentioned example code will elaborate on the command's functionality.
ls C:\Users\powershell\Documents\test\
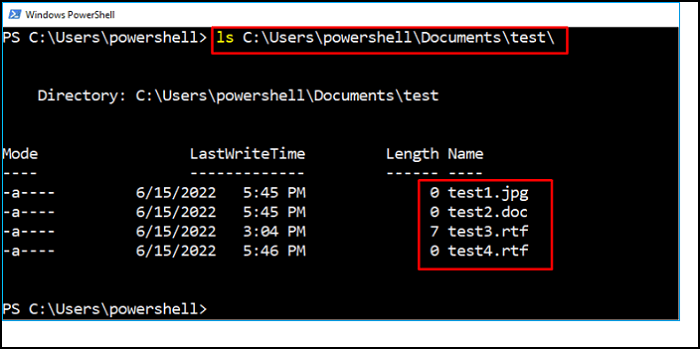
We have listed every item in the test folder using the "ls" tool. For example, all the files and folders with the .rtf extension are to be eliminated from the destination path, such as C:\Users\powershell\Documents\test\. Therefore, by utilizing the "Is" command, you can easily verify the deleted files and folders.
Remove-Item C:\Users\powershell\Documents\test\*.rtf
ls C:\Users\powershell\Documents\test\
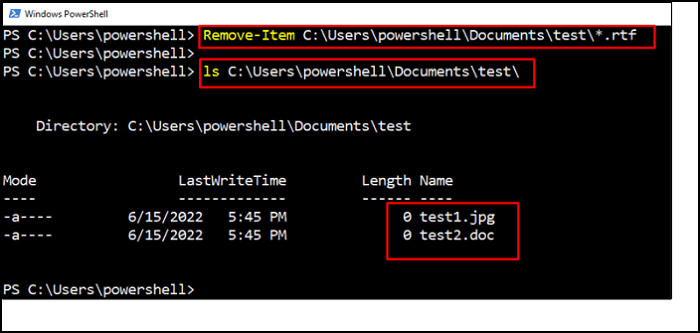
Now, it has been seen that the files with the ".rtf" extension are eliminated from the directory.
How to Delete File in PowerShell Using WMI Command
PowerShell supports WMI, also known as Window Management Instrumentation, which implies that WMI queries and methods can be directly called from PowerShell. It's not for the admins only who used some basic visual scripts in the previous days of Windows. Microsoft has incorporated WMI-specific CIM cmdlets in PowerShell. Therefore, Invoke-CimMethod and Get-CimInstance are used to delete file PowerShell.
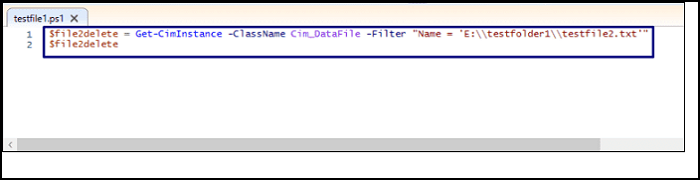
$file2delete = Get-CimInstance -ClassName Cim_DataFile -Filter "Name = 'E:\\testfolder1\\testfile2.txt'"
$file2delete
The Get_CimInstance uses Cim_DataFile to extract the details related to: "E:\\testfolder1\\testfile2.txt".
As you have obtained the details for the file "E:\\testfolder1\\testfile2.txt," you can use the "$file2delete" variable to pass the resulting object to the Invoke-CimMethod command. On the other hand, the "-Name" option of this Invoke-method command describes the name of the Cim_DataFile class's method.
The specified file has been successfully eliminated, according to the output!
If some of your files are corrupted, and you don't know how to delete corrupted files. Click the anchor text to find the answer.
Recover Files and Folders Accidentally Deleted by PowerShell
Are you one of the users who want to recover deleted files and folders eliminated accidentally by PowerShell? This step will show you how to retrieve the data with a 99.9% success rate! Yes, we are talking about a premium software, EaseUS Data Recovery Wizard, which helps recover data loss because of formatting, deleting, virus attacks, etc.
With EaseUS Data Recovery Wizard, you can retrieve files and folders accidentally deleted by PowerShell, as it's an all-in-one data retrieval software. The tech specification of this software are the following:
- It supports Windows 11/10/8/7.
- It uses Windows Server 2022, 2019, 2016, 2012, 2008, and 2003.
This reliable tool also can help you deal with the recycle bin recovery if you want to return files from recycle bin. It is possible to recover deleted files from hard drive also. If you lose important files on the external hard drive, EaseUS Data Recovery Wizard can help you return the deleted files. For home users, you don't have to worry about where do permanently deleted photos go, or think about how to recover deleted YouTube videos, this professional recovery tool can solve data loss problems for you.
It is pretty simple to recover files and folders accidentally deleted by PowerShell, and we will show you the tutorial:
Step 1. Run EaseUS Data Recovery Wizard. Choose the drive where you lost files and start scanning by clicking "Search for Lost Data". This software allows you to recover lost data from all devices, including HDD, SSD, USB drive, SD card, pen drive, camera, etc.

Step 2. Browse the full scan results. You can choose the file type you need by clicking on the file type filter. EaseUS data recovery software supports 1000+ file types like photos, videos, documents, emails, audio files, and many more.

Step 3. Select the files you want to preview. Click "Recover" and set a storage location or Cloud drive to save the recovered data.

Summary
Are you tired of getting rid of those files and folders which can't be removed easily? Don't worry, you can now eliminate them from your PC using PowerShell. It offers numerous techniques and commands to delete a file with PowerShell.
Hopefully, the methods the article has shown for deleting a single file or multiple files using the Remove-Item cmdlet and WMI help you delete all the unwanted files from your system. If you accidentally deleted a necessary file, choosing the EaseUS Data Recovery Wizard to undelete files will always be beneficial!
Delete File with PowerShell FAQs
The detailed FAQs are shown below when you want to delete a file with PowerShell.
Does RM work in PowerShell?
RM is aliased to Remove-Item in PowerShell. But you must know that it doesn't accept -rf. Moreover, it removes an item that is a specific parameter, which can't be found that goes with the parameter name "rf." So you may call Remove-Item without -rf, which will work without hassle. But you must know that it will always demand confirmation.
How do I delete a file using the command prompt?
Follow the steps below to understand how to delete a file using the command prompt:
- Open the command prompt.
- Alter the directory path in cmd.
- Utilize the delete command.
- Eliminate the read-only files.
- Delete files in bulk.
- Delete several files, such as Del file1, file2, file3, and file4.
How do you recursively delete a file in PowerShell?
In case you need to remove the files inside every sub-directory, you must add the -Recurse switch to the Get-ChildItem command to obtain all the files recursively.
How do I delete a directory in PowerShell?
You can delete a directory in PowerShell using the Delete () method. Every object in it possesses a Delete () method, which can be used to eliminate that object. In addition, you may utilize the Get-ChildItem cmdlet to eliminate the files and folders and use the Delete () mechanism on the output.
Was This Page Helpful?
Daisy is the Senior editor of the writing team for EaseUS. She has been working at EaseUS for over ten years, starting as a technical writer and moving on to being a team leader of the content group. As a professional author for over ten years, she writes a lot to help people overcome their tech troubles.
Dany is an editor of EaseUS who lives and works in Chengdu, China. She focuses on writing articles about data recovery on Mac devices and PCs. She is devoted to improving her writing skills and enriching her professional knowledge. Dany also enjoys reading detective novels in her spare time.
Related Articles
-
8 Ways to Fix Migration Assistant Not Working on Mac
![author icon]() Jaden/2024-01-11
Jaden/2024-01-11 -
[Quick Steps] How to Enter Startup Repair Windows 10 in 2024
![author icon]() Melissa Lee/2024-06-27
Melissa Lee/2024-06-27 -
How to Open Control Panel in Windows 10
![author icon]() Daisy/2024-05-11
Daisy/2024-05-11 -
Cleaning Up, Do Not Turn Off Your Computer - How to Fix
![author icon]() Larissa/2024-03-15
Larissa/2024-03-15

EaseUS Data Recovery Services
EaseUS data recovery experts have uneaqualed expertise to repair disks/systems and salvage data from all devices like RAID, HDD, SSD, USB, etc.