Featured Articles
Since its release in 2010, macOS Recovery has been a standard component of every Mac. So does the coming macOS Ventura. However, if the macOS Ventura Recovery Mode is missing, you may not start your Mac from the recovery partition to address software-related problems or perform other Mac tasks. So, what should you do now? This article provides tested 4 ways to help you troubleshoot the macOS Ventura Recovery Mode not showing the issue.
| Workable Solutions | Step-by-step Troubleshooting |
|---|---|
| Fix 1. Access Recovery Mode | You may notice that an M1 Mac and an Intel-powered Mac have different methods for...Full steps |
| Fix 2. Use Internet Recovery | Check if you have accidentally erased the recovery partition on your Mac. Or your Mac's...Full steps |
| Fix 3. Other Recovery Options | If your Mac Recovery mode is missing due to your Command + R not working, there are a...Full steps |
| Fix 4. Reinstall macOS Ventura | If the fixes below don't work, you may reinstall your macOS, which is typically the next...Full steps |
Now, you've come to the appropriate troubleshooting guide if macOS Ventura Recovery Mode is missing and you can't figure out why the standard "Command + R" process has failed. First, let's learn what macOS Recovery Mode is, how to use it, and how to prevent data loss when the macOS Recovery Mode is not showing.
What Is macOS Ventura Recovery Mode
Mac Recovery Mode is a specific Mode on a Mac that uses your Mac's recovery partition. Even if your Mac Ventura won't boot, you can still use the recovery partition to start the troubled Mac and use the recovery programs to help you fix internal hard drive (SSD) errors.
- You can use Mac Recovery Mode to:
- Utilize Mac Time Machine backup to recover missing files.
- To fix or clean disk drives and factory reset your Mac.
- Use the Terminal to enter commands.
- Check and repair the errors on the startup disk
- Reinstall Mac OS.

Recover Data Before Fixing macOS Ventura Recovery Mode Missing
After downloading macOS Ventura, you may find that the Mac Recovery Mode is not showing. Maybe because you unintentionally removed the recovery partition. No matter the reason, you can not normally boot your Recovery Mode due to something wrong with your Mac. In that case, you should be aware of your data security because your Mac is at risk of data loss. So before you take measures to fix the problem, protect your data first.
Don't worry about missing your Recovery partition and other data and files. Using EaseUS Data Recovery Wizard Mac is simple to recover, a robust data recovery software that can recover lost files after the macOS Ventura update. File recovery is a breeze even for inexperienced users because of the software's straightforward interface.
EaseUS Data Recovery Wizard for Mac
- Recover lost or deleted files, documents, photos, audio, music, and emails effectively
- Recover files from formatted hard drives, emptied HDDs, flash drives, and digital cameras
- Support Mac Trash recovery for sudden deletion, formatting, HDD corruption, virus attack, and system crash under different situations
Following the steps below will help you recover lost data and files with EaseUS Data Recovery for Mac if you run into an issue with data loss after missing the macOS Ventura Recovery Mode.
Step 1. Select the location and scan
Launch EaseUS Data Recovery Wizard for Mac and choose the disk where you lost data. Then, click "Search for lost files" to start scanning.

Step 2. Filter and preview lost files
After the scan, use the file format filter on the left or upper right corner to find the deleted files you need.

Step 3. Recover lost data or files
You can double-click a file to preview its content, or choose multiple files to recover them at once. Click "Recover" to restore the lost data to a local or cloud drive.

Ensure your data and files are in a safe environment, and then you can go through the following fixes to solve the problem of macOS Ventura Recovery Mode not showing.
Fix 1. Ensure the Way You Access macOS Ventura Recovery Mode
Your improper use of Recovery Mode is what caused the missing issue. It's essential to remember that an M1 Mac and an Intel-powered Mac have different methods for booting macOS Recovery Mode. Therefore, your M1 Mac Recovery Mode is not showing it may be due to that.
- Notice:
- macOS Recovery was released with macOS X 10.7 Lion in 2010. Therefore, Mac computers do not come pre-installed with a recovery partition if they run Mac OS X 10.6 Snow Leopard or earlier versions. So, there are no issues with the macOS Ventura's recovery partition.
You can use this guide on how to display Recovery Mode.
On an Intel-based Mac:
- 1. Wait a moment after shutting down your Mac.
- 2. To restart your Mac, press the power button or Touch ID while simultaneously holding down the Command and R keys.
- 3. When you see the Apple logo, release the Command + R buttons.
- 4. When the four macOS tools appear on the screen, you are in Recovery Mode.
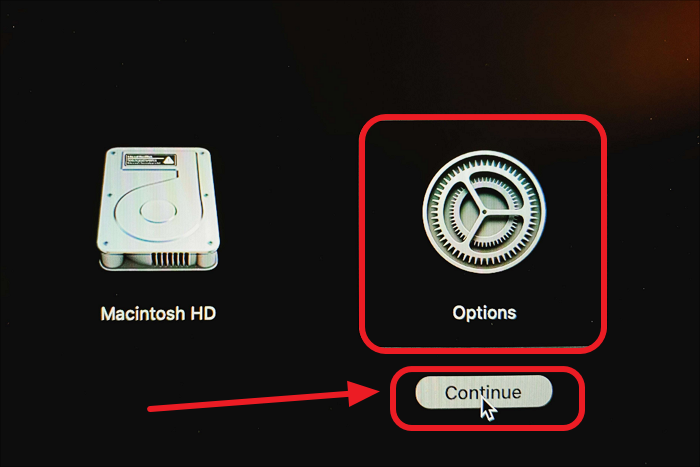
On an M1 Mac:
- 1. Switch off your M1 Mac, then wait a moment.
- 2. Once the startup options and the Options gear icon appear, hold down the power button for seconds.
- 3. Choose Continue after clicking the Options gear icon.
- 4. Enter your admin password to access M1 Mac Recovery Mode.
Fix 2. Use Internet Recovery to Fix macOS Ventura Recovery Mode
After attempting the above fixes, your macOS Ventura may still be unable to show Recover Mode. Check if you have accidentally erased the recovery partition on your Mac. Or perhaps your Mac's recovery partition is already harmed.
You can use Mac Internet Recovery Mode to fix this issue. Internet Recovery Mode establishes a direct connection with Apple's server to provide the same recovery tools as Recovery Mode. You should carry out the following steps:
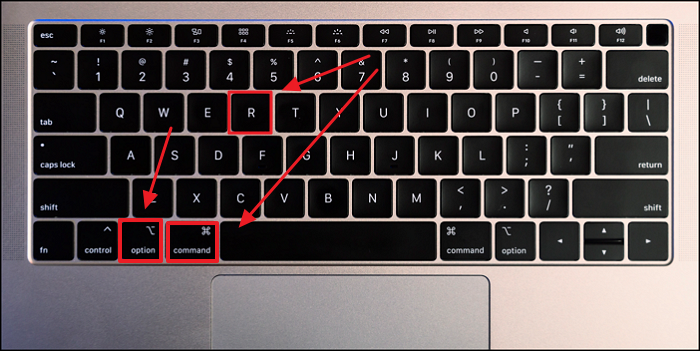
Step 1. Hold down the Command - Option/Alt - R or Shift - Option - Command - R keys when rebooting your Mac.
Step 2. Release the keys once you see a globe pattern with the "Starting Internet Recovery" message.

Step 3. The macOS Utility window will then appear on the screen after loading.
You may use Mac Internet Recovery to reinstall the operating system, restore your Mac, and utilize Disk Utility to check for disk problems.
Fix 3. Force Mac into Recovery Mode on macOS Ventura
If your Mac Recovery Mode is missing due to your Command + R not working, there are a couple more methods you might be able to force your Mac Ventura to boot into Recovery Mode.
- Press "Option/Alt + Command + R" when your computer starts to access Internet Recovery Mode by force.
You may access an Apple server to download the most recent macOS version - Ventura, in this Mode that works with your Mac.
However, be aware that if "Command + R" isn't working for you, it can be due to a straightforward issue if your Mac contains a T2 chip.
- If your Mac has a T2 chip, pressing "Option/Alt + Command + R" will install the most recent version of macOS.
Fix 4. Reinstall Your macOS Ventura
If the fixes below don't work, you may have to reinstall your macOS, which is typically the next option if a severe issue occurs on your Mac, such as your Recovery Mode not showing.
As the Mac Recovery Mode is missing, you may, which means making a bootable USB installer and using that to reinstall macOS Ventura. Here are instructions on how to reinstall macOS.
Step 1. Format an external USB drive that prepares to save the macOS installer. Be cautious about backing up your vital data in it!
Step 2. Download the macOS installer from the "System Preferences" - "Software Update".
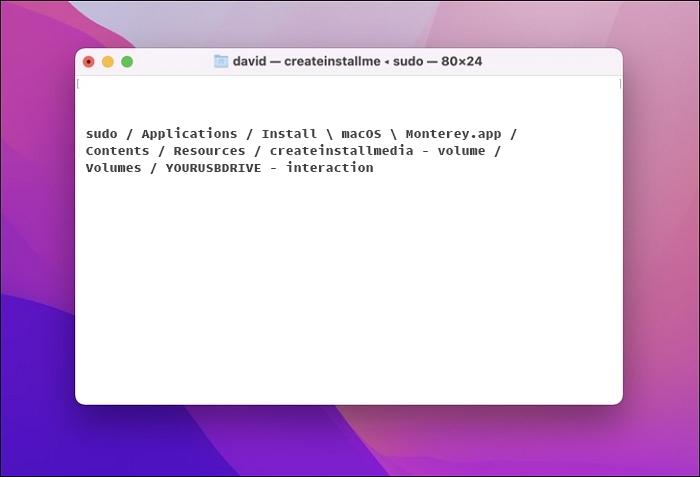
Step 3. Create a bootable USB disk in the "Utility folder" and use"Terminal" to boot it by typing the following Command:
Step 4. Boot your Mac from a USB drive.
Now you can select your USB device as the starting disk. After reinstalling your macOS Ventura, you can fix the macOS Recovery Mode missing problem.
Conclusion
Following the above fixes, you can restore your Recovery Mode without deleting any of your data. All you should remember is to safeguard your data by creating a backup plan or promptly restoring your data. You might use EaseUS Data Recovery Wizard for Mac as a great helper.
FAQs About macOS Ventura Recovery Mode Missing
Here are 4 questions about macOS Ventura Recovery Mode not working. Check here for the answers.
1. Why can't I get my Mac in Recovery Mode?
Temporary Mac OS issues, a broken keyboard, entering Recovery Mode incorrectly, a lack of a built-in Recovery partition or an accidentally deleted or damaged Recovery sector are a few potential causes.
2. How do I reinstall macOS if Recovery is unavailable?
In this case, you can install the macOS from a bootable USB installer if your Recovery Mode is unavailable and you already have the installation files downloaded.
3. How do I restore my Mac to factory settings without Recovery Mode?
If your Mac is lower than Monterey, you can't factory reset your device without Recovery Mode. However, you have another and more straightforward option in your System Preferences if your Mac runs macOS Monterey (12.0) or higher.
- Step 1. Open System Preferences and then.
- Step 2. Select Erase All Content and Settings.
4. How do I boot into Recovery Mode?
Restart your Mac device or turn it on while pressing and holding down the Command+R keys until the Apple logo appears on the screen.
Was This Page Helpful?
Jaden is one of the editors of EaseUS, who focuses on topics concerning PCs and Mac data recovery. Jaden is committed to enhancing professional IT knowledge and writing abilities. She is always keen on new and intelligent products.
Related Articles
-
What's The Best SSD Allocation Unit Size in Windows 11/10
![author icon]() Cici/Jul 04, 2025
Cici/Jul 04, 2025 -
[Solved!] Can't Sign into iMessage on Mac? 8 Solutions Here
![author icon]() Brithny/Jun 17, 2026
Brithny/Jun 17, 2026 -
Recover Saved Game Data on Xbox Series X [ 3 Proven Ways]
![author icon]() Jaden/Feb 12, 2026
Jaden/Feb 12, 2026 -
Hogwarts Legacy Save File Location & Config File Location [Detailed Info]
![author icon]() Jerry/Jul 04, 2025
Jerry/Jul 04, 2025