Part 1. Introduction
Let's be genuine: there seem to be instances when we all get puzzled about the difference between terms such as disk recovery, recovery drive, and system repair disc. While these items may seem identical in appearance, they each perform a specific function that every Windows user should be aware of.
Don't worry. We've put up this comprehensive guide to assist you in distinguishing between these topics and covering them in further depth. We will get right into it and learn topics like utilizing recovery CDs in Windows 7/10, which will be highly valuable to you in the long term.
Part 2. Key Differences Between System Repair Disc and Recovery Drive
It is possible to create a system repair CD with Windows 10, 8, and 7. The user includes several system repair programs on this specially created DVD/CD.
Startup Repair, System Restore, System Image Recovery, Windows Memory Diagnostic, and Command Prompt are all included on a system repair CD. System repair DVDs allow users to make use of these capabilities when necessary.
Although a recovery disk is comparable to a repair disk, it is not precisely the same. It offers similar repair tools to those found on the system recovery CD.
On the other hand, a recovery disk contains Windows 10 or 8 system files, allowing you to reinstall the operating system when necessary. This software provides a backup copy of Windows 10.
USB sticks and CDs may be used as recovery drives. Depending on the manufacturer, Windows 10 system recovery DVDs may be available. On Amazon, for example, the HP Recovery Disc for Windows 10 is for sale.
OEM (Original Equipment Manufacturer) recovery CDs used to be included with laptops and desktops, although bootable hard disk partitions are now a more common option.
While Amazon does sell a recovery drive, you don't necessarily need one. The Recovery Media Creator program in Windows 10 may create a USB recovery disk. As a side note, you can't use the Recovery Media Creator on Windows 7.
Part 3. Access to Create a Recovery Drive in Windows 11/10/8.1/7
An excellent approach is to backup your data on a separate disk. In the event of a significant problem, such as a hardware breakdown, you will be able to reinstall Windows 11 using the recovery disc.
Because Microsoft regularly releases security and performance updates for Windows, we suggest that you build a new recovery drive each year
There will be no backup of your data or any programs not installed on your PC. You'll require a USB device with at least 16 GB of storage capacity.
For Windows 7
Step 1: Before you begin, be certain that you have placed an empty disc in your computer and that it is being recognized.
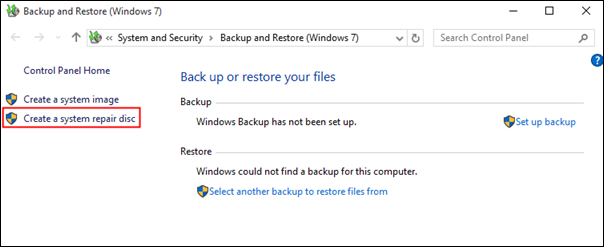
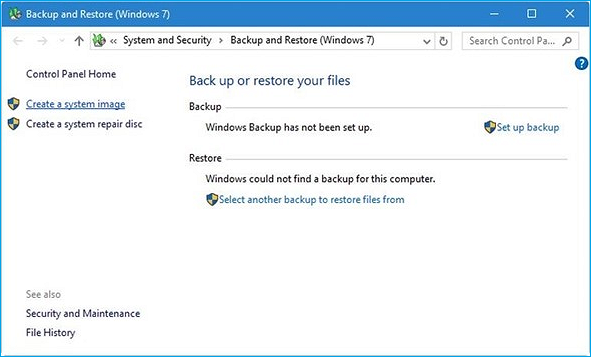
Step 2: Enter "backup" in the search box and pick "Backup and Restore" from the results.
Step 3: Create a system repair disc may be found in the left pane by clicking on it.
Step 4: The CD/DVD disc is automatically identified by the operating system. You may choose it yourself if you choose. Afterward, select the Create disc option.
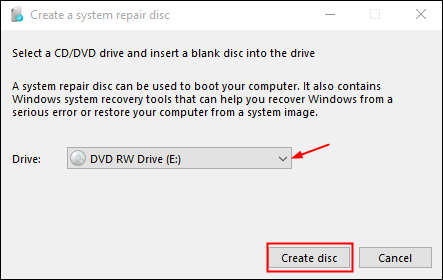
Step 5: As soon as you click, Windows will begin the disc creation process.
Windows 8/8.1/10/11
Step 1: The USB disk should be connected to your computer.
Step 2: When searching, type "recovery drive" into the search bar. Select the option to create a recovery drive from the results.
Step 3: Select "Back up system files to the recovery disk" and click Next in the pop-up box.
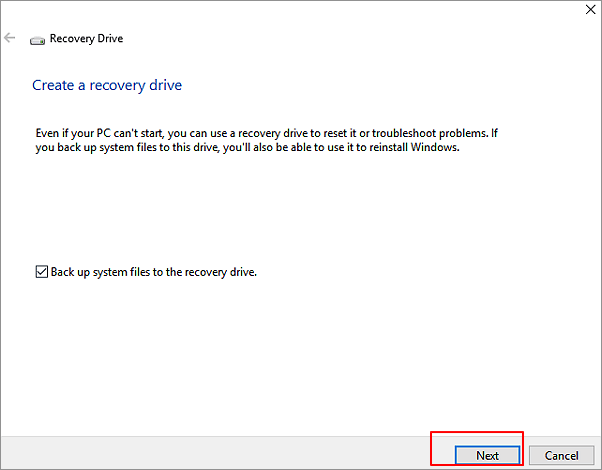
(Note: Reinstalling your computer is possible if you click the box for backing up system files to the recovery disk).
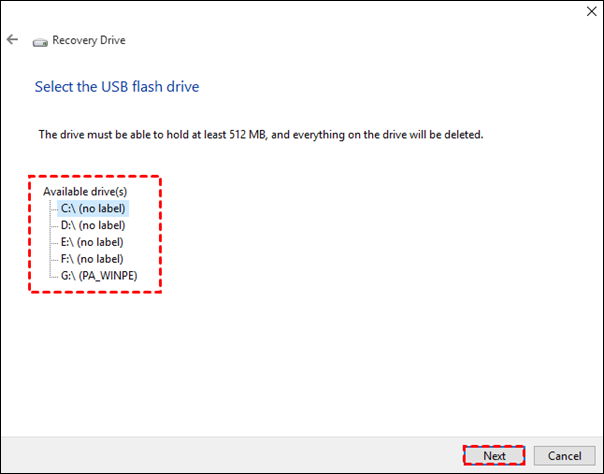
Step 4: Click Next to proceed after selecting a USB flash disk.
Step 5: To begin the process of creating a recovery disk, click Create.
Now you know how to make a Windows 7/8.1/8/10 system repair disc. Insert the system repair disc and restart your computer to utilize it.. if you ever need to. BIOS may be used to arrange your computer to boot from a CD/DVD or USB drive if your machine begins straight from the hard drive rather than the repair disk.
Part 4. Access to Create a System Repair Disc in Windows 11/10/8.1/7
If a significant mistake happens, you may use system recovery options to fix Windows. You'll need to have a Windows installation CD or access to your computer's company's recovery options to employ system recovery options. System recovery options may be accessed by creating a repair disc if none of these solutions are available to you.
For Windows 10/11
Press Windows+R and enter command Control. Then press the F3 key. Select the Restore option and hit Enter.
Click on “Backup and restore” and “Create System Repair Disk” to continue.
For Windows 7
Step 1: Start by selecting "Start Control Panel" and then "Control Panel." Then choose "System & Maintenance" and "Backup and Restore."
Step 2: To create a system repair disc in the left pane, follow the directions. Administrators must have access to the system. The administrative password or confirmation must be entered if requested to do so.
Windows 8/8.1
Step 1: When you get to the Start Menu, type "recdisc."
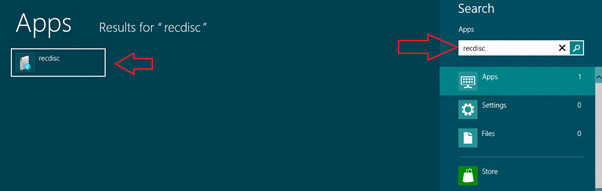
(Note: A blank DVD should be installed before proceeding. You can use CDs, but you'll have to use a lot of them, while a DVD just requires one disc to do the same thing).
Step 2: Choose your CD/DVD drive from the list of available devices in the device menu.
(Note: For the repair disc manufacturing tool to complete its operation, it'll just take a few of minutes. Finally, you'll be able to use any Windows 8 repair disc's functions).
Part 5. Make an Easier System Backup with EaseUS Todo Backup
Using Ease Todo Backup, you may back up your Windows system with several methods, including whole images, incremental images, and differential images.
Secure Download
The user may choose the kind of backup according to their requirements. Windows users may also create a backup plan for their computer that will run daily, weekly, monthly, or yearly. Other features include cloning, migrating the operating system to an SSD, and other tasks.
Step 1. Launch EaseUS Todo Backup and choose "Create Backup" on the home page, click "Select backup contents".

Step 2. Among the four available categories, click "OS" to start back up.

Step 3. The system partition will be automatically selected, you only need to select the location.

Step 4. Local Drive, Cloud, and NAS are available for you to save the backup file. You can also connect an external hard drive to preserve the system backup files.

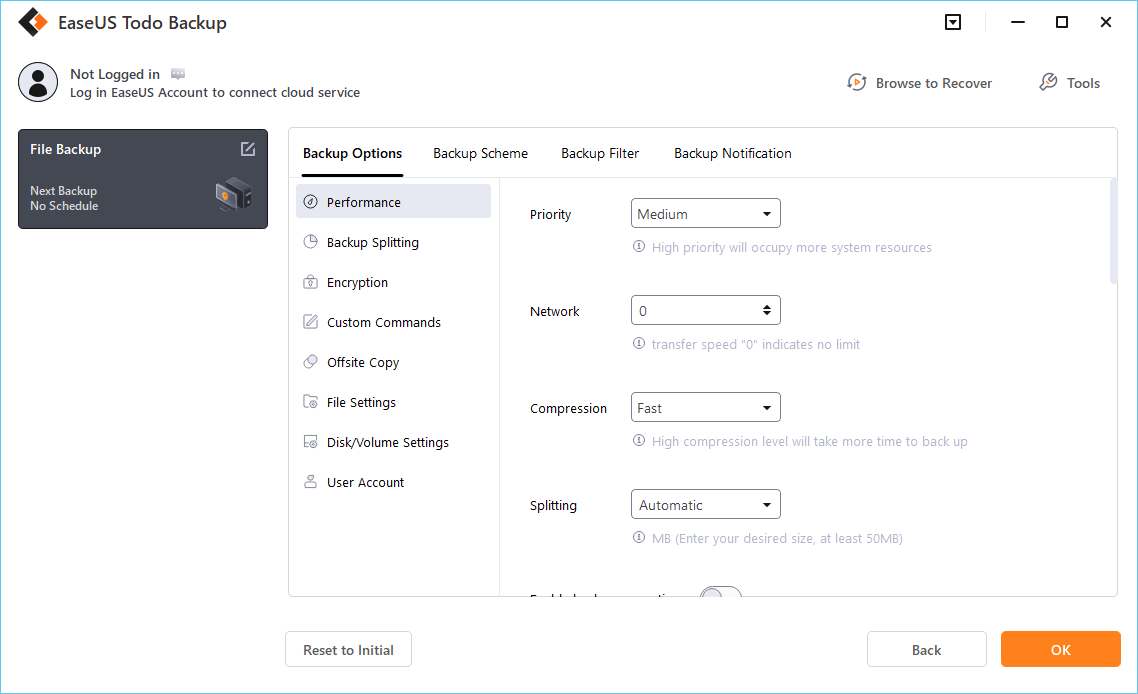
Step 5. You can customize the settings in "Options" at the left bottom. After that, click "Backup Now", and the process will begin.
*After finishing the backup process, you can check the backup status, recover, open, or delete the backup by right-clicking the backup task on the left.
Conclusion
Secure Download
Well, there you have it – your System Repair Disc vs. Recovery Drive review and whether the two are the same or not. While they may sound the same, they are different. Each has its own features and functions, making it different from the other. Hopefully by now, you know your way around them!
Was This Page Helpful?
Daisy is the Senior editor of the writing team for EaseUS. She has been working at EaseUS for over ten years, starting as a technical writer and moving on to being a team leader of the content group. As a professional author for over ten years, she writes a lot to help people overcome their tech troubles.
Jean is recognized as one of the most professional writers in EaseUS. She has kept improving her writing skills over the past 10 years and helped millions of her readers solve their tech problems on PC, Mac, and iOS devices.
Related Articles
-
Are There 1TB Free Cloud Storage Available? See What We've Found
![author icon]() Jean/Mar 15, 2024
Jean/Mar 15, 2024 -
How to Install Windows 11 on VirtualBox (Never Forget BACKUP!)
![author icon]() Jean/Mar 15, 2024
Jean/Mar 15, 2024 -
How to Backup Minecraft Worlds [Full & Detailed Tutorial]
![author icon]() Jerry/May 20, 2024
Jerry/May 20, 2024 -
Microsoft Surface Factory Reset Without Password or Recovery Key
![author icon]() Larissa/Mar 15, 2024
Larissa/Mar 15, 2024