Network Attached Storage (NAS) offers a centralized location on a network to store data. Compared to traditional Network Attached Storage, a Synology NAS is a popular choice among business users. It not only offers centralized storage but also allows users to build a private cloud for storing, backing up, and sharing files.

Users often choose the incremental backup method to back up their Synology NAS. This article will provide a comprehensive understanding of the incremental backup process and guide you on how to carry out an incremental backup of your Synology NAS with EaseUS Todo Backup Enterprise.
What is Incremental Backup
Incremental backup is a method that backs up only the files that have changed since the last backup, regardless of whether the previous backup was a full, incremental, or differential backup.
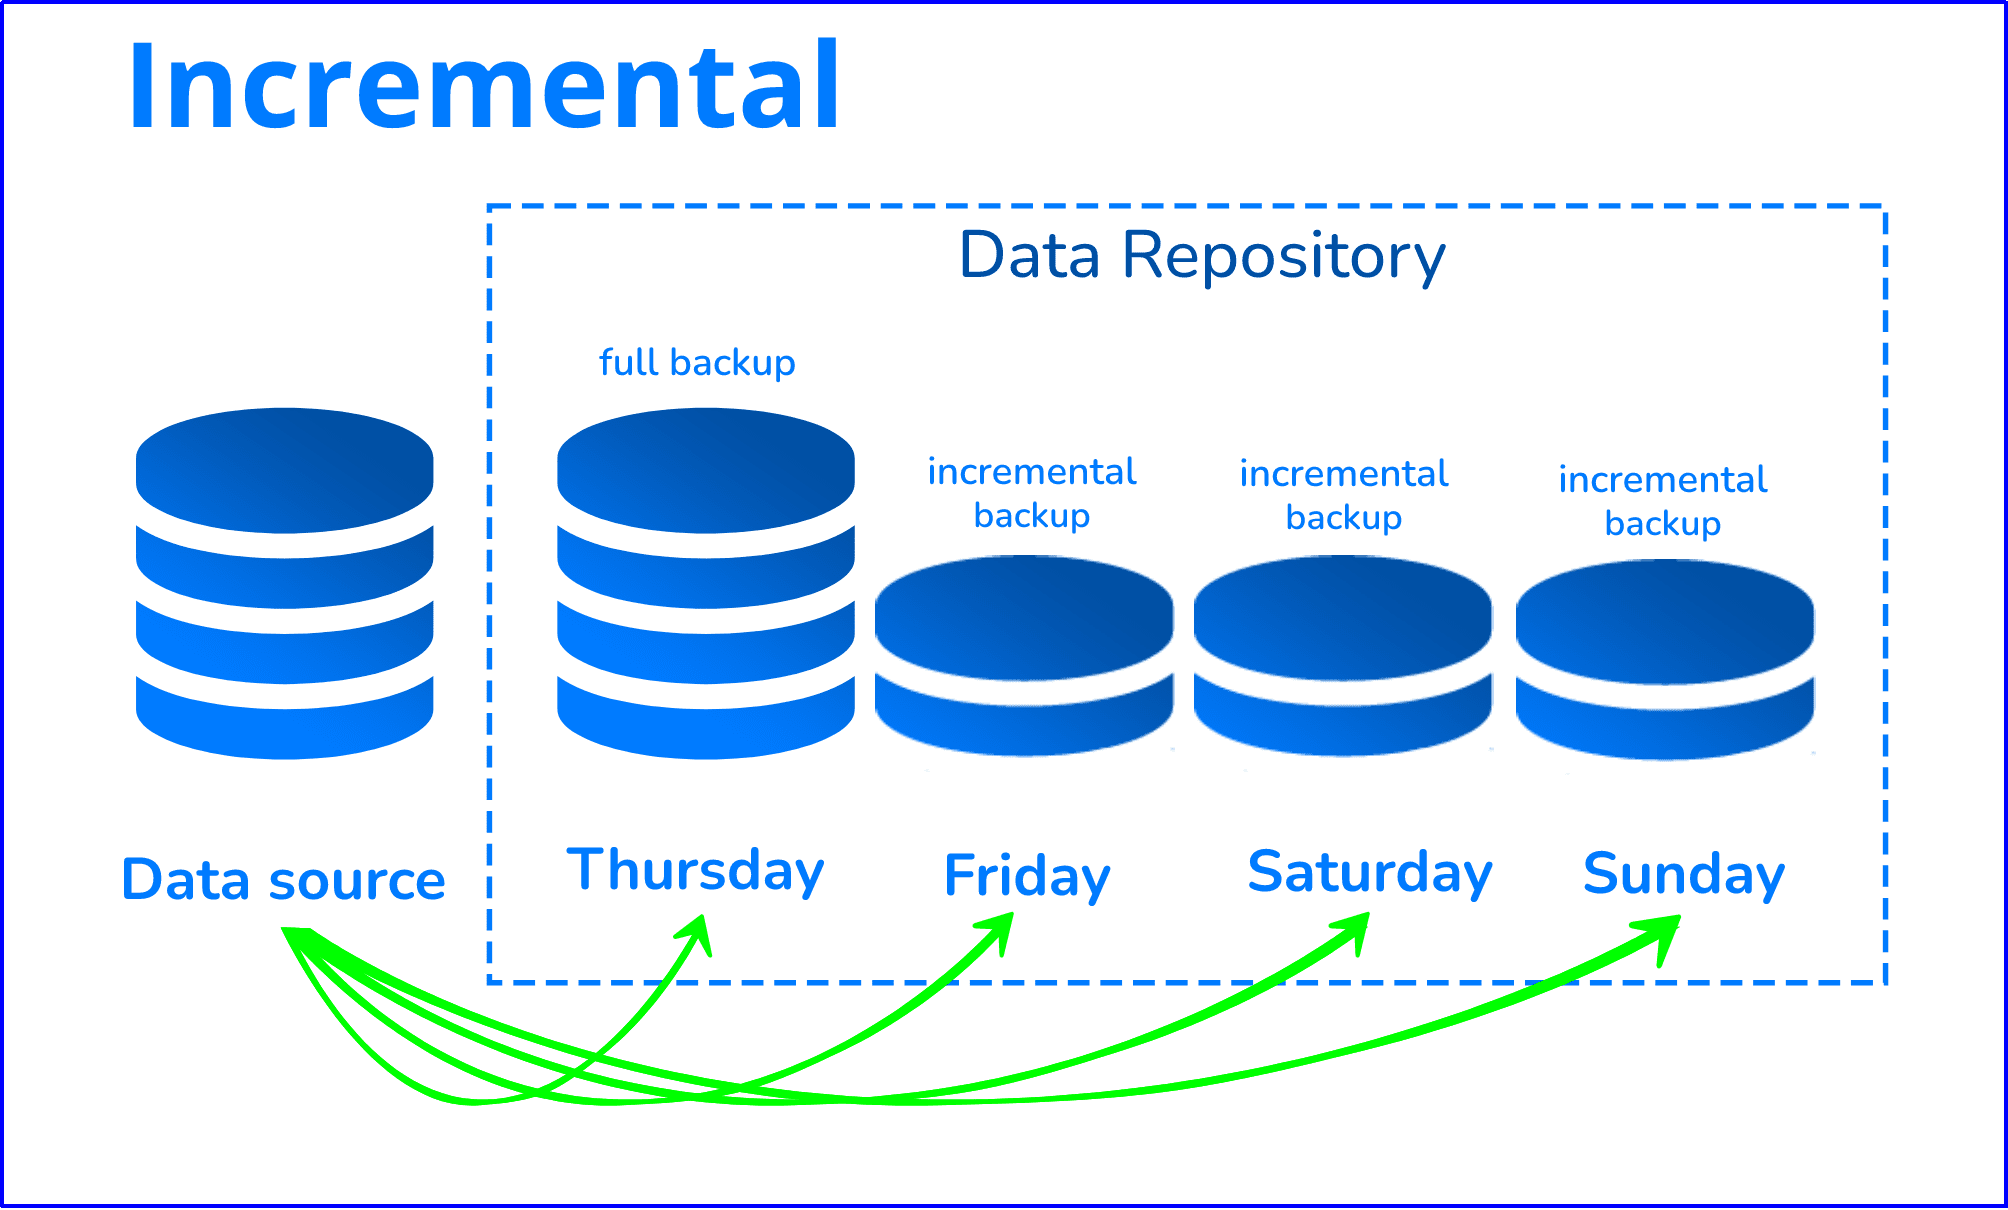
The Advantages and Disadvantages of Incremental Backup
Pros:
Efficiency: Incremental backups are faster and more efficient than full backups because they only back up data that has changed since the last backup.
Storage Utilization: They use less storage space as they don’t duplicate data.
Bandwidth Usage: They consume less network bandwidth, making them ideal for environments where network bandwidth is a concern.
Cons:
Longer Restoration: Restoring an incremental backup is typically slower than a full backup because the system must process each incremental backup in sequence.
Risk of Data Loss: If any incremental backups in the sequence are damaged, corrupted, or missing, it could result in incomplete data restoration.
Complexity: Managing incremental backups can be more complex as they depend on previous backups.

Perform Synology NAS Incremental Backup with EaseUS Todo Backup Enterprise
EaseUS Todo Backup Enterprise, renowned for its user-friendly interface and reliability, can assist you in safely and quickly backing up your Synology NAS. Please follow the step-by-step guide below to perform an incremental backup.
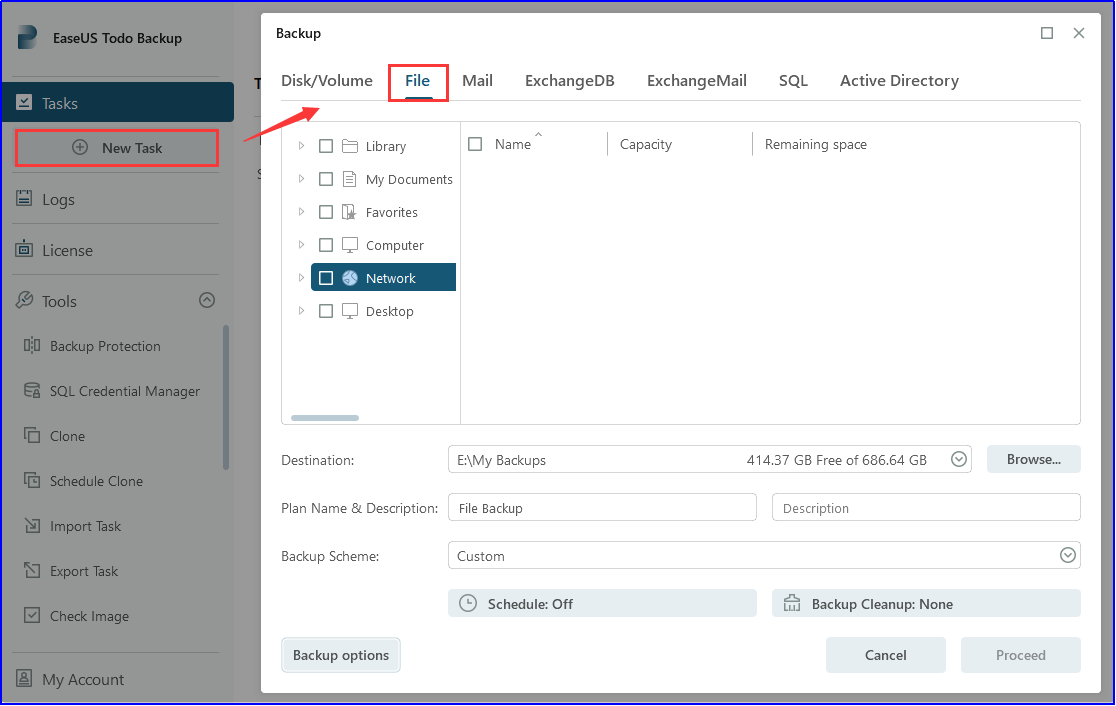
Firstly, install and launch EaseUS Todo Backup. Click New Task in the top left corner, then choose File Backup.
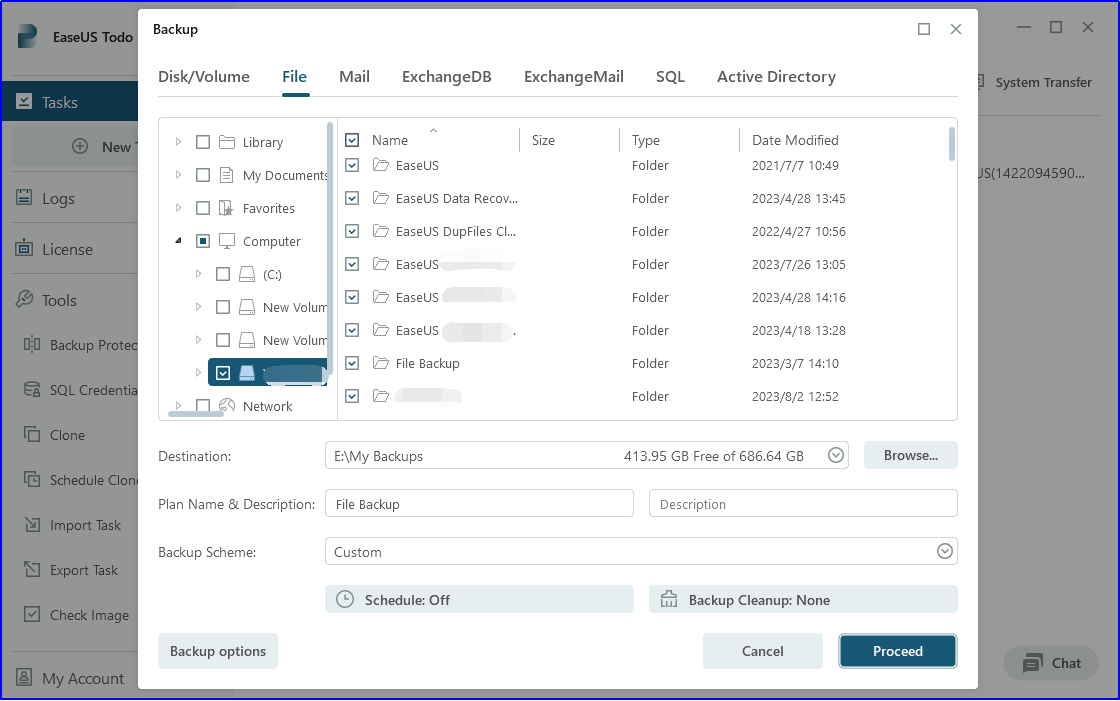
Secondly, locate your NAS device and select the files or folders you need to back up.
Thirdly, choose a destination as the storage path for your backup by clicking the Browse...button. You can save the data to an on-premise device or a cloud service.
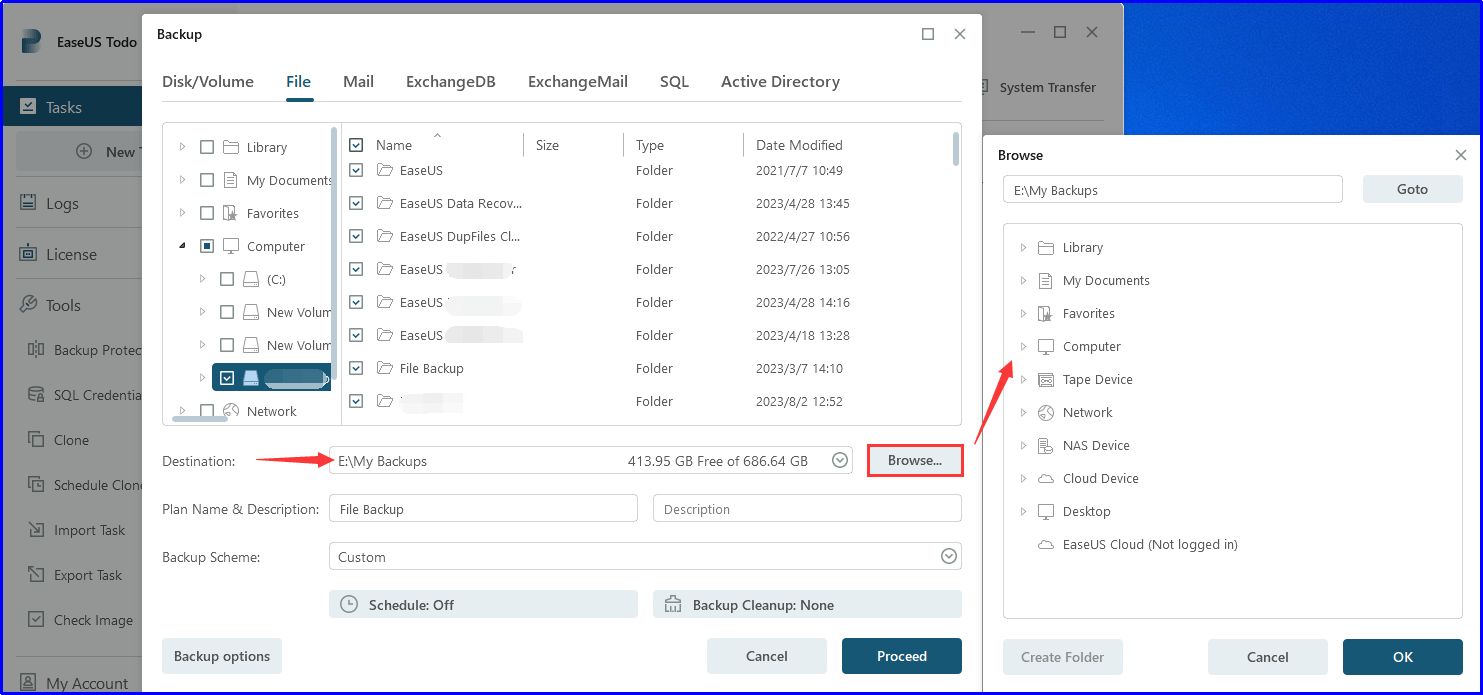
Additionally, there are other options to help customize your backup.
You can differentiate your backup task with the Plan Name and description.
The Backup Schedule option allows you to set up a regular backup task to be executed one-time, daily, weekly, or monthly. You can also set backup types as full, incremental, or differential, all based on your requirements.
The Backup Cleanup option helps optimize storage space usage.
You can also optimize storage space usage with the Backup Cleanup option.
Furthermore, the Backup options provide more features to refine and perfect your backup task, such as the performance and encryption options, etc.
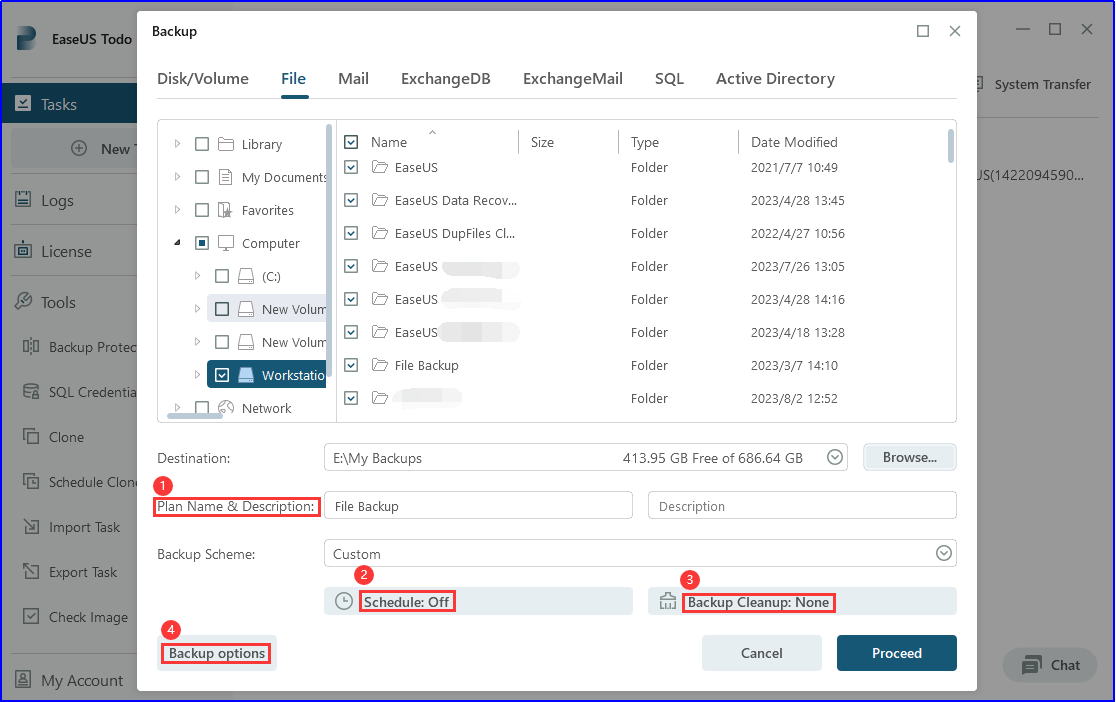
Finally, once your backup task is configured, please click Proceed to start backing up your Synology NAS.
Perform Synology NAS Incremental Backup with Hyper Backup
Hyper Backup is a built-in application of Synology, allowing users to back up data on Synology NAS manually or by schedule. With it, you can back up data incrementally and save it in local shared folders, remote servers, and clouds. Here is the guide to help you do the incremental backup step by step.
Firstly, install and launch Hyper Backup. Click the + button on the left corner and select Data Backup task to launch the Backup Wizard.

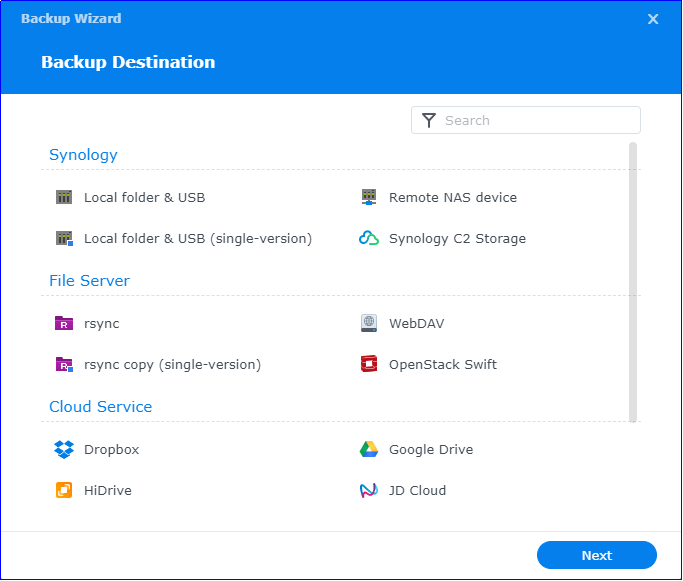
Secondly, select a backup destination. You can save your backup data to Synology, a files server, or a cloud service. Please choose a storage path to move forward.
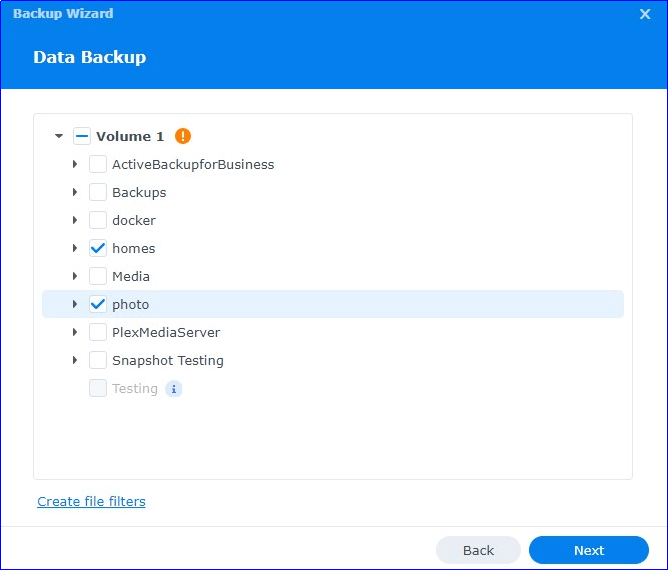
Thirdly, select Create a backup task and choose your Synology NAS. Then, select your desired data to be backed up. Later, click Next to do the next step.
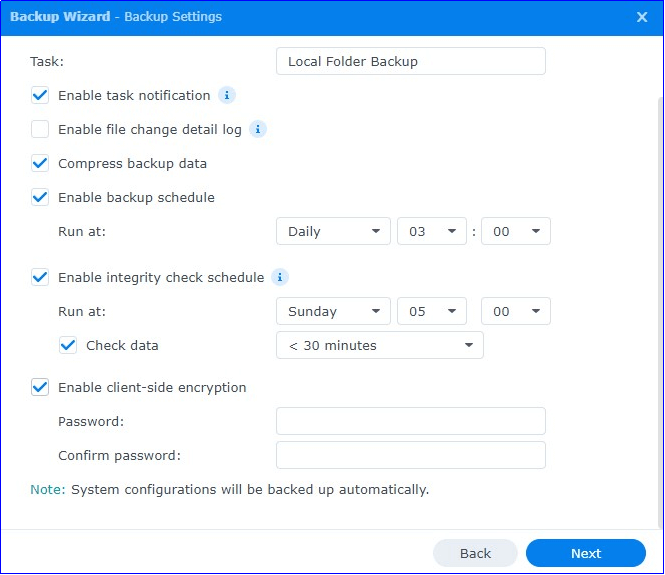
After the above process, there will be a Backup Settings window pop up. Please finish the settings according to your needs.
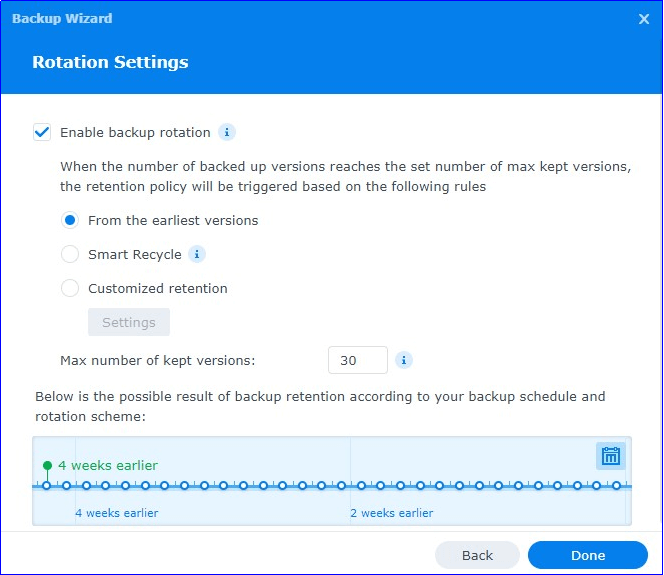
Next, set the Rotation Settings. Backup rotation settings will be specific for everyone and ultimately decide how many versions of this archive you can/should keep. Click Enable backup rotation and set it according to your requirements.
After all the process is done, your backup task is configured. Please perform the incremental backup for your Synology NAS directly.
Conclusion
Backup is a vital method to safeguard your data from accidental loss. Given that Synology NAS, as a centralized location for data storage, constantly faces the risk of data loss. It is advised for users to back up their essential data. EaseUS Todo Backup Enterprise, with its comprehensive features designed for all requirements, is one of the best backup tools available for selection.
How to Perform Synology NAS Incremental Backup FAQs
1. Is Synology Drive backup incremental?
Synology Drive Client supports incremental backups. Following the initial full backup, subsequent backups only capture the changes to files and folders. This is accomplished using approaches like file-level deduplication and version control.
2. Does Synology Hyper backup do incremental backups?
Hyper Backup features block-level incremental backup to back up only the modified/added data chunks of a file after the first-time backup rather than the whole file.
3. What are the pros and cons of incremental backup?
Pros: As it only backs up the changed content from the last backup, Incremental backup is faster when creating a backup, and less storage space is needed.
Cons: It requires the full backup it-based and many sets of the previous incremental backups to fully restore all the data, so that the backup restore process will be slow. And if one of the subsequent backups in the chine is damaged, all the following images based on it will be unavailable.
4. What is the difference between Incremental and Differential backup?
An incremental backup stores all files changed since the last backup, whether it was a full or an incremental backup. This means it takes less storage space and is quicker to perform than a full backup. A differential backup saves all files changed since the last full backup, regardless of other differential backups made in between. So, it takes more space and is slower to perform than an incremental backup.
Was This Page Helpful?
Daisy is the Senior editor of the writing team for EaseUS. She has been working at EaseUS for over ten years, starting as a technical writer and moving on to being a team leader of the content group. As a professional author for over ten years, she writes a lot to help people overcome their tech troubles.
Written by Gap
Gap has been working as an experienced data backup and security engineer at EaseUS for over 10 years, focusing on working with clients to assess needs and implemented procedures and tasks for appropriate backup solutions.
-
Taking everything into consideration, we can say that EaseUS Todo Backup Home can offer you a little extra sense of security with a set of advanced tools. The interface provides quick adaptation, every process guiding you all the way through so you don't get stuck or further damage your system rather than keeping it safe.
Read More -
EaseUS Todo Backup Free lets you create backups of your important files or your entire computer through its streamlined interface. Just choose the backup type you'd like to get started, and let the program do the reset.
Read More -
EaseUS includes all the features I expect from backup software like versioning, incremental backups, and scheduling. For more advanced users, EaseUS allows you to install a pre-boot environment onto your hard drive so you can use it to restore files without burning a CD or putting it on an external USB drive.
Read More
Related Articles
-
How to Back up Windows Server 2016 to External Hard Drive
![author icon]() Gap/2026/01/21
Gap/2026/01/21 -
How to Backup Computers to Synology NAS
![author icon]() Gap/2026/01/21
Gap/2026/01/21 -
How to Take SQL Server Database Backup Using Command Prompt
![author icon]() Gap/2026/01/21
Gap/2026/01/21 -
How to Effortlessly to Migrate Windows 7 to VirtualBox in Two Ways
![author icon]() Gap/2026/01/21
Gap/2026/01/21

EaseUS Todo Backup
Smart backup tool for your files and entire computer in Windows 10/8/7.
Install Windows on Multiple Computers at Once? No Problem!
Learn how to install Windows 11/10/7 and special programs/software on a batch of computers. Use 10 minutes to do the 10 hours work without making a single mistake!
Get Free Solution!Hot Topics
