The hard drive showing 0 bytes free in NTFS indicates that your file system is either unable to recognize or access data on the drive. Sometimes it does not indicate your drive is full.
Malware, file system corruption, or the OS not recognizing the actual storage capacity are some of the problems that might be indicated by a hard disk with 0 bytes free on an NTFS drive. The issue can be identified and resolved using several troubleshooting techniques.
As you can see it says 0 BYTES available, and NTFS? This is my mother's computer so there are important documents she needs, until we manage to get a good usb, factory resetting is out of the question. I've checked task manager and there isn't anything unusual (in case it was a virus) so I'm stuck. I've also deleted temp files in run command, it still says 0 bytes free.
from Reddit
Do your computer's hard drive partitions suddenly turn to 0 bytes? Can you access any data from the 0-byte hard drive partition? Don't worry anymore. Follow the solutions on this page to fix SSD showing 0 bytes in Windows 10/8/7.
Quick Fix to Solve 0 Bytes Free NTFS
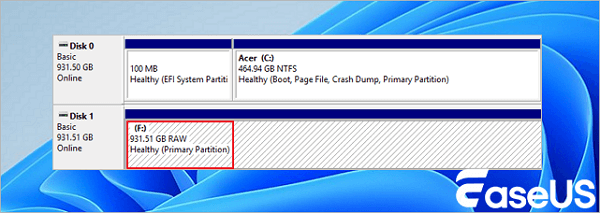
Hard drive partitions, HDD/SSD with the RAW issue, may also show up as 0 bytes used in device properties. To resolve this issue without data loss, follow the steps outlined here for guidance. Here are some quick fixes you can have a try:
- 1. Unplug, replug the hard drive, and reboot the computer.
- 2. Change the hard drive power line and STATA cable, and reboot the computer.
- If this doesn't resolve the issue, please follow up to address the problem.
Note: The primary symptoms of 0-byte hard drive partitions in Disk Management are 'RAW' and 'No Media'. The solutions for the two cases differ, and you can read on to find the one that eliminates this error.
Lost Partition Recovery and Data Restore
Stop writing new data to your formatted hard drive or partition from now on. Then launch EaseUS Data Recovery Wizard and scan your formatted partition.

First Aid: Restore Data with a Professional Data Recovery Tool
When 0 bytes of the used devices show RAW in Disk Management, you are unable to access the device. With the help of professional hard drive recovery software, you can restore all precious data. EaseUS Data Recovery Wizard is a tool that enables you to perform fast and secure data recovery on hard drive partitions, USB drives, SD cards, or other storage devices with the "0 bytes" issue.
Here is how you can restore data from the 0 bytes SSD:
Step 1. Select a drive and start scanning
Launch EaseUS Data Recovery Wizard and hover over the partition where you lost data. This could be an internal hard disk, external disk, USB, or SD card. Then, click "Search for Lost Data".

Step 2. Check and preview scanned files
Use the file format filter on the left or upper right corner to narrow the scan results until you find the files you need. Then, you can click the "Preview" button or double-click a file to preview its content, if you'd like.

Step 3. Recover lost data to a secure location
Click the checkbox next to the file and click "Recover" to restore the lost data to your local storage or Cloud drive. We recommend that you do not store the recovered data on the disk where you lost it earlier.

Remember to save the restored data to another secure device until the error is resolved.
Consult with EaseUS data recovery experts for one-on-one manual recovery service. We could offer the following services after a FREE diagnosis
- Repair corrupted RAID structure, unbootable Windows OS, and corrupted virtual disk file
- Recover/repair lost partition and re-partition the drive
- Unformat the hard drive and repair the RAW drive (Bitlocker encrypted drive)
- Fix disks that become GPT-protected partitions
If you find this information helpful, please share it with others on social media to assist them in overcoming this common challenge.
Change the Hard Drive Letter to Solve 0 Bytes Error on RAW Hard Drive
When a hard drive becomes 0 bytes, it might be a connection problem or an undetected drive letter. A quick fix that you can try is to reconnect the hard drive and change its drive letter.
Step 1. Press "Windows+R" and type diskmgmt.msc and hit "Enter". The Disk Management window appears.
Step 2. Right-click on the hard drive that shows 0 bytes free space and choose "Change Drive Letter and Paths…"
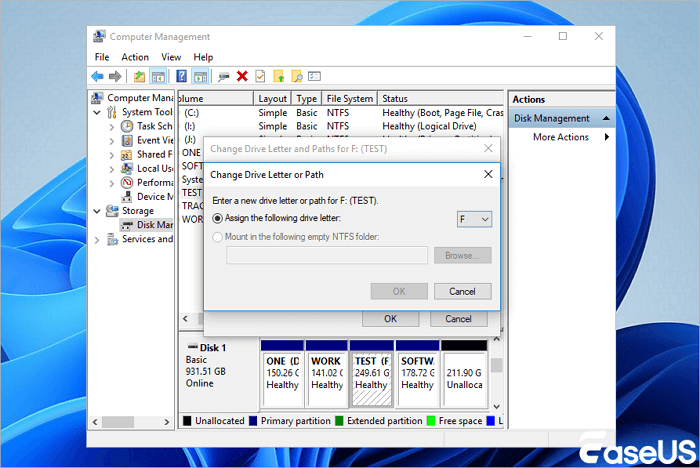
Step 3. Click the Change drive letter button and choose a drive letter from the drop-down list.
Step 4. Click "OK" and then click "Yes" when prompted. Click "OK" to confirm and close the box.
If changing the drive letter doesn't help to fix the hard drive 0-byte issue, there are 3 methods that can apply to resolve the RAW issue on your 0 bytes hard drive partition.
Format 0 Byte RAW SSD/Hard Drive Partition to NTFS
After restoring data, you can use Disk Management to format the 0 bytes RAW hard drive partition to NTFS.
Step 1. Right-click on This PC/My Computer, select "Manage".
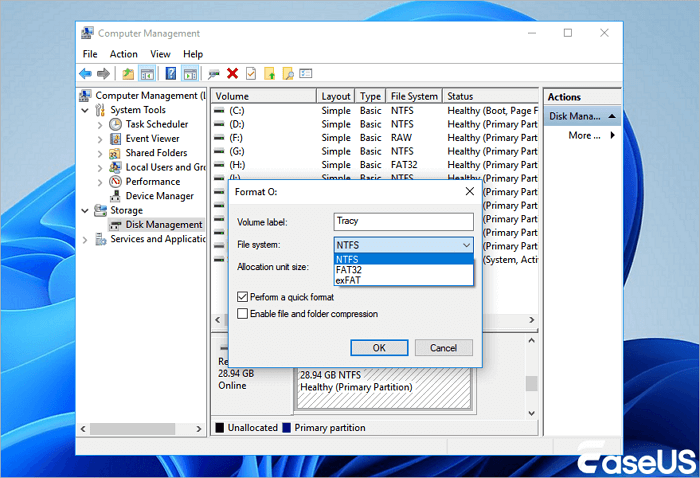
Step 2. Click "Disk Management", locate and right-click the 0 bytes hard drive partition, then choose "Format".
Step 3. Select NTFS as the file system for the partition and click "OK" to confirm.
Convert RAW Hard Drive to NTFS with CMD
There is another way that can resolve the device RAW issue on 0 bytes used hard drive, which is to convert RAW file system to NTFS using CMD command.
Step 1. Press Windows + R, type diskpart, and hit Enter.
Step 2. Enter the following commands hitting Enter after each line.
- list volume
- select volume X ("X" means the volume number of the RAW drive)
- format fs=ntfs quick (or format fs=fat32 quick)
- exit
Then, check the drive.
Run Disk Error Checker to Fix SSD Showing 0 Bytes
Step 1. Open File Explorer and right-click on the 0-byte HDD/SSD partition, select "Properties" and go to the Tools tab.
Step 2. Click on the Check button under the Error checking section.
Step 3. It will scan the SD card and automatically repair found file system errors.
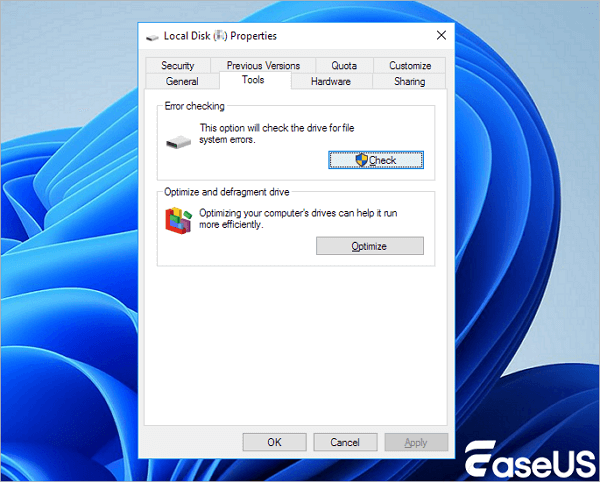
When the process completes, you can restart the PC if necessary. Then the partition will be available for saving and storage new files and you can copy the restored data back to the partition again.
[Resolved] 0 Bytes Hard Drive Shows No Media in Disk Management
Applies to resolve 0 bytes hard drive which displays no media in Disk Management.
To repair 0 bytes used hard drive or partition which displays No Media in Disk Management, you have two methods to try here below.
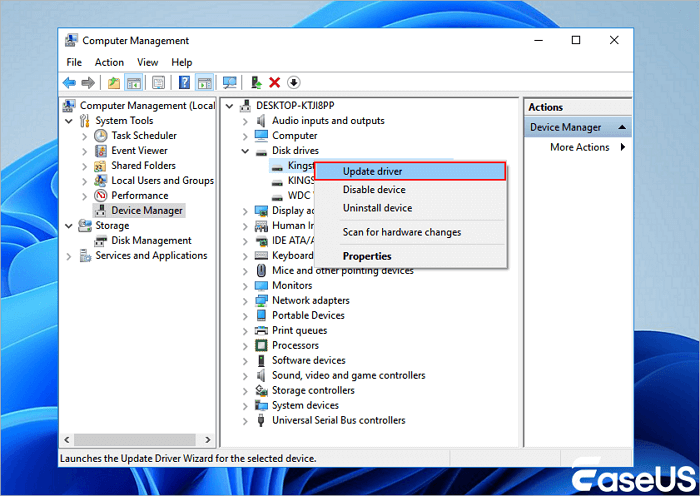
# 1. Update Hard Drive Driver
- Step 1. Right-click on This PC/My Computer icon, select Manage and go to Device Manager.
- Step 2. Expand Disk drivers, find and right-click on the 0 bytes hard drive which displays as no media, choose "Update driver".
![Update SD card driver.]()
- Step 3. Select "Search automatically for updated driver software" and wait patiently till the process completes.
- Restart the PC if necessary.
If your hard drive or SSD is a customized device, you can contact or go to the manufacturer's website, download and install the hard drive driver.
After updating the device, you can check the hard drive partition to see if you can access the data or not. And check the display state in Disk Management.
- If it shows RAW, follow the above solutions and fix it.
- If it shows Offline, activate the device to Online and try to open the device again.
- If it still shows no media, follow Method 2 below for help.
# 2. Take 0 Bytes No Media Hard Drive to Local Device Repair Center
When the first method fails to work, you'll only have the last solution. It is to take your hard drive to be repaired at the local storage device repair center or the manufacturer's support center.
Final Words
This post has looked at how you can fix SSD showing 0 bytes error and provided you with a few quick fixes and some more complicated methods you can try one by one. Once you spot the data loss on your HDD or SSD, try EaseUS Data Recovery Wizard.
SSD Showing 0 Bytes FAQs
You may have solved the internal or external hard disk showing 0 bytes of free space. If you want to learn more, read the questions and answers below.
1. Why does it say I have 0 bytes?
Reasons why HDDs may be showing 0 bytes:
- Your hard drive becomes a RAW drive
- Your hard drive is corrupted
- There is a virus on your drive
2. How do I fix my hard drive showing 0 bytes?
When your hard drive shows 0 bytes, follow the solutions below:
- Convert RAW to NTFS
- Format the hard drive to NTFS
- Check disk errors with CHKDSK
- Update hard drive drivers
3. Is 0 bytes a virus?
No, it's not a virus. Generally, a 0-byte file is a result of file or storage drive corruption.
4. do I fix my SSD full for no reason?
You can fix the SSD full for no reason error with these solutions:
- Delete big hidden files and folders
- Clean up junk files and large files
- Delete hibernate file
- Uninstall some programs
- Temporarily disable system restore
- Add extra space to drive C
Was This Page Helpful?
Jaden is one of the editors of EaseUS, who focuses on topics concerning PCs and Mac data recovery. Jaden is committed to enhancing professional IT knowledge and writing abilities. She is always keen on new and intelligent products.
Written by Tracy King
Tracy became a member of the EaseUS content team in 2013. Being a technical writer for over 10 years, she is enthusiastic about sharing tips to assist readers in resolving complex issues in disk management, file transfer, PC & Mac performance optimization, etc., like an expert.
Related Articles
-
How to Fix a Slow WD External Hard Drive Without Losing Data
![author icon]() Jean/Jan 29, 2026
Jean/Jan 29, 2026 -
Fixe Maxtor External Hard Drive Not Working/Recognized Without Data Loss
![author icon]() Tracy King/Feb 12, 2026
Tracy King/Feb 12, 2026 -
Windows Installation Not Detecting SSD? Fixes Here
![author icon]() Jaden/Jan 29, 2026
Jaden/Jan 29, 2026 -
Fixed: Seagate external hard drive not showing up in Windows 10/11
![author icon]() Tracy King/Jan 29, 2026
Tracy King/Jan 29, 2026


