
-
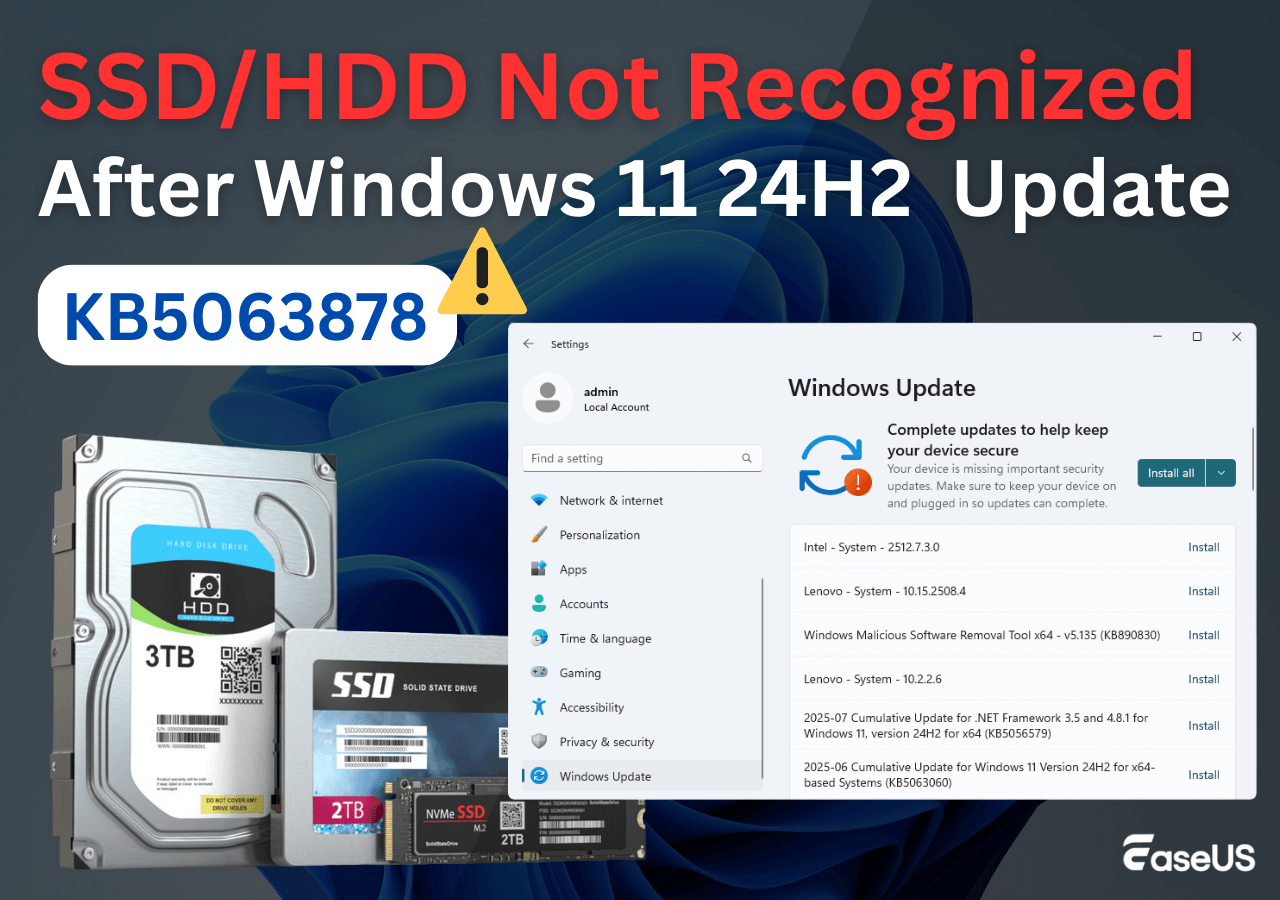
![]() [KB5063878] SSD/HDD Not Recognized After Windows 11 Update
[KB5063878] SSD/HDD Not Recognized After Windows 11 Update June 30,2026
 6 min read
 -
![]() How to Use CMD to Remove Virus from Any Drive in Windows 10/11June 21,20266 min read
How to Use CMD to Remove Virus from Any Drive in Windows 10/11June 21,20266 min read -
![]()
-
![]()
-
![]() How to Fix Corrupted HTML File Recovery Solutions (Online & Offline)June 30,20266 min read
How to Fix Corrupted HTML File Recovery Solutions (Online & Offline)June 30,20266 min read -
![]() How to Open PowerShell in Windows 11 | Full InformationJune 16,20266 min read
How to Open PowerShell in Windows 11 | Full InformationJune 16,20266 min read -
![]() Bootable Data Recovery Software Full Information | for BeginnerJune 30,20266 min read
Bootable Data Recovery Software Full Information | for BeginnerJune 30,20266 min read -
![]() Discord RTC Connecting Stuck? Troubleshoot This Error Now (7 Ways)June 16,20266 min read
Discord RTC Connecting Stuck? Troubleshoot This Error Now (7 Ways)June 16,20266 min read -
![]() How to Cancel a Format in Progress If Windows Won't Cancel FormatJune 16,20266 min read
How to Cancel a Format in Progress If Windows Won't Cancel FormatJune 16,20266 min read -
![]() How to Use DiskPart to Repair Disk Without Losing DataJune 30,20266 min read
How to Use DiskPart to Repair Disk Without Losing DataJune 30,20266 min read
Page Table of Contents
You're not alone if you're getting the restart to repair drive error. Several Windows 10 users have reported receiving these notifications in their Action Center and are unsure what to do. Don't be concerned if you're experiencing a similar problem. In this article, we'll show you how to fix this error in various ways. However, before we go ahead, let's take a quick look at this error and the reason behind it.
What Is Restart to Repair Drive Errors
The "Restart to repair drive errors" generally means that there's an ongoing issue with your computer's hard drive. However, do not worry as all you need to do is repair your storage, and there are numerous methods for doing so.
Many users have reported that they began experiencing this problem after upgrading to the most recent version of Windows. To be specific, if this error frequently appears in your notifications, you must restart your computer and execute the necessary troubleshooting steps to resolve the error completely.
Why Does My Computer Keep Having Restart to Repair Drive Errors
This error mostly happens due to some hard drive issues, boated Windows registry, or failed updates. You cannot open your files and folders on your PC until this issue is resolved because the data on the disk that is causing the problem becomes inaccessible. If you keep getting the same error on your computer, it means that Windows has detected an unusual error while performing reading and writing operations on one of your drives.
Hard drive errors are arguably the most prominent cause of this issue. It can happen because of bad system maintenance, malware, or human error. To fix hard drive errors, you can use a tool called Chkdsk on your Windows computer. We'll discuss the necessary steps further in this article.
Apart from that, failed Windows updates are also a significant reason for this error. Lack of disk space can cause an update to fail because your PC won't have enough memory to install the update altogether. However, clearing some extra space might do the job, but in some cases, it leads to the "Restart to repair drive errors" notification.
How to Fix Repair Drive Errors on Windows 10 Without Data Loss
Below is the list of methods and tools to address this specific problem. We'll go over each method one by one. But, before you implement those methods, you should do a few things first, such as data rescue and recovery.
First Thing to Do: Rescue and Recover Data
Important to note that when you receive the Restart to Repair Drive, the chances are that you will not be able to access the PC. And some of the methods we will use may result in data loss in the long run. Therefore, it is strongly advised that users use data recovery software to import and export data in advance. We recommend that you use EaseUs Data Recovery Wizard, which will assist you in restoring data in the WinPE environment when the computer or hard drive cannot boot.
EaseUS data recovery program is the perfect tool for you to use in this scenario, as it helps you recover data in the WinPE environment. It offers a great set of features that can entirely recover deleted files, or restore data from OS crashes, partition losses, documents, videos, and other data loss scenarios. It is an all-in-one platform to recover your data from damaged hard drives.
We recommend that you use EaseUS Data Recovery Wizard before attempting the methods we're about to discuss.
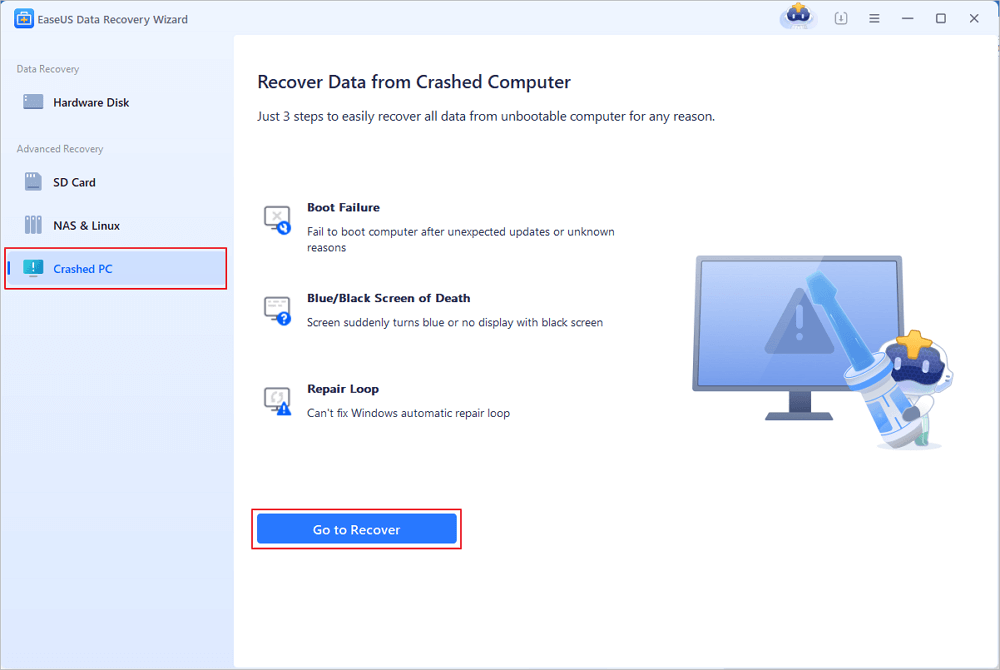
Step 1. Create a bootable disk
Launch EaseUS Data Recovery Wizard, choose "Crashed PC" and click "Go to Recover".
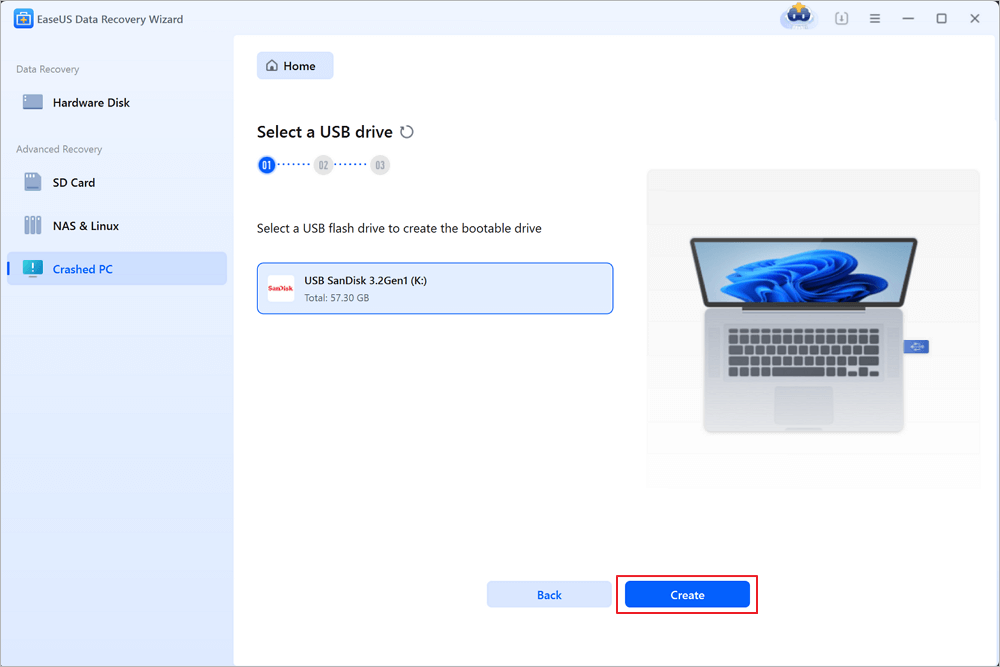
Select an empty USB to create the bootable drive and click "Create".
⚠️Warning: When you create a bootable disk, EaseUS Data Recovery Wizard will erase all data saved in the USB drive. Back up important data beforehand.
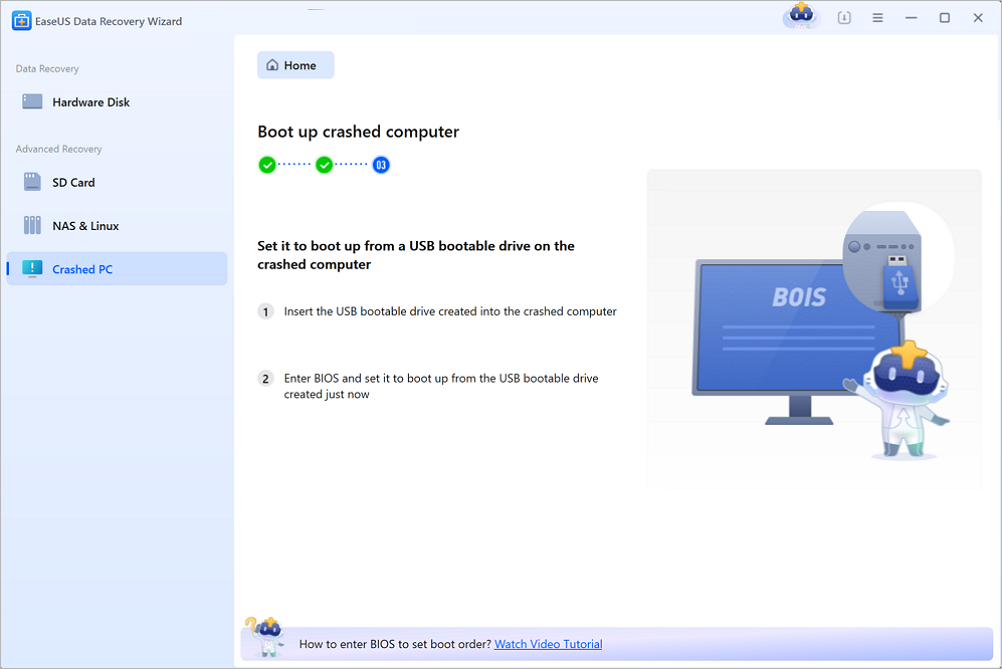
Step 2. Boot your computer from the bootable USB
Connect the bootable disk to the PC that won't boot and change your computer boot sequence in BIOS. For most users, it works well when they restart their computer and press F2 simultaneously to enter BIOS.
Set to boot the PC from "Removable Devices" (bootable USB disk) beyond Hard Drive. Press "F10" to save and exit.
Step 3. Recover data from a crashed system/PC
After booting from EaseUS Data Recovery Wizard bootable disk, select the drive you want to scan to find all your lost files. Preview and recover the files you need to a safe location.
💡Tip: You can restore data on the local disks, external hard drives, and also the cloud storage.

After you have reduced the important data, try the methods as follows to fix restart to repair drive issue on Windows 10 or Windows 11. As you try each method, move on to the next if one doesn't work.
Method 1. Reboot Computer
The first and most fundamental step in resolving this problem is to restart your computer. It is advantageous in situations like this. Windows can automatically perform and fix some minor errors if the last shutdown was not proper. It will not essentially solve the problem, but it does work in some cases.
Method 2. Run CHKDSK Command in Safe Mode
As we know that the Restart To Repair Drive Errors is a disk-oriented error, we can use CHKDSK to resolve the issue altogether. CHKDSK is a tool specific to fix disk-related errors in Windows computers.
Run CHKDSK in safe mode in the following way:
Step 1. Restart your PC. As the bootup process begins, start spamming the F8 key. It will open the Advanced Boot Option.
Step 2. There, you'll see an option called "Safe Mode with Command Prompt." Select it.
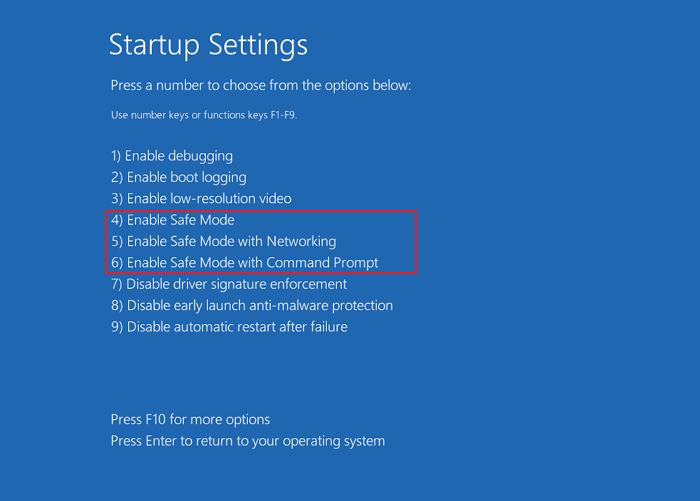
Step 3. Now, the computer will begin booting, and you'll see the list of drivers. Run CHKDSK. Wait for the wizard to complete the process, and if the errors are minor, they will be automatically resolved.
Method 3. Run DISM and SFC Scan
DISM is an abbreviation for Deployment Image Servicing and Management. It is a powerful tool that can resolve corrupted system files by scanning them, resulting in the repair of drive errors that occur frequently.
Step 1. Boot from a bootable USB Drive and open the Command Prompt with Safe Mode (see how to boot into Safe Mode)as explained above.
Step 2. Write the following command on the command line given below:
dism.exe /Online /Cleanup-image /RestoreHealth
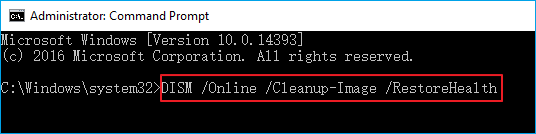
Step 3. Sometimes, this may not work because the DISM can't obtain the files online. You can use your installation DVD or USB. Insert it and write the following commands:
DISM.exe /Online /Cleanup-image /RestoreHealth /Source :C : RepairSourceWindows /LimitAccess
Replace the C: RepairSourceWindows to your inserted DVD or USB path.
These are the steps that you follow to run CHKDSK. However, you can also use SFC as a primary tool for fixing drive-related errors.
To perform SFC Scan:
Step 1. Once you are on the recovery screen and open the command prompt, type SFC /scannow, and press Enter.
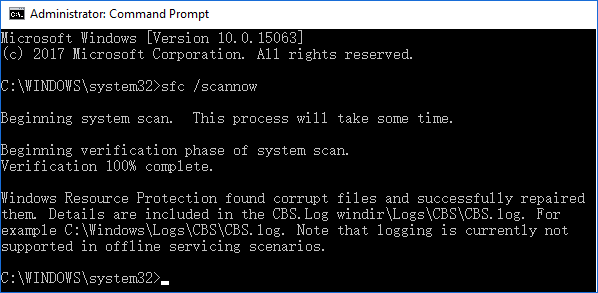
Step 2. Now the scan and repair process will be initiated. Please wait for it to finish.
If your problem persists, go to the following procedure given below.
Method 4. Run Automatic Startup Repair
You can also only use this process if you have a Windows bootable USB. Automatic Startup Repair is proven to be an effective solution for this error. Here's how you can use it:
Step 1. Take the Windows bootable installation USB to insert it into the USB port of your PC. Restart your computer, enter the BIOS, and ensure the USB is set as the first bootable device. Restart the computer again, and the PC will boot from the USB drive.
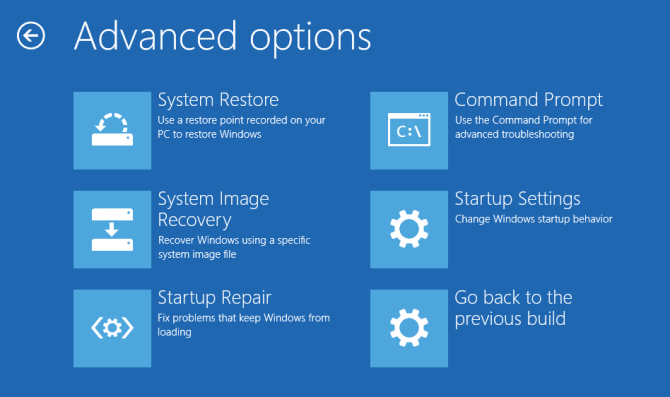
Step 2. It will start the Windows installation. Choose your language preferences, click "Next". On the bottom left, click on "Repair Your Computer". Now, a screen will appear saying Choose an option. Press "Troubleshoot" > Click on "Advanced Options" > "Automatic Repair" or "Startup Repair".

Step 3. Wait for the Windows Automatic Repair process to complete entirely. Finally, restart your PC and boot to Windows.
It is one of the most effective ways to solve this issue, and we hope that your problem is fixed. If not, there's one last resort which you can still look forward to.
Method 5. Perform System Restore
Step 1. Boot into advanced recovery and click on "Advanced Options".
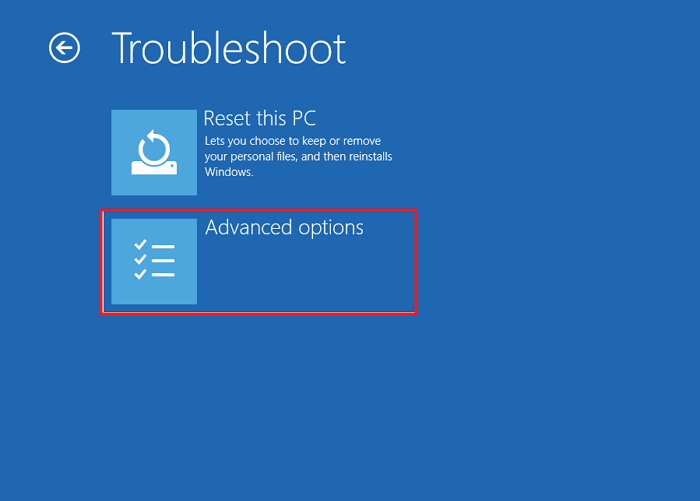
Step 2. Click on "System Restore" to launch the wizard.
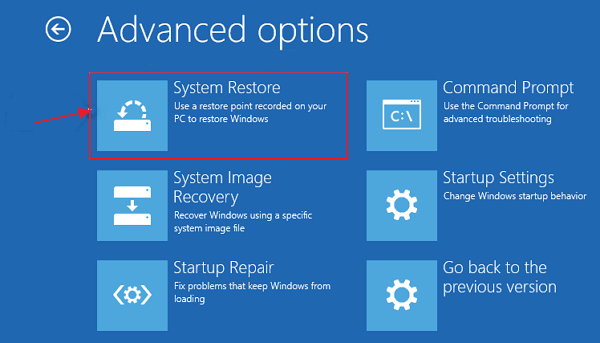
Step 3. The system restore wizard looks similar to how it is in Windows. Click next to find the list of dates.
Step 4. Select a date on which the PC was working perfectly. Click next, and let the wizard restore the PC to a working state.
You can restore your PC to a previous state. It can return your PC to a state in which the problem did not exist in the first place. The next obvious step should be to backup your data and then replace the hard disk if the problem occurs again.
Method 6. Use Manual Services to Fix Restart to Repair Drive Errors
The final way is using manual data recovery services from EaseUS. Our professional technical team can help you solve any system startup errors, including system failure, system blue screen, system black screen, and so on.
Consult with EaseUS data recovery experts for one-on-one manual recovery service. We could offer the following services after FREE diagnosis:
- Fix Windows boot issues, including BSOD
- Fix Windows error and configure Windows environment
- Restore the system when it fails to boot
- Optimize Windows computer to make it run quickly
Conclusion
This article covered all the fundamental methods and tutorials for resolving the "Restart to Repair Drive Errors" problem. Disk Errors can occur because of various factors, including hard drive problems, failed updates, and so on.
The post also offers a variety of solutions to this problem, ranging from simple to extreme. The securest way to fix this is using the EaseUS Data Recovery Wizard to recover your lost data at first. It is critical because the methods described here may result in data loss. EaseUS Data Recovery Wizard can help you restore files when your computer or hard drive can't boot. We hope you found this helpful article.
Was this page helpful?
-
![]()
Approved by
Evan Galasso is a digital forensics and data recovery engineer with over 10 years of experience in the field. He presents opinions on the current state of storage media, reverse engineering of storage systems and firmware, and electro-mechanical systems of SSDs and HDDs.…


20+
Years of experience

160+
Countries and regions

72 Million+
Downloads

4.9 +
Trustpilot Score


