Page Table of Contents
Reviews and Awards
| Workable Solutions | Step-by-step Troubleshooting |
|---|---|
| 1. What are OneDrive and Teams? | OneDrive by Microsoft can save everything from family photos to lecture notes Teams is another top-tier service...Full steps |
| 2. How to Move Files from OneDrive to Teams? |
Firstly, use your Microsoft 365 account to log into the Microsoft Teams app. Now go to the "Files" section...Full steps |
| 3. How to Upload Files to Microsoft Teams? | A simple method to upload files on Teams is directly from a channel. By uploading a file this way, you can also...Full steps |
| 4. Transfer OneDrive between PCs | This top-tier PC transfer tool is a smart choice when it comes to moving your data, accounts...Full steps |
What are OneDrive and Teams?
OneDrive by Microsoft has secured its place among the top cloud storage services used today. With your personal cloud on the go, you can save everything from family photos to lecture notes, eBooks, and business proposals there without much trouble.
Teams is another top-tier service provided by Microsoft that has made it easy to create a single centralized hub to harmonize your workflow better. Teams can help you accomplish many things, including instant messages, calls, organizing meetings, sharing content, and more.
There may come certain instances when you wish to share a file stored on your OneDrive to a channel in Teams. Be it an assignment, lecture material, business proposals, or anything else of interest, knowing how to move files from OneDrive to Teams is bound to come in handy. Keep reading to learn how to do so easily using simple step-by-step guides.
How to Move Files from OneDrive to Teams
If you want to directly move and share files stored on your OneDrive with participants in a Teams meeting, you have landed on the right page. The following is a detailed guide on how to move a file from OneDrive to Teams using just a few simple clicks:
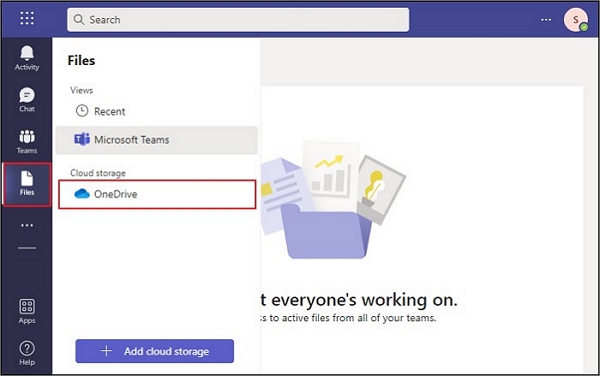
Step 1: Firstly, use your Microsoft 365 account to log into the Microsoft Teams app. Now go to the "Files" section and find the "OneDrive" option under the "Cloud Storage" section.
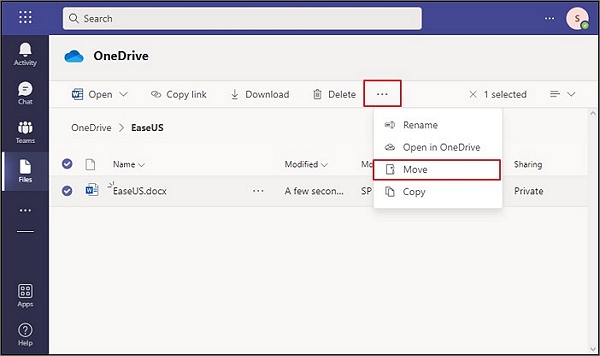
Step 2: From the pop-up window, choose the file(s) you wish to move. From the options visible in the top header, access "Three Dots" to select the "Move" option.
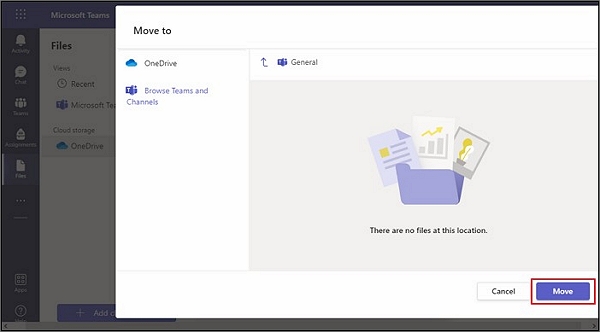
Step 3: Then, click on "Browse Teams and Channels" and select your desired location. Tap the "Move" button to conclude the process. You can view your moved files by going to "Files" in Teams.
Get More Info: How to Upload Files to Microsoft Teams
If you wish to simply upload files to Microsoft Teams instead of directly moving them, it can be done quite easily. Following are some of the useful methods you can apply to upload files to Microsoft Teams with ease.
1. Upload Files to Teams via Channel
A simple method to upload files on Teams is directly from a channel. By uploading a file this way, you can also present it as a message and notify your teammates. You can follow the steps mentioned below to achieve this:
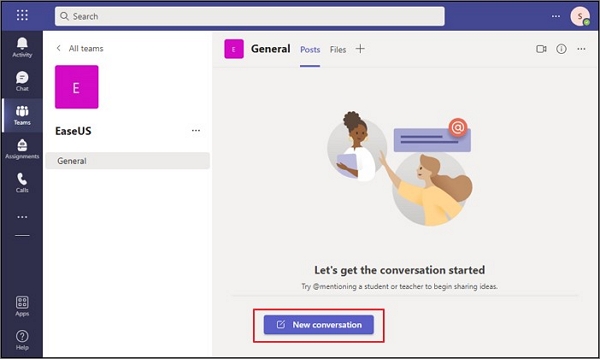
Step 1: Launch Microsoft Teams on your device and head over to the "Teams" tab. Now, choose the channel you wish to upload the file to. Then, tap on "New Conversation."
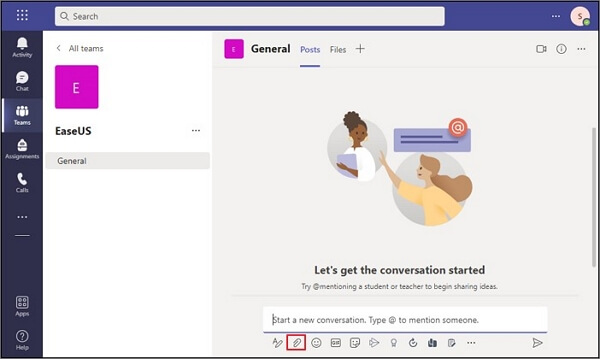
Step 2: You can now attach the file you wish to upload on Teams by clicking on the "Attachment" paperclip icon in the toolbar underneath the text input field.
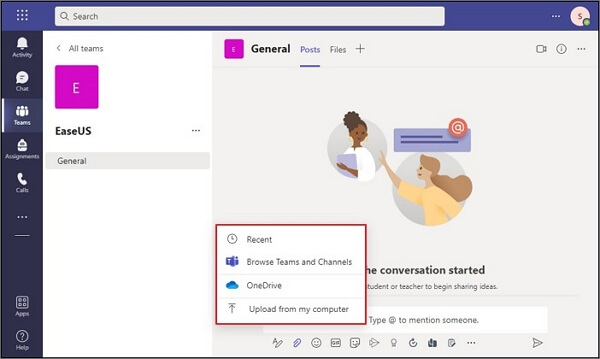
Step 3: Now, choose where you want to attach your file. You can choose from recent files, OneDrive, your computer's local storage, and browse Teams and Channels. Finally, select your file and hit the "Send" button to conclude the process.
2. Upload Files to Teams via Files Tab
One of the simplest methods you can adopt to upload files on Microsoft Teams is using the "Files" tab. Here are the steps for that:
Step 1: Launch Microsoft Teams on your device and select the channel you wish to upload your file to by going to the "Teams" tab.

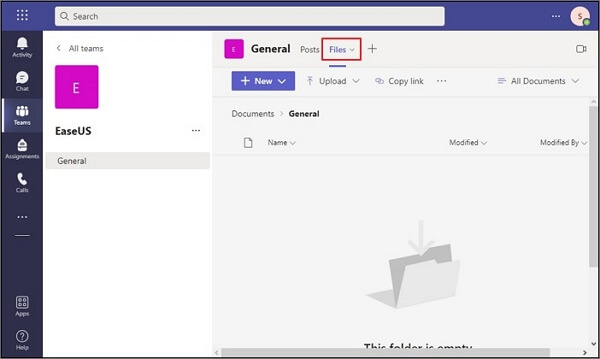
Step 2: Head over to the "Files" tab of your chosen channel.
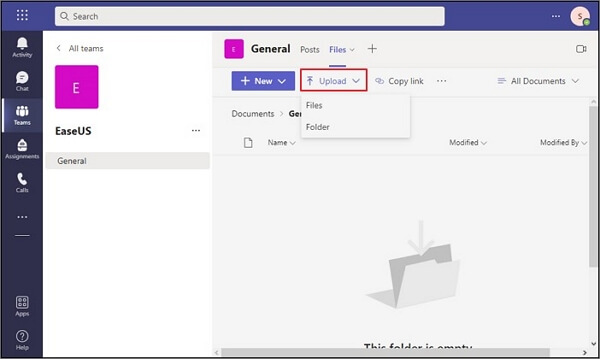
Step 3: Now, use the "Upload" button from the top toolbar and select the files or folders you wish to upload. Your selection will be automatically uploaded to your chosen channel.
3. Upload Files to Teams via SharePoint
SharePoint is a quick and efficient method to upload large and multiple files on Microsoft Teams. You can follow these steps to use SharePoint to upload files on Teams:
Step 1: In Microsoft Teams, go to the "Teams" tab and select your desired channel.

Step 2: Navigate to the "Files" tab inside your selected channel. From the toolbar at the top, select the "Open in SharePoint" option from the "Three-dots" menu.
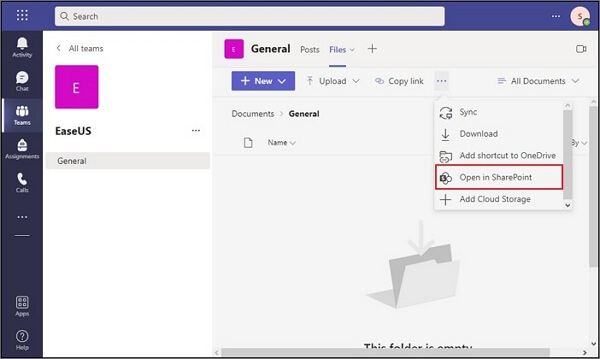
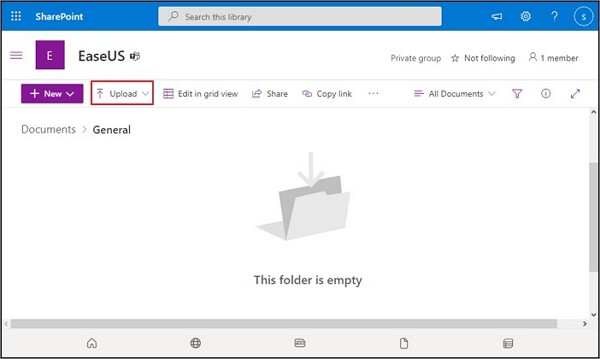
Step 3: In the next window, you can add the files you wish to upload to your Teams channel or simply drag and drop them. Once the upload process is complete, you will be able to see your files and folders in Teams.
Bonus Tip: Transfer OneDrive between PCs
In case you were looking for a competent tool to help you transfer all your OneDrive data from one computer to another, there is no better choice than EaseUS Todo PCTrans.
This top-tier PC transfer tool is a smart choice when it comes to moving your data, accounts, and other applications between computers quickly. With an intuitive interface and easy-to-use features, it can help you transfer important data without any loss along the way. The software's automatic functions and free services make it one of the top choices among data transfer tools for PCs.
Advantages of EaseUS Todo PCTrans
- Using the tool, you can transfer all types of data files and most commonly used applications such as Microsoft Office and Adobe Photoshop.
- The tool ensures no data loss along the way, so you can move your files securely.
- You can choose multiple options to transfer data and files, depending on your requirements.
- It features a simple and easy-to-use interface so everyday users can operate it with ease.
Transfer OneDrive between PCs Using EaseUS Todo PCTrans
You can transfer your OneDrive account and data between PCs using the EaseUS Todo PCTrans app by following the steps mentioned below:
Step 1. Run EaseUS Todo PCTrans on both PCs
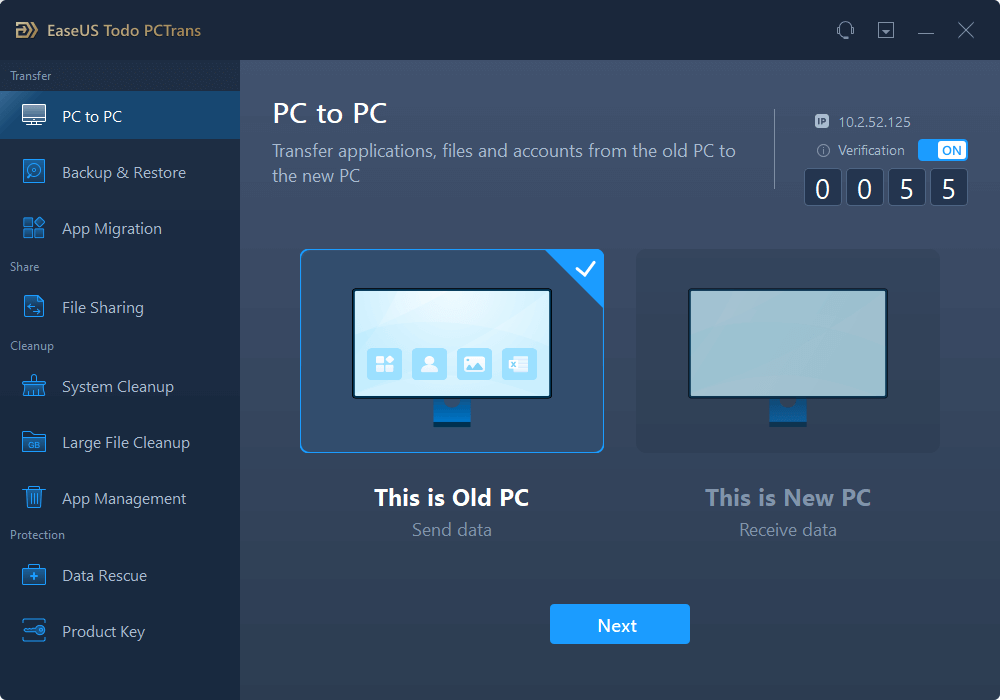
Download EaseUS Todo PCTrans and you will be in the PC to PC interface.
Step 2. Choose transfer direction - Old or New Computer
"This is New PC" - Transfer all data from remote old computer to current new computer.
"This is Old PC" - Transfer all data from current old device to a new computer.
Step 3. Connect two computers
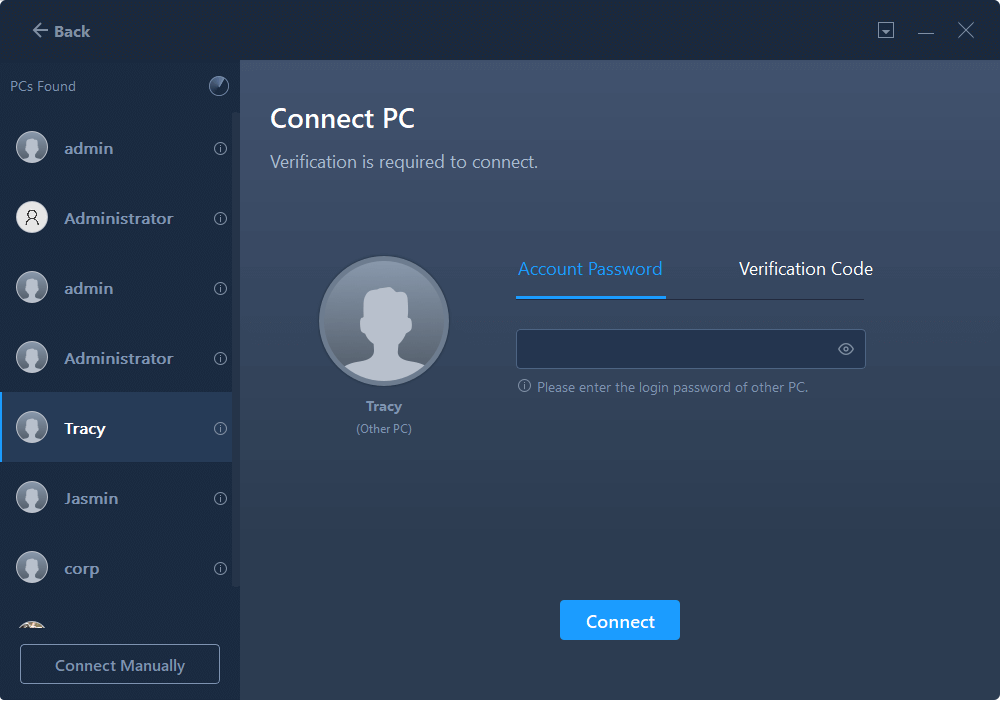
1. Select your target PC to connect via its IP address or device name and click "Connect".
2. Enter the login password of your target PC and click "OK" to confirm.
If you didn't see the target PC in the listed devices, you can also click "Add PC" to manually connect the target PC by inputting its IP address or device name.
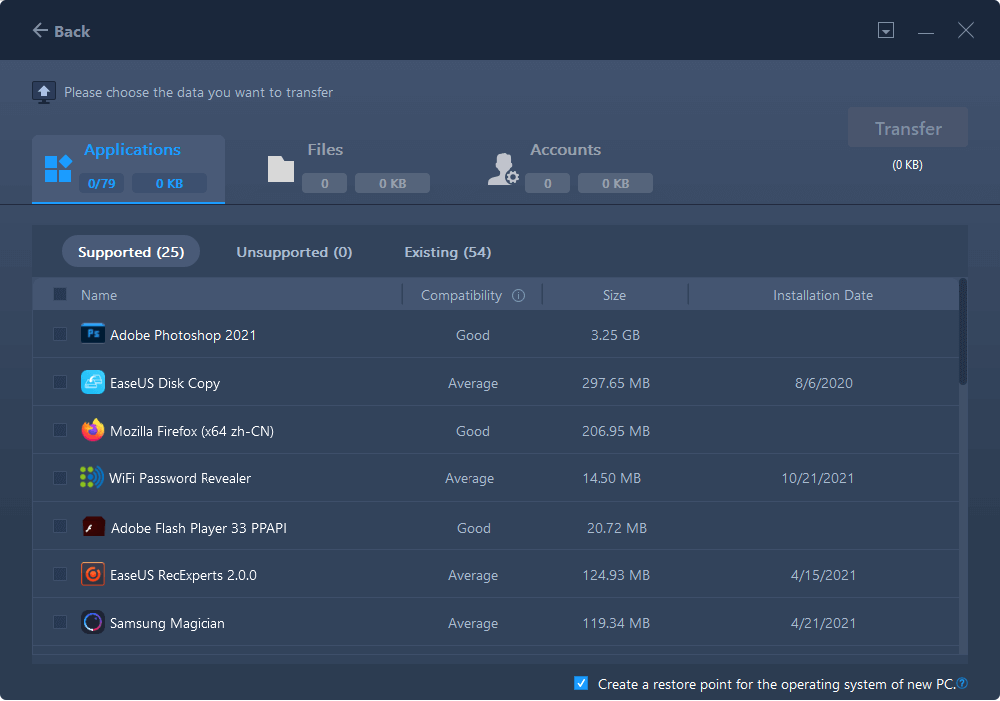
Step 4. Select apps, programs, and software and transfer to the target computer
1. You can select and choose what you want to transfer from the current computer to the target PC.
2. After selecting desired applications and programs, click "Transfer" to start the transferring process.
Conclusion
Uploading a file on Microsoft Teams is a fairly easy process that does not require much trouble. There are multiple ways using which you can upload files to Microsoft Teams, none of which require much technical information or hassle. If you wish to move files from OneDrive to Teams, you can easily do so using the thorough and helpful guide mentioned above.
About the Author
Updated by Tracy King
Tracy became a member of the EaseUS content team in 2013. Being a technical writer for over 10 years, she is enthusiastic about sharing tips to assist readers in resolving complex issues in disk management, file transfer, PC & Mac performance optimization, etc., like an expert.
Reviews and Awards
-
EaseUS Todo PCTrans Free is a useful and and reliable software solution created to serve in computer migration operations, be it from one machine to another or from an earlier version of your OS to a newer one.
Read More -
EaseUS Todo PCTrans is by the folks at EaseUS who make incredible tools that let you manage your backups and recover your dead hard disks. While it is not an official tool, EaseUS has a reputation for being very good with their software and code.
Read More
-
It offers the ability to move your entire user account from your old computer, meaning everything is quickly migrated. You still get to keep your Windows installation (and the relevant drivers for your new PC), but you also get all your apps, settings, preferences, images, documents and other important data.
Read More
Related Articles
-
4 Ways to Move Programs from SSD to HDD
![author icon]() Roxanne/2024/06/13
Roxanne/2024/06/13 -
How to Run Backup MySQL Database Command Line🔥
![author icon]() Roxanne/2024/06/13
Roxanne/2024/06/13 -
Transfer WhatsApp Backup from PC to iPhone free | Best Way
![author icon]() Tracy King/2024/06/13
Tracy King/2024/06/13 -
How to Transfer Hi-Fi RUSH Data From Game Pass to Steam Efficiently
![author icon]() Sherly/2024/06/13
Sherly/2024/06/13