
Content
Page Table of Contents
About the Author
Hot Topics
Updated on Jan 10, 2025
When attempting to use a USB device, have you ever discovered that you failed to add or modify files? It happens as a result of write protection. A USB drive with write protection serves as a shield, prohibiting you from changing the data stored, adding new files, or removing old ones.
Sometimes, you might want this protection to keep your data extra safe by making the drive read-only. While meant for security, this can be incredibly frustrating when you need to modify your files or urgently transfer new data to the flash drive.
How to Add Write Protection to USB? 5 Ways Recommended
Ready to remove that extra layer of annoying read-only permission to your USB drive? If you are looking for an easy solution to know how to enable write protection on USB, this guide is for you. It will help you learn five ways to enable write protection on a USB drive.
Now let's get going! Please note that some of these techniques may require specific permissions, and others may need formatting a drive that will remove all files from the flash drive. Here are five ways to achieve write protection:
- USB Write-Protection Software: It's the most efficient and simple solution, especially for novice Windows users.
- Diskpart: An integrated Windows utility that provides fine-grained management (advised users should approach with caution).
- Windows Registry: For those who are accustomed to modifying registry entries.
- Properties: Directly altering the drive's permissions
- Turn On BitLocker: Windows feature that provides a layer of write protection to your encrypted drive.
Please note that USB write-protected software provides a streamlined experience for those who are not tech-savvy Windows users. The other methods require more caution, especially Diskpart, as a single error could potentially damage your data.
Let's dive deeper into each of these methods and learn how to secure your USB data!
#1. USB Write Protection Software
Anyone can use specialized software to manage write protection on their USB drives, which is an easy and effective solution. Such tools include solid data security features and an easy-to-use interface.
One extremely effective and user-friendly tool to enable write protection on your USB drives and manage disk partitions is EaseUS Partition Master. Its well-known "Write Protection" feature offers a simple solution for protecting your private information on USB drives.
Download EaseUS Partition Master and follow these simple steps:
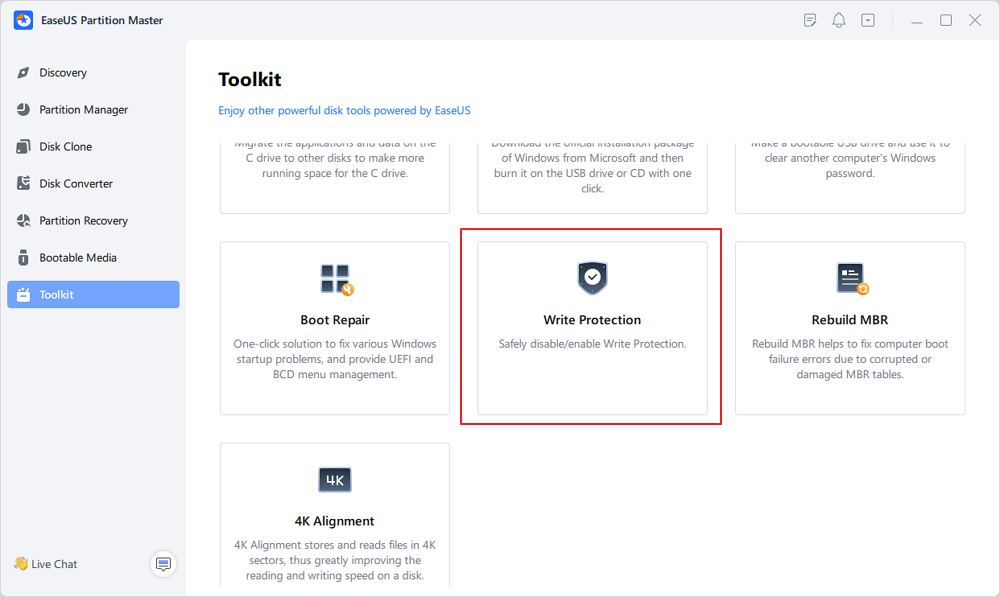
Step 1. Launch EaseUS Partition Master and go to the Toolkit section, click "Write Protection".
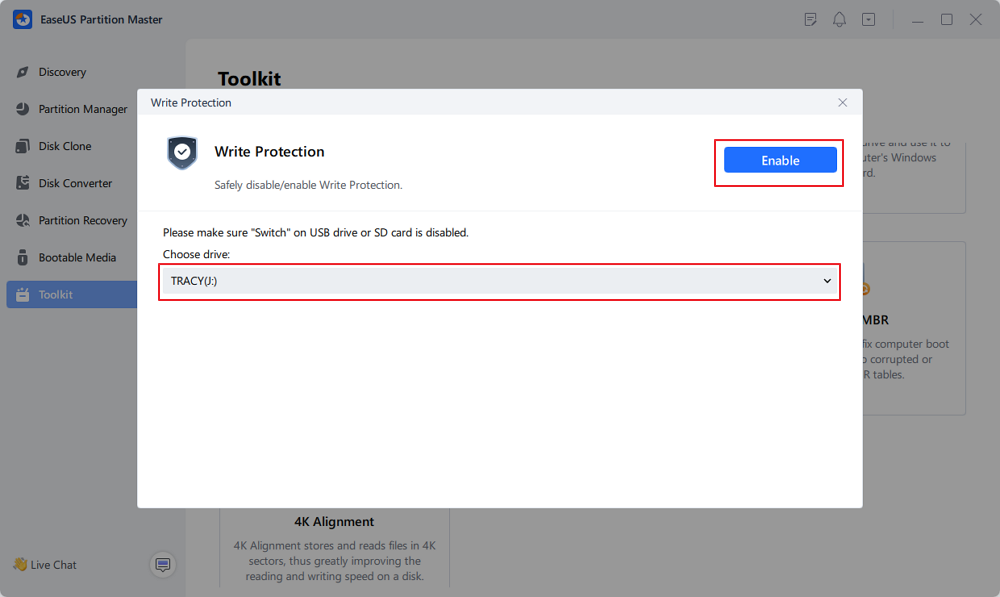
Step 2. Select the desired device you want to write protect and select "Enable" to confirm.
Here's how EaseUS Partition Master can help you:
- Simple Write Protection: With just one click, you can enable or disable write protection on your USB drives. It helps you avoid deleting or changing files by mistake.
- Data Security: Ensure your valuable files remain unaltered, offering peace of mind.
- Wide Compatibility: Supports various USB brands and file systems for flexibility.
Additional Key Features:
- Effortless OS migration and disk cloning
- Comprehensive partition management tools (resize, create, format, etc.)
If you like this simple tool to add write protection to your USB drives in 1 click, share it online to help more of your friends secure their device efficiently:
#2. Diskpart
Diskpart is an in-built utility to navigate and fix disk-related problems. It will also help you enable write protection on your USB flash drive. The procedure involves a significant manual effort, which you may find laborious. Well, let's make the process seamless with detailed explanations.
Step 1: Press "Windows + R" to access the "Run" search box.
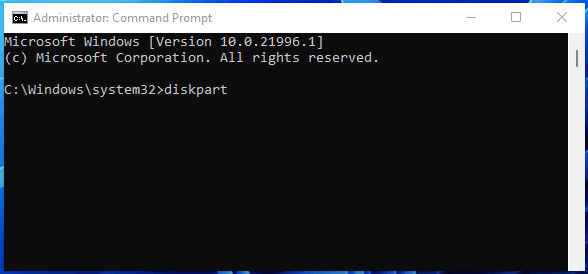
Step 2: Type"diskpart" and hit the "Enter" key.
Step 3: If asked, select "Yes" to provide User Account permissions.
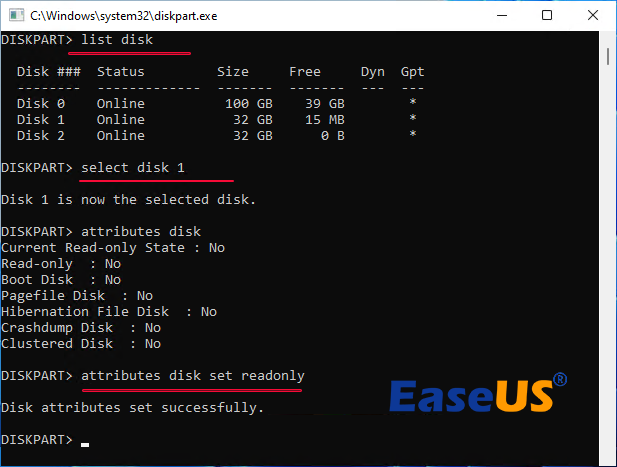
Step 4: At the DISKPART window type the following commands and hit "Enter" each time:
- list disk
- select disk 1 (replace 1 with the disk number of USB which you want to add write protection)
- attributes disk
- attributes disk set readonly
Step 5: Type "exit" and hit "enter" to end the process and close the Diskpart window.
If you like this manual method, feel free to share it online to help more friends around you write protect their storage devices:
#3. Windows Registry
We recommend newbies skip this method because it may lead you to data loss. In case, you still want to go with Registry editor, consider creating a data backup. Then, follow these steps:
Step 1: Press Windows + R to open the Run dialog box.
Step 2: Type "regedit" and press the Enter key to access the Registry Editor.
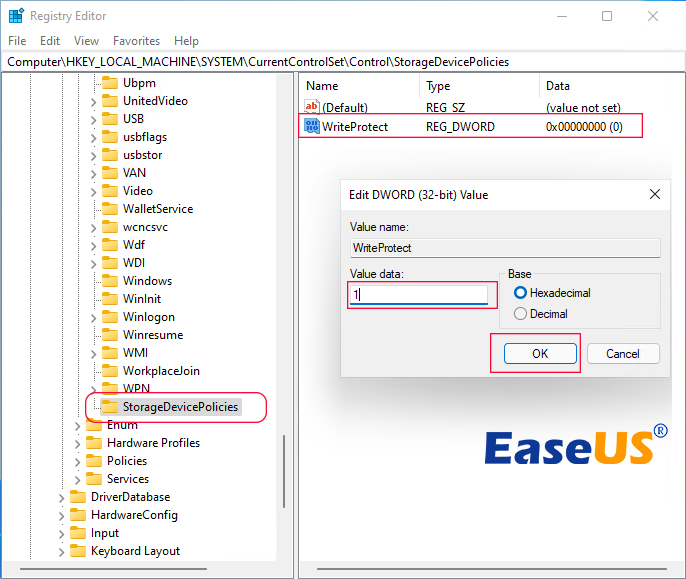
Step 3: Paste the following path in the Registry editor window: HKEY_LOCAL_MACHINE\SYSTEM\CurrentControlSet\Control.
Step 4: Right-click the Control key and click New > Key.
Step 5: Provide a new name as "StorageDevicePolicies" and hit "Enter."
Step 6: Enter the Right-protected value in the new key. To do so, Right-click the StorageDevicePolicies key and select New > DWORD (32-BIT) Value, naming it as WriteProtect.
Step 7: Double-click the WriteProtect value and set it from 1.
#4. Properties
You may try the following steps to change permissions from the properties of your USB flash drive. This way you can make it writable, let's get started.
Step 1: Open File Explorer and go to "This PC."
Step 2: Navigate the USB drive from the list and right-click on it.
Step 3: Click "Properties" from the list to proceed.
Step 4: Under the "General" tab, select the "File system" to check the format of the drive.
For example, if the flash drive has an NTFS file system, follow the coming steps to make it writable.
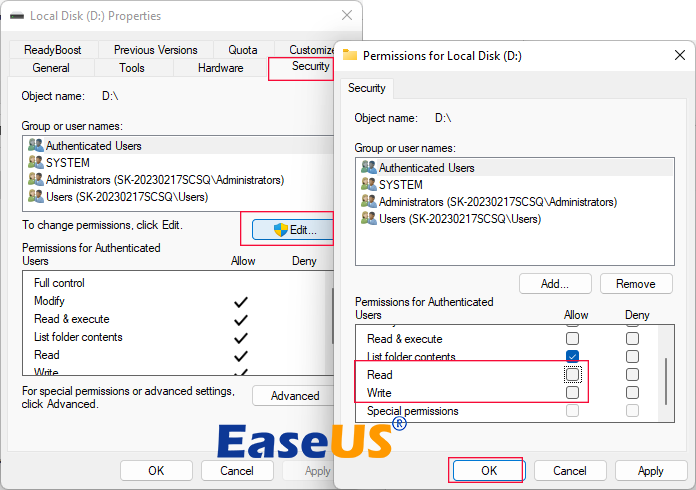
Step 1: Select the "Security" tab from the top menu.
Step 2: Click "Edit" under the Group or User Names option.
Step 3: Uncheck "Read" and "Write" in the "Permissions" window.
Step 4: Click "OK" to save the changes and close the window.
#5. Turn On BitLocker
BitLocker is a powerful Windows feature that encrypts your drives for enhanced data security. If you're looking to add this protection to your USB drive, here's how to enable it:
Step 1: Press "Win + E" to open File Explorer.
Step 2: Click on "This PC" in the left-side panel. Find the flash drive you want to encrypt.
Step 3: Right-click on the drive and choose "Manage BitLocker."
Step 4: Select the drive and click on the "Turn on BitLocker" option.
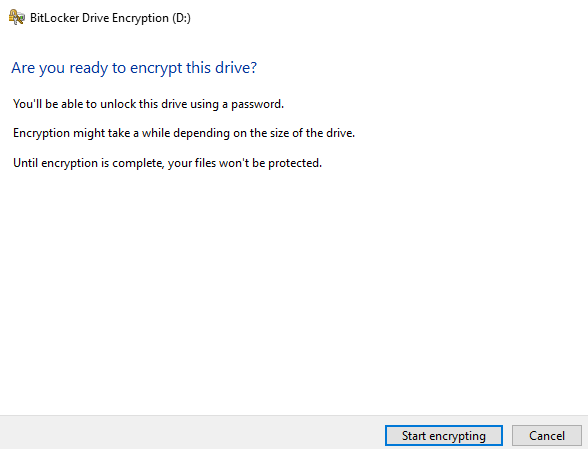
Step 5: Follow the on-screen instructions to choose how you want to save the recovery key of your BitLocker. This key is essential if you forget your password.
- Insert the BitLocker recovery key to turn on the BitLocker.
- Close the window and check if you can write the data on your flash drive.
Step 6. Click "Start encrypting" to begin encrypting the USB drive.
Conclusion
Your USB drive can now be written-protected using this guide's flexible techniques. You have the option to achieve several levels of protection, whether your preference is for ease of use software, registry updates, permission adjustments, or Bitlocker drive encryption.
EaseUS Partition Master is the best option for unprofessional computer users. It provides users with automated features to enable write protection in a few clicks. When it comes to protecting your priceless data on USB devices, this solution offers the highest level of flexibility and security.
Moreover, to avoid accidental data loss, always use caution when using these programs, especially Diskpart.
FAQs on Adding Write Protection to USB
Let's address some common questions about enabling and resolving write protection issues on your USB drive.
1. How do I unlock my USB write protection?
First, check for a physical switch. If there's none, try formatting the drive (warning: this deletes all data) or adjust the read-only permissions in File Explorer.
2. Why can't I remove write protection from USB?
Possible reasons include hardware malfunctions, incorrect formatting, or file system errors. Specialized third-party software can sometimes aid in this process.
3. How do I add write protection on USB without a switch?
You can use Diskpart, a command-line tool in Windows:
- Open the command prompt as administrator
- Type "diskpart" and press Enter
- Use "list disk", "select disk #" (replace # with your USB disk number), and "attributes disk set readonly" commands.
How Can We Help You
About the Author
Updated by Tracy King
Tracy became a member of the EaseUS content team in 2013. Being a technical writer for over 10 years, she is enthusiastic about sharing tips to assist readers in resolving complex issues in disk management, file transfer, PC & Mac performance optimization, etc., like an expert.
Product Reviews
-
I love that the changes you make with EaseUS Partition Master Free aren't immediately applied to the disks. It makes it way easier to play out what will happen after you've made all the changes. I also think the overall look and feel of EaseUS Partition Master Free makes whatever you're doing with your computer's partitions easy.
Read More -
Partition Master Free can Resize, Move, Merge, Migrate, and Copy disks or partitions; convert to local, change label, defragment, check and explore partition; and much more. A premium upgrade adds free tech support and the ability to resize dynamic volumes.
Read More -
It won't hot image your drives or align them, but since it's coupled with a partition manager, it allows you do perform many tasks at once, instead of just cloning drives. You can move partitions around, resize them, defragment, and more, along with the other tools you'd expect from a cloning tool.
Read More
Related Articles
-
How to Install Windows 10 on Second Hard Drive | 2 Ways🔥
![author icon]() Cici/2024/07/04
Cici/2024/07/04 -
NTFS or exFAT for SSD: Which Works Better? Your Answer Here
![author icon]() Tracy King/2024/12/13
Tracy King/2024/12/13 -
[Full Guide] How to Rebuild MBR | Fix Damaged MBR
![author icon]() Daisy/2024/11/19
Daisy/2024/11/19 -
How Long Does It Take to Format a Hard Drive? Hard Drive Takes Forever to Format Fixes
![author icon]() Jean/2024/09/19
Jean/2024/09/19
Hot Topics in 2024


EaseUS Partition Master

Manage partitions and optimize disks efficiently