How to Restore Photos from Time Machine Backup
This article will provide detailed step-by-step processes to restore photos from Time Machine backup, as it can restore your lost smile after losing those photos accidentally.
Time Machine is Apple's built-in backup solution, which can help you restore your Mac from Time Machine backups, retrieve your photos to an earlier state, and get back to those precious memories. If you want to restore photos from Time Machine, keep reading this!
1. Restore a Single Photo from the Time Machine
Here, you need to decide whether the picture you would like to retrieve is in the Photos app or another location. In case the photo requiring retrieval isn't in the Photos app, you may restore it with the below-mentioned steps:
Step 1. Link the "Time Machine backup disk" to your Mac.
Step 2. Launch "Finder" and move to where the deleted picture was stored.
Step 3. Launch "Time Machine" by hitting its icon at the top-right menu bar or from the "Applications folder".

Step 4. Opt for the photo, and hit "Restore".
2. Restore Photos from Time Machine
Time machine backup is one of the quick rescuers in the event of deleted or missing pictures from Mac. In case you're using Time Machine backup on your macOS, the best free method to retrieve photos on Mac is this one.
In case the lost or deleted photo is in the Photos application, you can't merely retrieve it like the above-mentioned steps. On the other hand, you must retrieve the whole library to an entirely different location, then import those with the steps below:
Step 1. Shut down the "Photos" application in case you have it opened.
Step 2. Move to your "Pictures" folder, and opt for the Photos library file.

Step 3. Plug the "Time Machine backup disk" into your MacBook.
Step 4. Pressing the "Time Machine" icon in the upper-right menu bar or from the Activities folder will launch the program.
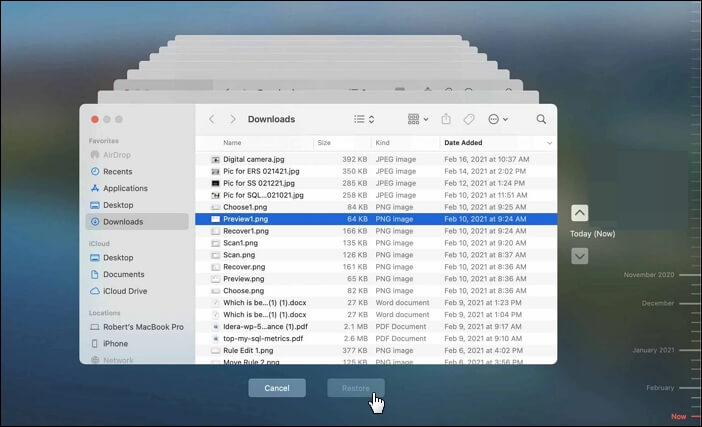
![]()
Step 5. Employ the up and down arrow or the timeline logo on the right to find the date with the intended pictures.
Step 6. Hit the "Photos library" while pressing the "Control".
Step 7. Opt for "Restore Photos Library.photoslibrary", and preserve it on an external drive with sufficient space on your Mac other than the pictures. Hit "Restore".
Step 8. Launch the restored "Photos Library" with the "Photos" app.
Step 9. Opt for the "Photo > File > Export" at the top-left menu bar.
Step 10. Store the photo in your recent working library. If desired, you can remove the "Photos Library" to free up space.
If this article is helpful and informative, share it on social media to help others learn how to restore photos from Time Machine on a Mac.
🔥Restore Photos Without Time Machine Backup
If you haven't created a Time Machine backup before, don't panic! We also provide an effective method to recover deleted files on a Mac without Time Machine backups. Read on!
Photo Library recovered, but lost images not visible in Time Machine? Have you failed to make a Time Machine backup of your pictures? There's no reason to grieve, as you can rely on a reputable macOS Sonoma photo recovery program in this scenario.
All image formats that have been lost or erased from Time Machine, Fusion Drive, or any other macOS disk can be recovered with the sophisticated EaseUS Data Recovery Wizard for Mac.
When images are organized, unreadable disks or volumes, or irreversibly erased during a macOS upgrade, this software's deep search increases the likelihood of photograph retrieval. With the most recent macOS Sonoma 14.2.0 or older versions, EaseUS is available for MacBook Air, MacBook Pro, iMac, and other models.
Download this professional data recovery software now, and follow the steps below to recover deleted photos on a Mac:
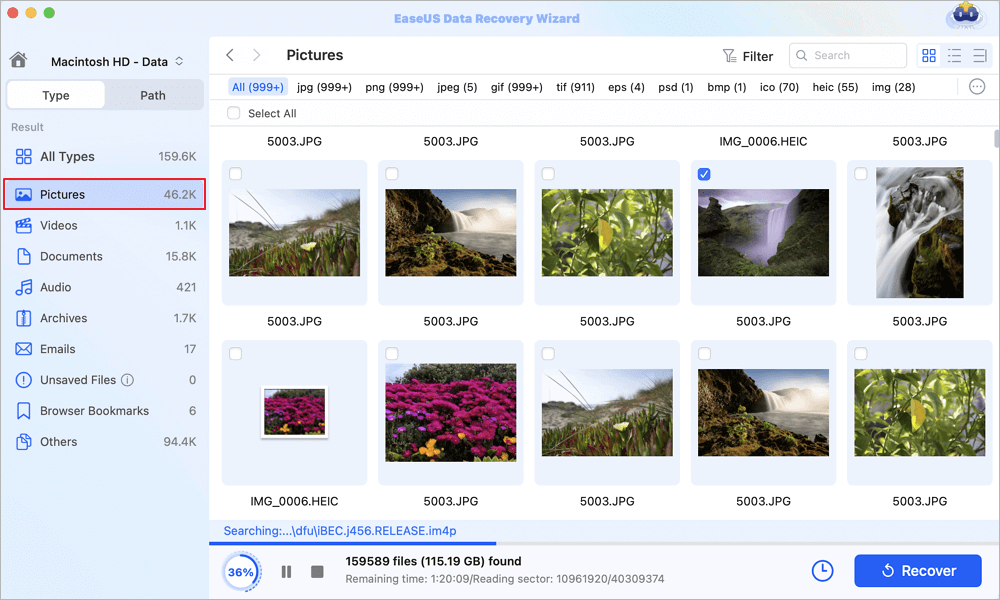
Step 1. Scan for lost photos
Select the location where your valuable photos were lost and click the "Search for lost files" button.

Step 2. Select wanted photos
EaseUS Data Recovery Wizard for Mac will immediately start a scan on your selected disk volume. Meanwhile, the scanning results will be presented in the left pane. By Path and Type, you can quickly filter the photos you've lost earlier.
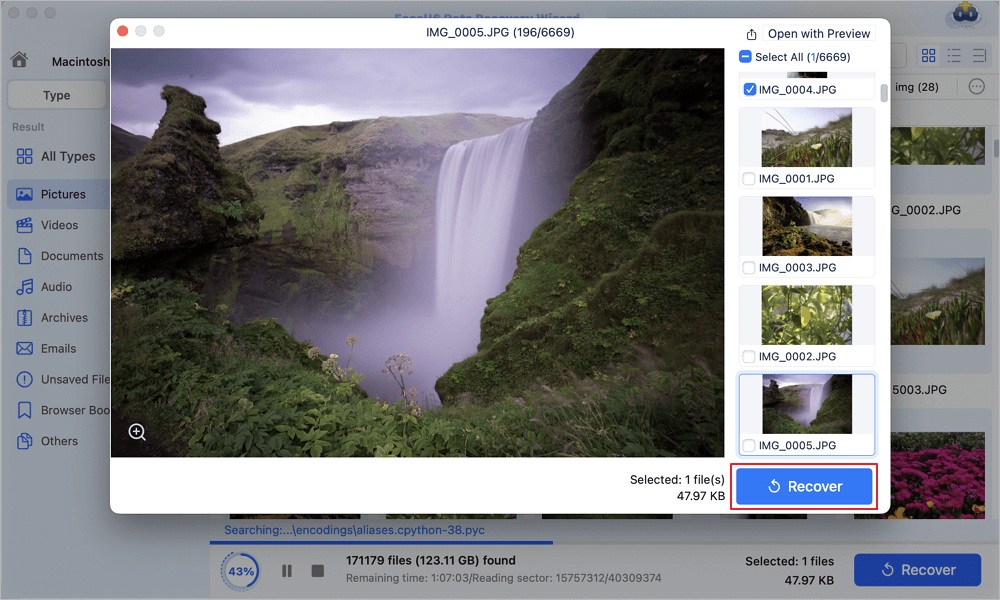
Step 3. Recover lost photos
Select the target photos and click the "Recover" button to get them back at once.
As you're well acquainted with this photo retrieval software, remember to share the information about this tool with your friends.
Can I Delete Photos after Backing Up in Time Machine
If you failed to modify the preferences, you may verify that the Pictures directory on your Time Machine backup drive contains the backup of the images from the Photographs application.
After that, you have to locate the Photos Library.photoslibrary folder or one that's identical to it. Time Machine will stop the images in the app's write access; therefore, in order to look at the photographs within the archive, you must rebuild the library's contents first.
After using Time Machine to back up your pictures, you are unable to delete them from your Mac's memory because it is not equivalent to an external hard drive. If you plan to access Time Machine often, the backup you created with the images will ultimately be removed when it decides to clear additional disk space for fresh backups. Move those essential pictures to an external hard drive device in order to free up storage on your Macintosh HD.
Conclusion
In the unlikely scenario that you lose any image on your Mac, you are protected by the Time Machine backup. Use the instructions in the following piece to recover the Photos Library from a Time Machine backup on an external hard drive.
To reclaim photos that were deleted on a Mac, use EaseUS Data Recovery Wizard for Mac if you are unable to track down the missing images in the backup. You are welcome to use the no-cost trial version, which analyzes and displays an image preview.
Restore Photos from Time Machine FAQs
Consider the FAQs below to retrieve photos from Time Machine efficiently:
1. Can I retrieve photos from a Time Machine backup?
When Time Machine launches, all of your backups are displayed. To access a copy of the image library, hit the date of your most recent backup and then proceed to select it. Press the button that shows "Restore."
2. Can I restore just a single file from a Time Machine backup?
Navigate through the Time Machine backups using the sequence of events and arrows. Pick Restore after selecting the number of objects you wish to get back (you may recover folders or the whole disk). The refurbished things go back where they were originally.
Was This Page Helpful?
Brithny is a technology enthusiast, aiming to make readers' tech lives easy and enjoyable. She loves exploring new technologies and writing technical how-to tips. In her spare time, she loves sharing things about her game experience on Facebook or Twitter.
-
EaseUS Data Recovery Wizard is a powerful system recovery software, designed to enable you to recover files you’ve deleted accidentally, potentially lost to malware or an entire hard drive partition.
Read More -
EaseUS Data Recovery Wizard is the best we have seen. It's far from perfect, partly because today's advanced disk technology makes data-recovery more difficult than it was with the simpler technology of the past.
Read More -
EaseUS Data Recovery Wizard Pro has a reputation as one of the best data recovery software programs on the market. It comes with a selection of advanced features, including partition recovery, formatted drive restoration, and corrupted file repair.
Read More
Related Articles
-
How to Recover Data from the Dead Mac in 2026 [Pro/Air]🍎
![author icon]() Tracy King/Jun 17, 2026
Tracy King/Jun 17, 2026 -
4 Working Ways to Recover Lost Files After macOS Monterey Update
![author icon]() Brithny/Jun 30, 2026
Brithny/Jun 30, 2026 -
How to Download Word Document on a Mac [Step-by-Step Tutorial 2026]
![author icon]() Brithny/Jun 30, 2026
Brithny/Jun 30, 2026 -
How to Recover Deleted Files on macOS Sequoia? 4 Ways Here
![author icon]() Dany/Jun 30, 2026
Dany/Jun 30, 2026