Mac RAID systems could only run video editing and expensive graphic design software a few years ago. Therefore, until the past two years, Mac RAID recovery was a rare data recovery service. Recently, Mac has expanded beyond niche software like design and video to become a competitive alternative. High-end Apple computers are now used in many other enterprises and homes. Ways to recover data from RAID hard drives on Mac have become much more common.
RAID, or Redundant Array of Inexpensive Disks, technology is no longer exclusively employed by big businesses. Today, even everyday household users use RAID arrays to store their data, making them susceptible to RAID data loss. Fortunately, free RAID recovery software on Mac is now available, making it simple to solve the problem without specialized technical knowledge. This post will introduce the best EaseUS Data Recovery Wizard for Mac.
What Does RAID and RAID Recovery Mean
RAID was initially created for servers to produce massive storage at reduced costs. It quickly gained popularity among hobbyists and home users for numerous applications, including personal DIY cloud storage and home media centers. There are five different RAID levels, each with a unique use.
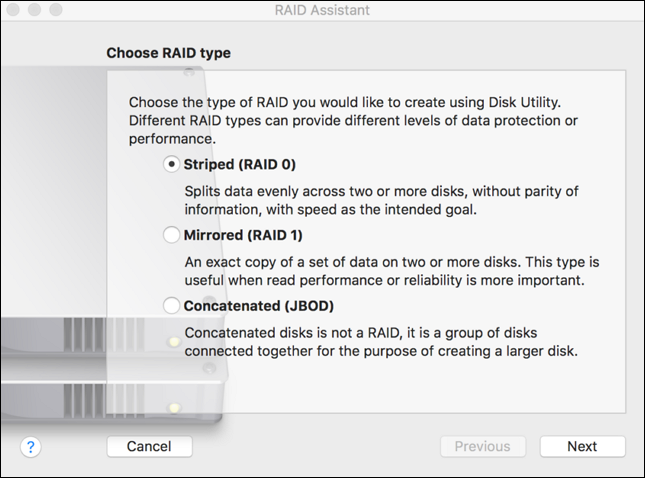
RAID 0 – Striping: This is great for users seeking high capacities and faster performance. However, due to its lack of redundancy, RAID 0 is typically not advised for people seeking data security.
RAID 1 - Mirroring: Also referred to as mirroring, this RAID offers data protection and redundancy by repeatedly replicating or cloning data across two hard drives.
RAID 5 – Striping With Parity: It is significantly more efficient in achieving ideal capacity and redundancy. Block-level striping with distributed parity is included in RAID 5.
RAID 5 – Striping With Parity: It provides the benefits of both RAID 1 and RAID 0. Increased capacity and fault tolerance are combined into one single solution. You achieve two times as much capacity and performance.
Users require RAID recovery for the same reasons that they need regular hard disk data recovery. Human error, hardware or software failure, malware infection, mechanical failure, power outage, faulty sectors, abrupt system shutdown, etc., can all lead to a failed or corrupted RAID. But when you need to recover a damaged RAID, things are different.
RAID recovery for Mac is typically more challenging to locate than similar software for Windows, and any data recovery software has the same drawbacks. However, the EaseUS data recovery organization has some excellent news for you! Data recovery on the Mac is as easy to do, thanks to the EaseUS firm, as it is on Windows. You should adhere to this straightforward guide when performing the recovery.
How to Recover Data from RAID Hard Drives on Mac
When a RAID malfunction, the data disappears, and the RAID volume becomes unavailable. What should you do to recover the data lost from your RAID? Then we will get deeper into a few solutions from this part. Below I'll list 4 Mac RAID recovery options that I suggest you consider.
- Solution 1. Recover RAID Data via RAID Recovery Software on Mac
- Solution 2. Recover from RAID Hard Drives on Mac with Service
- Solution 3. Changing Ports on Mac
- Solution 4. Rebuild the RAID Array in macOS
Solution 1. Recover RAID Data via RAID Recovery Software on Mac
Choosing a robust RAID recovery software is greatly helpful in recovering data from RAID drives! Because RAID hard disks do not offer direct access or data restoration. Fortunately, third-party data recovery options are available to simplify this procedure without reconstructing the RAID setup and facing the risk of losing more data.
EaseUS Data Recovery Wizard for Mac can help you fully recover RAID data on a Mac. The most excellent RAID recovery program, EaseUS, can also help you recover lost data from any RAID hard drive as long as your computer system can read and recognize it. RAID 0, RAID 1, RAID 5, and RAID 10 are included in this.
EaseUS Data Recovery Wizard for Mac
- Recover data from RAID hard drives on a Mac, and SSD, or HDD, for it supports various device types.
- Recover lost partitions on Mac to a PC or the original internal hard drive of the Mac in multiple file systems.
- Recover permanently deleted files, like files on the unmountable hard drive on Mac, even though you can't access the contents directly.
To recover data from RAID hard drives on Mac, follow these steps:
Step 1. Search for lost files
Correctly connect your external hard drive to your Mac. Launch EaseUS Data Recovery Wizard for Mac, and select the external hard drive. Then, click "Search for lost files" to find lost/deleted files on your external devices.

Step 2. Filter and find lost files
After the scan, all file types will be presented in the left panel. Select the file type to find wanted files on your external devices.

Step 3. Preview and recover
Click the file and preview it. Then, select the files you want to recover and click the "Recover" button. You can save your data to local and cloud drives.

Solution 2. Recover from RAID Hard Drives on Mac with Service
While software may provide fixes for simple RAID file system configuration errors, it can sometimes worsen situations where hardware, such as hard disk drives or RAID controllers, is severely corrupted. So, try the one-to-one manual data recovery service online if your RAID malfunctions and fails to be scanned by the software.

Consult with EaseUS data recovery experts for one-on-one manual recovery service. We could offer the following benefits after a FREE diagnosis
- Repair corrupted RAID structure, unbootable Windows OS, and corrupted virtual disk file
- Recover/repair lost partition and re-partitioned drive
- Unformat the hard drive and restore RAW drive (Bitlocker encrypted drive)
- Fix disks that become GPT-protected partitions
Solution 3. Changing Ports on Mac
Switching hard drive ports is a free method that might help you recover data from Mac RAID hard disks. If you cannot ensure that your RAID hard drive is uninitialized or permanently lost data, you first change the ports on your Mac.
Step 1. turn off and unplug your RAID system before removing the hard drives.
Step 2. Place the hard disks in that location. Use SATA, SCSI, or SAS ports.
Step 3. Turn on your computer. Ensure that the system recognizes every hard drive. If your computer fails to recognize hard disks, recovery is impossible.
Solution 4. Rebuild the RAID Array in macOS
Please physically detach all external storage devices, like external hard drives, SSD, and SD cards, from your Mac computer before continuing, except for the one on which you want to construct the RAID.
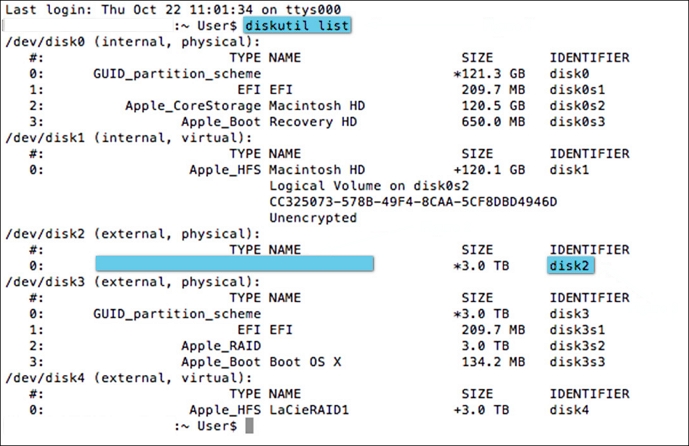
Then you should check the RAID status. These steps will instruct how to open Terminal on Mac and identify which drive has failed from the array:
Step 1. Select "Go" from the top menu bar from the Desktop, then "Utilities" - "Terminal".
Step 2. Type the following: diskutil checkraid to see if the Status of the RAID is "Degraded", "Missing", or"Damaged".
After checking the Status of the RAID, follow the steps:
Step 1. Run the Disk Utility on Mac after making the backup.
Step 2. In Terminal, type the command: diskutil appleraid remove UUID of the failed drive Device Node to remove the failed drive from the RAID.
Step 3. Select "Initialize" on the storage device.
Step 4. Type the following command in Terminal: diskutil addtoRAID member IDENTIFIER of new drive RAID Unique ID
Step 5. Press Enter.
Troubleshooting the Mac RAID Recovery
If data is not being appropriately recovered from the RAID, we suggest the following steps to troubleshoot the issue:
1. If you're using a Mac, you should change the Allocation Block layout and keep trying to recover the files until all other possibilities have been tried and failed. When you view the Allocation Block layout on the View tab, you can discover a variety of alternatives. The software is instructed to read data from a specific drive location. Depending on your configuration, the Allocation Tab may display a variety of options for you to choose from.
- Notice:
- In the Mac version, you can alter the starting point from within the Scan Results screen. You should manually set up the offset and size information in the Windows version through the driver editor. This process is only recommended for advanced users who know their exact RAID configuration.
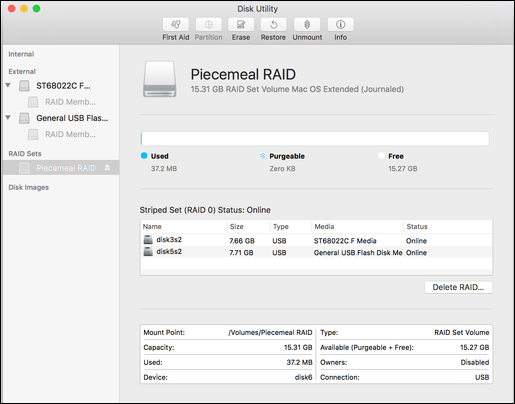
2. Redefine the RAID set by using Add Virtual RAID and drag to rearrange the order of the hard drives/volumes.
What Are the Benefits of Recovering RAID Array
RAID is a flexible technology that can be set up to provide data redundancy. For instance, you may set up a RAID array with two hard disks to duplicate new data across both drives. The other drive will still have complete copies of your files if one of the drives fails, making it simple to restore data from the RAID without any loss at all.
Thus, once the rebuilding and recovering RAID array are finished, you can regain the improved performance of RAID on your Mac and relocate your stored files wherever you like after they have been saved. It could be an FTP connection, a network disk, or a local drive.
Conclusion
Time is crucial when recovering files from RAID arrays, just like when trying to fix any other data loss issue. The likelihood of mistakenly overwriting the lost files will be reduced the earlier you start the recovery process. You must also employ trustworthy RAID recovery software, like EaseUS Data Recovery Wizard for Mac.
Recover Data from RAID Hard Drives on Mac FAQs
After learning how to recover data from RAID hard drives on Mac, you may have more questions about it. See if you can find your answers here:
1. How do I recover files from a RAID drive?
If you are familiar with the RAID data recovery plan, you can manually recover data from a RAID. However, if you are unfamiliar with RAID, retrieving data from it alone could result in total data loss. The simplest way to find and recover lost RAID data on your device is often with professional data recovery software. EaseUS can be beneficial, as was previously mentioned.
2. How to recover lost RAID 1 data in Linux?
Step 1. Remove the hard drives from the NAS.
Step 2. Attach them to your MacBook.
Step 3. In the Linux reader, expand the largest EXT partition.
Step 4. Use the Linux recovery if it doesn't work.
Download, install, and run the EaseUS RAID recovery software on your Mac to simplify the recovery procedure. The scanning process will be started. If the data can be restored, the software will find out.
3. Why may data lose from RAID-based NAS devices?
- File loss, whether deliberate or unintentional.
- Commencing the formatting of a drive in anticipation of employing NAS RAID disks
- Power failure-related configuration flaws and other human or system errors
4. Does RAID rebuild itself?
In this case, the hot spare will replace the failing hard disk when the RAID begins to rebuild automatically. Depending on the size of the RAID array and the number of disks that make up the RAID set, this is frequently an automatic procedure that could take a long time.
Was This Page Helpful?
Dany is an editor of EaseUS who lives and works in Chengdu, China. She focuses on writing articles about data recovery on Mac devices and PCs. She is devoted to improving her writing skills and enriching her professional knowledge. Dany also enjoys reading detective novels in her spare time.
Jaden is one of the editors of EaseUS, who focuses on topics concerning PCs and Mac data recovery. Jaden is committed to enhancing professional IT knowledge and writing abilities. She is always keen on new and intelligent products.
-
EaseUS Data Recovery Wizard is a powerful system recovery software, designed to enable you to recover files you’ve deleted accidentally, potentially lost to malware or an entire hard drive partition.
Read More -
EaseUS Data Recovery Wizard is the best we have seen. It's far from perfect, partly because today's advanced disk technology makes data-recovery more difficult than it was with the simpler technology of the past.
Read More -
EaseUS Data Recovery Wizard Pro has a reputation as one of the best data recovery software programs on the market. It comes with a selection of advanced features, including partition recovery, formatted drive restoration, and corrupted file repair.
Read More
Related Articles
-
How to Recover Deleted TIFF Photos on Mac
![author icon]() Jaden/Jun 16, 2026
Jaden/Jun 16, 2026 -
Repair Corrupted Photos Mac: How to Repair PNG, JPEG, GIF, BMP
![author icon]() Dany/Jun 30, 2026
Dany/Jun 30, 2026 -
How to Recover a Deleted Word Document on Mac
![author icon]() Brithny/May 03, 2026
Brithny/May 03, 2026 -
[Mac SSD Recovery] How to Recover Data from SSD on Mac
![author icon]() Jaden/Jun 30, 2026
Jaden/Jun 30, 2026