Quick Guide:
- 1. Why is the GoPro Not Showing Up on Mac
- 2. How Do I Get GoPro Recognized by Mac (5 Effective Solutions!)
- 3. Additional Tips: Ensure the Data Security of GoPros Data (Pretty Useful!)
A common issue is that users' GoPro cameras either do not connect to their Macs or do not appear on their computers. Connecting the GoPro SD card to the Mac is the first step in learning how to load GoPro on Mac. Once the card is connected, you will be able to transfer footage from the camera, edit it, and share it with your friends.
The Mac Not Recognizing the GoPro makes unloading films and photographs more difficult, regrettably one of the difficulties encountered throughout this method. This article contains in-depth information on how to address such a problem on a Mac through various approaches.
Why is the GoPro Not Showing Up on Mac
GoPro not connecting on Mac is a common problem when using the techniques above to load GoPro on a Mac. Unfortunately, the GoPro camera won't connect to the Mac computer since the camera isn't shown under your My Devices area in the GoPro app.
All GoPro cameras, including the HERO+, HERO Session + HERO4 Session, HERO 5, 6, 7, and 8 Black, and all HERO variants, suffer from this problem.
If you're using a micro SD card adapter to connect GoPro to your Mac, it will appear as your computer's mass storage device. It's possible that other programs will not be able to identify the camera.
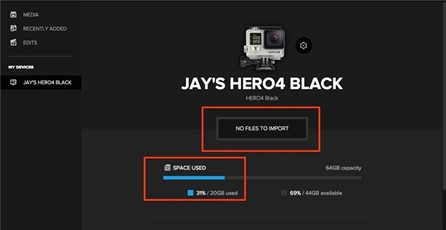
Another possibility is that the camera may be recognized. However, if a warning such as "No Files to Import" or "Space Used," which implies that there is some data on the micro SD card, appears, GoPro will still not connect on Mac.
Fix Mac Not Reading SD Card Once for All
When inserting an SD card into your Mac, nothing shows up in Disk Utility or Finder. Argh! Your SD card not working on Mac.
How Do I Get GoPro Recognized by Mac
If you are perplexed by a problem such as "Why does my GoPro not show up on Mac?" there is a good probability that you will also be perplexed because your Mac does not recognize your GoPro. There are, fortunately, workarounds for the problem of GoPro not being visible on Mac.
If you're using the GoPro software for Mac and discover that GoPro isn't showing up on your computer, you may use any of the following two solutions to attempt to fix the problem.
- Solution 1. Reactivate the hardware settings
- Solution 2. Reinstall the drivers for USB controllers
- Solution 3. Restart your Mac and Reconnect Again
- Solution 4. Connect the camera to a different USB port
- Solution 5. Formatted the GoPro SD card
Solution 1. Reactivate the hardware settings
To reactivate the different hardware settings, you need to reset the USB port. To do this, follow these steps:
Step 1. Go to the Apple menu and choose Shut Down from the list of options.
Step 2. The Shift, Control, Option, and Power buttons may all be found on the keyboard to be held at once.
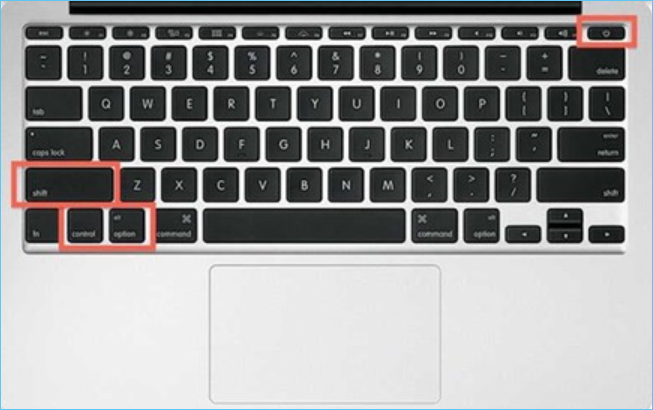
Step 3. To release all of the buttons at once, press and hold them for 5 seconds.
Step 4. The Mac can now be turned on.
Verify whether GoPro is compatible with Mac by connecting the camera through a micro SD card adapter or USB cable after resetting Mac's USB ports. My Devices must be configured to show GoPro for desktop.
Solution 2. Reinstall the drivers for USB controllers
To reinstall the drivers for USB Controllers on Mac, follow the steps below to do so:
Step 1. Device Manager may be accessed using the Windows + X keys on your keyboard.
Step 2. Find the entry that says USB Controllers, then expand it.
Step 3. Right-click on your device and choose Uninstall.
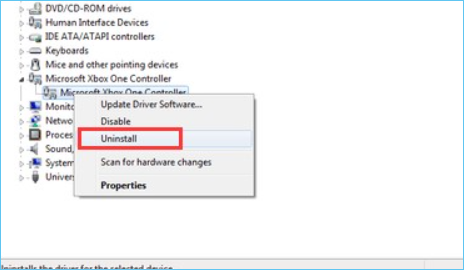
Step 4. Mark the checkbox labeled Delete the driver software for this device in the confirmation dialog box and click the OK button.

Step 5. Unplug the USB Controller and then restart your PC
Step 6. Now, reconnect the controller to the console. Windows will handle the installation of the controller driver on its own.
Solution 3. Restart your Mac and Reconnect Again
To restart your Mac and reconnect GoPro again, follow the steps below:
Step 1. Select Apple menu > Restart from your Mac's menu bar.

Step 2. Disable the option Reopen windows after login back in if you don't want open program windows to be reopened when your Mac restarts.
Note: The Mac is shut down when the screen goes black. No fan or drive noise may be heard on certain computers and no active power light.
Step 3. Connect the USB-C cable to the GoPro's USB-C connector and then to a Mac's USB-C port.
Step 4. Turn on your GoPro.
Solution 4. Connect the camera to a different USB port
To connect the camera to a different USB Port, see the instructions below:
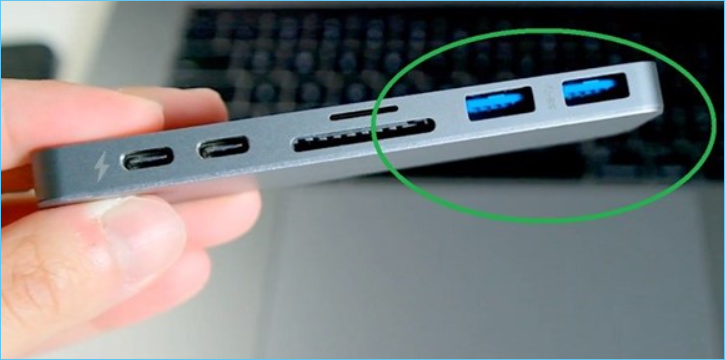
Step 1. Put the cord that comes with the camera into one of the available ports on your Mac.
Note: You may be able to utilize the camera even if the connection it comes with doesn't match the port you wish to attach it to by purchasing an adapter.
Step 2. Wait for ten to fifteen seconds for the camera to be recognized by your Mac when you plug it in.
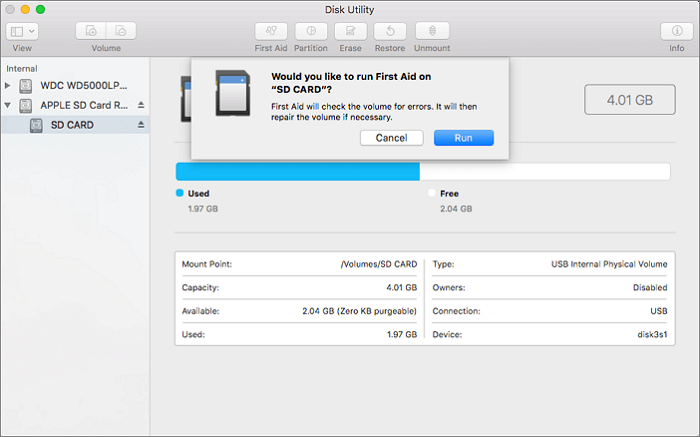
Solution 5. Formatted the GoPro SD card
To format a GoPro SD card on a Mac, follow these easy instructions.
Step 1. The disk utility may be opened by clicking on the open button.
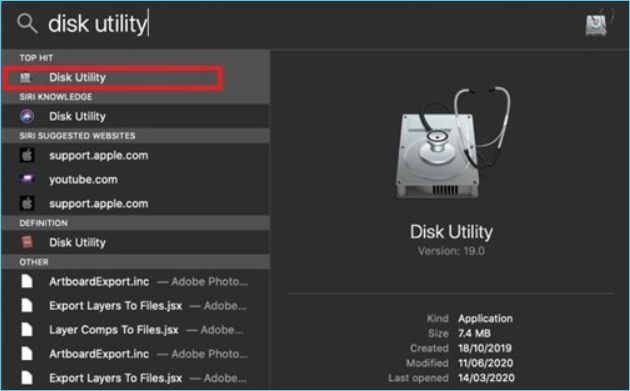
Step 2. Go to the External menu on the left panel and choose your SD card to begin using it.
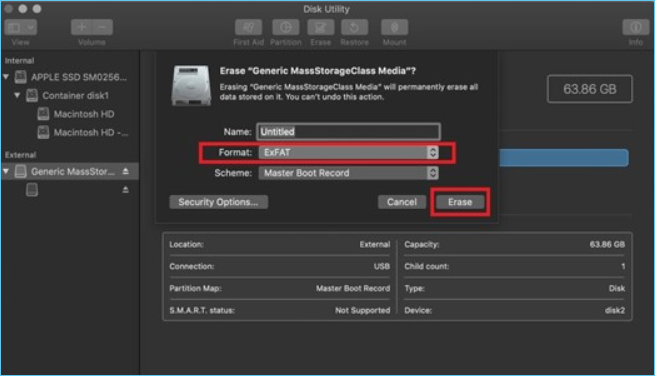
Step 3. Now, choose the file type you'd want to use. For SD cards with 32GB or less, choose FAT. ExFAT is the format if your SD card is 64GB or larger.
Step 4. Once you've chosen the item, click Erase to remove it. The formatting process will begin here. Once you get the indication that your formatting was successful, you're done.
Additional Tips: Ensure the Data Security of GoPros Data
Even if you may have solved the problem, they could still face the issue of data loss when Mac recognizes the GoPro. These are some of the basic causes of data losses on Mac:
Viruses and Malware: An email-based assault or phishing that entices an employee to click on a tainted link typically results in a virus infection on a computer. The virus or malware may then infiltrate the computer system over this connection, causing harm or stealing data.
Hard Drive Damage: The hard drive is the most common cause of data loss, accounting for more than half of all data losses. Around 140 thousand hard drives fail every week, making them the most vulnerable elements of computers.
Power Outages: Software systems may be abruptly shut down if there is a significant interruption in power. This might lead to the loss of previously unsaved data and the corruption of already existent files as a consequence of faulty shutdown processes.
Human Error: Our blunders may cause data files or text chunks to be deleted without the owner's knowledge. Overwriting vital files or erasing data that you need might happen without recognizing it.
Tips to Avoid Data Loss on Mac
Here are some tips that may be helpful to better ensure the data security of GoPros.
1. Regularly Backup Your Data
Regularly backing up data is always important and it is also one of the most efficient ways to make sure that your data is secure. Although backing up data regularly, such as on a daily, weekly, or monthly basis, may sound a little bit tedious, it could be much easier if you try to do this by using powerful data backup software. Among all of the data backup tools in the market, EaseUS Todo Backup for Mac is highly recommended due to its excellent performance and reliability.
2. Install Antivirus and Firewalls
A firewall and antivirus software are a must if you want to keep unwanted threats from gaining access to your private information.
3. Other Preventative Measures
Laptops and other data devices should be stored in a dry, dust-free environment to avoid overheating and other negative effects of moist environments on electronic equipment.
4. Prepare Reliable Data Recovery Tool
You may have found a solution to solve the Mac not recognizing GoPro problem, but when Mac recognizes the GoPro, it may still experience data loss. Preparing a reliable Mac data recovery tool is very important since it makes sure that even if your data is lost, it can still be restored easily with a high success rate. If you have installed EaseUS Data Recovery Wizard for Mac, recovering lost data from different storage devices would no longer be a difficult matter.
Follow the steps below to prevent data loss on Mac:
Step 1. Select the drive to be scanned
In the main EaseUS Data Recovery Wizard window, there will be a list of the drives connected to your Mac. Select the drive you need to recover lost/deleted files from, and click the "Search for lost files" button.

Step 2. Select your lost data/files
EaseUS Data Recovery Wizard for Mac will immediately scan your selected disk volume and display the scanning results on the left pane. You can sort the results to find the wanted files if you are looking for certain files.

Step 3. Recover lost/deleted data
Once you have found the desired files, preview the files and then click "Recover" to begin the recovery of your deleted/lost Mac files.

Was This Page Helpful?
Jaden is one of the editors of EaseUS, who focuses on topics concerning PCs and Mac data recovery. Jaden is committed to enhancing professional IT knowledge and writing abilities. She is always keen on new and intelligent products.
Jean is recognized as one of the most professional writers in EaseUS. She has kept improving her writing skills over the past 10 years and helped millions of her readers solve their tech problems on PC, Mac, and iOS devices.
-
EaseUS Data Recovery Wizard is a powerful system recovery software, designed to enable you to recover files you’ve deleted accidentally, potentially lost to malware or an entire hard drive partition.
Read More -
EaseUS Data Recovery Wizard is the best we have seen. It's far from perfect, partly because today's advanced disk technology makes data-recovery more difficult than it was with the simpler technology of the past.
Read More -
EaseUS Data Recovery Wizard Pro has a reputation as one of the best data recovery software programs on the market. It comes with a selection of advanced features, including partition recovery, formatted drive restoration, and corrupted file repair.
Read More
Related Articles
-
Quick Fix: Why Do Deleted Files Still Appear Mac
![author icon]() Jean/Jun 17, 2026
Jean/Jun 17, 2026 -
External Hard Drive Is Not Showing Up in Finder: 5 Ways to Fix
![author icon]() Jaden/Jun 30, 2026
Jaden/Jun 30, 2026 -
Recover Deleted Screenshots on Mac | 5 Ways
![author icon]() Dany/Jun 30, 2026
Dany/Jun 30, 2026 -
How to Fix Microsoft Update Assistant Errors on Mac [New]
![author icon]() Jaden/Jun 17, 2026
Jaden/Jun 17, 2026