Did you clear out space on your Mac and are surprised by the appearance of the deleted files? It is no secret that one of the most prominent downsides of Mac is the limited storage capacity. That is why most users are compelled to delete different files to make space for improved performance and new ones.
However, it is entirely possible to come across files you have deleted. It leads to massive confusion as you clearly remember that you have eliminated the files. To clear the confusion and offer some clarity, we have discussed some vital aspects. Here, you will learn the reasons for the re-appearance of the deleted files, how to force delete them, and more.
Why Deleted Files Still Appear on Mac
Deleting files on the Mac is a fairly straightforward task. It only takes a few minutes and clicks to get the job done. The easiest method is simply dragging the files you don't want to the Trash can. However, in some cases, the re-appearance of the deleted files can cause a fuss.
Several reasons explain the appearance of the deleted files on your Mac. They are listed below:
- You can see deleted files if you use an external drive connected to the Time Machine drive on the Mac previously.
- Sometimes, issues with the macOS Trash Can folders can also lead to the appearance of deleted files.
- In some cases, the SD card or USB drive might sustain damages or corruption that lead to the scenario of deleted files reappearing.
- If you have not emptied the MacOS Trash Can, you will see the deleted files appearing again.
- You might not be aware, but the file might not have permission to get deleted.
- Other applications on the Mac are currently using the file.
How to Recover Deleted Files on Mac Without Time Machine [2 Ways]
Time Machine will not be helpful if you don't have an external hard drive to use it to create a backup of all of your files on Mac. EaseUS Data Recovery Wizard for Mac is available here to restore your Mac data without Time Machine backup.
How to Completely Force Delete Files On Mac?
Deletion of files from Mac is not a challenging task. In fact, it is relatively easy until you encounter any of the situations mentioned above. In that case, the only option left is to force delete files. Remember that once you opt for the methods listed below, you might never recover the file.
Before you learn how to delete files on a Mac that won't delete, watch this video first. It provides more details and tips.
- 00:27 Method 1. Delete Files Through Terminal
- 00:57 Method 2. Force Quit and Delete
- 01:23 Method 3. Change from Read-only to Read-Write
Method 1. Empty Your Trash
Step 1. Click on the "Trash can" icon on the Dock at the bottom of the screen.

Here, there are two different options you can follow:
Option 1. The first one is emptying one particular item from the Trash. You need to control-click the file and then select the Delete Immediately option.
Option 2. The second path is emptying the entire Trash.
Step 2. Go to the Finder window and select the Empty Bin option from the drop-down menu. Then click on the "Empty" option.
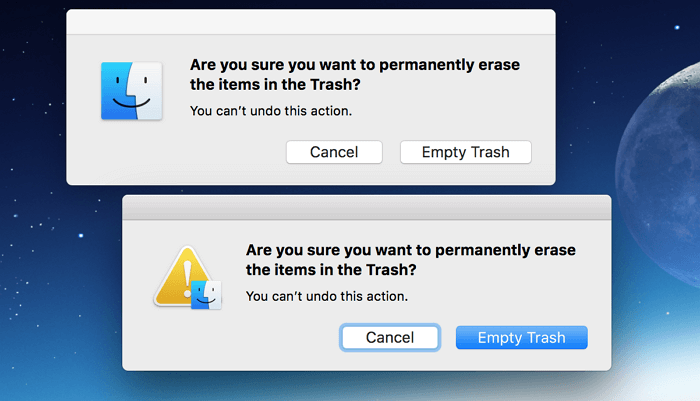
It is vital to understand that the files you delete on the Mac remain in the Trash until you decide to delete them permanently.
Note: Opting for this method ensures permanently deleting your files from the system. It also enables overwriting the previously occupied space.
Method 2. Remove Files Using Terminal
Opting for the terminal method is a risky solution. That is because even the slightest mistakes can lead to horrifying consequences. It would help if you were extremely cautious while using Terminal for file deletion.
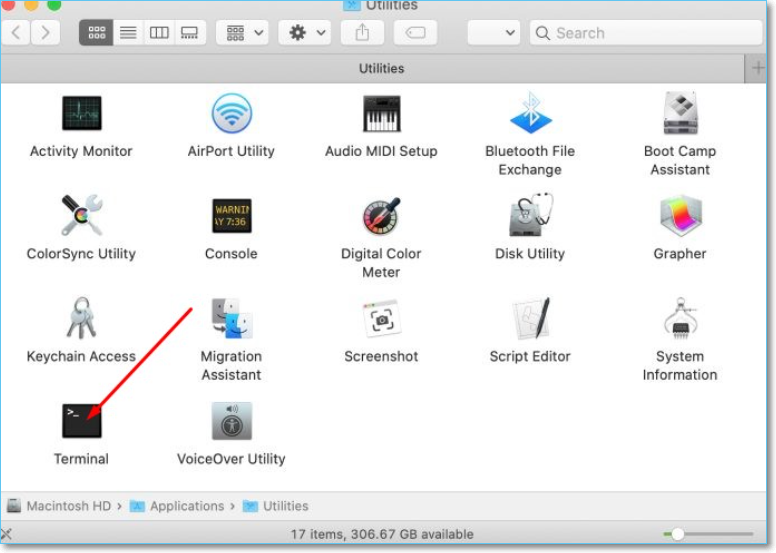
Step 1. Go to "Applications" and press the "Utilities" option.
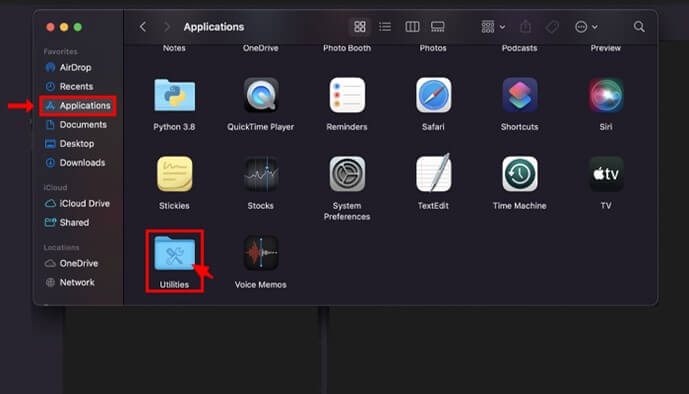
Step 2. Go to "Terminal". Navigate to the folder from where you need to delete files
Type the following command:
– rm-f. Make sure that there is a space after the f.
Step 3. Drag the file you want to delete to the terminal window. Now, the filename and path are added to the terminal command. Make sure it is the right file, and press the Enter key.
If you want to delete a folder, enter – rm-rf and follow the same steps.
If that doesn't work, enter sudo rm–R. Keep in mind that there should be a space after the R.
Step 4. Drag the file you want to delete to the terminal window. It adds the filename and path to the terminal command.
Step 5. After double-checking, press the Enter key. Here, you will be asked to enter the Admin password. Type the password and press the enter key again.
Note: Using sudo rm–R is much more dangerous as there is a possibility of deleting multiple essential files. It will take some time to delete the files on your Mac. Here, the size of the file plays a significant role. The bigger the file size, the more time it will take to complete the deletion process.
Method 3. Delete Files Using Safe Mode
Step 1. Go to the "Apple" icon on the screen. Press the Restart option. A prompt will ask if you are sure you want to Restart.
Step 2. Select the "Restart" option and press the Shift key and hold it. Release the Shift key when you see the login window.
Step 3. The safe mode has started. Select the file menu where the file you want to delete is located. Press the "Move to trash" option from the drop-down to remove the file selected.
Step 4. Go to the trash icon. Click and hold it. Wait for the appearance of "empty trash". Now, please change it to delete the file permanently.
Step 5. Restart the system. That will exit the safe mode.
Related Guide: Delete Files from Your Mac that Won't Delete
Usually, deleting files on your Mac is not a strenuous task. It is relatively easy and doesn't take much time. All you need to do is drag the files you want to delete into the Trash. However, some instances might lead to the non-deletion of these files.
See also:
Several reasons indicate why Mac won't delete certain files:
- The file is locked.
- The file you want to delete is in use presently.
- Bugs in Mac Finder.
- Absence of permission to delete or edit the file.
- Corruption within the macOS.
Different solutions can rectify this problem. Check them out:
- Unlocking files: If the file you want to delete is locked, you must unlock it. For that, press the control key and select the desired file. After that, click on Get Info (⌘ + I). Click, and the General section will be expanded. Here, it would help if you unchecked the Locked option.
- Resolving the "File in use" error: Go to the Apple icon and select the Force Quit option. It will show you a list of files currently running on the system. Select the app that might hinder the deletion of the file you want. Then, select the Force Quit button. If a pop-up appears, select Force Quit again. Alternatively, you can try closing all the applications and then deleting the file.
Also read: How to Delete Files on Mac that Won't Delete
Watch Out! Don't Delete Those Critical Data
Force deleting files or opting for the deletion of files that Mac won't delete is a critical decision. You need to make sure that you understand the consequences before moving forward. You might not be able to recover the data deleted ever. With that in mind, taking caution is imperative.
Creating a backup of the files you want to delete is an excellent idea. Apart from that, you must first try the regular deleting methods. You don't want to delete essential files from your system accidentally. That will only cause more issues.
No matter how many precautions you take, there are some cases where you might lose some essential data. In that case, you must opt for the best data recovery software. You can rely on EaseUS Data Recovery Wizard for Mac. Irrespective of the cause that leads to data loss, you can restore it. It is an excellent way to retrieve photos, music files, videos, emails, etc.
Check out the steps that explain how to use the EaseUS Data Recovery Wizard for Mac:
Step 1. Select the drive to be scanned
In the main EaseUS Data Recovery Wizard window, there will be a list of the drives connected to your Mac. Select the drive you need to recover lost/deleted files from, and click the "Search for lost files" button.

Step 2. Select your lost data/files
EaseUS Data Recovery Wizard for Mac will immediately scan your selected disk volume and display the scanning results on the left pane. You can sort the results to find the wanted files if you are looking for certain files.

Step 3. Recover lost/deleted data
Once you have found the desired files, preview the files and then click "Recover" to begin the recovery of your deleted/lost Mac files.

Conclusion
In some cases, Mac users come across files they have already deleted. That is not a cause for panic, as several reasons explain the occurrence. Fortunately, multiple solutions can aid in the force deletion of the files you don't want.
Sometimes, there are files that Mac doesn't want to delete. These are mostly configuration or system files. However, there are solutions for that too.
Make sure you have a backup before deleting vital files or opting for force delete. However, you can still lose data. In that case, you can opt for the best data recovery software, EaseUS Data Recovery Wizard for Mac. It is easy to use and aids in retrieving essential files.
Was This Page Helpful?
Jaden is one of the editors of EaseUS, who focuses on topics concerning PCs and Mac data recovery. Jaden is committed to enhancing professional IT knowledge and writing abilities. She is always keen on new and intelligent products.
Jean is recognized as one of the most professional writers in EaseUS. She has kept improving her writing skills over the past 10 years and helped millions of her readers solve their tech problems on PC, Mac, and iOS devices.
-
EaseUS Data Recovery Wizard is a powerful system recovery software, designed to enable you to recover files you’ve deleted accidentally, potentially lost to malware or an entire hard drive partition.
Read More -
EaseUS Data Recovery Wizard is the best we have seen. It's far from perfect, partly because today's advanced disk technology makes data-recovery more difficult than it was with the simpler technology of the past.
Read More -
EaseUS Data Recovery Wizard Pro has a reputation as one of the best data recovery software programs on the market. It comes with a selection of advanced features, including partition recovery, formatted drive restoration, and corrupted file repair.
Read More
Related Articles
-
How to Recover Tesla Dashcam Footage [with 3 Proven Methods]
![author icon]() Brithny/Jun 30, 2026
Brithny/Jun 30, 2026 -
Toshiba External Hard Drive not Showing Up on Mac? How to Fix
![author icon]() Jaden/Jun 30, 2026
Jaden/Jun 30, 2026 -
How to Fix Failed to Create macOS Installer OpenCore on Mac
![author icon]() Dany/May 10, 2026
Dany/May 10, 2026 -
How to Recover Data from M2 Chip Mac [2026]
![author icon]() Jaden/Jun 30, 2026
Jaden/Jun 30, 2026