-
![]()
-
![]()
-
![]()
-
![]()
-
![]()
-
![]() Fix Blank Word Document: Word Opens But Does Not Display Document [5 Ways]
Fix Blank Word Document: Word Opens But Does Not Display Document [5 Ways] July 23,2026
 6 min read
 -
![]()
-
![]() Troubleshoot Windows 11 Not Showing Up in Windows Update [Solved]July 23,20266 min read
Troubleshoot Windows 11 Not Showing Up in Windows Update [Solved]July 23,20266 min read -
![]() [Solved] Dashcam Footage Missing? How to Recover Missing Dashcam FootageJuly 23,20266 min read
[Solved] Dashcam Footage Missing? How to Recover Missing Dashcam FootageJuly 23,20266 min read -
![]()
Page Table of Contents
We provide you with four effective ways to recover deleted or unsaved Audacity recordings. The table below is an overview of the solutions, read detailed content for full steps.
| Workable Solutions | Step-by-step Troubleshooting |
|---|---|
| Fix 1. Recover deleted files |
|
| Fix 2. Recover unsaved files |
|
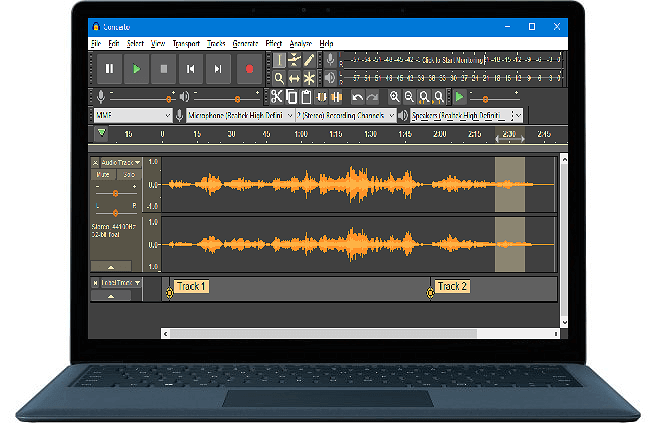
Audacity, as a powerful & free multi-track audio editor and recorder for Windows and Mac users, enables you to record live audio, record computer playback and even convert tapes, records into recordings. Besides, you can also use this program to edit various sound files.
What will you do if you accidentally delete audio files on Audacity? When Audacity suddenly crashes, do you know how to bring the unsaved Audacity recordings back? If you are experiencing the same issues as listed here, stay here and read on to get the answers.
Part 1. Restore Deleted or Lost Audacity Audio Files
Applies to: Restore deleted or lost Audacity audio files saved on Windows PC or external storage devices.
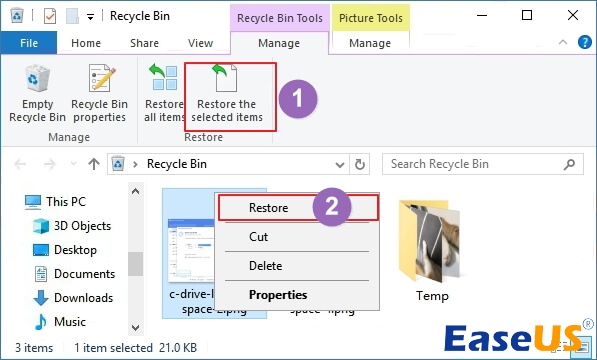
When you happen to delete saved Audacity audio files on your PC, you can look for the deleted Audacity recording in the Recycle Bin. If you find nothing in the Recycle Bin, don't worry.
Read on to see how to regain your recordings with below two methods:
Method 1. Restore Audacity Recordings with Audio File Recovery Software
Powerful audio recovery software - EaseUS Data Recovery Wizard supports restoring your deleted or lost audios or recordings on your computer or external storage devices in three steps.
It supports all Audacity video file formats, including uncompressed audio - WAV, AIFF, PCM, compress audio - Ogg Vorbis, FLAC, MP2, MP3, FFmpeg for other importable audio formats - AC3, AMR, M4A, WMA, etc. If you are a Mac user and lost Audacity audios on a Mac computer, choose the Mac version of EaseUS file recovery software for help.
Step 1. Select the location
Select the location where you lost music, voice recordings, and other audio files and click "Search for Lost Data".

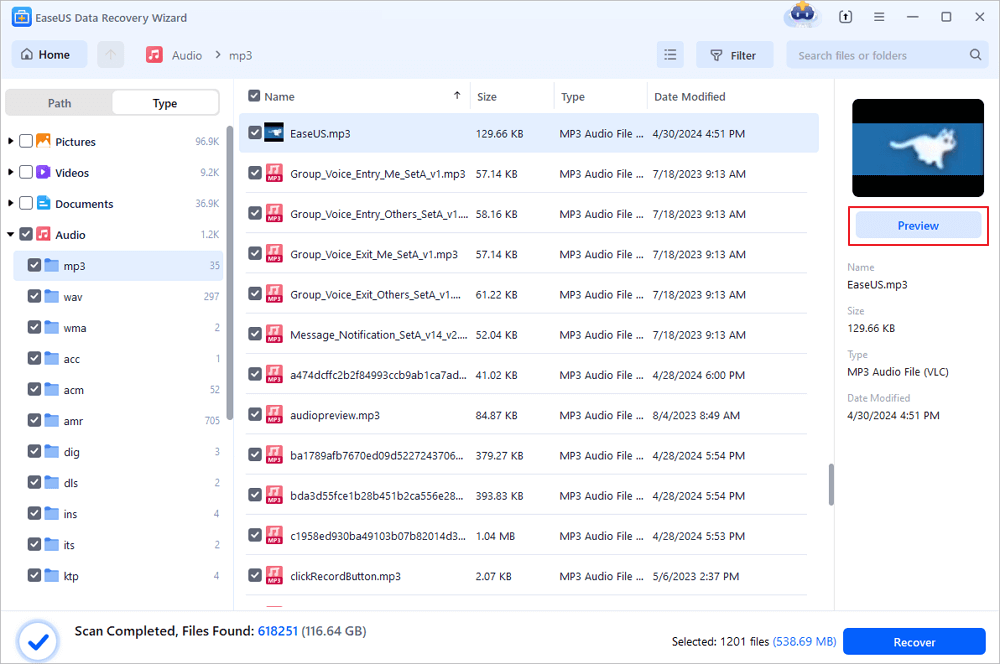
Step 2. Preview the audio files
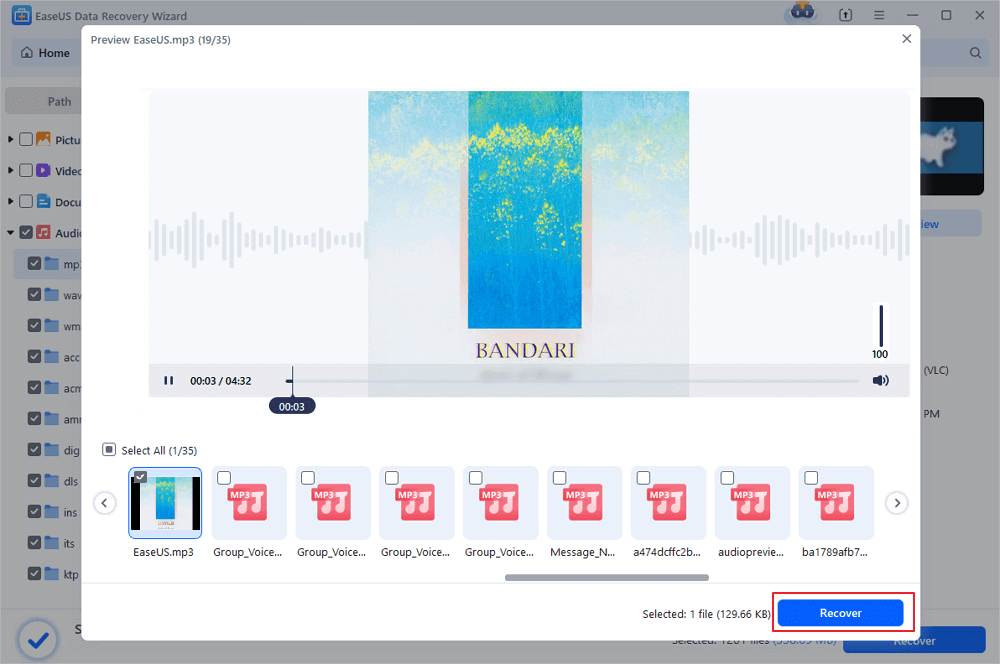
The time required for the scanning process depends on the size of the disk. You can recover files during the scanning process. Click "Audio" in the left panel. Preview found audio files by clicking the "Preview" button.
Step 3. Restore lost audio files
Select all found audio files and click "Recover". Choose a safe location on your PC or an external storage device to save these files and click "Save" to confirm. You can also save your files to cloud storage like OneDrive, Google Drive or Dropbox.
Method 2. Restore Lost Tracks or Audacity Recordings from Exported Files
Note: This only works when you have exported those tracks or recordings by using File > Export commands.
When you lost Audacity tracks or recordings, you can directly find lost tracks or recordings from the exported files with the steps below:
Step 1. Locate the folder or storage devices where you saved your Audacity recordings.
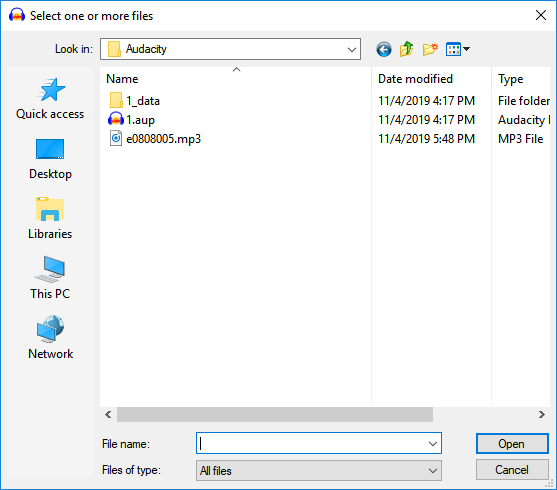
Step 2. On Audacity, click "File" > "Open".
Then select the lost or track or Audacity recordings from the drive where you've exported, and click "Open" to bring it into your Audacity.
If it works, congratulations! You've got your recordings back and you can continue editing the recording in Audacity again.
If you haven't exported the lost Audacity recordings in advance, go back to let EaseUS file recovery software help in Method 1.
Part 2. Find and Restore Unsaved Audacity Tracks
Applies to: Find and restore unsaved tracks in Audacity due to program crash, sudden shutdown, or other reasons.
And some of you may also want to know how to find or restore unsaved Audacity recordings if Audacity suddenly crashes, right? In this part, you'll find two ways to bring the unsaved audacity tracks back.
Read on and find the best way to restore your unsaved files:
Solution 1. Find Unsaved Tracks in Audacity Temporary Folder
Usually, Audacity would create a temporary folder on the same drive where you install Audacity to save the editing tracks. When you lost Audacity recordings without saving, you can refer to the next steps to find the temporary folder and restore the lost tracks:
Step 1. Find unsaved tracks from the Audacity temporary folder
1. Open Audacity, and press Ctrl + P
2. Open the Audacity Preference window, go to Directories, and copy the path of the temporary file directory:
- Windows 10/8: C:\Users\UserName\AppData\Local\Audacity\SessionData
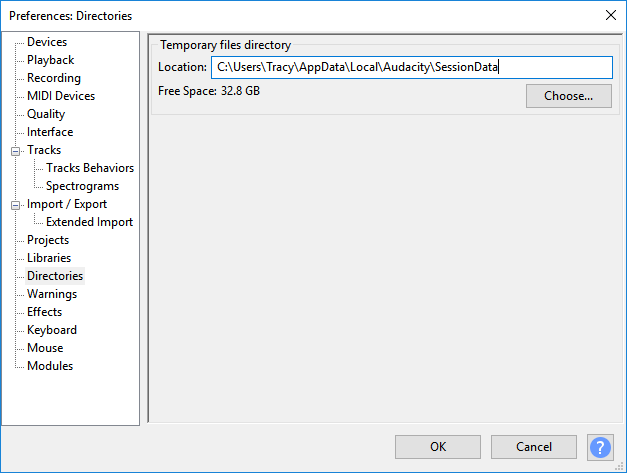
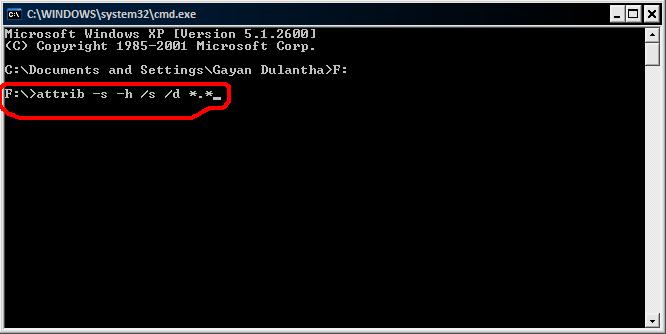
- Windows 7: C:\Users\UserName\AppData\Local\Temp\audacity_1_2_temp
- Windows XP: C:\Documents and Settings\Local Settings\Temp\audacity_1_2_temp
Step 2. Restore unsaved Audacity file
- 1. Open the Temporary folder and check left AU files in the folder with the .au extension.
- 2. Drag the AU file into Audacity or click "Open" under File on Audacity to bring the AU files into this program.
Step 3. Save the unsaved files into a safe location
You can play the unsaved AU file in Audacity to check if the files are wanted ones. If yes, export and save them into another safe location.
If you've set Audacity to remove temp data, the chance to restore your unsaved Audacity files may minimize then.
Solution 2. Automatic Crash Recovery: Recover Unsaved Recordings from AutoSave
Audacity contains an AutoSave feature that can fully help you out when you lose an unsaved record in Audacity. When you lost track in Audacity without saving, or the Audacity suddenly closes or crashes, you can automatically bring the lost recording back with the below steps:
Step 1. Quick Audacity first if the program is still running but the projects are missing.
Step 2. Re-open Audacity, an automatic crash recovery dialog will show up.
- Warning
- Don't discard the unsaved data for all projects on Audacity.
- If you confirm to discard the unsaved data for all projects after restarting this program, all the files won't be recoverable again.
Step 3. Select to recover the unsaved data for all projects, and load the recovered waveforms.
If there are multiple unsaved projects, each will recover into their own project window. And all you need to do is to save each project one by one. Note that the project history and text contents are unrecoverable.
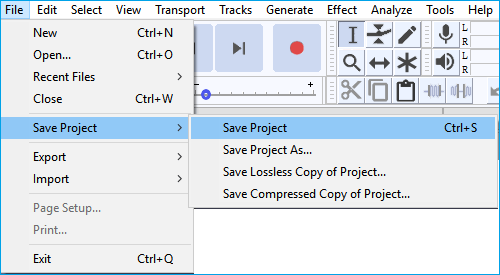
Step 4. Confirm to save all files: File > Save Project > Save Project.
- Tip
- If the recovered projects appear to be incorrect, try the tips provided by Audacity:
- 1. Open Help > Diagnostics > Show Log... and copy the errors shown, such as "missing data block files".
- 2. Force to quit Audacity in Task Manager to keep the autosave file and audio data safe, and search your computer or use a data recovery software like EaseUS Data Recovery Wizard recommended on this page to locate any files that were noted as missing.
- 3. Restore these files to the location shown for them in the log, and then you can re-open Audacity to recover the recordings correctly.
Part 3. Tips to Protect Audacity Recordings
Applies to: Save, protect Audacity recordings, tracks on Windows PC, preventing further Audacity file loss.
If you always use Audacity to edit recordings or create audio files, we'd like to offer 3 practical and useful tips to help you protect Audacity recordings. Let's see the details:
# 1. Manually Locate and Copy Saved Audacity Recordings
If you prefer a manual free way to copy saved audacity recordings as a backup, follow the guidelines below:
Step 1. Prepare a secure location on the PC or an empty external storage device, connecting to the PC.
Step 2. Locate saved Audacity files on PC:
For Windows Users:
C:\Users\your username\AppData\Local\Audacity\SessionData
For Mac Users:
/Users/your username/Library/Application Support/audacity/SessionData
Sometimes, Audacity also may save created projects under this path: C:\Users\UserName\Documents\Audacity.
Step 3. Select AUP files with .aup extension, copy and save them to the target storage location as a backup.
# 2. Use Automated Backup Software for Help
Applies to: automatically back up Audacity files as scheduled.
If you prefer to use an automated method, professional file backup software - EaseUS Todo Backup can help. It enables you to simply back up your files in only 3 steps:
Step 1. Click "Select backup contents" to initiate a backup.

Step 2. There are four data backup categories, File, Disk, OS, and Mail, click File.

Step 3. Local and network files will be displayed on the left side. You may extend the directory to choose which files to back up.

Step 4. Select the location where you want to store the backup by following the on-screen instructions.

Click "Options" to encrypt the backup with a password in "Backup Options," and to setup a backup schedule and choose to initiate a backup at a certain event in "Backup Scheme." There are a variety of other customization options available for the backup process.

Step 5. You may save the backup to a local disk, EaseUS' online service, or a NAS.

Step 6. EaseUS Todo Backup enables customers to back up data to a third-party cloud drive and its own cloud drive.
If you want to back up data to a third-party cloud drive, choose Local Drive, scroll down to add Cloud Device, add your account, and then log in.

You can also save backups to EaseUS's cloud storage service. Sign up for an EaseUS Account and log in after clicking EaseUS Cloud.

Step 7. To begin backup, click "Backup Now" Once the backup process has been finished, it will be shown as a card on the panel's left side. To further manage a backup job, right-click it.

# 3. Enable AutoSave Feature in Audacity
Applies to: automatically save editing files by enabling its AutoSave feature.
Note: This feature is no longer available in the latest version of Audacity on Windows 10/8.
If you are using Windows 7, XP, etc. on your computer, you may try this tip to enable the AutoSave feature and protect your Audacity recordings:
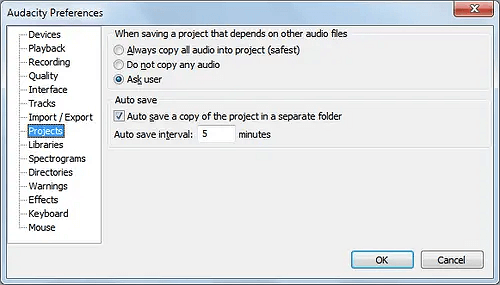
Step 1. Click "Edit" on Audacity > and select "Preferences".
Step 2. Scroll to the "Project" section, tick the box of Autosave as a copy of the project in a separate folder, and set the frequency in Autosave internal.
Step 3. Click "OK" to confirm and keep the changes.
Was this page helpful?
-
![]()
Written by
Tracy became a member of the EaseUS content team in 2013. Being a technical writer for over 10 years, she is enthusiastic about sharing tips to assist readers in resolving complex issues in disk management, file transfer, PC & Mac performance optimization, etc., like an expert.…

20+
Years of experience

160+
Countries and regions

72 Million+
Downloads

4.9 +
Trustpilot Score


